参考
phusion/passenger-docker: Docker base images for Ruby, Python, Node.js and Meteor web apps
全体の流れ
- 開発モードでコンテナ化する
- コンテナからDBに接続できるようにする ←今回の投稿
- 本番モードでコンテナ化する
今回やること
- 開発モード(development)でRailsアプリをコンテナ化する
- RailsアプリのコンテナからDBに接続できるようにする
次回以降にやること
- 本番モード(production)でRailsアプリをコンテナ化する
もくじ
- Railsアプリを作成
- Dockerfileの作成
- nginxコンフィグを作成
- DBマイグレーションを実行
- コンテナをビルド
- コンテナをローカルで起動
ソース一式
今回の投稿のために用意したソースは下記で公開しております。
qiita-rails-passenger-docker/2 at master · NaokiIshimura/qiita-rails-passenger-docker
ディレクトリ構成
今回の投稿のために用意した作業ディレクトリは以下の構成です。
| ディレクトリ | 内容 |
|---|---|
| / | Dockerfile |
| /nginx | nginxコンフィグ一式 |
| /rails-app | railsのソース一式 |

1. Railsアプリを作成
まずはコンテナ化するRailsアプリを用意します。
今回はアクセスした時に静的ページを表示するだけのアプリを用意しました。
DB接続に必要なパラメータは以下のように環境変数で指定しました。
default: &default
  adapter: postgresql
  encoding: unicode
  pool: <%= ENV.fetch("RAILS_MAX_THREADS") { 5 } %>

development:
  <<: *default
  database: <%= ENV['DB_DATABASE'] %>
  username: <%= ENV['DB_USER'] %>
  password: <%= ENV['DB_PASSWORD'] %>
  host:     <%= ENV['DB_HOST'] %>
  port:     5432
2. Dockerfileの作成
Dockerfileについてはphusion/passenger-dockerリポジトリのREADMEを参考にRuby2.5を利用する設定としました。
今回は環境変数RAILS_ENVにdevelopmentを指定してます。
今回は本番モード(production)で必要になる設定は省略してます。
##
# phusion/passenger-docker
# https://github.com/phusion/passenger-docker

##
# Getting started

# Ruby images
FROM phusion/passenger-ruby25:latest

# ...put your own build instructions here...

##
# Nginx

# Using Nginx and Passenger
RUN rm -f /etc/service/nginx/down

# Using Nginx and Passenger
RUN rm /etc/nginx/sites-enabled/default
ADD nginx/webapp.conf /etc/nginx/sites-enabled/webapp.conf

# Configuring Nginx
ADD nginx/secret_key.conf /etc/nginx/main.d/secret_key.conf
ADD nginx/gzip_max.conf /etc/nginx/conf.d/gzip_max.conf

##
# Rails application

# Set correct environment variables.
ENV RAILS_ENV development

# Your application should be placed inside /home/app.
COPY --chown=app:app rails-app /home/app/webapp

# bundlerのインストール
# 実行しなかった場合、Railsアプリにアクセスした時に以下のエラーが発生する
# cannot load such file -- bundler/dep_proxy (LoadError)
RUN gem install bundler

# tzdataのインストール
# 実行しなかった場合、Railsアプリにアクセスした時に以下のエラーが発生する
# tzinfo-data is not present.
# Please add gem 'tzinfo-data' to your Gemfile
# and run bundle install (TZInfo::DataSourceNotFound)
RUN apt-get update && apt-get install -y \
  tzdata

# タイムゾーンをJSTに設定
ENV TZ=Asia/Tokyo

# bundle install
WORKDIR /home/app/webapp
RUN bundle install

# Clean up APT when done.
RUN apt-get clean && rm -rf /var/lib/apt/lists/* /tmp/* /var/tmp/*

# Use baseimage-docker's init process.
CMD ["/sbin/my_init"]
3. nginxコンフィグを作成
Dockerfileと同様にphusion/passenger-dockerリポジトリのREADMEを参考にRuby2.5を利用する設定としました。
今回はパラメータpassenger_app_envにdevelopmentを指定してます。
今回は本番モード(production)で必要になる設定は省略してます。
server {
  listen 80;
  server_name www.webapp.com;
  root /home/app/webapp/public;

  # The following deploys your Ruby/Python/Node.js/Meteor app on Passenger.

  # Not familiar with Passenger, and used (G)Unicorn/Thin/Puma/pure Node before?
  # Yes, this is all you need to deploy on Passenger! All the reverse proxying,
  # socket setup, process management, etc are all taken care automatically for
  # you! Learn more at https://www.phusionpassenger.com/.
  passenger_enabled on;
  passenger_user app;

  # If this is a Ruby app, specify a Ruby version:
  passenger_ruby /usr/bin/ruby2.5;

  # Ensures that RAILS_ENV, NODE_ENV, etc are set to "staging"
  # when your application is started.
  passenger_app_env development;

}
DB接続に利用する環境変数をnginxのコンフィグにも記述しておきます。
env DB_HOST;
env DB_USER;
env DB_PASSWORD;
env DB_DATABASE;
gzip_comp_level 9;
4. DBマイグレーションを実行
$ cd rails-app

$ export DB_HOST=xxxxx \
  export DB_USER=xxxxx \
  export DB_PASSWORD=xxxxx \
  export DB_DATABASE=xxxxx

$ rake db:migrate

== 20180329092915 CreateUsers: migrating ======================================
-- create_table(:users)
   -> 0.0134s
== 20180329092915 CreateUsers: migrated (0.0136s) =============================
4. コンテナをビルド
$ docker build -t rails-image .

...
Successfully built 5f49d98a6c9d
Successfully tagged rails-image:latest
6. コンテナをローカルで起動
$ docker run \
  -p 3000:80 \
  -e DB_HOST=xxxxx \
  -e DB_USER=xxxxx \
  -e DB_PASSWORD=xxxxx \
  -e DB_DATABASE=xxxxx \
  rails-image
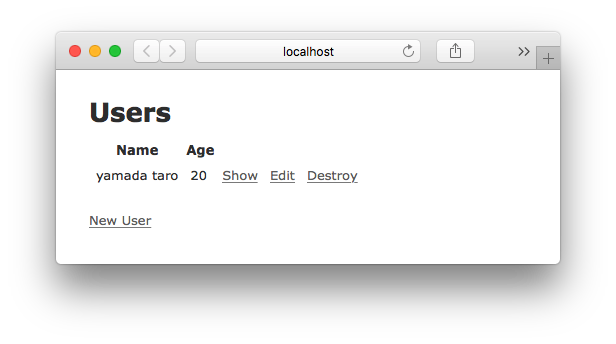
ブラウザでhttp://localhost:3000にアクセスしてRailsアプリが表示されることを確認
