【この記事は、iOSアプリを作成しようとしているandroidアプリエンジニアを想定しています】
特定のフレームワークで開発をしていると、そこでの考え方が期せずして定着してしまい、他のフレームワークで開発するときに妨げになることがあります。
私はもともとAndroidでアプリを開発しており、同じアプリのiOS版を作ろうとして "Xcode" という魔に足を踏み込みました。
iOSアプリを作ろうとして困ったことは多々ありますが、中でもUIScrollViewの挙動が最も理解不可能でした。
そんな理解の甘さが災いして、UIScrollViewの仕様を変更しなければならないことがあり、一念発起して勉強した結果、完全に理解した←のでまとめてみたいと思います。
手短に実装を知りたい人は3.から読み始めてください
#1. Androidの場合
まず、androidのScrollViewをおさらいしておきましょう。
androidではScrollViewタグの中に、適当なLayout(ConstraintLayoutなりLinearLayoutなり)を入れて、その中にスクロールさせたいものを入れるだけです。
例↓
<?xml version="1.0" encoding="utf-8"?>

<ScrollView
    xmlns:app="http://schemas.android.com/apk/res-auto"
    xmlns:tools="http://schemas.android.com/tools"
    xmlns:android="http://schemas.android.com/apk/res/android"
    android:layout_width="match_parent"
    android:layout_height="match_parent"
    tools:layout_editor_absoluteX="1dp"
    tools:layout_editor_absoluteY="1dp">


    <androidx.constraintlayout.widget.ConstraintLayout
        android:layout_width="match_parent"
        android:layout_height="wrap_content"
        tools:context=".MainActivity">


        <TextView
            android:id="@+id/textView1"
            android:layout_width="wrap_content"
            android:layout_height="wrap_content"
            android:layout_marginTop="200dp"
            android:text="Hello World!"
            app:layout_constraintLeft_toLeftOf="parent"
            app:layout_constraintRight_toRightOf="parent"
            app:layout_constraintTop_toTopOf="parent" />

        <TextView
            android:layout_width="wrap_content"
            android:layout_height="wrap_content"
            android:layout_marginTop="500dp"
            android:layout_marginBottom="200dp"
            android:text="Hello World2!"
            app:layout_constraintBottom_toBottomOf="parent"
            app:layout_constraintLeft_toLeftOf="parent"
            app:layout_constraintRight_toRightOf="parent"
            app:layout_constraintTop_toBottomOf="@+id/textView1" />


    </androidx.constraintlayout.widget.ConstraintLayout>

</ScrollView>
簡単にできました。
androidさんがやんべえに(いい具合)にやってくれます。
なぜここを強調したのか、勘の鋭い人にはお分かりでしょう。
そうです。東北弁だからですiOSはやんべえにやってくれないのです。
#2. androidとiOSの違い
androidだろうがiOSだろうが、Scrollしようとすると2種類のサイズを考える必要があります。
① ScrollViewのサイズ。上の例では、android:layout_width="match_parent" android:layout_height="match_parent"で指定しています。
② ScrollViewの内側のViewのサイズです。上の例ではConstraintLayoutのサイズのことで、androidではConstraintLayoutのサイズが決まることで、どの領域をScrollすべきかを自動で決めてくらています(正確な表現ではないかもしれません)。
androidさんありがたや、ありがたや。
一方のiOSでは、UIScrollViewの内側のViewサイズと、Scrollしたい領域のサイズを手動で同じにする必要があります。
これだけだと頭に?が浮かびますよね。大丈夫です、一番下まで読めばとりあえず動くようになるはずです。
ここまで読んですんなりわかった人はUIScrollViewを完全に理解しています。ぜひ一番下まで読んでコメントください。
#3. 実際の実装
どういうことか詳しく見ていきましょう。
UIScrollViewをView上にドラッグ&ドロップします。"Scroll View"を展開すると、"Content Layout Guide"と"Frame Layout Guide"の二つあることがわかります。
このFrame Layout Guideというのが、UIScrollViewのサイズで、Content Layout GuideというのがScroll領域のサイズです。
UIScrollViewを全画面に広げた後(これはわかりやすさのためにやっています。必須ではないです)、ViewをUIScrollView上にドラッグ&ドロップします。labelもドラッグ&ドロップし、labelに適当に制約をつけて、ひとまずビルドしてみましょう。
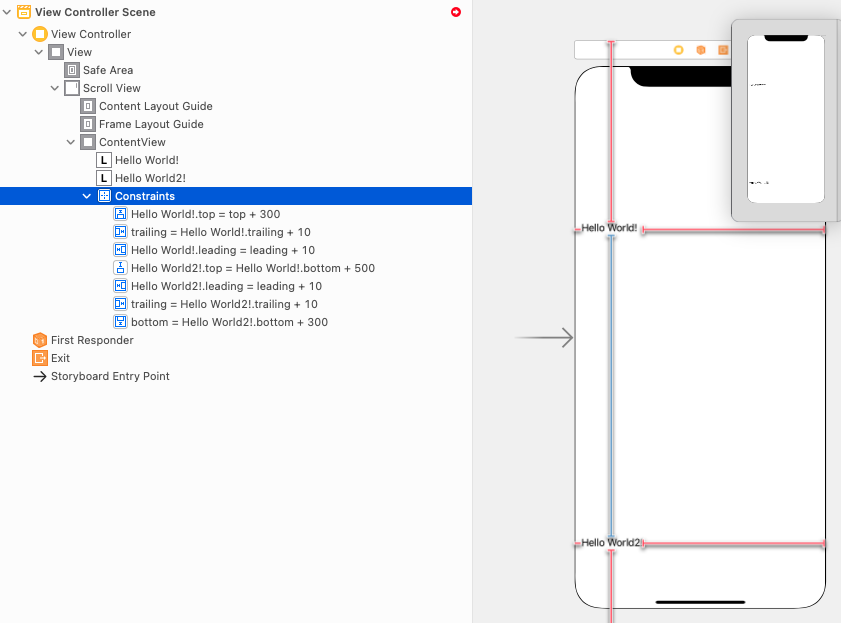
↓labelの制約はこんな感じで付けてみました。ある程度上下幅がないとそもそもスクロールしないので、top + 300とか、bottom + 500とか現実離れした数字になっています。

なお、この状態ではScrollViewとView(ContentViewという名前にしています)に制約を付けてないので、Scrollできないのは当たり前です。
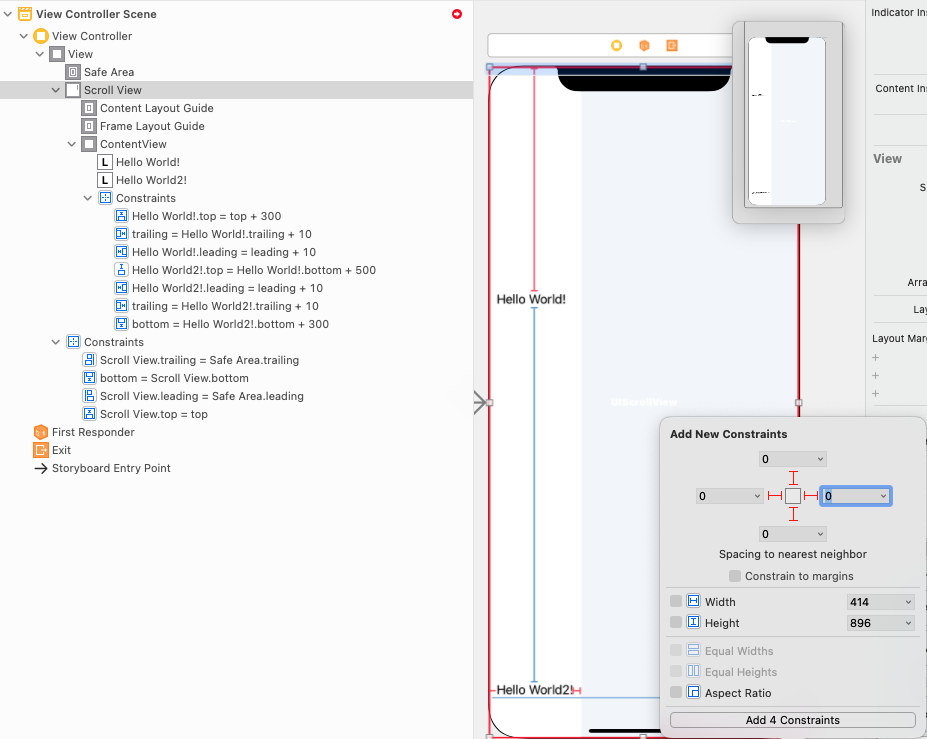
次にScrollViewに適当な制約をつけます。ここでは下のように全て0で制約を付けました。
それではラスボスView(ContentView)に制約をつけていきます。
ポイントは、下のようにScroll Viewに対して制約を付けることです。これによってContent Layout GuideとView(ContentView)のサイズが一致します。※今回は縦方向にスクロールするので、左端と右端の制約はどちらでも良いです。
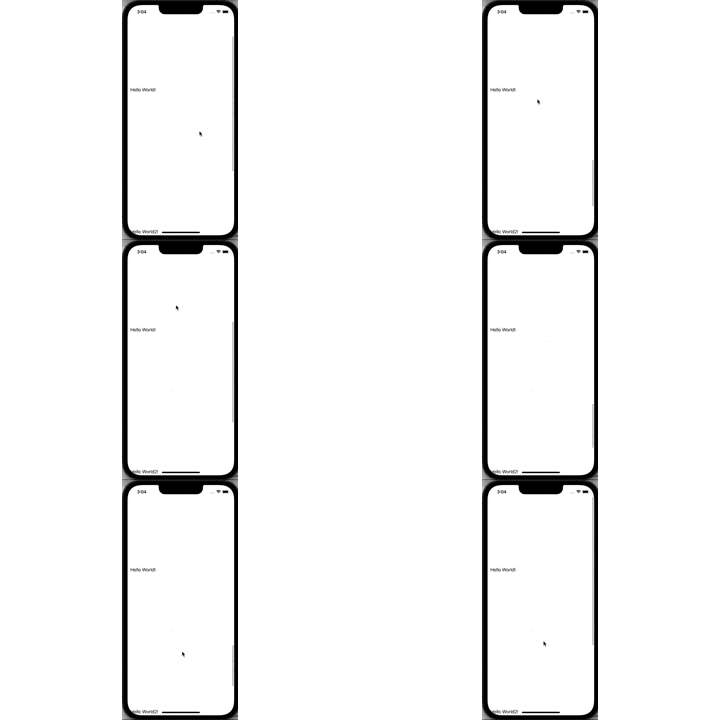
そうするとできました!!
ちなみにFrame Layout Guideに対して制約をつけると下のようになります。スクロール領域の外側に対して制約を付けてしまったので、スクロールできません。

参考記事
UILabelやUITextViewを自動スクロールしたい
【徹底解説】UIScrollViewクラス その1
大変お世話になりました。
間違いなどへのコメント頂けますと大変ありがたいです!


