はじめに
「ブラウザでURLを入力してEnterを押すと、なぜページが表示されるんだろう?」
普段何気なく使っているWebサイトやアプリ。その裏側では、HTTP(HyperText Transfer Protocol)という仕組みが動いています。HTTPは、インターネット上でデータをやり取りするための「共通言語」のようなものです。
この記事では、HTTP通信の基礎から実践的な知識まで、できるだけわかりやすく解説していきます。初めての方でも安心して読み進められるよう、丁寧に説明していきますね。
HTTP通信とは何か
HTTP(HyperText Transfer Protocol)は、Webブラウザとサーバーの間でデータをやり取りするためのルールです。
Webの基本的な仕組み
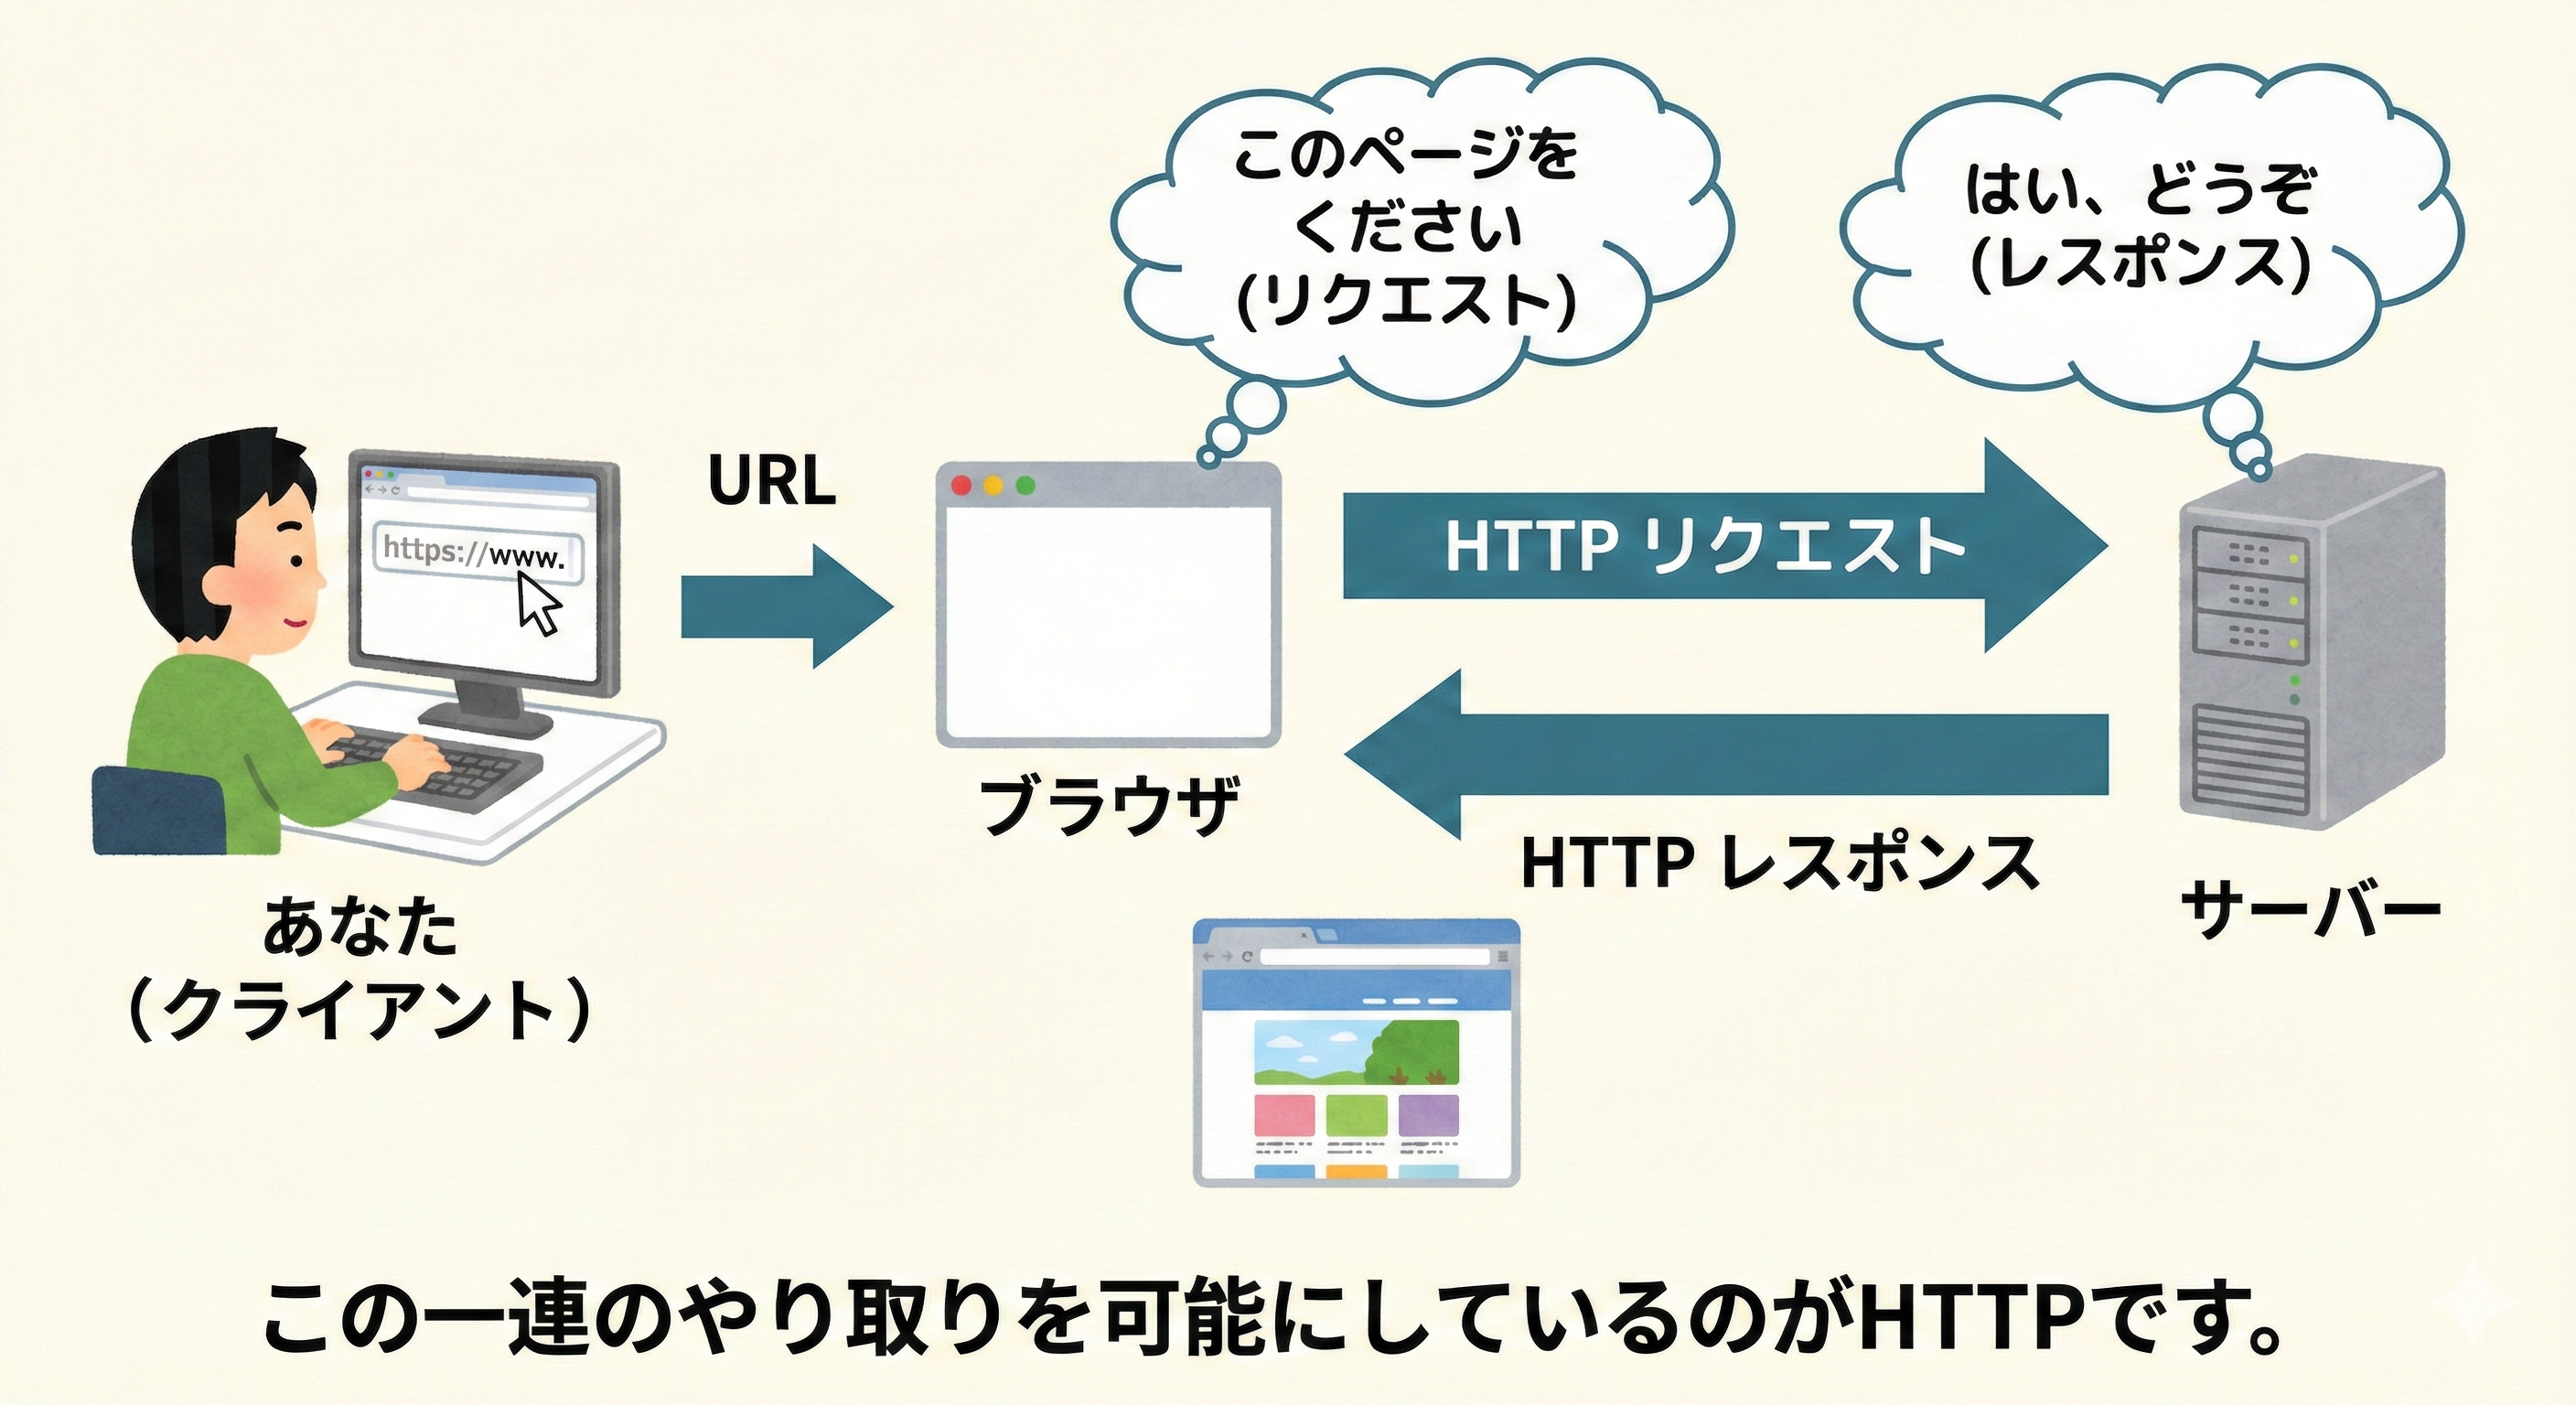
Webサイトを見るとき、実は以下のようなやり取りが行われています:
- **あなた(クライアント)**がブラウザでURLを入力
- ブラウザがサーバーに「このページをください」とリクエスト
- サーバーが「はい、どうぞ」とレスポンスを返す
- ブラウザが受け取ったデータを画面に表示
この一連のやり取りを可能にしているのがHTTPです。
HTTPの特徴
HTTPには、いくつかの重要な特徴があります:
1. ステートレス(状態を持たない)
HTTPは、一度のリクエストとレスポンスが完了すると、その情報を覚えていません。
// 1回目のリクエスト
fetch('https://api.example.com/login', {
  method: 'POST',
  body: JSON.stringify({ username: 'user', password: 'pass' })
});

// 2回目のリクエスト
// サーバーは1回目のログイン情報を覚えていない!
fetch('https://api.example.com/profile');
このため、ログイン状態などを保持するには、Cookie や Token といった仕組みが必要になります。
2. テキストベースのプロトコル
HTTPのメッセージは、人間が読める形式で書かれています:
GET /api/users HTTP/1.1
Host: example.com
User-Agent: Mozilla/5.0
Accept: application/json
これにより、デバッグやトラブルシューティングがしやすくなっています。
3. リクエスト・レスポンス型
必ずクライアントからリクエストがあって、サーバーがレスポンスを返す、という流れです。サーバーから勝手に情報を送ってくることはありません(WebSocketなどの別の技術を使えば可能ですが)。
HTTPリクエストの構造
HTTPリクエストは、以下の3つの部分から構成されています。
1. リクエストライン
リクエストの最も基本的な情報です:
GET /api/users/123 HTTP/1.1
これは以下の3つの要素で構成されています:
-
HTTPメソッド:
GET(何をしたいか) -
パス:
/api/users/123(どこにアクセスするか) -
HTTPバージョン:
HTTP/1.1(どのバージョンを使うか)
2. ヘッダー
リクエストに関する追加情報です:
Host: api.example.com
User-Agent: Mozilla/5.0 (Macintosh; Intel Mac OS X 10_15_7)
Accept: application/json
Content-Type: application/json
Authorization: Bearer eyJhbGciOiJIUzI1NiIsInR5cCI6IkpXVCJ9...
Cookie: session_id=abc123
よく使われるヘッダー:
| ヘッダー名 | 説明 | 例 |
|---|---|---|
Host |
アクセス先のホスト名 | api.example.com |
User-Agent |
クライアントの情報 | Mozilla/5.0... |
Accept |
受け入れ可能なデータ形式 | application/json |
Content-Type |
送信するデータの形式 | application/json |
Authorization |
認証情報 | Bearer token... |
Cookie |
クッキー情報 | session_id=abc123 |
3. ボディ
実際に送信するデータです(POSTやPUTなどで使用):
POST /api/users HTTP/1.1
Host: api.example.com
Content-Type: application/json

{
  "name": "山田太郎",
  "email": "yamada@example.com",
  "age": 25
}
GETリクエストの場合、通常ボディは空です。
実際のリクエスト例
JavaScriptでHTTPリクエストを送る例を見てみましょう:
// Fetch APIを使ったGETリクエスト
fetch('https://api.example.com/users/123', {
  method: 'GET',
  headers: {
    'Accept': 'application/json',
    'Authorization': 'Bearer your-token-here'
  }
})
  .then(response => response.json())
  .then(data => console.log(data))
  .catch(error => console.error('エラー:', error));

// POSTリクエストの例
fetch('https://api.example.com/users', {
  method: 'POST',
  headers: {
    'Content-Type': 'application/json',
    'Authorization': 'Bearer your-token-here'
  },
  body: JSON.stringify({
    name: '山田太郎',
    email: 'yamada@example.com'
  })
})
  .then(response => response.json())
  .then(data => console.log('作成されたユーザー:', data))
  .catch(error => console.error('エラー:', error));
HTTPレスポンスの構造
サーバーからのレスポンスも、リクエストと似た構造を持っています。
1. ステータスライン
リクエストの結果を示す情報です:
HTTP/1.1 200 OK
-
HTTPバージョン:
HTTP/1.1 -
ステータスコード:
200(結果の種類) -
ステータステキスト:
OK(結果の説明)
2. レスポンスヘッダー
レスポンスに関する追加情報です:
Content-Type: application/json; charset=utf-8
Content-Length: 1234
Cache-Control: no-cache
Set-Cookie: session_id=xyz789; HttpOnly; Secure
Access-Control-Allow-Origin: *
よく使われるレスポンスヘッダー:
| ヘッダー名 | 説明 | 例 |
|---|---|---|
Content-Type |
データの形式 | application/json |
Content-Length |
データのサイズ(バイト) | 1234 |
Cache-Control |
キャッシュの制御 | no-cache |
Set-Cookie |
クッキーの設定 | session_id=xyz789 |
Access-Control-Allow-Origin |
CORS設定 | * |
3. レスポンスボディ
実際に返されるデータです:
HTTP/1.1 200 OK
Content-Type: application/json

{
  "id": 123,
  "name": "山田太郎",
  "email": "yamada@example.com",
  "createdAt": "2024-01-15T10:30:00Z"
}
レスポンスの処理例
fetch('https://api.example.com/users/123')
  .then(response => {
    // ステータスコードを確認
    console.log('ステータス:', response.status); // 200
    console.log('OK?:', response.ok); // true (200-299の場合)

    // ヘッダーを取得
    console.log('Content-Type:', response.headers.get('Content-Type'));

    // ボディをJSONとしてパース
    return response.json();
  })
  .then(data => {
    console.log('ユーザー情報:', data);
  })
  .catch(error => {
    console.error('エラーが発生しました:', error);
  });
HTTPメソッド
HTTPメソッドは、「何をしたいか」を表します。よく使われるメソッドを見ていきましょう。
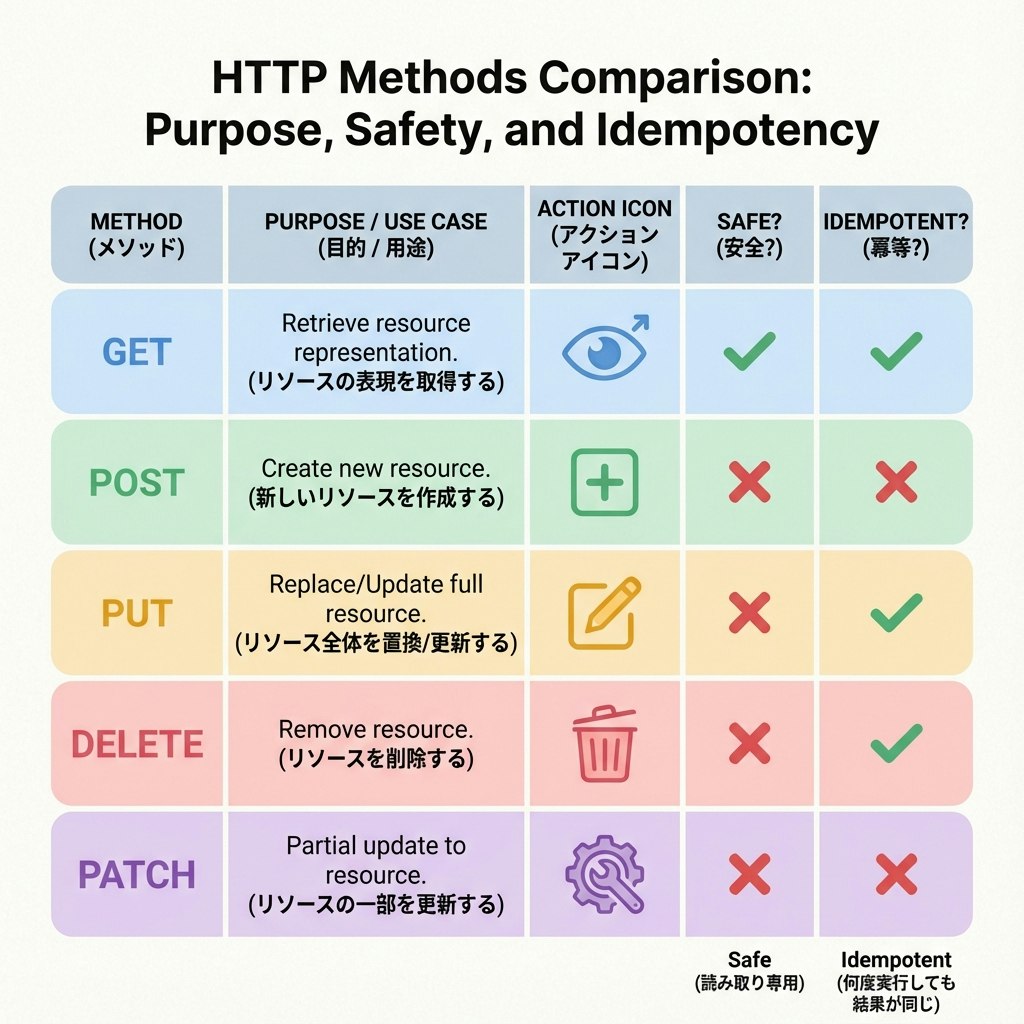
GET - データの取得
用途: サーバーからデータを取得する
特徴:
- ボディを持たない
- 安全(データを変更しない)
- 冪等性がある(何度実行しても同じ結果)
- ブラウザでキャッシュされる
// ユーザー一覧を取得
fetch('https://api.example.com/users')
  .then(response => response.json())
  .then(users => console.log(users));

// 特定のユーザーを取得
fetch('https://api.example.com/users/123')
  .then(response => response.json())
  .then(user => console.log(user));

// クエリパラメータ付き
fetch('https://api.example.com/users?page=1&limit=10')
  .then(response => response.json())
  .then(data => console.log(data));
POST - データの作成
用途: 新しいデータを作成する
特徴:
- ボディにデータを含む
- 安全ではない(データを変更する)
- 冪等性がない(実行するたびに新しいデータが作られる)
// 新しいユーザーを作成
fetch('https://api.example.com/users', {
  method: 'POST',
  headers: {
    'Content-Type': 'application/json'
  },
  body: JSON.stringify({
    name: '佐藤花子',
    email: 'sato@example.com'
  })
})
  .then(response => response.json())
  .then(newUser => {
    console.log('作成されたユーザー:', newUser);
    // { id: 124, name: '佐藤花子', email: 'sato@example.com' }
  });
PUT - データの更新(完全置換)
用途: 既存のデータを完全に置き換える
特徴:
- ボディに完全なデータを含む
- 冪等性がある(何度実行しても同じ結果)
// ユーザー情報を完全に更新
fetch('https://api.example.com/users/123', {
  method: 'PUT',
  headers: {
    'Content-Type': 'application/json'
  },
  body: JSON.stringify({
    name: '山田太郎(更新)',
    email: 'yamada-new@example.com',
    age: 26,
    address: '東京都渋谷区'
  })
})
  .then(response => response.json())
  .then(updatedUser => console.log(updatedUser));
PATCH - データの部分更新
用途: 既存のデータの一部だけを更新する
特徴:
- ボディに変更したい部分だけを含む
- PUTより効率的
// メールアドレスだけを更新
fetch('https://api.example.com/users/123', {
  method: 'PATCH',
  headers: {
    'Content-Type': 'application/json'
  },
  body: JSON.stringify({
    email: 'yamada-updated@example.com'
  })
})
  .then(response => response.json())
  .then(updatedUser => console.log(updatedUser));
DELETE - データの削除
用途: データを削除する
特徴:
- 通常ボディは持たない
- 冪等性がある(何度実行しても結果は同じ)
// ユーザーを削除
fetch('https://api.example.com/users/123', {
  method: 'DELETE'
})
  .then(response => {
    if (response.ok) {
      console.log('ユーザーが削除されました');
    }
  });
メソッドの使い分け
実際のアプリケーションでの使用例:
// ブログ記事のCRUD操作

// Create(作成)- POST
async function createPost(title, content) {
  const response = await fetch('/api/posts', {
    method: 'POST',
    headers: { 'Content-Type': 'application/json' },
    body: JSON.stringify({ title, content })
  });
  return response.json();
}

// Read(読み取り)- GET
async function getPost(id) {
  const response = await fetch(`/api/posts/${id}`);
  return response.json();
}

// Update(更新)- PUT or PATCH
async function updatePost(id, updates) {
  const response = await fetch(`/api/posts/${id}`, {
    method: 'PATCH',
    headers: { 'Content-Type': 'application/json' },
    body: JSON.stringify(updates)
  });
  return response.json();
}

// Delete(削除)- DELETE
async function deletePost(id) {
  const response = await fetch(`/api/posts/${id}`, {
    method: 'DELETE'
  });
  return response.ok;
}
HTTPステータスコード
ステータスコードは、リクエストの結果を3桁の数字で表します。

1xx - 情報レスポンス
リクエストを受信し、処理を継続していることを示します。
| コード | 意味 | 説明 |
|---|---|---|
| 100 | Continue | クライアントはリクエストを継続すべき |
| 101 | Switching Protocols | プロトコルを切り替えている |
実際にはあまり見かけません。
2xx - 成功
リクエストが正常に処理されたことを示します。
| コード | 意味 | 説明 | 使用例 |
|---|---|---|---|
| 200 | OK | リクエスト成功 | GET、PUT、PATCHの成功 |
| 201 | Created | 新しいリソースが作成された | POSTでの作成成功 |
| 204 | No Content | 成功したがレスポンスボディがない | DELETEの成功 |
// 200 OK の例
fetch('/api/users/123')
  .then(response => {
    if (response.status === 200) {
      return response.json();
    }
  });

// 201 Created の例
fetch('/api/users', {
  method: 'POST',
  body: JSON.stringify({ name: 'テスト' })
})
  .then(response => {
    if (response.status === 201) {
      console.log('ユーザーが作成されました');
      return response.json();
    }
  });

// 204 No Content の例
fetch('/api/users/123', {
  method: 'DELETE'
})
  .then(response => {
    if (response.status === 204) {
      console.log('削除されました(レスポンスボディなし)');
    }
  });
3xx - リダイレクト
リクエストを完了するために、追加の操作が必要なことを示します。
| コード | 意味 | 説明 |
|---|---|---|
| 301 | Moved Permanently | リソースが恒久的に移動した |
| 302 | Found | リソースが一時的に移動した |
| 304 | Not Modified | キャッシュが有効(変更なし) |
// リダイレクトは通常ブラウザが自動的に処理します
fetch('/old-page')
  .then(response => {
    // 301や302の場合、自動的に新しいURLにリダイレクトされる
    console.log('最終的なURL:', response.url);
  });
4xx - クライアントエラー
クライアント側に問題があることを示します。
| コード | 意味 | 説明 | 対処法 |
|---|---|---|---|
| 400 | Bad Request | リクエストが不正 | リクエストの形式を確認 |
| 401 | Unauthorized | 認証が必要 | ログインまたはトークンを確認 |
| 403 | Forbidden | アクセス権限がない | 権限を確認 |
| 404 | Not Found | リソースが見つからない | URLを確認 |
| 422 | Unprocessable Entity | バリデーションエラー | 入力値を確認 |
| 429 | Too Many Requests | リクエストが多すぎる | レート制限を確認 |
// エラーハンドリングの例
async function fetchUser(id) {
  try {
    const response = await fetch(`/api/users/${id}`);

    if (response.status === 404) {
      throw new Error('ユーザーが見つかりません');
    }

    if (response.status === 401) {
      // 認証エラー - ログイン画面にリダイレクト
      window.location.href = '/login';
      return;
    }

    if (response.status === 403) {
      throw new Error('このユーザーにアクセスする権限がありません');
    }

    if (!response.ok) {
      throw new Error(`HTTPエラー: ${response.status}`);
    }

    return await response.json();

  } catch (error) {
    console.error('エラーが発生しました:', error.message);
    // ユーザーにエラーメッセージを表示
    showErrorMessage(error.message);
  }
}
5xx - サーバーエラー
サーバー側に問題があることを示します。
| コード | 意味 | 説明 |
|---|---|---|
| 500 | Internal Server Error | サーバー内部エラー |
| 502 | Bad Gateway | ゲートウェイエラー |
| 503 | Service Unavailable | サービス利用不可 |
| 504 | Gateway Timeout | ゲートウェイタイムアウト |
// サーバーエラーのハンドリング
async function fetchWithRetry(url, options = {}, maxRetries = 3) {
  for (let i = 0; i < maxRetries; i++) {
    try {
      const response = await fetch(url, options);

      // 5xxエラーの場合はリトライ
      if (response.status >= 500) {
        if (i === maxRetries - 1) {
          throw new Error('サーバーエラーが継続しています');
        }
        // 少し待ってからリトライ
        await new Promise(resolve => setTimeout(resolve, 1000 * (i + 1)));
        continue;
      }

      return response;

    } catch (error) {
      if (i === maxRetries - 1) {
        throw error;
      }
      await new Promise(resolve => setTimeout(resolve, 1000 * (i + 1)));
    }
  }
}
ステータスコードの実践的な使い方
// 包括的なエラーハンドリング
async function apiRequest(url, options = {}) {
  try {
    const response = await fetch(url, options);

    // ステータスコードに応じた処理
    switch (true) {
      case response.status >= 200 && response.status < 300:
        // 成功
        return await response.json();

      case response.status === 400:
        // バリデーションエラー
        const errors = await response.json();
        throw new ValidationError('入力内容を確認してください', errors);

      case response.status === 401:
        // 認証エラー
        localStorage.removeItem('token');
        window.location.href = '/login';
        throw new Error('認証が必要です');

      case response.status === 403:
        // 権限エラー
        throw new Error('アクセス権限がありません');

      case response.status === 404:
        // リソースが見つからない
        throw new Error('リソースが見つかりません');

      case response.status === 429:
        // レート制限
        throw new Error('リクエストが多すぎます。しばらく待ってから再試行してください');

      case response.status >= 500:
        // サーバーエラー
        throw new Error('サーバーエラーが発生しました。しばらく待ってから再試行してください');

      default:
        throw new Error(`予期しないエラー: ${response.status}`);
    }

  } catch (error) {
    console.error('APIリクエストエラー:', error);
    throw error;
  }
}

// カスタムエラークラス
class ValidationError extends Error {
  constructor(message, errors) {
    super(message);
    this.name = 'ValidationError';
    this.errors = errors;
  }
}
HTTPとHTTPS
HTTPSは、HTTPにセキュリティ層を追加したものです。
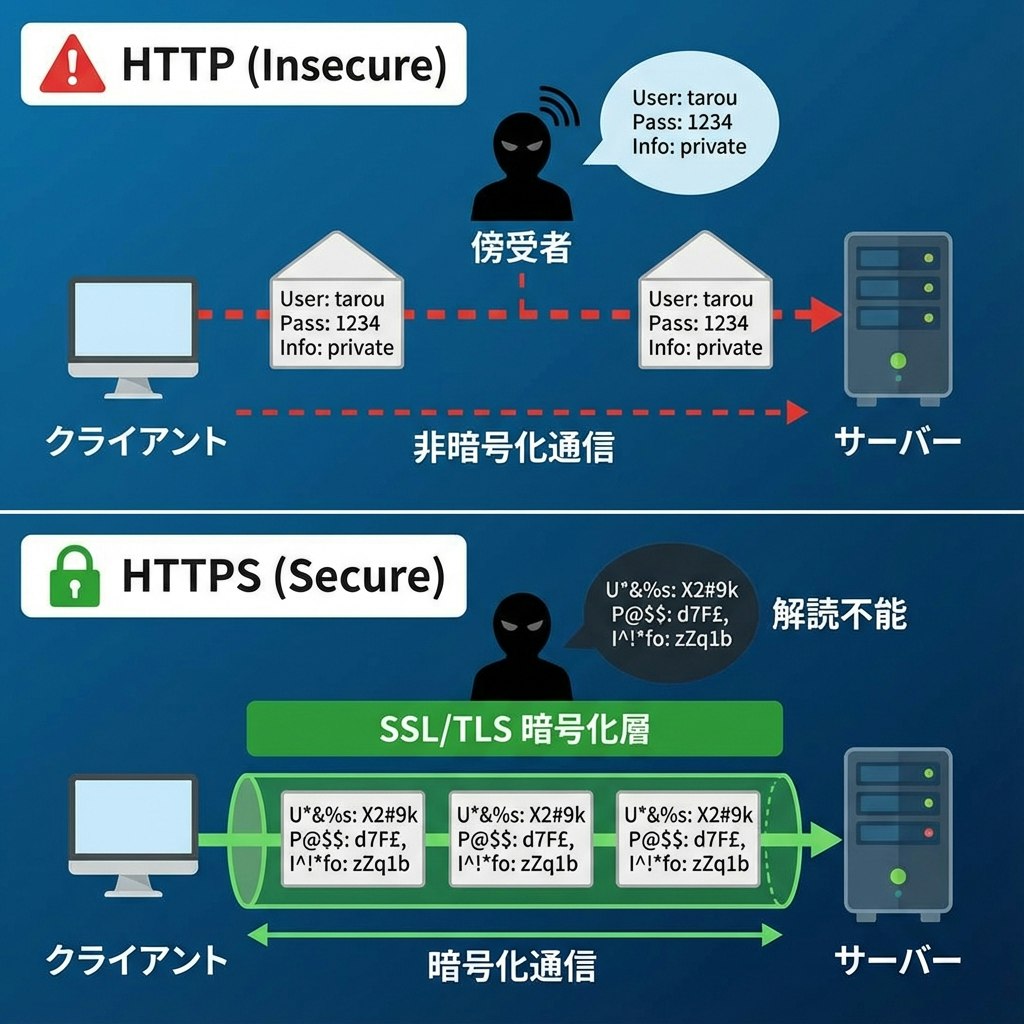
HTTPの問題点
通常のHTTPでは、データが暗号化されずに送信されます:
クライアント → [ユーザー名: admin, パスワード: password123] → サーバー
                        ↑
                  誰でも読める!
これは以下のような問題があります:
盗聴のリスク
- パスワードやクレジットカード情報が盗まれる可能性
- 個人情報の漏洩
改ざんのリスク
- 通信内容を書き換えられる可能性
- マルウェアを注入される危険性
なりすましのリスク
- 偽のサーバーに接続させられる可能性
HTTPSの仕組み
HTTPSは、SSL/TLSという技術を使ってデータを暗号化します:
クライアント → [暗号化されたデータ] → サーバー
                     ↑
              読めない!
HTTPSの3つの保護
- 暗号化: データを読めない形に変換
- 完全性: データが改ざんされていないことを保証
- 認証: 接続先が本物のサーバーであることを確認
HTTPSの実装
現代のWebアプリケーションでは、HTTPSは必須です:
// HTTPSを使用(推奨)
fetch('https://api.example.com/users')
  .then(response => response.json());

// HTTPは避けるべき
// fetch('http://api.example.com/users')
開発時の注意点
// 本番環境ではHTTPSを強制
if (location.protocol !== 'https:' && process.env.NODE_ENV === 'production') {
  location.replace(`https:${location.href.substring(location.protocol.length)}`);
}

// Mixed Content(HTTPSページ内でHTTPリソースを読み込む)を避ける
// ❌ 悪い例
<script src="http://example.com/script.js"></script>

// ✅ 良い例
<script src="https://example.com/script.js"></script>
// または
<script src="//example.com/script.js"></script> // プロトコル相対URL
CORS(Cross-Origin Resource Sharing)
異なるドメイン間でのHTTP通信には、CORSという仕組みが関わってきます。
同一オリジンポリシー
ブラウザは、セキュリティのために「同一オリジンポリシー」というルールを持っています:
// 現在のページ: https://example.com

// ✅ OK: 同じオリジン
fetch('https://example.com/api/users')

// ❌ NG: 異なるオリジン(ドメインが違う)
fetch('https://api.other-site.com/users')

// ❌ NG: 異なるオリジン(ポートが違う)
fetch('https://example.com:8080/api/users')

// ❌ NG: 異なるオリジン(プロトコルが違う)
fetch('http://example.com/api/users')
CORSの仕組み
異なるオリジンにアクセスするには、サーバー側でCORSを許可する必要があります:
// サーバー側(Node.js/Express)
app.use((req, res, next) => {
  // どのオリジンからのアクセスを許可するか
  res.header('Access-Control-Allow-Origin', 'https://example.com');

  // どのHTTPメソッドを許可するか
  res.header('Access-Control-Allow-Methods', 'GET, POST, PUT, DELETE');

  // どのヘッダーを許可するか
  res.header('Access-Control-Allow-Headers', 'Content-Type, Authorization');

  // 認証情報(Cookie)を含むリクエストを許可するか
  res.header('Access-Control-Allow-Credentials', 'true');

  next();
});
プリフライトリクエスト
特定の条件下では、ブラウザが本番のリクエストの前に「プリフライトリクエスト」を送信します:
// このようなリクエストを送ると...
fetch('https://api.example.com/users', {
  method: 'POST',
  headers: {
    'Content-Type': 'application/json',
    'Authorization': 'Bearer token'
  },
  body: JSON.stringify({ name: 'テスト' })
});

// ブラウザは先にOPTIONSリクエストを送る(プリフライト)
// OPTIONS /users HTTP/1.1
// Origin: https://your-site.com
// Access-Control-Request-Method: POST
// Access-Control-Request-Headers: Content-Type, Authorization

// サーバーが許可を返すと、本番のPOSTリクエストが送られる
CORS問題の解決方法
開発中によく遭遇するCORS問題の解決方法:
1. サーバー側でCORSを設定
// Express.jsの場合
const cors = require('cors');

// すべてのオリジンを許可(開発時のみ)
app.use(cors());

// 特定のオリジンのみ許可(本番環境推奨)
app.use(cors({
  origin: 'https://your-frontend.com',
  credentials: true
}));
2. プロキシを使用
// Viteの場合(vite.config.js)
export default {
  server: {
    proxy: {
      '/api': {
        target: 'https://api.example.com',
        changeOrigin: true,
        rewrite: (path) => path.replace(/^\/api/, '')
      }
    }
  }
}

// これで以下のようにアクセスできる
fetch('/api/users') // 実際は https://api.example.com/users にアクセス
3. JSONPを使用(古い方法、非推奨)
現代では使われませんが、参考までに:
// JSONPは<script>タグを使うため、CORSの制限を受けない
function handleResponse(data) {
  console.log(data);
}

const script = document.createElement('script');
script.src = 'https://api.example.com/users?callback=handleResponse';
document.body.appendChild(script);
HTTP通信の実践例
実際のアプリケーションで使える、実践的なHTTP通信のパターンを紹介します。
1. 認証付きAPI通信
// トークンベース認証のラッパー関数
class ApiClient {
  constructor(baseURL) {
    this.baseURL = baseURL;
    this.token = localStorage.getItem('authToken');
  }

  // 共通のヘッダーを設定
  getHeaders() {
    const headers = {
      'Content-Type': 'application/json'
    };

    if (this.token) {
      headers['Authorization'] = `Bearer ${this.token}`;
    }

    return headers;
  }

  // GETリクエスト
  async get(endpoint) {
    const response = await fetch(`${this.baseURL}${endpoint}`, {
      method: 'GET',
      headers: this.getHeaders()
    });

    return this.handleResponse(response);
  }

  // POSTリクエスト
  async post(endpoint, data) {
    const response = await fetch(`${this.baseURL}${endpoint}`, {
      method: 'POST',
      headers: this.getHeaders(),
      body: JSON.stringify(data)
    });

    return this.handleResponse(response);
  }

  // PUTリクエスト
  async put(endpoint, data) {
    const response = await fetch(`${this.baseURL}${endpoint}`, {
      method: 'PUT',
      headers: this.getHeaders(),
      body: JSON.stringify(data)
    });

    return this.handleResponse(response);
  }

  // DELETEリクエスト
  async delete(endpoint) {
    const response = await fetch(`${this.baseURL}${endpoint}`, {
      method: 'DELETE',
      headers: this.getHeaders()
    });

    return this.handleResponse(response);
  }

  // レスポンス処理
  async handleResponse(response) {
    if (response.status === 401) {
      // トークンが無効な場合、ログアウト
      this.logout();
      throw new Error('認証が必要です');
    }

    if (!response.ok) {
      const error = await response.json();
      throw new Error(error.message || 'リクエストに失敗しました');
    }

    // 204 No Contentの場合はnullを返す
    if (response.status === 204) {
      return null;
    }

    return response.json();
  }

  // ログイン
  async login(email, password) {
    const data = await this.post('/auth/login', { email, password });
    this.token = data.token;
    localStorage.setItem('authToken', data.token);
    return data;
  }

  // ログアウト
  logout() {
    this.token = null;
    localStorage.removeItem('authToken');
    window.location.href = '/login';
  }
}

// 使用例
const api = new ApiClient('https://api.example.com');

// ログイン
await api.login('user@example.com', 'password');

// ユーザー情報を取得
const users = await api.get('/users');

// 新しいユーザーを作成
const newUser = await api.post('/users', {
  name: '山田太郎',
  email: 'yamada@example.com'
});
2. ページネーション
// ページネーション付きデータ取得
async function fetchPaginatedData(page = 1, limit = 10) {
  const response = await fetch(
    `https://api.example.com/users?page=${page}&limit=${limit}`
  );

  const data = await response.json();

  return {
    items: data.users,
    currentPage: data.page,
    totalPages: data.totalPages,
    totalItems: data.total,
    hasNextPage: data.page < data.totalPages,
    hasPrevPage: data.page > 1
  };
}

// 使用例
const page1 = await fetchPaginatedData(1, 20);
console.log(`${page1.totalItems}件中 ${page1.items.length}件を表示`);

if (page1.hasNextPage) {
  const page2 = await fetchPaginatedData(2, 20);
  console.log('次のページ:', page2.items);
}
3. ファイルアップロード
// ファイルアップロード
async function uploadFile(file, onProgress) {
  const formData = new FormData();
  formData.append('file', file);
  formData.append('description', 'ユーザーがアップロードしたファイル');

  // XMLHttpRequestを使用(進捗を追跡できる)
  return new Promise((resolve, reject) => {
    const xhr = new XMLHttpRequest();

    // 進捗イベント
    xhr.upload.addEventListener('progress', (e) => {
      if (e.lengthComputable) {
        const percentComplete = (e.loaded / e.total) * 100;
        onProgress(percentComplete);
      }
    });

    // 完了イベント
    xhr.addEventListener('load', () => {
      if (xhr.status >= 200 && xhr.status < 300) {
        resolve(JSON.parse(xhr.responseText));
      } else {
        reject(new Error(`アップロード失敗: ${xhr.status}`));
      }
    });

    // エラーイベント
    xhr.addEventListener('error', () => {
      reject(new Error('ネットワークエラー'));
    });

    xhr.open('POST', 'https://api.example.com/upload');
    xhr.setRequestHeader('Authorization', `Bearer ${getToken()}`);
    xhr.send(formData);
  });
}

// 使用例
const fileInput = document.querySelector('#file-input');
fileInput.addEventListener('change', async (e) => {
  const file = e.target.files[0];

  try {
    const result = await uploadFile(file, (progress) => {
      console.log(`アップロード進捗: ${progress.toFixed(2)}%`);
      // プログレスバーを更新
      updateProgressBar(progress);
    });

    console.log('アップロード成功:', result);
  } catch (error) {
    console.error('アップロード失敗:', error);
  }
});
4. リトライ機能付きリクエスト
// リトライ機能付きfetch
async function fetchWithRetry(url, options = {}, maxRetries = 3, delay = 1000) {
  let lastError;

  for (let i = 0; i < maxRetries; i++) {
    try {
      const response = await fetch(url, options);

      // 一時的なエラーの場合はリトライ
      if (response.status === 429 || response.status >= 500) {
        throw new Error(`HTTP ${response.status}`);
      }

      return response;

    } catch (error) {
      lastError = error;
      console.log(`リトライ ${i + 1}/${maxRetries}...`);

      if (i < maxRetries - 1) {
        // 指数バックオフ(待機時間を徐々に増やす)
        await new Promise(resolve =>
          setTimeout(resolve, delay * Math.pow(2, i))
        );
      }
    }
  }

  throw new Error(`${maxRetries}回のリトライ後も失敗: ${lastError.message}`);
}

// 使用例
try {
  const response = await fetchWithRetry('https://api.example.com/users');
  const data = await response.json();
  console.log(data);
} catch (error) {
  console.error('リクエストが完全に失敗しました:', error);
}
5. キャッシュ機能
// シンプルなキャッシュ機能
class CachedApiClient {
  constructor() {
    this.cache = new Map();
    this.cacheDuration = 5 * 60 * 1000; // 5分
  }

  async get(url, options = {}) {
    const cacheKey = `${url}${JSON.stringify(options)}`;
    const cached = this.cache.get(cacheKey);

    // キャッシュが有効な場合
    if (cached && Date.now() - cached.timestamp < this.cacheDuration) {
      console.log('キャッシュから取得:', url);
      return cached.data;
    }

    // 新しくデータを取得
    console.log('APIから取得:', url);
    const response = await fetch(url, options);
    const data = await response.json();

    // キャッシュに保存
    this.cache.set(cacheKey, {
      data,
      timestamp: Date.now()
    });

    return data;
  }

  // キャッシュをクリア
  clearCache(url) {
    if (url) {
      // 特定のURLのキャッシュをクリア
      for (const key of this.cache.keys()) {
        if (key.startsWith(url)) {
          this.cache.delete(key);
        }
      }
    } else {
      // すべてのキャッシュをクリア
      this.cache.clear();
    }
  }
}

// 使用例
const cachedApi = new CachedApiClient();

// 1回目: APIから取得
const users1 = await cachedApi.get('https://api.example.com/users');

// 2回目: キャッシュから取得(速い!)
const users2 = await cachedApi.get('https://api.example.com/users');

// キャッシュをクリア
cachedApi.clearCache('https://api.example.com/users');
HTTP/2とHTTP/3
HTTPは進化を続けています。最新のバージョンについても簡単に紹介します。
HTTP/1.1の課題
従来のHTTP/1.1には、いくつかの制限がありました:
1. ヘッドオブライン・ブロッキング
- 1つのリクエストが完了するまで、次のリクエストを送れない
- 複数のファイルを取得するのに時間がかかる
2. ヘッダーの冗長性
- 毎回同じヘッダーを送信する必要がある
- 帯域幅の無駄
HTTP/2の改善点
HTTP/2(2015年)は、これらの問題を解決しました:
1. 多重化(Multiplexing)
HTTP/1.1:
リクエスト1 → レスポンス1
              リクエスト2 → レスポンス2
                            リクエスト3 → レスポンス3

HTTP/2:
リクエスト1 ──┐
リクエスト2 ──┼→ サーバー → レスポンス1, 2, 3(並行)
リクエスト3 ──┘
2. ヘッダー圧縮
- 重複するヘッダーを圧縮
- 通信量を削減
3. サーバープッシュ
- サーバーが必要なリソースを先回りして送信
- ページの読み込みが高速化
HTTP/3の特徴
HTTP/3(2022年)は、さらなる改善を提供:
QUIC プロトコルの使用
- TCPではなくUDPを使用
- 接続確立が高速
- パケットロスへの耐性が向上
// 開発者としては、特別なコードは不要
// ブラウザとサーバーが自動的に最適なバージョンを選択

fetch('https://api.example.com/users')
  .then(response => response.json())
  .then(data => console.log(data));

// ブラウザは自動的にHTTP/2やHTTP/3を使用(サーバーが対応していれば)
まとめ
HTTP通信について、基礎から実践的な内容まで見てきました。
重要なポイント
HTTPの基本
- リクエストとレスポンスの構造を理解する
- ヘッダーとボディの役割を知る
- ステートレスな性質を理解する
HTTPメソッド
- GET: データの取得
- POST: データの作成
- PUT/PATCH: データの更新
- DELETE: データの削除
ステータスコード
- 2xx: 成功
- 3xx: リダイレクト
- 4xx: クライアントエラー
- 5xx: サーバーエラー
セキュリティ
- HTTPSを使用する
- CORSを理解する
- 認証情報を適切に扱う
次のステップ
HTTP通信の基礎を理解したら、以下のトピックに進むと良いでしょう:
- RESTful API設計: APIの設計原則を学ぶ
- GraphQL: より柔軟なデータ取得方法
- WebSocket: リアルタイム通信
- Service Worker: オフライン対応とキャッシュ戦略
- 認証・認可: JWT、OAuth 2.0など
おわりに
HTTP通信は、Web開発の基礎中の基礎です。最初は難しく感じるかもしれませんが、実際に手を動かしてリクエストを送ってみることで、徐々に理解が深まっていきます。
ブラウザの開発者ツールのNetworkタブを開いて、実際の通信を観察してみるのもおすすめです。どんなリクエストが送られ、どんなレスポンスが返ってくるのかを見ることで、HTTPへの理解がさらに深まるはずです。
この記事が、あなたのHTTP通信の理解の助けになれば幸いです。Happy coding! 🚀