はじめに
この記事は、個人的にAndroidアプリ開発をした際に役立った記事についてまとめた個人的なメモです。
ですので、その点を踏まえて閲覧していただきますようお願いいたします。
Fragmentが重なる
-
フラグメントコンテンツがツールバーと下部ナビゲーションビューに重なる
- Fragmentの対象となるLayoutを、widthとheightを0dpにし、constraintBottom_toTopOfやconstraintTop_toBottomOfの設定を行う
-
AppBarLayoutを使う時にlayout_behaviorをFragmentに持たせるとviewが重ねて表示される
- Containerに対し、app:layout_behaviorの設定を行う
BottomNavigationViewがキーボードの上に表示されてしまう
-
adjustResizeセットでキーボードの下にあるBottomNavigationViewを非表示にする方法
- BottomNavigationViewを表示しているActivityに対し、マニフェストにてandroid:windowSoftInputMode="adjustPan"の設定を行う
キーボードを隠したい
-
【InputMethodManager】Kotlinでキーボードを閉じる方法
- InputMethodManagerを用いて行う
隠れるHeader
要点
- 以下のコードのように、CoordinatorLayout内にHeaderとなるAppBarLayoutとコンテンツを作成
- AppBarLayout内にCollapsingToolbarLayoutを作成、この中にHeaderに表示したいコンテンツとToolbarを作成
- CollapsingToolbarLayoutのlayout_scrollFlagsによってスクロール時のHeaderの動作が変化する
- Toolbarのlayout_collapseModeによって、Toolbarを上部に表示したままにできる
<?xml version="1.0" encoding="utf-8"?>
<androidx.coordinatorlayout.widget.CoordinatorLayout xmlns:android="http://schemas.android.com/apk/res/android"
    xmlns:app="http://schemas.android.com/apk/res-auto"
    xmlns:tools="http://schemas.android.com/tools"
    android:layout_width="match_parent"
    android:layout_height="match_parent"
    android:fitsSystemWindows="true"
    tools:context=".~~Activity">
    <com.google.android.material.appbar.AppBarLayout
        android:id="@+id/app_bar"
        android:layout_width="match_parent"
        android:layout_height="@dimen/app_bar_height"
        android:fitsSystemWindows="true"
        android:theme="@style/AppTheme.AppBarOverlay">
        <com.google.android.material.appbar.CollapsingToolbarLayout
            android:id="@+id/toolbar_layout"
            android:layout_width="match_parent"
            android:layout_height="match_parent"
            android:fitsSystemWindows="true"
            app:contentScrim="?attr/colorPrimary"
            app:layout_scrollFlags="scroll|exitUntilCollapsed"
            app:toolbarId="@+id/toolbar">

            <ImageView
                android:layout_width="match_parent"
                android:layout_height="match_parent"
                android:scaleType="centerCrop"
                app:layout_collapseMode="parallax"
                app:srcCompat="@drawable/ic_baseline_chat_24"/>
            <de.hdodenhof.circleimageview.CircleImageView
                android:id="@+id/fab"
                android:layout_width="wrap_content"
                android:layout_height="wrap_content"
                app:layout_anchor="@id/app_bar"
                android:src="@mipmap/icon_180"
                android:layout_marginTop="100dp"
                android:layout_marginLeft="10dp"/>

            <androidx.appcompat.widget.Toolbar
                android:id="@+id/toolbar"
                android:layout_width="match_parent"
                android:layout_height="?attr/actionBarSize"
                app:layout_collapseMode="pin">
                <TextView
                    android:id="@+id/titleText"
                    android:layout_width="match_parent"
                    android:layout_height="wrap_content"
                    android:textSize="18sp"
                    android:textStyle="bold"
                    android:textColor="@color/white"
                    android:text="Title"/>
            </androidx.appcompat.widget.Toolbar>
        </com.google.android.material.appbar.CollapsingToolbarLayout>
    </com.google.android.material.appbar.AppBarLayout>
    <include layout="@layout/content_scrolling" />
</androidx.coordinatorlayout.widget.CoordinatorLayout>
参考サイト
- スクロールに合わせてToolbarにタイトルを表示する
- いろいろなCoordinatorLayoutパターン
- CoordinatorLayoutで作るマテリアルデザインとカスタム方法の基礎
- NestedScrollViewの仕組み
- CoordinatorLayoutでヘッダー隠す時の知見を得た話
- AndroidのCoordinatorLayoutを使いこなして、モダンなスクロールを実装しよう
角丸の画像を表示したい
よくあるSNSのTLみたいな画像表示をしたい
やりたいこと
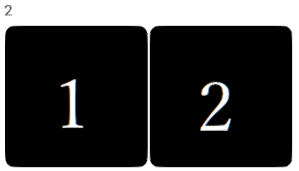
よくあるSNSの画像表示みたく、画像数によって以下の画像のように表示の仕方を変える


流れ
- 画像を表示するためのRecyclerViewを用意する
- RecyclerViewのAdapterを作成
- GridLayoutManagerの設定
- GridLayoutManagerにspanSizeLookupの設定
- RecyclerViewのlayoutManagerに設定したGridLayoutManagerを設定
要点
- GridLayoutManagerで指定するSpanCountとgetSpanSizeの返り値によって一行に表示する数が変わる
- 一行に表示する数 = spanCount / SpanSize
- 1つ表示: 1 = 4 / 4
- 2つ表示: 2 = 4 / 2
- 一行に表示する数 = spanCount / SpanSize
レイアウト
RecyclerViewの親は、お好みでConstraintLayoutなどを用いる
<androidx.recyclerview.widget.RecyclerView
    android:id="@+id/gridImgView"
    android:layout_width="match_parent"
    android:layout_height="wrap_content"/>
処理
gridImgView.setHasFixedSize(true)
// GridLayoutMangerの設定
val layout = GridLayoutManager(context, 4, LinearLayoutManager.VERTICAL, false)
// spanSizeLookupの設定
layout.spanSizeLookup = object : SpanSizeLookup() {
  override fun getSpanSize(p: Int): Int {
    return when (images.size) {
      1 -> 4
      2, 3, 4 -> 2
      else -> 1
    }
  }
}

holder.gridImgView.layoutManager = layout
// ImgAdapterの設定(中ではonBindViewHolder内で、画像の表示できるようにしてるだけ)
holder.gridImgView.adapter = ImgAdapter(context, this, images)
参考サイト
includeしたレイアウトの中のViewを触りたい
やりたいこと
以下のitemViewをrootレイアウトでincludeした際に、itemViewのCardViewやImageViewを触りたい。
要点
rootレイアウトのitemViewからfindViewByIdを行い、ImageViewを取得する。
CardViewは、includeで指定したidを用いればよい。
(itemViewレイアウトで指定したCardViewは、itemViewからfindViewByIdをを行っても取得できない)
レイアウト
root
<include
    android:id="@+id/includeView"
    layout="@layout/itemView" />
itemView
<?xml version="1.0" encoding="utf-8"?>
<androidx.cardview.widget.CardView xmlns:android="http://schemas.android.com/apk/res/android"
    xmlns:app="http://schemas.android.com/apk/res-auto"
    android:id="@+id/cardView"
    android:layout_width="match_parent"
    android:layout_height="150dp"
    android:layout_margin="1dp"
    app:cardBackgroundColor="@color/colorAccent"
    app:cardCornerRadius="10dp"
    app:cardElevation="0dp">

    <ImageView
        android:id="@+id/imageItem"
        android:layout_width="match_parent"
        android:layout_height="match_parent"
        android:layout_gravity="center"
        android:adjustViewBounds="true"
        android:contentDescription="@string/ImgDesc"
        android:scaleType="centerCrop" />
</androidx.cardview.widget.CardView>
ソースコード
val img = itemView.findViewById<ImageView>(R.id.imageItem)
参考サイト
ListAdapter not updating item in RecyclerView
要点
- viewModel側でlistを更新した際に、observerで
submitListを行うとRecyclerViewの描画が更新されない場合がある。- androidx.recyclerview.widgetのAsyncListDifferクラス内に実装されているsubmitListでは以下のような実装を行っているため
-
submitListを呼び出した後にnotifyDataSetChangedを呼びだしたり、listの更新処理を工夫する必要がある。
if (newList == mList) {
    // nothing to do (Note - still had to inc generation, since may have ongoing work)
    if (commitCallback != null) {
        commitCallback.run();
    }
    return;
}
参考サイト
Gradle Play Publisher
どうやらクローズドテストを公開(審査中)とするまで使えない様子。
よくある通話アプリの着信通知処理の実装
参考サイト
- Android FCM(GCM) バックグラウンドでonMessageReceivedを通らない時は
- Androidで着信通知を実装してみよう
- ICHI.PRO
FCM通知を使用してすべてのAndroidOSバージョンの着信ビデオ通話を管理する方法 - ロック画面での可視性を設定する

