

はじめに
Tricentis Toscaを既存のCI/CDパイプラインに統合し、コミットから自動テストまでを一気通貫で回すと、デリバリーリードタイムとソフトウェアの品質が向上します。今回はTosca Server実装環境下でTosca ServerのAutomation Object Service(AOS)を軸に、Azure DevOps PipelinesとPowerShellスクリプトからAPI経由でリモート実行させる手順を紹介します。
本記事の内容
- Azure DevOpsのビルド/リリースパイプラインにToscaの自動テストを組み込む全体像
- Tosca Server AOSを利用したリモート実行キューの設計
- PowerShell + REST APIでExecutionListをキックする実装例
本記事ではToscaおよびTosca Serverの基本知識を有している方を対象としています。
全体アーキテクチャ
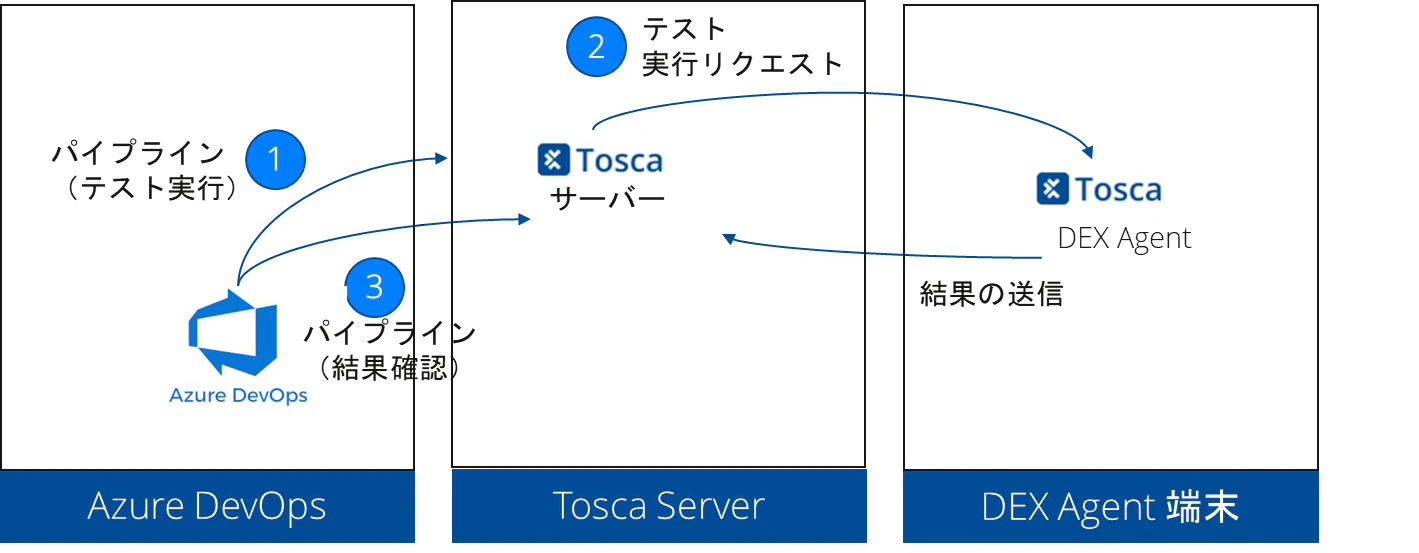
この構成により、テストスクリプトはTosca Repository、Azure DevOps側はREST APIを介して実行を指示できます。
前提条件
- AOSが有効なTosca Server環境
- 少なくとも1台のExecution Agent実行環境
- Azure DevOpsでSelf-hosted Agent(Windows)が利用可能
- APIアクセス用のTosca User(システムユーザー)とアクセストークン
- PowerShell 7以降(Windows PowerShell 5.1でも可だがTLS1.2を明示)
Step1: Tosca側の準備
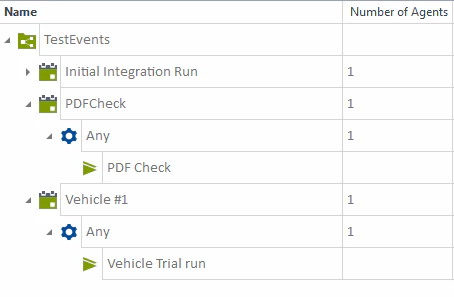
- Tosca CommanderでExecutionListを整理し、ExecutionListsフォルダーをTosca Serverにチェックイン。
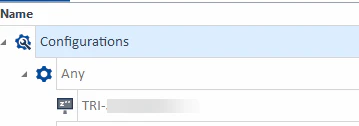
- TestEventsを作成し、利用するExecution Agentを紐付け。
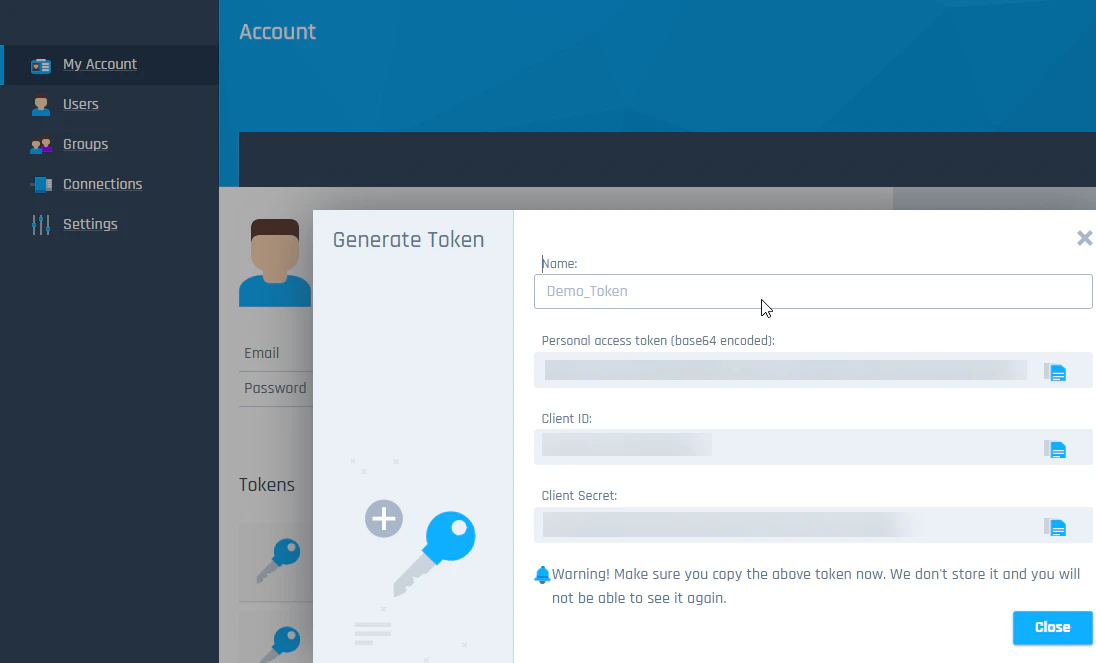
- Technical UserのTokenを生成
- AOSの
https://<tosca-server>/AutomationObjectService/がAzure DevOpsエージェントから到達できることを確認。
1. Tosca Commander側のExecutionList
2. Execution Agent設定
3. システムユーザーのToken
Step2: Azure DevOpsパイプラインでの呼び出し
今回の例ではazure-pipelines-ps.ymlという手動トリガー専用パイプラインを定義し、AOSを直接キックするPowerShellスクリプトを中心に据えています。パラメーターと変数グループを用意しておくと、同じ定義で複数のプロジェクト/ExecutionListを切り替えながら再利用できます。
主な処理の流れ:
-
Parameters:
projectName/events/executionEnvを手動実行時に指定。既定値を入れておくと運用が楽。 -
Variables: 変数グループ
ToscaServerCredsからAPI_BASE_URL、CLIENT_ID、CLIENT_SECRETを安全に参照。 -
Task 0:
$(Build.ArtifactStagingDirectory)の作成。後続タスクがログ/成果物を格納できるようにする。 -
Task 1:
run_tosca_server.ps1を呼び出し、ExecutionListをキューイングしてsummary.jsonを生成。 - Task 2: サマリーJSONをJUnit XML・Markdownに変換し、失敗数に応じて終了コードを制御。
- Task 3-5: JUnit結果の公開、成果物のアップロード、Markdownサマリーのビルドサマリー添付。
# azure-pipelines-ps.yml
trigger: none
pr: none

parameters:
  - name: projectName
    type: string
    default: 'DemoRepo-Server'
  - name: events
    type: string
    default: 'Vehicle #1,PDFCheck'
  - name: executionEnv
    type: string
    default: 'Dex'

pool:
  name: Default   # Windows self-hosted agent

variables:
  - group: ToscaServerCreds

steps:
  - task: PowerShell@2
    displayName: '0) Ensure artifact staging directory exists'
    inputs:
      targetType: inline
      pwsh: true
      script: |
        New-Item -ItemType Directory -Path '$(Build.ArtifactStagingDirectory)' -Force

  - task: PowerShell@2
    displayName: '1) Run Tosca Server Execution'
    inputs:
      targetType: inline
      pwsh: true
      script: |
        $ps1 = '$(Build.SourcesDirectory)\run_tosca_server.ps1'
        & $ps1 `
          -ProjectName  '${{ parameters.projectName }}' `
          -Events       '${{ parameters.events }}' `
          -ExecutionEnv '${{ parameters.executionEnv }}' `
          -JsonOut      '$(Build.ArtifactStagingDirectory)\summary.json'
    env:
      API_BASE_URL:  $(API_BASE_URL)
      CLIENT_ID:     $(CLIENT_ID)
      CLIENT_SECRET: $(CLIENT_SECRET)

  - task: PowerShell@2
    displayName: '2) Convert summary to JUnit & Markdown'
    inputs:
      targetType: inline
      pwsh: true
      script: |
        # ... JSONを読み取り、JUnit XMLとMarkdownに成形 ...

  - task: PublishTestResults@2
    displayName: '3) Publish Tosca-Server JUnit'
    inputs:
      testResultsFormat: JUnit
      testResultsFiles: '$(Build.ArtifactStagingDirectory)\results.xml'

  - task: PublishBuildArtifacts@1
    displayName: '4) Publish execution artifacts'
    inputs:
      PathtoPublish: '$(Build.ArtifactStagingDirectory)'
      ArtifactName: 'executionResult'

  - task: PowerShell@2
    displayName: '5) Attach execution summary'
    inputs:
      targetType: inline
      pwsh: true
      script: |
        Write-Host "##vso[task.uploadsummary]$(Build.ArtifactStagingDirectory)\summary.md"
スクリプトのパラメーター
| パラメーター名 | 必須 | 取得元 | 用途 |
|---|---|---|---|
ProjectName |
✔ | パイプラインparameter projectName
|
Tosca Repository名(AOSに渡すprojectName)。 |
Events |
✔ | parameter events
|
カンマ区切りのExecutionEvent名。スクリプト内でeventId配列に変換。 |
ExecutionEnv |
✖ (既定: Dex) | parameter executionEnv
|
Tosca実行環境(Distributed Execution Server上の環境名)。 |
PowerShellタスクが出力したsummary.jsonを標準フォーマット(JUnit/Markdown)に変換しておくことで、テスト結果の集計とナレッジ共有を1本のパイプラインで完結できます。
Step3: PowerShellからAPIでリモート実行
パイプラインから呼び出しているrun_tosca_server.ps1は、AOSエンドポイントに対して実行キュー投入→結果ポーリング→サマリー保存までを一気通貫で担います。
param(
  [Parameter(Mandatory=$true)][string] $ProjectName,
  [Parameter(Mandatory=$true)][string] $Events,
  [string] $ExecutionEnv = 'Dex',
  [Parameter(Mandatory=$true)][string] $JsonOut,
  [int] $TimeoutSec  = 600,
  [int] $IntervalSec = 30
)

$apiBase      = $env:API_BASE_URL
$clientId     = $env:CLIENT_ID
$clientSecret = $env:CLIENT_SECRET

$tokenResp = Invoke-RestMethod -Method Post -Uri "$apiBase/tua/connect/token" -Body @{
  grant_type    = 'client_credentials'
  client_id     = $clientId
  client_secret = $clientSecret
} -ContentType 'application/x-www-form-urlencoded'
$token = $tokenResp.access_token

$payload = @{
  projectName          = $ProjectName
  executionEnvironment = $ExecutionEnv
  events = ($Events.Split(',') | ForEach-Object {
    @{ eventId = $_.Trim(); parameters = @{}; characteristics = @{} }
  })
  importResult = $true
  creator      = 'AzureDevOpsPipeline'
} | ConvertTo-Json -Depth 5

$headers = @{
  'Content-Type'  = 'application/json'
  'Authorization' = "Bearer $token"
}
$execResp = Invoke-RestMethod -Method Post -Uri "$apiBase/automationobjectservice/api/Execution/enqueue" -Headers $headers -Body $payload
$execId   = $execResp.ExecutionId

do {
  Start-Sleep -Seconds $IntervalSec
  $summary = Invoke-RestMethod -Method Get -Uri "$apiBase/automationobjectservice/api/Execution/$execId/results/summary" -Headers $headers
  Write-Host "⏱ inProgress = $($summary.inProgress)"
} while ($summary.inProgress -gt 0 -and (Get-Date) -lt (Get-Date).AddSeconds($TimeoutSec))

$summary | ConvertTo-Json -Depth 5 | Out-File -FilePath $JsonOut -Encoding utf8
if ($summary.failed -gt 0) { exit 1 } else { exit 0 }
環境変数(変数グループ ToscaServerCreds)
| 変数名 | 保存場所 | スクリプト内での用途 |
|---|---|---|
API_BASE_URL |
Azure DevOps変数グループ (例: https://tosca-server.example.com) |
TokenエンドポイントとAOS APIのベースURL生成。 |
CLIENT_ID |
同上 |
tua/connect/token に渡すOAuthクライアントID。 |
CLIENT_SECRET |
同上 (Secretとして保護) | OAuthクライアントシークレット。 |
CLIENT_ID, CLIENT_SECRETは前StepのTosca側処理で取得したテスト実行ユーザーのToken生成で取得した値。
実装のポイント:
- 認証: Tosca Server(AOS)のTokenエンドポイントにクライアントクレデンシャルでアクセスし、Bearer Tokenを取得。
-
イベント指定: カンマ区切りの
eventsパラメーターを配列化し、AOSのExecution/enqueueに渡す。必要に応じてparametersやcharacteristicsを追加可能。 -
結果ポーリング:
/results/summaryを定期取得し、inProgressフラグが0になるまで待機。タイムアウト/リトライはTimeoutSecとIntervalSecで調整。 -
出力: サマリーJSONをそのまま保存し、Pipeline側でJUnit/Markdownに変換。
failed件数によってプロセス終了コードを制御してビルド結果と連動。 -
TLS/証明書: 社内CAを使う場合は
-SkipCertificateCheckを外し、エージェントOSの証明書ストアを正しく構成する。
このスクリプトと前述のYAMLを組み合わせることで、API実行~可視化までをP自動化する準備が整います。
実際の環境においては何をトリガーにテストを実施するのか、何のテストを実施するのか詳細な設計が必要になりますので、要件に合わせてご対応ください。
サンプル画面
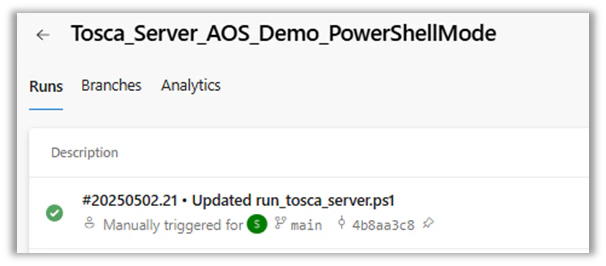
実際に実行してみると以下のようにPipelineが実行されると
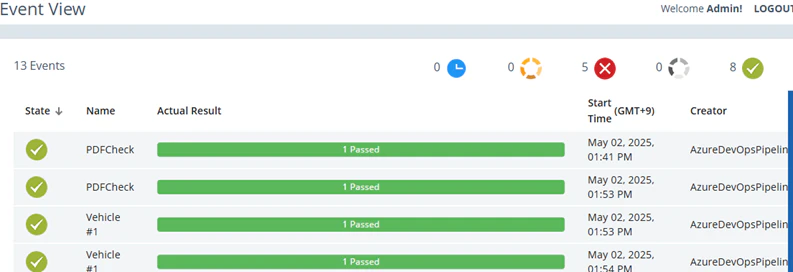
Tosca Server上でテストが実行されます。
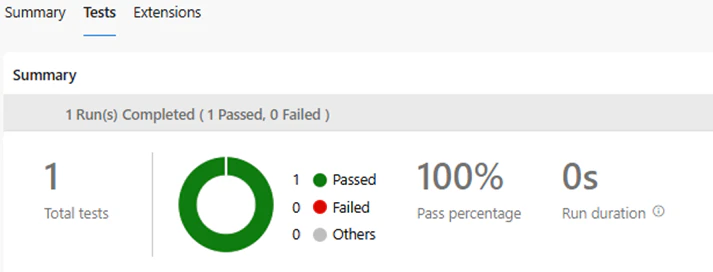
テスト結果を基に、サマリタブに概要が表示されるようになります。
よくあるエラー対応
- 証明書エラー: 社内CAを利用している場合、Azure DevOpsエージェントのTrusted Rootに証明書を配置。
- ファイアウォール: AOSは双方向通信を行うため、443/6060ポートのOutbound許可が必要。
-
同時実行制御: Azure DevOps側で
environmentリソースを使い、特定環境への同時実行をシリアル化すると安定。 -
タイムアウト: 長時間テストは
Agent.JobTimeoutInMinutesを拡張し、PowerShellスクリプト側でも-TimeoutSecを設定。
Tosca Cloud版との違い
公開済みのクラウド版記事では、Tricentis Cloud PlatformのAPIゲートウェイを利用します。本記事のオンプレミス/AOS構成との主な差分は以下です。
- 認証がOAuth 2.0(Cloud)か、AOSのPAT/Basic(オンプレ)か
- CloudではExecution Serviceがマネージド、オンプレではDistribution Server/Agentを自前で維持
- ネットワーク要件:Cloudはインターネット越し、オンプレはVPN/社内LAN
クラウド移行を見据える場合は、API契約やPowerShellロジックをインターフェース単位で抽象化しておくと移行コストが下がります。
まとめ
- Tosca Server AOSは既存のAzure DevOpsパイプラインへ自然に組み込めるAPIを提供し、コミット後の自動回帰を加速できる。
- PowerShellスクリプトからExecutionListを安全に制御することで、きめ細かなリトライや結果収集も自動化できる。
- ハイブリッド構成のままでも、クラウド版と同じ設計思想でCI/CDを構築できるため、将来のクラウド移行にも備えられる。