今回はわかりやすいと思うので、ちょっと理論から入ることとする。
データを$x_i=(x_{i1},…,x_{id})^T$, $(i=1,…,N)$、ここで$d$は独立な測定項目の次元である。
データ行列を $X=(x_i,…,x_{N})^T$ 、原点を平均 $\bar{x} = \sum_{i=1}^{N}x_{i}$としたデータ行列を $\bar{X}=(x_i−\bar{x},…,x_{N}−\bar{x})^{T}$とすると、PCA主成分分析は$S=\frac{1}{N}\bar{X}^{T} \bar{X}$という共分散行列を使って、以下のようないわゆる固有値問題となる。
Su=λu
を解いて固有値を求めて$S$を対角化し、新たな主軸(分散の大きい順に第一主成分、第二主成分。。。)を求めることである。
ここでこの固有ベクトルが新たな主軸の軸方向を示しており、この固有ベクトルを利用すると、
P^{-1}SP
と対角化できる。そして、元の方程式は以下のように変形でき、変換テンソルPは固有ベクトル$u_1,u_2,u_3...$で以下のように書けることが分かる。
P^{-1}SP P^{-1}u=λP^{-1}u \\
P=(u_1,u_2,u_3...)
つまり、このPを使って、新たな主軸(基底という)における各座標が
P^{-1}u
で求められることが分かる。
また、この固有値を$s_k$とすると、各成分の寄与は以下のようになる。
c_k=\frac{s_k}{V_{total}}
ここで重要なことは、上記の共分散行列の各行列要素は比例していないことが前提となる。すなわち測定項目間の相関が無いかあるいはあっても小さいことが前提条件になる。
今回はこの対角化の様子を多変量解析についてグラフ化して見える化することを試みる。
手法は前回の3D見える化と同じであるが、上式の新たな座標上の点への座標変換$P^{-1}u$を利用して示そうと思う。
【参考】
・[Python][Scikit-learn]主成分分析を用いた次元削減、主成分ベクトルを用いた予測と線形回帰による予測の比較
・主成分分析と固有値問題@Aidemy Blog
・固有値問題・固有空間・スペクトル分解@武内修@筑波大
やったこと
・最初の一歩2次元
・三次元でGifアニメーション
・六次元を3DGifアニメーション
今回のコードは以下に置きました
・MachineLearning/pca_exaple.py
・MachineLearning/out_gif.py
・最初の一歩2次元
説明はこの2次元の場合が分かりやすい。
import numpy as np
from sklearn.decomposition import PCA
import matplotlib.pyplot as plt
データはscikit_learnの例から以下のとおりのものを使う。
【参考】
・sklearn.decomposition.PCA
X = np.array([[-1, -1], [-2, -1], [-3, -2], [1, 1], [2, 1], [3, 2]])
まず、2次元のPCA分析を実施する。
そして、その結果として、主成分方向のベクトルv_pca0と第二主成分方向のベクトルv_pca1が以下のとおり、得られる。
pca = PCA(n_components=2)
pca.fit(X)
v_pca0=pca.components_[0]
v_pca1=pca.components_[1]
このベクトルはそれぞれ以下のとおり求められる。
X_pca0=[0,1*v_pca0[0]]
Y_pca0=[0,1*v_pca0[1]]
X_pca1=[0,1*v_pca1[0]]
Y_pca1=[0,1*v_pca1[1]]
元々の空間で入力座標をプロットする。
さらに、上記で求めた第一主成分(赤)と第二主成分(青)のベクトルをプロットする。
plt.scatter(X[:,0],X[:,1],c="g",marker = "*")
plt.plot(X_pca0,Y_pca0,c="r",marker = "o")
plt.plot(X_pca1,Y_pca1,c="b",marker = "o")
plt.savefig('k-means/pca_example/pca_data_scatter.jpg')
plt.pause(1)
plt.close()
第一主成分が赤い線の方向、第二主成分が青い線の方向である。

次に固有値ベクトルを利用して、測定点Xと主成分ベクトルYを変換して、変換された座標上にプロットする。この変換はscikit-learnではPCAの関数pca.transform()を利用して以下のとおり変換できる。
Y=np.array([[0,0],[v_pca0[0],v_pca0[1]],[v_pca1[0],v_pca1[1]]])
pcatran_X = pca.transform(X)
pcatran_Y = pca.transform(Y)
print("pcatran_Y={}".format(pcatran_Y))
そして、変換された座標上に以下のとおりプロットする。
plt.scatter(pcatran_X[:,0],pcatran_X[:,1],c="g",marker = "*")
plt.scatter(pcatran_Y[:,0],pcatran_Y[:,1],c="r",marker = "o")
plt.plot([pcatran_Y[0,0],pcatran_Y[0,1]],[pcatran_Y[2,0],pcatran_Y[2,1]],c="b")
plt.plot([pcatran_Y[2,0],pcatran_Y[2,1]],[pcatran_Y[0,0],pcatran_Y[0,1]],c="r")  #,marker = "o")
plt.savefig('k-means/pca_example/pca_tran_scatter.jpg')
plt.pause(1)
plt.close()
まともな方向にプロットされ、新しい座標軸も第一主成分及び第二主成分方向になった。

次に、これらの成分の寄与を以下のように求める。
s=2
print("pca.explained_variance_ratio_{}".format(pca.explained_variance_ratio_))
plt.bar([1, 2], pca.explained_variance_ratio_, align = "center",label="pca.explained_variance_ratio_={}".format(pca.explained_variance_ratio_))
plt.title("pca.explained_variance_ratio_")
plt.xlabel("components")
plt.ylabel("contribution")
plt.legend()
plt.savefig('k-means/pca_example/pca2d_contribution_PCA12_plotSn'+str(s)+'.jpg')
plt.pause(1)
plt.close()

・三次元でGifアニメーション
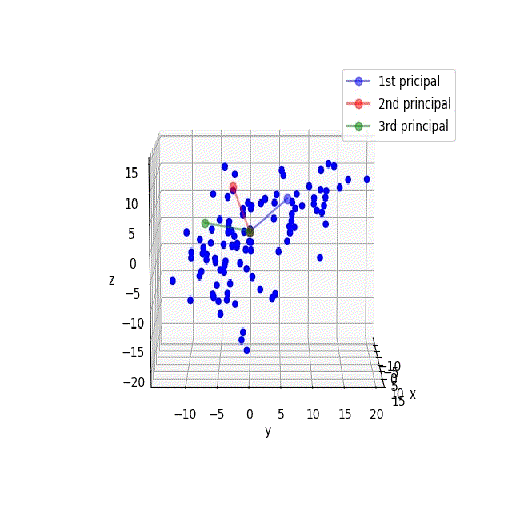
次元が増えるだけで、同じ流れで進みます。
データは、以下のようにmake_blobsで生成しました。
from sklearn.datasets import make_blobs
X, Y = make_blobs(random_state=8,
                  n_samples=100,
                  n_features=3,
                  cluster_std=4,
                  centers=3)
PCA分析の成分は3とします。そして、3つの成分ベクトルが求まります。
そして、それぞれの方向のベクトルを定義します。
pca = PCA(n_components=3)
pca.fit(X)
v_pca0=pca.components_[0]
v_pca1=pca.components_[1]
v_pca2=pca.components_[2]
X_pca0=[0,10*v_pca0[0]]
Y_pca0=[0,10*v_pca0[1]]
Z_pca0=[0,10*v_pca0[2]]
X_pca1=[0,10*v_pca1[0]]
Y_pca1=[0,10*v_pca1[1]]
Z_pca1=[0,10*v_pca1[2]]
X_pca2=[0,10*v_pca2[0]]
Y_pca2=[0,10*v_pca2[1]]
Z_pca2=[0,10*v_pca2[2]]
座標軸は3次元なので、以下のように立体的に描画します。
def show_with_angle(angle):
    fig = plt.figure()
    ax = fig.add_subplot(111, projection='3d')
    ax.view_init(elev = 10., azim = angle)
    ax.plot(X_pca0,Y_pca0,Z_pca0, c='b', marker='o', alpha=0.5, label='1st pricipal')
    ax.plot(X_pca1,Y_pca1,Z_pca1, c='r', marker='o', alpha=0.5, label='2nd principal')
    ax.plot(X_pca2,Y_pca2,Z_pca2, c='g', marker='o', alpha=0.5, label='3rd principal')
    ax.scatter(X[:, 0], X[:, 1], X[:, 2],  c="b", marker='o', alpha=1)
    ax.set_xlabel('x')
    ax.set_ylabel('y')
    ax.set_zlabel('z')
    ax.legend()
    plt.pause(0.01)
    plt.savefig('k-means/pca_example/pca3d/keiba3_PCA3d_angle_'+str(angle)+'.jpg')
    plt.close()

for angle in range(0, 360, 5):
    show_with_angle(angle)
3次元でも同じようにYを定義して、一括変換して新たな座標上のベクトルを求め、スナップを書いてみます。
Y=np.array([[0,0,0],[10*v_pca0[0],10*v_pca0[1],10*v_pca0[2]],[10*v_pca1[0],10*v_pca1[1],10*v_pca1[2]],[10*v_pca2[0],10*v_pca2[1],10*v_pca2[2]]])
print(Y)

pcatran_X = pca.transform(X)
print("pcatran_X={}".format(pcatran_X))
pcatran_Y = pca.transform(Y)
print("pcatran_Y={}".format(pcatran_Y))

plt.scatter(pcatran_X[:,0],pcatran_X[:,1],c="g",marker = "*")
plt.scatter(pcatran_Y[:,0],pcatran_Y[:,1],c="r",marker = "o")
plt.plot([pcatran_Y[0,0],pcatran_Y[1,0]],[pcatran_Y[0,1],pcatran_Y[1,1]],c="b",marker = "o")
plt.plot([pcatran_Y[0,0],pcatran_Y[2,0]],[pcatran_Y[0,1],pcatran_Y[2,1]],c="r",marker = "o")
plt.savefig('k-means/pca_example/pca_tran_scatter3.jpg')
plt.pause(1)
plt.close()

次に新しい座標軸上に3dプロットします。
def show_with_angle(angle):
    fig = plt.figure()
    ax = fig.add_subplot(111, projection='3d')
    ax.view_init(elev = 10., azim = angle)
    ax.scatter(pcatran_X[:, 0], pcatran_X[:, 1], pcatran_X[:, 2],  c="b", marker='o', alpha=1)
    ax.set_xlabel('tran_x')
    ax.set_ylabel('tran_y')
    ax.set_zlabel('tran_z')
    ax.legend()
    plt.pause(0.01)
    plt.savefig('k-means/pca_example/tran_pca3d/pca3_PCA3d_angle_'+str(angle)+'.jpg')
    plt.close()

for angle in range(0, 360, 5):
    show_with_angle(angle)
今回は変換された軸上にプロットしているので、軸の記載はしていません。

最後に寄与のグラフは以下のとおりになっています。
s=3
print("pca.explained_variance_ratio_{}".format(pca.explained_variance_ratio_))
plt.bar([1, 2,3], pca.explained_variance_ratio_, align = "center",label="pca.explained_variance_ratio_={}".format(pca.explained_variance_ratio_))
plt.title("pca.explained_variance_ratio_")
plt.xlabel("components")
plt.ylabel("contribution")
plt.legend()
plt.savefig('k-means/pca_example/pca3d_contribution_PCA12_plotSn'+str(s)+'.jpg')
plt.pause(1)
plt.close()
第一主成分とそん色なく第二主成分や第三主成分の広がりがあるように見えますが、寄与は以下のとおり、70%,19%,11%程度になっています。

・六次元を3DGifアニメーション
次元、広がり、そして3中心(n_features=6,cluster_std=4,centers=3)で生成しました。
s=6
X, Y = make_blobs(random_state=8,
                  n_samples=100,
                  n_features=6,
                  cluster_std=4,
                  centers=3)
上と同じように、固有ベクトルはとりあえず第三主成分まで求めます。
pca = PCA(n_components=6)
pca.fit(X)
v_pca0=pca.components_[0]
v_pca1=pca.components_[1]
v_pca2=pca.components_[2]

X_pca0=[0,10*v_pca0[0]]
Y_pca0=[0,10*v_pca0[1]]
Z_pca0=[0,10*v_pca0[2]]
X_pca1=[0,10*v_pca1[0]]
Y_pca1=[0,10*v_pca1[1]]
Z_pca1=[0,10*v_pca1[2]]
X_pca2=[0,10*v_pca2[0]]
Y_pca2=[0,10*v_pca2[1]]
Z_pca2=[0,10*v_pca2[2]]
そして、以下のように三次元プロットをします。
def show_with_angle(angle):
    fig = plt.figure()
    ax = fig.add_subplot(111, projection='3d')
    ax.view_init(elev = 10., azim = angle)
    ax.plot(X_pca0,Y_pca0,Z_pca0, c='b', marker='o', alpha=0.5, label='1st pricipal')
    ax.plot(X_pca1,Y_pca1,Z_pca1, c='r', marker='o', alpha=0.5, label='2nd principal')
    ax.plot(X_pca2,Y_pca2,Z_pca2, c='g', marker='o', alpha=0.5, label='3rd principal')
    ax.scatter(X[:, 0], X[:, 1], X[:, 2],  c="b", marker='o', alpha=1)
    ax.set_xlabel('x')
    ax.set_ylabel('y')
    ax.set_zlabel('z')
    ax.legend()
    plt.pause(0.01)
    plt.savefig('k-means/pca_example/pca6d/keiba3_PCA3d_angle_'+str(angle)+'.jpg')
    plt.close()

for angle in range(0, 360, 5):
    show_with_angle(angle)

今回も同じように固有ベクトルで変換し、3dプロットします。
pcatran_X = pca.transform(X)
print("pcatran_X={}".format(pcatran_X))

def show_with_angle(angle):
    fig = plt.figure()
    ax = fig.add_subplot(111, projection='3d')
    ax.view_init(elev = 10., azim = angle)
    ax.scatter(pcatran_X[:, 0], pcatran_X[:, 1], pcatran_X[:, 2],  c="b", marker='o', alpha=1)
    ax.set_xlabel('tran_x')
    ax.set_ylabel('tran_y')
    ax.set_zlabel('tran_z')
    ax.legend()
    plt.pause(0.01)
    plt.savefig('k-means/pca_example/tran_pca6d/pca3_PCA3d_angle_'+str(angle)+'.jpg')
    plt.close()

for angle in range(0, 360, 5):
    show_with_angle(angle)

以下のようにそれぞれの成分の寄与を見ます。
print("v_pca0={},v_pca1={},v_pca2={}".format(v_pca0,v_pca1,v_pca2))
s=3
print("pca.explained_variance_ratio_{}".format(pca.explained_variance_ratio_))
plt.bar([1, 2,3,4,5,6], pca.explained_variance_ratio_, align = "center",label="pca.explained_variance_ratio_={}".format(pca.explained_variance_ratio_))
plt.title("pca.explained_variance_ratio_")
plt.xlabel("components")
plt.ylabel("contribution")
plt.legend()
plt.savefig('k-means/pca_example/pca6d_contribution_PCA12_plotSn'+str(s)+'.jpg')
plt.pause(1)
plt.close()
第三成分までで、45%,25%,10%で80%程度をカバーしています。

まとめ
・固有値問題としてのPCA分析の理論を見た
・二次元、三次元、そして六次元の場合について座標変換の様子を見た
・こうして次元圧縮の様子が分かった
・これをベースにさらなるクラスタリング手法と利用を見ていく
おまけ
【参考】
・機械学習 〜 データセット生成 〜
import numpy as np
from sklearn.decomposition import PCA
import matplotlib.pyplot as plt
from pandas.tools import plotting # 高度なプロットを行うツールのインポート
import pandas as pd
from mpl_toolkits.mplot3d import Axes3D

X = np.array([[-1, -1], [-2, -1], [-3, -2], [1, 1], [2, 1], [3, 2]])

pca = PCA(n_components=2)
pca.fit(X)
v_pca0=pca.components_[0]
v_pca1=pca.components_[1]
X_pca0=[0,1*v_pca0[0]]
Y_pca0=[0,1*v_pca0[1]]
X_pca1=[0,1*v_pca1[0]]
Y_pca1=[0,1*v_pca1[1]]

plt.scatter(X[:,0],X[:,1],c="g",marker = "*")
plt.plot(X_pca0,Y_pca0,c="r",marker = "o")
plt.plot(X_pca1,Y_pca1,c="b",marker = "o")
plt.savefig('k-means/pca_example/pca_data_scatter.jpg')
plt.pause(1)
plt.close()
print(v_pca0[0],v_pca0[1])
Y=np.array([[0,0],[v_pca0[0],v_pca0[1]],[v_pca1[0],v_pca1[1]]])
print(Y)

pcatran_X = pca.transform(X)
pcatran_Y = pca.transform(Y)
print("pcatran_Y={}".format(pcatran_Y))

plt.scatter(pcatran_X[:,0],pcatran_X[:,1],c="g",marker = "*")
plt.scatter(pcatran_Y[:,0],pcatran_Y[:,1],c="r",marker = "o")
plt.plot([pcatran_Y[0,0],pcatran_Y[0,1]],[pcatran_Y[2,0],pcatran_Y[2,1]],c="b")
plt.plot([pcatran_Y[2,0],pcatran_Y[2,1]],[pcatran_Y[0,0],pcatran_Y[0,1]],c="r")  #,marker = "o")
plt.savefig('k-means/pca_example/pca_tran_scatter.jpg')
plt.pause(1)
plt.close()

print("v_pca0={},v_pca1={}".format(v_pca0,v_pca1))
s=2
print("pca.explained_variance_ratio_{}".format(pca.explained_variance_ratio_))
plt.bar([1, 2], pca.explained_variance_ratio_, align = "center",label="pca.explained_variance_ratio_={}".format(pca.explained_variance_ratio_))
plt.title("pca.explained_variance_ratio_")
plt.xlabel("components")
plt.ylabel("contribution")
plt.legend()
plt.savefig('k-means/pca_example/pca2d_contribution_PCA12_plotSn'+str(s)+'.jpg')
plt.pause(1)
plt.close()

print("pca.singular_values_={}".format(pca.singular_values_))

from sklearn.datasets import make_regression
# X, Y, coef = make_regression(random_state=12, n_samples=100, n_features=3, n_informative=2, noise=10.0, bias=-0.0, coef=True)

from sklearn.datasets import make_blobs
X, Y = make_blobs(random_state=8,
                  n_samples=100,
                  n_features=3,
                  cluster_std=4,
                  centers=3)

pca = PCA(n_components=3)
pca.fit(X)
v_pca0=pca.components_[0]
v_pca1=pca.components_[1]
v_pca2=pca.components_[2]
X_pca0=[0,10*v_pca0[0]]
Y_pca0=[0,10*v_pca0[1]]
Z_pca0=[0,10*v_pca0[2]]
X_pca1=[0,10*v_pca1[0]]
Y_pca1=[0,10*v_pca1[1]]
Z_pca1=[0,10*v_pca1[2]]
X_pca2=[0,10*v_pca2[0]]
Y_pca2=[0,10*v_pca2[1]]
Z_pca2=[0,10*v_pca2[2]]

def show_with_angle(angle):
    fig = plt.figure()
    ax = fig.add_subplot(111, projection='3d')
    ax.view_init(elev = 10., azim = angle)
    #for kx, ky,kz, name in zip(kmeans_model.cluster_centers_[:,0], kmeans_model.cluster_centers_[:,1], kmeans_model.cluster_centers_[:,2], labels):
        #ax.text(kx, ky,kz, name, alpha=0.8, size=20)
    ax.plot(X_pca0,Y_pca0,Z_pca0, c='b', marker='o', alpha=0.5, label='1st pricipal')
    ax.plot(X_pca1,Y_pca1,Z_pca1, c='r', marker='o', alpha=0.5, label='2nd principal')
    ax.plot(X_pca2,Y_pca2,Z_pca2, c='g', marker='o', alpha=0.5, label='3rd principal')
    ax.scatter(X[:, 0], X[:, 1], X[:, 2],  c="b", marker='o', alpha=1)
    #ax.scatter(kmeans_model.cluster_centers_[:,0], kmeans_model.cluster_centers_[:,1], kmeans_model.cluster_centers_[:,2], c = "b", marker = "*", s = 100)
    ax.set_xlabel('x')
    ax.set_ylabel('y')
    ax.set_zlabel('z')
    ax.legend()
    plt.pause(0.01)
    plt.savefig('k-means/pca_example/pca3d/keiba3_PCA3d_angle_'+str(angle)+'.jpg')
    plt.close()

for angle in range(0, 360, 5):
    show_with_angle(angle)

print(v_pca0[0],v_pca0[1],v_pca0[2])
Y=np.array([[0,0,0],[10*v_pca0[0],10*v_pca0[1],10*v_pca0[2]],[10*v_pca1[0],10*v_pca1[1],10*v_pca1[2]],[10*v_pca2[0],10*v_pca2[1],10*v_pca2[2]]])
print(Y)

pcatran_X = pca.transform(X)
print("pcatran_X={}".format(pcatran_X))
pcatran_Y = pca.transform(Y)
print("pcatran_Y={}".format(pcatran_Y))

plt.scatter(pcatran_X[:,0],pcatran_X[:,1],c="g",marker = "*")
plt.scatter(pcatran_Y[:,0],pcatran_Y[:,1],c="r",marker = "o")
plt.plot([pcatran_Y[0,0],pcatran_Y[1,0]],[pcatran_Y[0,1],pcatran_Y[1,1]],c="b",marker = "o")
plt.plot([pcatran_Y[0,0],pcatran_Y[2,0]],[pcatran_Y[0,1],pcatran_Y[2,1]],c="r",marker = "o")
plt.savefig('k-means/pca_example/pca_tran_scatter3.jpg')
plt.pause(1)
plt.close()

def show_with_angle(angle):
    fig = plt.figure()
    ax = fig.add_subplot(111, projection='3d')
    ax.view_init(elev = 10., azim = angle)
    ax.scatter(pcatran_X[:, 0], pcatran_X[:, 1], pcatran_X[:, 2],  c="b", marker='o', alpha=1)
    ax.set_xlabel('tran_x')
    ax.set_ylabel('tran_y')
    ax.set_zlabel('tran_z')
    ax.legend()
    plt.pause(0.01)
    plt.savefig('k-means/pca_example/tran_pca3d/pca3_PCA3d_angle_'+str(angle)+'.jpg')
    plt.close()

for angle in range(0, 360, 5):
    show_with_angle(angle)

print("v_pca0={},v_pca1={},v_pca2={}".format(v_pca0,v_pca1,v_pca2))
s=3
print("pca.explained_variance_ratio_{}".format(pca.explained_variance_ratio_))
plt.bar([1, 2,3], pca.explained_variance_ratio_, align = "center",label="pca.explained_variance_ratio_={}".format(pca.explained_variance_ratio_))
plt.title("pca.explained_variance_ratio_")
plt.xlabel("components")
plt.ylabel("contribution")
plt.legend()
plt.savefig('k-means/pca_example/pca3d_contribution_PCA12_plotSn'+str(s)+'.jpg')
plt.pause(1)
plt.close()

print("pca.singular_values_={}".format(pca.singular_values_))

s=6

X, Y = make_blobs(random_state=8,
                  n_samples=100,
                  n_features=6,
                  cluster_std=4,
                  centers=3)


pca = PCA(n_components=6)
pca.fit(X)
v_pca0=pca.components_[0]
v_pca1=pca.components_[1]
v_pca2=pca.components_[2]

X_pca0=[0,10*v_pca0[0]]
Y_pca0=[0,10*v_pca0[1]]
Z_pca0=[0,10*v_pca0[2]]
X_pca1=[0,10*v_pca1[0]]
Y_pca1=[0,10*v_pca1[1]]
Z_pca1=[0,10*v_pca1[2]]
X_pca2=[0,10*v_pca2[0]]
Y_pca2=[0,10*v_pca2[1]]
Z_pca2=[0,10*v_pca2[2]]

def show_with_angle(angle):
    fig = plt.figure()
    ax = fig.add_subplot(111, projection='3d')
    ax.view_init(elev = 10., azim = angle)
    #for kx, ky,kz, name in zip(kmeans_model.cluster_centers_[:,0], kmeans_model.cluster_centers_[:,1], kmeans_model.cluster_centers_[:,2], labels):
        #ax.text(kx, ky,kz, name, alpha=0.8, size=20)
    ax.plot(X_pca0,Y_pca0,Z_pca0, c='b', marker='o', alpha=0.5, label='1st pricipal')
    ax.plot(X_pca1,Y_pca1,Z_pca1, c='r', marker='o', alpha=0.5, label='2nd principal')
    ax.plot(X_pca2,Y_pca2,Z_pca2, c='g', marker='o', alpha=0.5, label='3rd principal')
    ax.scatter(X[:, 0], X[:, 1], X[:, 2],  c="b", marker='o', alpha=1)
    #ax.scatter(kmeans_model.cluster_centers_[:,0], kmeans_model.cluster_centers_[:,1], kmeans_model.cluster_centers_[:,2], c = "b", marker = "*", s = 100)
    ax.set_xlabel('x')
    ax.set_ylabel('y')
    ax.set_zlabel('z')
    ax.legend()
    plt.pause(0.01)
    plt.savefig('k-means/pca_example/pca6d/keiba3_PCA3d_angle_'+str(angle)+'.jpg')
    plt.close()

for angle in range(0, 360, 5):
    show_with_angle(angle)

print(v_pca0[0],v_pca0[1],v_pca0[2])

pcatran_X = pca.transform(X)
print("pcatran_X={}".format(pcatran_X))

def show_with_angle(angle):
    fig = plt.figure()
    ax = fig.add_subplot(111, projection='3d')
    ax.view_init(elev = 10., azim = angle)
    ax.scatter(pcatran_X[:, 0], pcatran_X[:, 1], pcatran_X[:, 2],  c="b", marker='o', alpha=1)
    ax.set_xlabel('tran_x')
    ax.set_ylabel('tran_y')
    ax.set_zlabel('tran_z')
    ax.legend()
    plt.pause(0.01)
    plt.savefig('k-means/pca_example/tran_pca6d/pca3_PCA3d_angle_'+str(angle)+'.jpg')
    plt.close()

for angle in range(0, 360, 5):
    show_with_angle(angle)

print("v_pca0={},v_pca1={},v_pca2={}".format(v_pca0,v_pca1,v_pca2))
s=3
print("pca.explained_variance_ratio_{}".format(pca.explained_variance_ratio_))
plt.bar([1, 2,3,4,5,6], pca.explained_variance_ratio_, align = "center",label="pca.explained_variance_ratio_={}".format(pca.explained_variance_ratio_))
plt.title("pca.explained_variance_ratio_")
plt.xlabel("components")
plt.ylabel("contribution")
plt.legend()
plt.savefig('k-means/pca_example/pca6d_contribution_PCA12_plotSn'+str(s)+'.jpg')
plt.pause(1)
plt.close()

print("pca.singular_values_={}".format(pca.singular_values_))