今回は、だましのテクニックの話、その根本のところで「説明責任」の話があり、以下の紹介記事①にあるようなことはどうすればできるのか興味がわいたのでやってみました。
(以下は、参考記事①からの引用です)
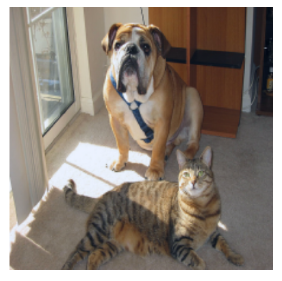
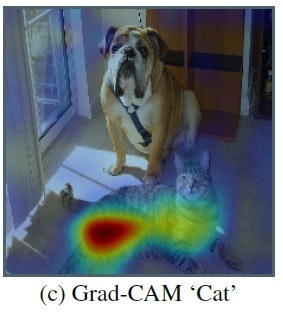
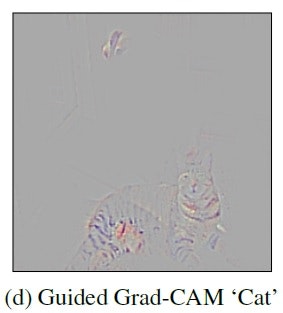
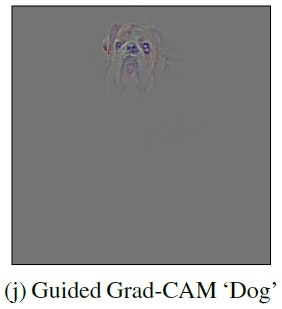
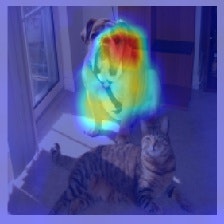
「写真のように"犬"と"猫"を判別する分類器にGrad-CAMを適用した場合、"犬"、"猫"のそれぞれについて特徴部位がヒートマップで強調されます。"犬"の特徴部位を可視化した場合には、犬の顔がヒートマップで強調され、"猫"の特徴部位を可視化した場合には、猫の胴体の部分がヒートマップで強調されています。...そこで拡張手法であるGuided Grad-CAMを適用して高解像度の画像を出力した結果が、ヒートマップ図の右隣の画像です。犬の画像では犬の顔の特徴として垂れた耳、目、頬などが可視化されているのが見て取れます。同様に猫の特徴部位として胴体の縞模様に着目していることがわかります。」
| 元画像 | なに | Grad-CAM | Guided-Grad-CAM |
|---|---|---|---|
 |
猫 |
|
|
|
犬 | 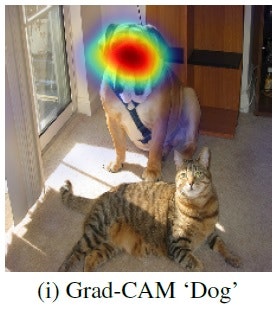 |
|
model = VGG16(weights='imagenet')
画像を上の左の犬猫の絵をpreprocessed_input = load_image(sys.argv[1])で呼び出しているので、適当な名前で保存して、以下のようにコマンドラインから入力すると実行できます。
サイトの実行の仕方は以下のとおりになっています。
python grad-cam.py <path_to_image>
たとえば、上記の画像をdog_cat.pngとすると、以下のとおりで動くはず、。。
python grad-cam.py dog_cat.png
動きませんでした。
ということで、以下の参考サイトの記述を参考に改変します。
【参考】
・【Keras】grad-camの実装において自作の学習済モデルを作りたい…がエラーが出ます…
改変箇所は以下のとおりで、コメントアウトしたのが上記参考サイトの今日現在のコードで、それらを以下のとおり変更すると動きました。
def grad_cam(input_model, image, category_index, layer_name):
    """
    model = Sequential()
    model.add(input_model)
    nb_classes = 1000
    target_layer = lambda x: target_category_loss(x, category_index, nb_classes)
    model.add(Lambda(target_layer,
                     output_shape = target_category_loss_output_shape))
    """
    nb_classes = 1000
    target_layer = lambda x: target_category_loss(x, category_index, nb_classes)
    x = Lambda(target_layer, output_shape = target_category_loss_output_shape)(input_model.output)
    model = Model(inputs=input_model.input, outputs=x)

    loss = K.sum(model.layers[-1].output)
    conv_output =  [l for l in model.layers if l.name == layer_name][0].output  #is
    #conv_output =  [l for l in model.layers[0].layers if l.name == layer_name][0].output #is
    grads = normalize(K.gradients(loss, conv_output)[0])
    gradient_function = K.function([model.layers[0].input], [conv_output, grads])
また、以下の参考に改善コードがのっていますが、それも以下のように変更しないと動きません。
【参考】Code crashes for new version of TF and Keras #12@isshues
・keras-grad-cam/grad-cam.py
    #model = keras.models.Model(input_model.layers[0].input, x)
    model = keras.models.Model(inputs=input_model.input, outputs=x)
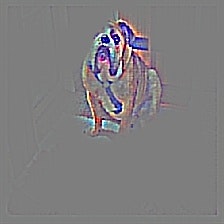
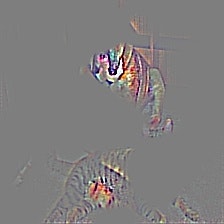
やっと、結果は、似ているのが得られました。というか、こんな感じでちゃんと該当の犬を捕獲していると思います。上記よりは少し領域が広がっているようにも思います。
| 元画像 | なに | Grad-CAM | Guided-Grad-CAM |
|---|---|---|---|
 |
243 |
|

|
predicted_class = np.argmax(predictions)
print(predicted_class)
cam, heatmap = grad_cam(model, preprocessed_input, predicted_class, "block5_conv3")
cv2.imwrite("gradcam.jpg", cam)
つまりpredicted_class=243ということになります。
ちなみに、その手前のコード
predictions = model.predict(preprocessed_input)
top_1 = decode_predictions(predictions)[0][0]
print('Predicted class:')
print('%s (%s) with probability %.2f' % (top_1[1], top_1[0], top_1[2]))
でクラスなどを出力していますが、これは標準出力見ると
bull_mastiff (n02108422) with probability 0.24
と出ていました。
・コードを読む
分かったように書くのも何かしっくりこないので、今回もコード中心に動かしてみます。
まず、コードの主な部分は以下のとおりです。
最初の部分は、普通に読めると思います。
preprocessed_input = load_image(sys.argv[1])
model = VGG16(weights='imagenet')
predictions = model.predict(preprocessed_input)
このdecode_predictions(predictions)[0][0]が曲者です。
これは、上記で予測したpredictionsから名称や確率を取得しています。
以下のようにすると、top3のデータが得られます。つまり、[0][0]の最初の[0]はトップのデータを取得していることになります。
【参考】
・Usage examples for image classification models@KerasDocumentation
decode the results into a list of tuples (class, description, probability)
print('Predicted:', decode_predictions(predictions, top=3)[0])
top_1 = decode_predictions(predictions)[0][0]
print('Predicted class:')
print('%s (%s) with probability %.2f' % (top_1[1], top_1[0], top_1[2]))
predicted_class = np.argmax(predictions)
print(predicted_class)
そして、大切なことは以下の主要な関数grad_camの引数に渡すのは、predicted_classであるところです。
これは、grad_cam()の中で、 target_category_loss(x, category_index, nb_classes)という関数によって、tf.multiply(x, K.one_hot([category_index], nb_classes))を計算するためにcategory_indexが必要になるためです。
あとは、どのLayerのgrad_camを見たいかということでVGG16のblock5_conv3を指定しています。この層の値も変数であり、いろいろな値を試してやってみることができます。
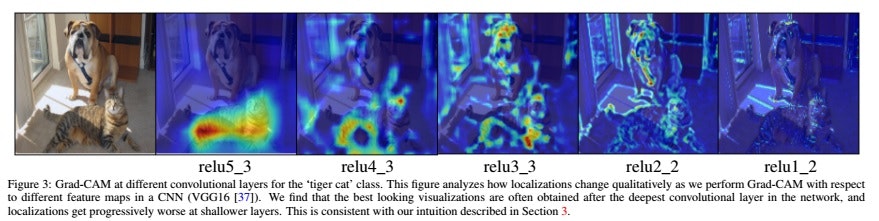
※上記参考②の論文でこのあたりの例として以下が示されています。この結果、キャプションにも記載されているように本文において、一番深い層がhigh level semanticsとdetailed spatial imformationとの最良のcompromise(妥協点)だと云っています。
そして、まず、gradcamを保存。
grad_cam内で何をやっているかは、今回は触れないことにします。
※ただただ、動かすことに専念
cam, heatmap = grad_cam(model, preprocessed_input, predicted_class, "block5_conv3")
cv2.imwrite("gradcam.jpg", cam)
以下がguided backpropagationの計算をするための関数呼び出しです。
最初の関数は、わかりませんm(_ _)m
⇒カスタムgradients"GuidedBackProp"の登録です
【参考】
・what's ops from tensorflow.python.framework for?
以下のdef _register_guided_gradient(name):と同じコードです
・keras-vis/vis/backend/tensorflow_backend.py
・Tensorflow - Access weights while doing backprop
二つ目はguided_modelを定義しています。
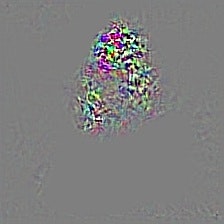
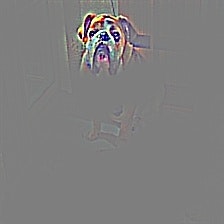
しかし、reluをkeras.activations.reluからtf.nn.reluに変更しているらしいですが、効果や理由はわかりません。そこで、keras.activations.reluのままで(変換部分をすべてコメントアウトして)実行してみます。画像は得られて以下のようになりました。やはり、keras_reluの所には犬の絵が出ていません。
| 元画像 | Grad-CAM | keras_relu | nn_relu |
|---|---|---|---|
|
 |
|
|
register_gradient()
guided_model = modify_backprop(model, 'GuidedBackProp')
compile_saliency_function()では、 K.function([input_img, K.learning_phase()], [saliency])という関数定義をしています。ここでinput_imgに対して、saliencyと呼ばれる、layer.outputの最大値の和の偏微分を出力しているようです。
※間違っていたらごめんなさい。。。別途理論見ながら再考察したいと思います
saliency_fn = compile_saliency_function(guided_model)
saliency = saliency_fn([preprocessed_input, 0])
かくして、gradcamは、上記のsaliencyとheatmapの積で定義されています。
※np.newaxisは計算できるように次元を導入しているようです。。。
【参考】以下は直接的ではないですが、計算結果を追うと参考になります
・Plotting x and y values with result as color / heatmap
gradcam = saliency[0] * heatmap[..., np.newaxis]
cv2.imwrite("guided_gradcam.jpg", deprocess_image(gradcam))
・コードをいじって上記の絵を再現する
上の絵の再現というのは、つまり猫を出すってことです。
もともとの記事だと、犬・猫の学習した識別器にかけたように読めますが、それはVGG16のことです。ということで、このVGG16の識別器に犬・猫の画像を入力して猫の画像も出力することになります。
これは、上記のコードを読むの中で上記では、一番目の予測=犬(bull_mastiff (n02108422) with probability 0.24)を描画していました。
そこで、二番目や三番目はどうなっているでしょう。
ということで、print('Predicted:', decode_predictions(predictions, top=3)[0])として三番目まで出力してみると、。。以下のように三番目に猫っぽいのが出てきます。
Predicted: [('n02108422', 'bull_mastiff', 0.23710363),
 ('n02108089', 'boxer', 0.14418593),
 ('n02129604', 'tiger', 0.12792063)]
ここで、実は「大切なことは以下の主要な関数grad_camの引数に渡すのは、predicted_classであるところです。」を思い起こすと、犬のpredicted_classが必要になります。
もっと簡単に求まるかもですが、ウワンは以下の参考から次のように求めました。
【参考】
・Pythonでリストのn番目に大きい・小さい値のインデックスの取得
つまり、i番目のtop_1とpredicted_classは以下のように求められます。
top_1 = decode_predictions(predictions)[0][i]
predicted_class = predictions.argsort()[0][::-1][i]
これで、i=0..bull_mastiff, i=1..boxer, そしてi=2..tigerということで、猫の絵っぽいものが得られます。
ちなみに、ここでは以下のように5番目までを出力してみました。
predictions = model.predict(preprocessed_input)
register_gradient()
guided_model = modify_backprop(model, 'GuidedBackProp')
guided_model.summary()
for i in range(5):
    top_1 = decode_predictions(predictions)[0][i]
    print(predictions.argsort()[0][::-1][i])
    print('Predicted class:')
    print('%s (%s) with probability %.2f' % (top_1[1], top_1[0], top_1[2]))
    predicted_class = predictions.argsort()[0][::-1][i] #np.argmax(predictions)
    cam, heatmap = grad_cam(model, preprocessed_input, predicted_class, target_layer)
    cv2.imwrite("gradcam"+str(top_1[1])+".jpg", cam)
    saliency_fn = compile_saliency_function(guided_model)
    saliency = saliency_fn([preprocessed_input, 0])
    gradcam = saliency[0] * heatmap[..., np.newaxis]
    cv2.imwrite("guided_gradcam"+str(top_1[1])+".jpg", deprocess_image(gradcam))
こうして、5種類の絵が得られました。
※なぜか、上で一個だけ得たときのものはここでは二番目の候補になっていますが、このまま掲載することとします(バグがありそうですが見つけた時点で修正します)
| クラス | Grad-CAM | Guided Grad-CAM |
|---|---|---|
| boxer (n02108089) with probability 0.42 | 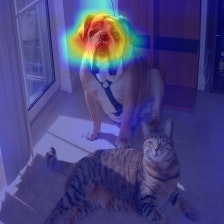 |
 |
| bull_mastiff (n02108422) with probability 0.28 | 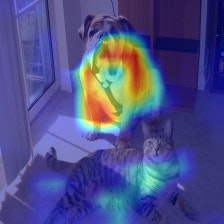 |
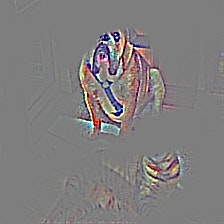 |
|
|tiger_cat (n02123159) with probability 0.05|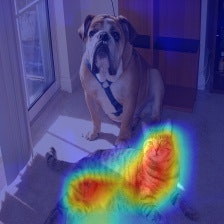 |
|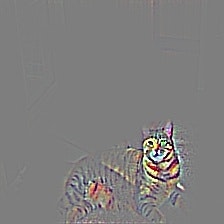 |
|
|tiger (n02129604) with probability 0.05|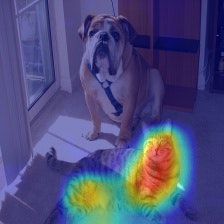 |
|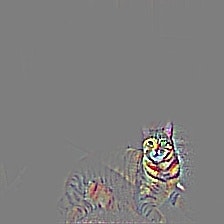
|
|Great_Dane (n02109047) with probability 0.05|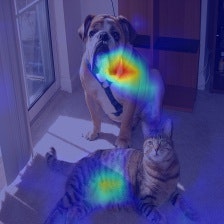 |
| |
|
コードは以下に置きました
・cheating_DL/grad-cam_5category.py
まとめ
・Grad-CAMとGuided Grad-CAMを動かして遊んでみた
・一応、それらしい画像に到達した
・理論もコードもまだまだ半分理解状態なのでさらにいろいろ試そうと思う
・層を変えたり、モデルを変更して他のモデルで同じことをやった結果は次回の記事にしよう