はじめに
Swift で OpenCV の ArUco モジュールを使ってARマーカーを検出するコードを書きました。
ArUcoモジュールによるARマーカー検出は、マーカーの向きや傾きによる影響が少なく、非常に認識精度が高いです。検出したマーカーのから得られる情報にしたがって進行方向を決定する動体の実装などに使えそうです。
SwiftにOpenCVを導入する
こちらの記事を参考にしてください。
Swiftで OpenCV の ArUco モジュールを使う
プログラム
# import <Foundation/Foundation.h>
# import <UIKit/UIKit.h>

@interface opencvWrapper : NSObject {
    UIImage *_image;
    NSDictionary *_markerDict;
}
- (UIImage *)image; // 検出されたマーカーを描画した画像
- (NSDictionary *)markerDict; // 検出されたマーカーの (id, rect) の辞書

//(返り値の型 *)関数名:(引数の型 *)引数名;;
- (void)detectARMarker:(UIImage *)input_img;
@end
Objective-C++のヘッダーファイルです。
Swiftから検出されたARマーカーが描画された画像と、ARマーカーのIDおよび座標が取得しやすいように、インスタンス変数として_image、_markerDictを定義しています。
# import <opencv2/opencv.hpp>
# import <opencv2/imgcodecs/ios.h>
# import <opencv2/aruco.hpp>
# import "opencvWrapper.h"
using namespace cv;
using namespace std;

@implementation opencvWrapper
- (UIImage *)image { return _image; };
- (NSDictionary *)markerDict { return _markerDict; }

- (void)detectARMarker:(UIImage *)input_img {
    Mat mat;
    UIImageToMat(input_img, mat);
    cvtColor(mat, mat, CV_RGBA2RGB);
    vector<int> ids;
    vector<vector<Point2f> > corners;

    // ArUcoモジュールに事前定義されたARマーカーの辞書を取得する
    Ptr<aruco::Dictionary> dictionary = aruco::getPredefinedDictionary(aruco::DICT_6X6_250);

    // detectMarkers でARマーカーを検出する
    // ids に ARマーカーのID、corners に ARマーカーの座標を格納する
    aruco::detectMarkers(mat, dictionary, corners, ids);

    // mat (元の画像) に 検出されたARマーカーを描画する
    if (ids.size() > 0)
        aruco::drawDetectedMarkers(mat, corners, ids); // draw bounding boxes.

    // Mat型の画像を Swiftで扱えるUIImage型に変換
    UIImage * output_img = MatToUIImage(mat);
    _image = output_img;

    // ids と corners を {id<NSNumber>: corner<NSArray[CGPoint]>} の形式の辞書に変換してmutableDictに格納する
    NSMutableDictionary *mutableDict =  [@{} mutableCopy];
    for (int i=0; i<ids.size(); i++) {
        auto id = ids[i];
        NSNumber* markerId = [NSNumber numberWithInt:id];
        NSMutableArray* corner = [[NSMutableArray alloc] initWithCapacity:corners[i].size()];
        for (auto point: corners[i]) {
            [corner addObject:[NSValue valueWithCGPoint:CGPointMake(point.x, point.y)]];
        }
        mutableDict[markerId] = corner;
    }
    _markerDict = mutableDict;
}
@end
Objective-C++の実装ファイルです。
詳しい説明はコード中のコメントとして記述しています。
detectMarkers関数によるARマーカーの検出結果は、検出されたARマーカーのIDとcorners(四隅の座標)の形で得られ、drawDetectedMarkers関数によって画像の中にARマーカーの四隅を直線で結んだ枠とidを描画しています。
import UIKit

class ViewController: UIViewController {

    let openCV = opencvWrapper()
    var imageView: UIImageView?
    var detectBtn: UIButton?

    override func viewDidLoad() {
        super.viewDidLoad()
        let image = UIImage(named: "armarkertest")
        self.imageView = UIImageView(image: image)
        self.imageView?.frame = CGRect(x: 75, y: 200, width: 250, height: 250)
        self.view.addSubview(self.imageView!)

        self.detectBtn = UIButton(type: .system)
        self.detectBtn?.frame = CGRect(x: 75, y: 550, width: 250, height: 90)
        self.detectBtn?.setTitle("Detect", for: .normal)
        self.detectBtn?.setTitleColor(UIColor.white, for: .normal)
        self.detectBtn?.titleLabel?.font = .systemFont(ofSize: 24)
        self.detectBtn?.backgroundColor = UIColor.blue
        self.detectBtn?.addTarget(self, action: #selector(detect(_:)), for: .touchUpInside)
        self.view.addSubview(self.detectBtn!)

    }

    @objc func detect(_ sender: UIButton) {
        openCV.detectARMarker(self.imageView?.image)
        let aruco_img = openCV.image()
        self.imageView?.image = aruco_img

        guard let markers = openCV.markerDict() else { return }
        if let markerDict = markers as? [Int : Array<CGPoint>] {
            for (key,data) in markerDict {
                print("id: \(key), corner: \(data)\n")
            }
        }
    }
}
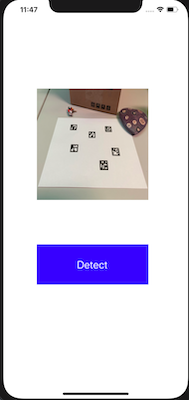
ARマーカーが複数個映った画像を画面上部のUIImageViewに配置し、その下に「Detect」ボタンを配置しています。
「Detect」ボタンを押下すると、OpencvWrapper.mm の detectARMarker関数が実行され、UIImageViewの画像がARマーカー検出結果が反映されたものに変わります。
また、同時にARマーカーのIDと座標の情報が標準出力に表示されます。
実行結果は以下です。
「Detect」前
「Detect」後
少し小さいですが、画像の中のARマーカーが緑の枠で囲われ、マーカーIDが赤字で記されています。
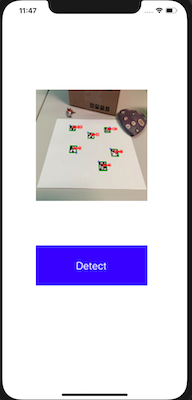
標準出力
id: 62, corner: [(233.0, 273.0), (190.0, 273.0), (196.0, 241.0), (237.0, 241.0)]

id: 40, corner: [(359.0, 310.0), (404.0, 310.0), (410.0, 350.0), (362.0, 350.0)]

id: 124, corner: [(425.0, 163.0), (430.0, 186.0), (394.0, 186.0), (390.0, 162.0)]

id: 203, corner: [(195.0, 155.0), (230.0, 155.0), (227.0, 178.0), (190.0, 178.0)]

id: 98, corner: [(427.0, 255.0), (469.0, 256.0), (477.0, 289.0), (434.0, 288.0)]

id: 23, corner: [(298.0, 185.0), (334.0, 186.0), (335.0, 212.0), (297.0, 211.0)]