はじめに
ruby on railsでアプリ開発を進めるが、コントローラー作成以降のコマンドや設定などを備忘録として残す。
今回、プロジェクト名は「qanda」としている。
また、環境構築や初期設定はこちらの記事に記載している。
・AWS Cloud9にRuby on Railsの環境構築する
完全に個人の備忘録ようなので、見た目や言葉足らずがあるので、ご了承ください。
コントローラーの作成
questionsというコントローラーを作って、保有するアクションはindex,show,new,editとする。
rails g controller questions index show new edit
モデルの作成
Questionモデルを作る。データベースのカラム情報は記載の通り
rails g model question name:string title:string content:text
db>migrateフォルダのタイムスタンプファイルを確認して問題なければmigrateする。
rails db:migrate
反映されているか確認する。dbconsoleから抜ける方法は「.q」を打つ。
rails dbconsole
sqlite> .schema
indexアクションを確認
railsを起動後、URLの語尾に/questions/indexをつけて確認
ルーティングの設定確認
rails routes
なお、現在はこのようなルーティング設定になっている。
Rails.application.routes.draw do
  get 'questions/index'
  get 'questions/show'
  get 'questions/new'
  get 'questions/edit'
  # For details on the DSL available within this file, see http://guides.rubyonrails.org/routing.html
end
なお、下記のように書き直すと、一般的に必要なるルーティングは自動で設定する。
Rails.application.routes.draw do
  resources :questions
  # For details on the DSL available within this file, see http://guides.rubyonrails.org/routing.html
end
これで、railsを起動後、URLの語尾に/questionsをつけると、
indexの内容が確認できる。
rootメソッドの設定
URLの語尾に何もつけないでも、indexアクションに行けるようにしたい。
(rootのURLでindexアクションを動かす)
Rails.application.routes.draw do
  root 'questions#index'
  resources :questions
  # For details on the DSL available within this file, see http://guides.rubyonrails.org/routing.html
end
質問一覧ページの作成
questions_controllerでindexアクションを修正する。
  def index
    @questions = Question.all
  end
viewでindex.html.erbを編集して、見た目を作る。
例えば、このように画面を作ってみる。(質問データがまだないのでデータ表示なし)
<h2>Questions</h2>
<div class="row">
    <div class="col-md-12">
        <table class="table table-striped">
            <thead class="thead-light">
                <tr>
                    <th>ID</th>
                    <th>Title</th>
                    <th>Menu</th>
                </tr>
            </thead>
            <tbody>
                <% @questions.each do |question| %>
                    <tr>
                        <td><%= question.id %></td>
                        <td><%= question.title %></td>
                        <td>[Edit] [Delete]</td>
                    </tr>
                <% end %>
            </tbody>
        </table>
    </div>
</div>
シードファイルを使った初期データの挿入
dbフォルダのseeds.rbを編集する。データを3つ作る準備をする。
Question.create(id: 1, name: 'Test name 1', title: 'Test question 1', content: 'Test content 1')
Question.create(id: 2, name: 'Test name 2', title: 'Test question 2', content: 'Test content 2')
Question.create(id: 3, name: 'Test name 3', title: 'Test question 3', content: 'Test content 3')
その後、ターミナルでコマンドを実行
rails db:seed
railsを起動して、動作確認をすると無事データを確認できる。

bootstrapの導入
Gemfileを使って導入する。下記をファイルに追加する。
なお、bootstrapバージョンは4.1.1以上で固定しておく。
また、jqueryは3系をインストールする。
gem 'bootstrap', '~> 4.1.1'
gem 'jquery-rails', '~> 4.3.1'
gemのインストールを実施する
bundle install
application.cssの拡張子をscssに変換する。
mv app/assets/stylesheets/application.css app/assets/stylesheets/application.scss
application.scssの中身を以下に変更する。
@import "bootstrap";
applivation.jsに以下を追加する。
(require_treeの手前)
参考:https://github.com/twbs/bootstrap-rubygem
//= require jquery3
//= require popper
//= require bootstrap-sprockets
各ページの共通で使われるHTML
views>layouts>application.html.erbがそれに当たる
新規質問の作成
viewの作成
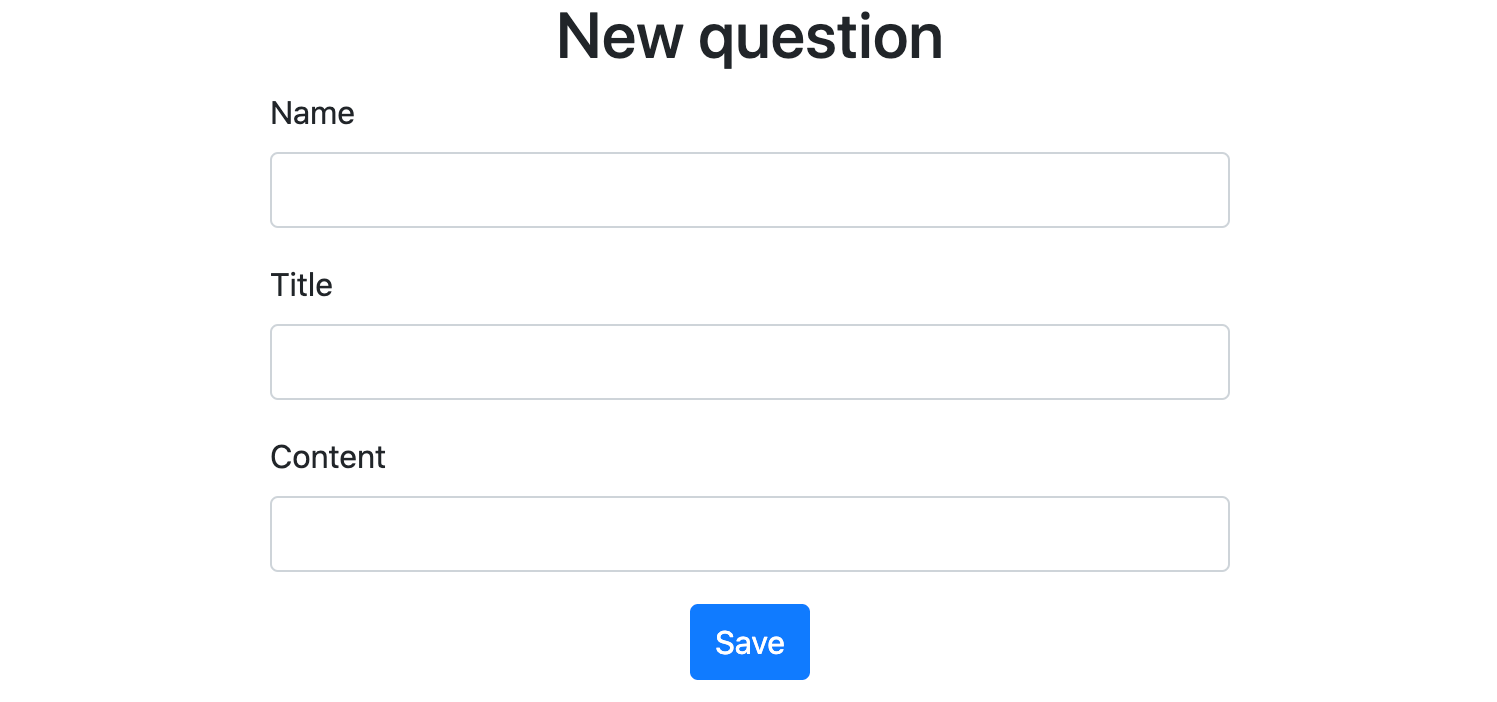
new.html.erbを下記のように記述する。
<div>
    <div class="col-md-4 offset-md-4">
        <h2 class="text-center">New question</h2>
        <%= form_with model: @question, local: true do |f| %>
            <div class="form-group">
                <label>Name</label>
                <%= f.text_field :name, class: "form-control" %>
            </div>

            <div class="form-group">
                <label>Title</label>
                <%= f.text_field :title, class: "form-control" %>
            </div>

            <div class="form-group">
                <label>Content</label>
                <%= f.text_field :content, class: "form-control" %>
            </div>

            <div class="text-center">
                <%= f.submit "Save", class: "btn btn-primary" %>
            </div>
        <% end %>
    </div>
</div>
またコントローラーでnewアクションを変更する。
  def new
    @question = Question.new
  end
投稿データの保存
コントローラーにcreateアクションを追加する。
新規作成でsaveを押すと呼び出されるアクションのこと。
- question_paramsメソッドの戻り値を利用
- redirect_to root_pathでrootのURLへ遷移
- notice: 'Success!'で、Success!のメッセージを表示
- flash[:alert]でアラートメッセージの表示
- render :newで、新規投稿ページにいたままになる
 def create
    @question = Question.new(question_params)
    if @question.save
      redirect_to root_path, notice: 'Success!'
    else
      flash[:alert] = 'Save error!'
      render :new
  end
また、privateで以下も定義する。
question_paramsメソッドによって、ストロングパラメータという仕組みを使って、
フォームから送られてきた特定のデータのみを受け付ける。
  private
    def question_params
      params.require(:question).permit(:name, :title, :content)
    end
バリデートの追加
- nameは必須とする。
- titleは必須とする。
- contentは必須とする。
- エラーのときにメッセージを出す。
class Question < ApplicationRecord
    validates :name, presence: true
    validates :title, presence: true
    validates :content, presence: true
end
以下で、noticeで正常系のメッセージ・alertで異常系のメッセージを表示する。
  <body>
    <div class="container">
      <% if flash[:notice] %>
        <p class="text-success"><%= flash[:notice] %></p>
      <% end %>
      <% if flash[:alert] %>
        <p class="text-danger"><%= flash[:alert] %></p>
      <% end %>
      <%= yield %>
    </div>
  </body>
リンクの貼り付け
下記で新規投稿画面へのリンクを貼り付けれる
link_toはビューヘルパーで、第一引数が名称・第二引数はURLとなる。
また、URLはroutesのprefixから確認できる。
<div>
  <%= link_to 'New question', new_question_path %>
</div>
質問詳細画面
リンクの作成
こちらでeditにリンクを貼ることができる
[<%= link_to 'Edit', edit_question_path(question) %>]
controllerの実装
URLでIDが渡されるので、それを使う。
  def edit
    @question = Question.find(params[:id])
  end
また、updateコントローラーを作成する。
  def update
    @question = Question.find(params[:id])
    if @question.update(question_params)
      redirect_to root_path, notice: 'Success!'
    else
      flash[:alert] = 'Save error!'
      render :new
    end
  end
質問削除機能の追加
index.html.erbにこちらを追加する
<td>[<%= link_to 'Edit', edit_question_path(question) %>]
    [<%= link_to 'Delete', question_path(question), method: :delete, data:{ confirm: 'Are you sure?'}  %>]</td>
質問詳細画面
index.html.erbにこちらを追加する
<td><%= link_to question.title, question_path(question) %></td>
回答投稿機能
これらのような機能を追加してみる
- ユーザが質問に対して、回答投稿できる
- ユーザが回答一覧を閲覧できる
- ユーザが回答を編集できる
- ユーザが回答を削除できる
showコントローラーの実装
  def show
    @question = Question.find(params[:id])
  end
answersコントローラーを作成する
こちらのコマンドでコントローラーを作成
rails g controller answers edit
answerモデルを作成する
questionsテーブルのidとanswersテーブルのquestion_idを紐づける(1対多)
rails g model answer question:references name:string content:text
また、questionモデルに下記を追加して、questionは複数のanswerを持っていることを示す。
dependent: : destroyでquestionが削除されたら紐づくanswersを全て削除することを示す。
has_many :answers, dependent: :destroy
次にこちらのコマンドを実行して、DBを作成する
rails db:migrate
answer関連のルーティング設定
routes.rbの中身をこちらに書き換える
Rails.application.routes.draw do
  get 'answers/edit'
  root 'questions#index'
  resources :questions do
    resources :answers
  end
end
Questionsコントローラーに回答投稿機能の連携
question_controller.erbを変更する。
  def show
    @question = Question.find(params[:id])
    @answer = Answer.new
  end
回答投稿画面
show.html.erbを編集して、このように記載する
<div class="row">
    <div class="col-md-12">
        <h2><%= @question.title %></h2>
        <div>
            Content: <%= @question.content %>
        </div>
        <div>
            Name: <%= @question.name %>
        </div>
        <hr>
        <h3>Post new answer.</h3>

        <%= form_with model: [@question, @answer], local: true do |f| %>
            <%= f.hidden_field :question_id, { value: @question.id} %>
            <div class="form-group">
                <label>Name</label>
                <%= f.text_field :name, class: 'form-control' %>
            </div>
            <div class="form-group">
                <label>Content</label>
                <%= f.text_area :content, class: 'form-control' %>
            </div>
            <div class="text-center">
                <%= f.submit "Post", class: 'btn btn-primary' %>
            </div>
        <% end %>
        <div>
            <%= link_to '> Home', root_path %>
        </div>
    </div>
</div>
質問が投稿されたときの保存処理
answers_controller.rbを編集して、下記を追加する。
  def create
    @question = Question.find(params[:question_id])
    @answer = Answer.new
    if @answer.update(answer_params)
      redirect_to question_path(@question), notice: 'Success!'
    else
      redirect_to question_path(@question), alert: 'Invalid!'
    end
  end
バリデーション
models>answer.rbに追加する。
  validates :content, presence: true
  validates :name, presence: true
回答一覧の表示
show.html.erbに表示を追加する。
場所はh3タグの上に配置する。
        <div>
            <h3>Answers</h3>
            <table class="table table-striped">
                <% if @question.answers.any? %>
                    <thead class="thead-light">
                        <tr>
                            <td>Answer</td>
                            <td>Name</td>
                            <td>Menu</td>
                        </tr>
                    </thead>
                    <tbody>
                        <% @question.answers.each do |answer| %>
                            <tr>
                                <td><%= answer.content %></td>
                                <td><%= answer.name %></td>
                                <td>[Edit] [Delete]</td>
                            </tr>
                        <% end %>
                    </tbody>
                <% else %>
                    <p>No Answer yet.</p>
                <% end %>
            </table>
        </div>
解答の編集機能
上記で追記したviewのコードで[Edit]となっている箇所を次に書き換える
[<%= link_to 'Edit', edit_question_answer_path(@question, answer) %>]
answers_controller.ebを編集して、下記を追加する。
  def edit
    @question = Question.find(params[:question_id])
    @answer = Answer.answers.find(params[:id])
  end
また、answersのedit.html.erbを編集する
<div>
    <h2>Update answer</h2>
    <%= form_with model:[@question, @answer], local: true do |f| %>
        <div class="form-group">
            <div class="form-group">
                <label>Name</label>
                <%= f.text_field :name, class: "form-control" %>
            </div>
            <div class="form-group">
                <label>Content</label>
                <%= f.text_area :content, class: "form-control" %>
            </div>
             <div class="text-center">
                <%= f.submit "Update", class: "btn btn-primary" %>
            </div>
        </div>
    <% end %>
</div>
回答の編集
answers_controller.rbに追加する
  def update
    @question = Question.find(params[:question_id])
    @answer = @question.answers.find(params[:id])
    if @answer.update(answer_params)
      redirect_to question_path(@question), notice: 'Success!'
    else
      flash[:alert] = 'Invalid'
      render :edit
    end
  end
回答の削除
answersのshow.html.erbに記載された[Delete]を下記のように修正する。
[<%= link_to 'Delete', question_answer_path(@question, answer),
method: :delete, data:{ confirm: 'Are you sure?'} %>]
また、answers_controller.rbに追加する
  def destroy
    @question = Question.find(params[:question_id])
    @answer = @question.answers.find(params[:id])
    @answer.destroy
    redirect_to question_path(@question), notice: 'Deleted!'
  end
さいごに
これで、ひととりのruby on railsをつかったWEBアプリができた。
次は公開に向けた手順を残していく


