Rails+Vue.js+Webpackerによる「Create, Read, Update, Destroy」処理のチュートリアルを記述する。
なお,前提知識として,Railsチュートリアル終了程度を想定する。
<概要>
■ 本記事の内容
- 新規データの登録,既存データの編集,データの削除機能を実装する。
- 今回のコードは,GitHubのコミット履歴で確認可能である。
- [APIの作成(Create:本の登録)]から[APIの作成(Delete:本の削除)]まで
■ 記事共通
-
目次
-
実装機能
- お気に入りの本に係る登録,参照,編集,削除処理
- 非同期通信(Ajax)による[Rails+Vue.js]のCRUD処理
- SinglePageApplication(SPA)
- ユーザー登録機能(JWTによるトークン認証)
-
開発環境
- MacOS Mojave
- Ruby(2.5.1)
- Ruby on Rails(5.2.1)
- Vue.js(2.6.10)
- Yarn(1.17.0)
- Webpack(4.39.2)
-
学習情報URL
<本文>
■ APIの作成(Create:本の登録)
○1:[books_controller.rb]の修正
-
新規登録に係るCreateアクションを追加する。
-
CSRF対策を無効化する。
-
RailsのCSRF対策
- Railsでは, 悪意のあるサイトからのリクエストを防止するため,POST等でRailsのデータを変更しようとする際は,CSRFトークンも同時に送信する必要がある。
- ERBでは,[form_with]等のヘルパーメソッド呼び出し時,次のようにCSRFトークンも自動的に生成及び送信していることから,特に気にする必要はない。
<input type="hidden" name="authenticity_token" value="~略~">
- しかし,Vue.js等のフロント側からデータの変更を試みる場合,つまりAjaxで通信する際は,その自動対策の恩恵を受けられないため,フロント側で対策する必要がある。
- 本稿では,[protect_from_forgery :except => [:action]]を使用してCSRF対策を無効にすることでAPI通信を実現したが,セキュリティ上問題があると考えるため,今後,参考URLに基づきCSRF対策の項目を追加する。
-
参考URL
class Api::BooksController < ApplicationController
  protect_from_forgery :except => [:create]
...
  def create
    @book = Book.new(book_params)
    if @book.save
      head :no_content
    else
      render json: @book.errors, status: :unprocessable_entity
    end
  end

  private

  def book_params
    params.fetch(:book, {}).permit(
      :title, :author, :publisher, :genre
    )
  end
end
○2:[BookCreate.vue]の作成
- createBook: function(){}
- [axios.post('/api/books', { book: this.book })]により,Railsに入力したデータを送信し,
- [this.$router.push({ path: '/' });]により,ルートページへリダイレクトする。
<template>
  <div class="container">
    <h1 class="#f3e5f5 purple lighten-5 center">本の登録</h1>
    <form class="col">
      <div class="row">
        <div class="input-field">
          <input placeholder="Title" type="text" class="validate" v-model="book.title" required="required"></br>
        </div>
      </div>
      <div class="row">
        <div class="input-field">
          <input placeholder="Author" type="text" class="validate" v-model="book.author" required="required">
        </div>
      </div>
      <div class="row">
        <div class="input-field">
          <input placeholder="Publisher" type="text" class="validate" v-model="book.publisher" required="required">
        </div>
      </div>
      <div class="row">
        <div class="input-field">
          <input placeholder="Genre" type="text" class="validate" v-model="book.genre" required="required">
        </div>
      </div>
      <div class="btn btn-info waves-effect waves-light" v-on:click="createBook">本を登録</div>
    </form>
  </div>
</template>

<script>
  import axios from 'axios';
  export default {
    data: function() {
      return {
        book: {
          title: '',
          author: '',
          publisher: '',
          genre: ''
        }
      }
    },
    methods: {
      createBook: function () {
        if (!this.book.title) return;
        axios.post('/api/books', { book: this.book }).then((res) => {
          this.$router.push({ path: '/' });
        }, (error) => {
          console.log(error);
        });
      }
    }
  }
</script>

<style scoped></style>
○3:[router.js]の修正
- 新規登録用のコンポーネントBookCreate.vueをルーティングに追加する。
import Vue          from 'vue'
import VueRouter    from 'vue-router'
import BookHome     from '../pages/BookHome.vue'
import BookCreate   from '../pages/BookCreate.vue'

Vue.use(VueRouter)

const routes = [
  { path: '/',  name: 'BookHome', component: BookHome },
  { path: '/create',  component: BookCreate },
];

export default new VueRouter({ routes });
○4:[routes.rb]の修正
- ルーティングにCreateアクションを追加する。
Rails.application.routes.draw do
  root to: 'home#index'

  namespace :api do
    resources :books, only: [:index, :show, :create]
  end
end
○5:[Header.vue]の修正
- 新規登録ページへのリンクを設定する。
...
<ul id="nav-mobile" class="right">
  <li><router-link to="/create">本の登録</router-link></li>
</ul>
...
○6:動作確認
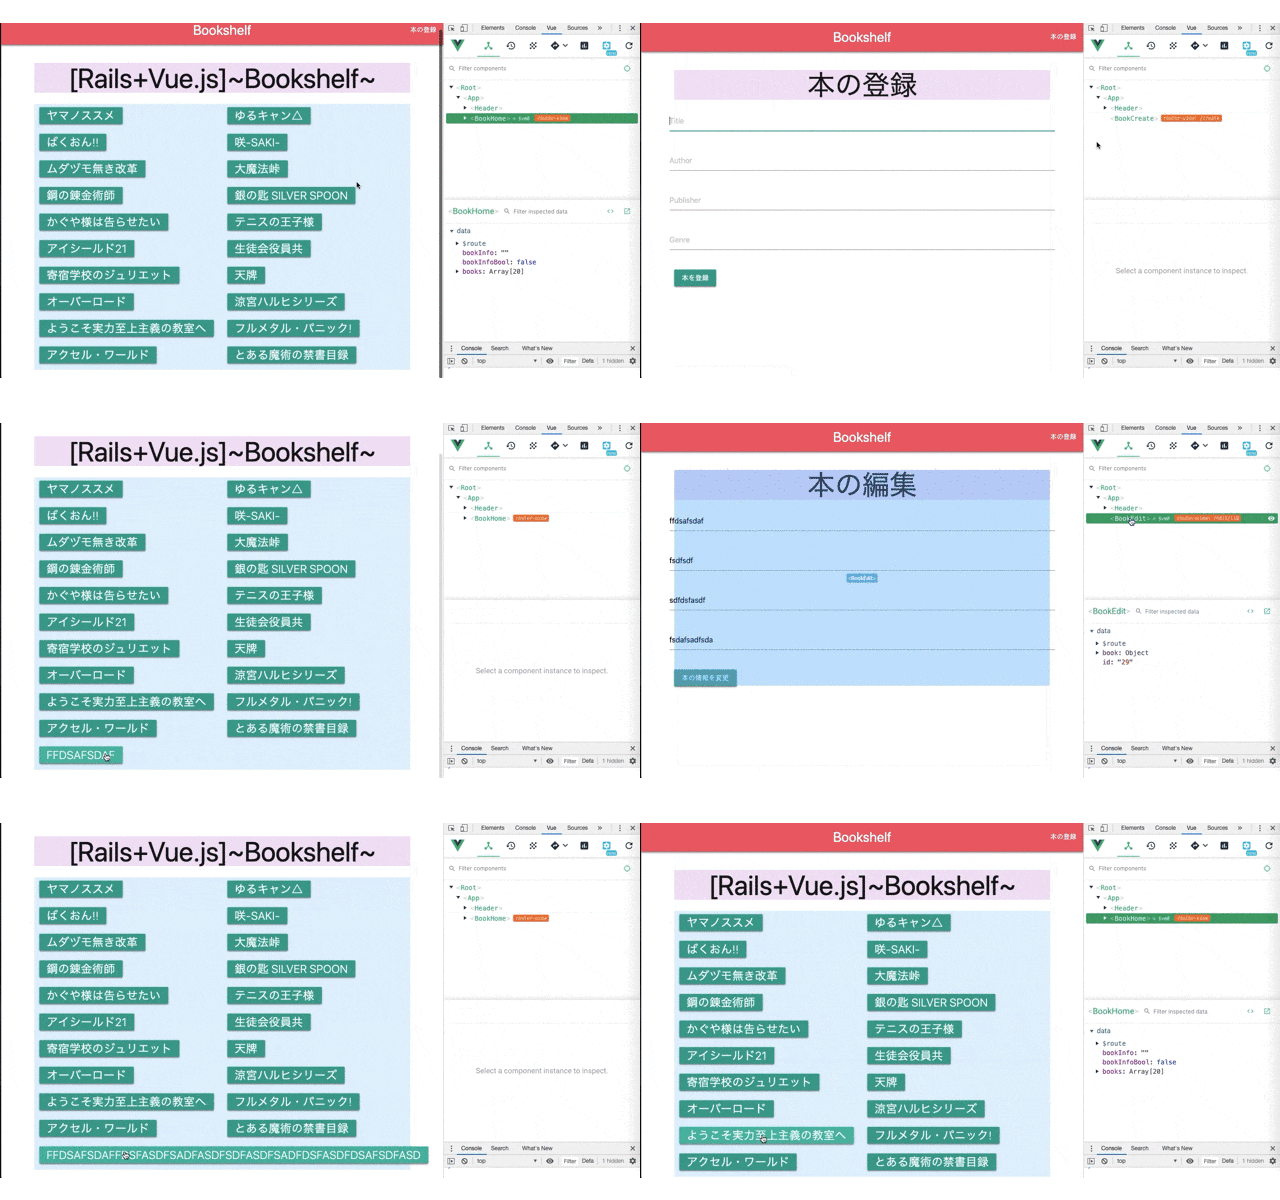
この時点で,次のように動作したら成功となる。
なお,GIFは本稿最後に掲載する。
- トップページからヘッダーの[本の登録]をクリックすると,新規登録ページに遷移する。
- 4つのフィールドに本の情報を入力後,[本を登録]をクリックすると,トップページに遷移する。
- トップページの下部に登録した本が表示されている。
■ APIの作成(Update:本の編集)
○1:[books_controller.rb]の修正
- updateアクションを追加する。
- CSRF対策の除外設定にupdateアクションを追加する。
class Api::BooksController < ApplicationController
  protect_from_forgery except: [:create, :update]
...
  def update
    @book = Book.find(params[:id])
    if @book.update_attributes(book_params)
      render 'index', formats:'json', handlers: 'jbuilder'
    else
      render json: @book.errors, status: :unprocessable_entity
    end
  end
...
○2:[BookEdit.vue]の作成
- 基本的にBookCreate.vueと同じであるが,API通信のメソッドを変更している。
- [id: this.$route.params.id,]
- 遷移時のパラメータである[bookInfo.id]を格納する。
- setbookEdit(id){}
- [bookInfo.id]を元に編集するレコードのデータをフォームに表示させる。
- updateBook(id) {}
- [createBook]と同じ動きをするが,HTTPメソッドがPUTであることに注意すること。
- http://localhost:5000/rails/info/routes でルーティングを確認すると理解が深まる。
<template>
  <div class="container">
    <h1 class="#f3e5f5 purple lighten-5 center">本の編集</h1>
    <form class="col s12">
      <div class="row">
        <div class="input-field">
          <input placeholder="Title" type="text" class="validate" v-model="book.title" required="required"></br>
        </div>
      </div>
      <div class="row">
        <div class="input-field">
          <input placeholder="Author" type="text" class="validate" v-model="book.author" required="required">
        </div>
      </div>
      <div class="row">
        <div class="input-field">
          <input placeholder="Publisher" type="text" class="validate" v-model="book.publisher" required="required">
        </div>
      </div>
      <div class="row">
        <div class="input-field">
          <input placeholder="Genre" type="text" class="validate" v-model="book.genre" required="required">
        </div>
      </div>
      <div class="btn" v-on:click="updateBook(book.id)">本の情報を変更</div>
    </form>
  </div>
</template>

<script>
  import axios from 'axios';
  export default {
    name: 'BookEdit',
    data: function() {
      return {
        id: this.$route.params.id,
        book: {
          id: '',
          title: '',
          author: '',
          publisher: '',
          genre: '',
        },
      }
    },
    mounted: function() {
      this.setbookEdit(this.id);
    },
    methods: {
      setbookEdit(id){
        axios.get(`api/books/${id}.json`).then(res => {
          this.book.id = res.data.id;
          this.book.title = res.data.title;
          this.book.author = res.data.author;
          this.book.publisher = res.data.publisher;
          this.book.genre = res.data.genre;
        });
      },
      updateBook(id) {
        if (!this.book.title) return;
        axios.put(`/api/books/${id}`, { book: this.book }).then((res) => {
          this.$router.push({ path: '/' });
        }, (error) => {
          console.log(error);
        });
      },
    }
  }
</script>

<style scoped></style>
○3:[BookHome.vue]の修正
- 本の詳細情報表示欄に[本の編集]ボタンを設置して,BookEditのリンクを作成する。
...
<div class="detail">
  ・ジャンル:{{ bookInfo.genre }}
</div>
<router-link :to="{ path: `/edit/${bookInfo.id}` }" class="btn">本の編集</router-link>
...
○4:[router.js]の修正
- BookEditをルーティングに組み込む。
import Vue          from 'vue'
import VueRouter    from 'vue-router'
import BookHome     from '../pages/BookHome.vue'
import BookCreate   from '../pages/BookCreate.vue'
import BookEdit     from '../pages/BookEdit.vue'

Vue.use(VueRouter)

const routes = [
  { path: '/',          name: 'BookHome',    component: BookHome },
  { path: '/create',    name: 'BookCreate',  component: BookCreate },
  { path: '/edit/:id',  name: 'BookEdit',    component: BookEdit },
];

export default new VueRouter({ routes });
○5:[routes.rb]の修正
- updateアクションを追加する。
Rails.application.routes.draw do
  root to: 'home#index'

  namespace :api do
    resources :books, only: [:index, :show, :create, :update]
  end
end
○6:動作確認
この時点で,次のように動作したら成功となる。
なお,GIFは本稿最後に掲載する。
- トップページから本のタイトルをクリックすると,ページ下部に本のデータが表示される。
- [本の編集]ボタンをクリックすると,本の編集ページに遷移する。
- 編集したいデータを入力後,[本の情報を変更]ボタンをクリックすると,トップページに遷移する。
- 本のデータが変更されている。
■ APIの作成(Delete:本の削除)
○1:[books_controller.rb]の修正
class Api::BooksController < ApplicationController
  protect_from_forgery except: [:create, :update, :destroy]
...
  def destroy
    @book = Book.find(params[:id])
    if @book.destroy
      head :no_content
    else
      render json: @book.errors, status: :unprocessable_entity
    end
  end
...
○2:[BookHome.vue]の修正
- [削除]ボタンを設置する。
- [削除]ボタンとトリガーとした,deleteBookメソッドを作成する。
- 次のコードのようにページを再読込する手段でも良いし,booksから対象データのみを削除する手段でも良い。
[this.$router.go({path: this.$router.currentRoute.path, force: true});]
...
<router-link :to="{ path: `/edit/${bookInfo.id}` }" class="btn">本の編集</router-link>
<button class="btn #e53935 red darken-1" v-on:click="deleteBook(bookInfo.id)">削除</button>
...
<script>
...
methods: {
  ...
  },
  deleteBook(id) {
    axios.delete(`/api/books/${id}`).then(res => {
      this.books = [];
      this.bookInfo = '';
      this.bookInfoBool = false;
      this.fetchBooks();
    })
  },
...
○3:[routes.rb]の修正
- destroyアクションを追加する。
Rails.application.routes.draw do
  root to: 'home#index'

  namespace :api do
    resources :books, only: [:index, :show, :create, :update, :destroy]
  end
end
○4:動作確認
この時点で,次のように動作したら成功となる。
- トップページから本のタイトルをクリックすると,ページ下部に本のデータが表示される。
- [削除]ボタンをクリックすると,対象のデータが一覧から削除されている。
■ Part1~4までの動作確認
〜Part4: Create, Update, Delete編終了〜
〜Part5: Vuex設定編へ進む〜
