7インチ大画面TFTモジュール付き「ESP32-8048S070」(タッチスクリーン無し)
https://ja.aliexpress.com/item/1005006625238405.html?spm=a2g0o.order_list.order_list_main.5.318d585aIfqEkw&gatewayAdapt=glo2jpn
をアリエクで購入、使えるようになりましたので投稿します。

基本情報
1.ESP32-S3 Flash-16MB PSRAM-8MB 技適マーク付き(写真がきれいにとれず申し訳ありません)
2.7インチTFT-LCD 800*480 ただし、RGBパネルでRGBバス接続
3.Windows 11 Pro
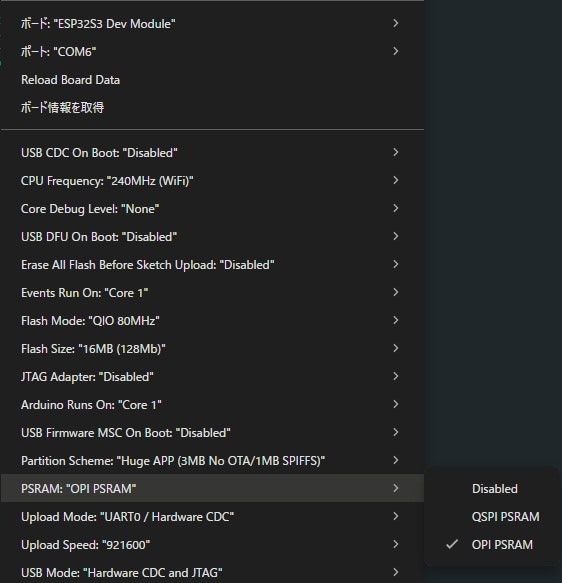
4.Arduino IDE 2.3.6 にて「ESP32S3 Dev Module」とする
5.ボードマネージャ 「esp32 by Espressif Systems 3.3.0」
コンパイル時のツール設定は次のようにしました。
最近とみに老眼が進み、細かいものが見ずらくなってきたところ、これを見つけました。ありがたいことに技適付き。ただ、サイトからダウンロードしたExampleそのままの設定では動作しませんでした。色々検索し、試行錯誤を繰り返し、表示できるようになりました。また、コネクタが引き出してあるのにUSBHOST機能も使えません。良くわからなくて残念です。
ArduinoGFXでは次の設定で表示できました。
#include <Arduino_GFX_Library.h>

#define TFT_BL 2
Arduino_GFX *gfx = create_default_Arduino_GFX();
Arduino_ESP32RGBPanel *bus = new Arduino_ESP32RGBPanel(
    41 /* DE */, 40 /* VSYNC */, 39 /* HSYNC */, 42 /* PCLK */,
    14 /* R0 */, 21 /* R1 */, 47 /* R2 */, 48 /* R3 */, 45 /* R4 */,
    9 /* G0 */, 46 /* G1 */, 3 /* G2 */, 8 /* G3 */, 16 /* G4 */, 1 /* G5 */,
    15 /* B0 */, 7 /* B1 */, 6 /* B2 */, 5 /* B3 */, 4 /* B4 */,
    0 /* hsync_polarity */,210 /* hsync_front_porch */, 30 /* hsync_pulse_width */, 16 /* hsync_back_porch */,
    0 /* vsync_polarity */, 22 /* vsync_front_porch */, 13 /* vsync_pulse_width */, 10 /* vsync_back_porch */,
    1 /* pclk_active_neg */, 16000000 /* prefer_speed */
);

Arduino_RGB_Display *gfx = new Arduino_RGB_Display(
   800, 480,bus, 0 /* rotation */, true /* auto_flush */
);
LovyanGFXでは次のようにしてできました。
myLovyan.h
#define LGFX_USE_V1
#include <LovyanGFX.hpp>
#include <Arduino_GFX_Library.h>
#include <lgfx/v1/platforms/esp32s3/Panel_RGB.hpp>
#include <lgfx/v1/platforms/esp32s3/Bus_RGB.hpp>
#include <driver/i2c.h>

class LGFX : public lgfx::LGFX_Device
{
public:
  lgfx::Bus_RGB     _bus_instance;
  lgfx::Panel_RGB   _panel_instance;

  LGFX(void) {
    {
      auto cfg = _panel_instance.config();
      cfg.memory_width  = 800;
      cfg.memory_height = 480;
      cfg.panel_width   = 800;
      cfg.panel_height  = 480;
      cfg.offset_x      = 0;
      cfg.offset_y      = 0;
      _panel_instance.config(cfg);
    }
    {
      auto cfg = _panel_instance.config_detail();
      cfg.use_psram = 1;
      _panel_instance.config_detail(cfg);
    }


    // Configure the RGB bus.
    {
      auto cfg = _bus_instance.config();

      cfg.panel = &_panel_instance;

      // Configure data pins.
      cfg.pin_d0  = GPIO_NUM_15; // B0
      cfg.pin_d1  = GPIO_NUM_7;  // B1
      cfg.pin_d2  = GPIO_NUM_6;  // B2
      cfg.pin_d3  = GPIO_NUM_5;  // B3
      cfg.pin_d4  = GPIO_NUM_4;  // B4

      cfg.pin_d5  = GPIO_NUM_9;  // G0
      cfg.pin_d6  = GPIO_NUM_46; // G1
      cfg.pin_d7  = GPIO_NUM_3;  // G2
      cfg.pin_d8  = GPIO_NUM_8;  // G3
      cfg.pin_d9  = GPIO_NUM_16; // G4
      cfg.pin_d10 = GPIO_NUM_1;  // G5

      cfg.pin_d11 = GPIO_NUM_14; // R0
      cfg.pin_d12 = GPIO_NUM_21; // R1
      cfg.pin_d13 = GPIO_NUM_47; // R2
      cfg.pin_d14 = GPIO_NUM_48; // R3
      cfg.pin_d15 = GPIO_NUM_45; // R4

      // Configure sync and clock pins.
      cfg.pin_henable = GPIO_NUM_41;
      cfg.pin_vsync   = GPIO_NUM_40;
      cfg.pin_hsync   = GPIO_NUM_39;
      cfg.pin_pclk    = GPIO_NUM_42;
      cfg.freq_write  = 16000000;

      // Configure timing parameters for horizontal and vertical sync.
      cfg.hsync_polarity    = 0;
      cfg.hsync_front_porch = 40;//80;//20;//
      cfg.hsync_pulse_width = 48;//4;//30;//
      cfg.hsync_back_porch  = 40;//16;//

      cfg.vsync_polarity    = 0;
      cfg.vsync_front_porch =  8;//22;//
      cfg.vsync_pulse_width = 31;//13;//
      cfg.vsync_back_porch  = 13;//10;//

      // Configure polarity for clock and data transmission.
      cfg.pclk_active_neg   = 1;
      cfg.de_idle_high      = 0;
      cfg.pclk_idle_high    = 0;//1;

      // Apply configuration to the RGB bus instance.
      _bus_instance.config(cfg);
    }
    // Set the RGB bus and panel instances.
    _panel_instance.setBus(&_bus_instance);
    setPanel(&_panel_instance);
  }
};
長くなりますので、具体的な使用例はまたあらためて投稿します。ご覧いただきありがとうございます。