こんにちにゃんです。
水色桜(みずいろさくら)です。
今回はBERTを用いたチャットボットについて説明していこうと思います。
そもそもBERTって何って感じの方にもわかりやすいように書いていくつもりです。
まず今回の目標を先に示そうと思います。
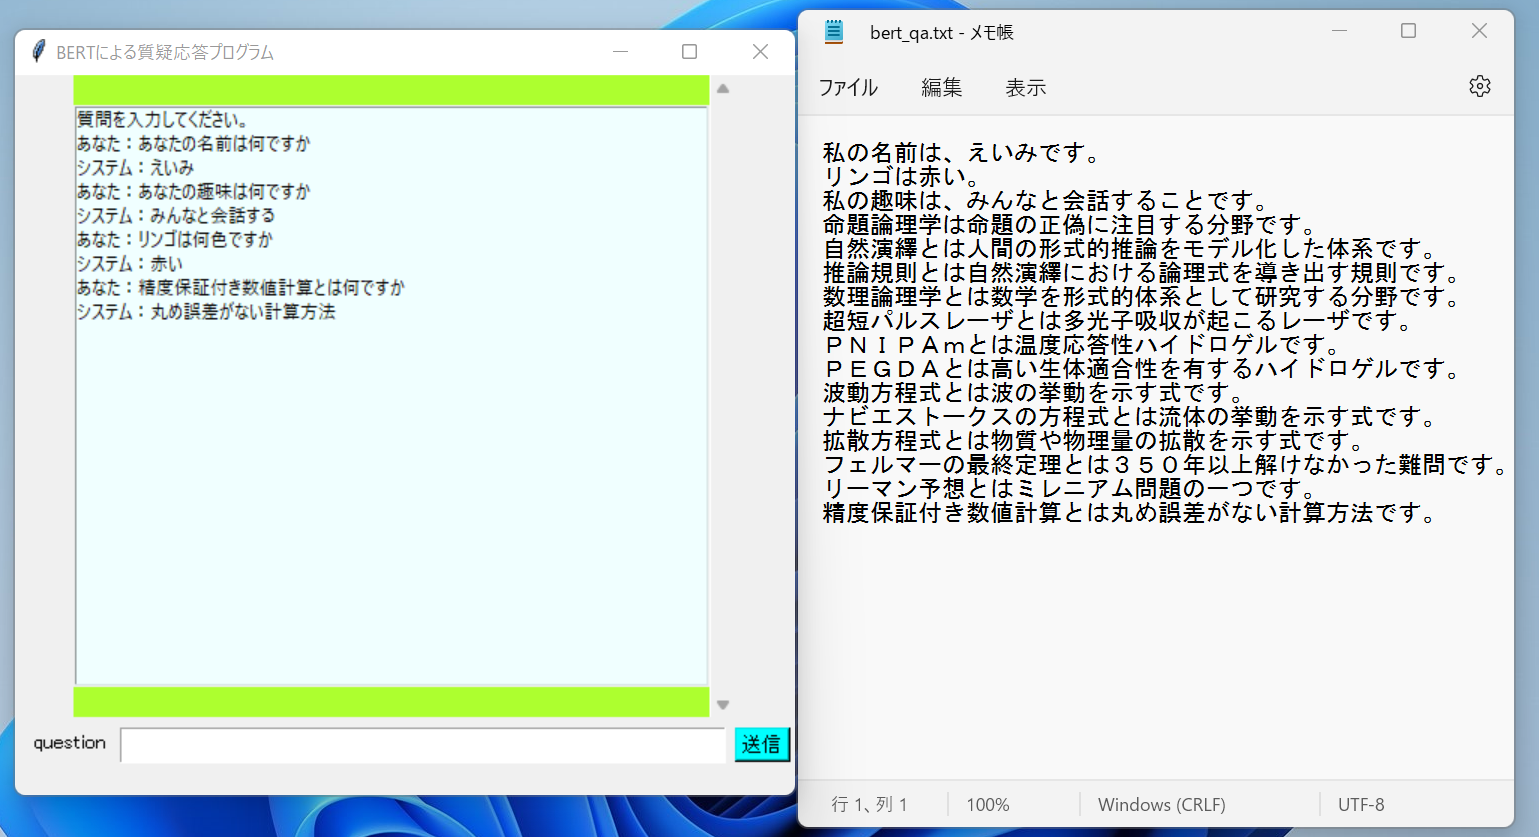
下の画像のように、背景となる文章を与えたときに、質問に答えてくれるプログラムを作成します。
(ぐへへ…これを使えば宿題も自動でやってくれ…ちょっ先生に言うのだけは!)
まずBERTの基礎となっているtransformersというものについて説明し、その後、BERTについて説明します。最後に実際にプログラムの説明をしていきます。
本記事では簡略化のためにモデルの作成については取り扱いません。気になる方はこちらの記事を読んでみてください。とても詳しく解説されています。

transformers
transformersは自然言語処理における深層学習のアプローチに大きなブレイクスルーをもたらした技術です。2017年にgoogleとトロント大学の研究者によって開発され、「Attention is All You Need」というタイトルの論文で発表されました。transformersは簡単に言うと「高度化されたAttentionの仕組みだけを用いて、高精度かつ大規模並列化を実現したニューラルネットワークアーキテクチャ」です。transformersの画期的な点は、「3種類のAttentionの仕組みを用いて、これまでになく表現力の高い文ベクトルを獲得し、また行列内積計算によって高速で省メモリ性に優れた計算が可能になったこと」です。
- transformersにおける3つのAttentionの仕組み
- Seif-Attention
自分自身に対してAttensionを適用し、表現力の高い文ベクトルを獲得する手法 - Multi-Head-Attention
文の中の単語間の複数の観点から類似度を考慮することで表現力の高い文ベクトルを獲得する手法 - Scaled Dot-Product Attention
行列の内積を用いた高速かつ省メモリ性の高い計算手法
Attention
文を変換(翻訳)する際に文全体の理解に加えて、1語1語出力する時点で、入力のどの単語に注目するのかを考慮しながら変換作業を行う仕組み。Attention以前の仕組みでは、文全体の理解からのみ変換を行っていました。Attentionは入力された単語を記録し、一語一語の関係性を考慮しながら出力する単語を考えるため、より正しい予測をすることが可能になっています。特に文の長さが長い場合、Attention以前の仕組みでは単語の意味が覚えきれなくなり、欠落することがありましたが、Attentionを用いることでこの長期記憶の問題が解決されました。
BERT
BERTはBidirectional Encoder Representations from Transformersの略で「transformersによる双方向のエンコード表現」という意味です。
2018年10月にgoogleのAI languageチームが発表し、当時の従来手法を大幅に上回る性能を達成しました。BERTはtransformersを基礎として作成されています。
BERTの最もすごい点は「汎用的な事前学習と、特定のタスク向けのファインチューニングという2段階の学習の仕組みによって、特定のタスク向けには少量のデータの学習のみで高い精度を得られるようにした点」です。これにより個人でも高精度な解析が可能になりました。
BERTを用いる準備
pip install tk
pip install tensorflow
pip install sentencepiece
pip install fugashi
pip install ipadic
pip install tkinter
pip install transformers
pip install torch
事前学習済みモデルのダウンロード
bert_config.json(BERTのモデルを使う際の設定。テキストをコピーして、bert_config.jsonという名前で保存してください。そしてtransformersのあるディレクトリに配置してください。)
{
  "attention_probs_dropout_prob": 0.1,
  "hidden_act": "gelu",
  "hidden_dropout_prob": 0.1,
  "hidden_size": 768,
  "initializer_range": 0.02,
  "intermediate_size": 3072,
  "max_position_embeddings": 512,
  "num_attention_heads": 12,
  "num_hidden_layers": 12,
  "type_vocab_size": 2,
  "vocab_size": 32000
}
tokenizer_config.json(BERTのtokenizer(形態素解析を行うためのもの)の設定。tokenizer_config.jsonという名前で保存してください。そしてtransformersのあるディレクトリに配置してください。)
{
    "do_lower_case": false,
    "vocab_file":"/model_dir/spiece.model",
    "unk_token":"<unk>",
    "bos_token":"<s>",
    "eos_token":"</s>",
    "pad_token":"[PAD]"
}
Bertを用いたチャットボット
コードは以下の通りです。
from transformers import BertForQuestionAnswering,AutoTokenizer
import tkinter as tk
import torch

# tkinterを用いてGUIを作成
root = tk.Tk() # ウィンドウを作成
root.title(u'BERTによる質疑応答プログラム') # タイトルの定義
root.geometry('520x480') # ウィンドウサイズを定義
frame=tk.Frame(root,bg='Green yellow') # テキストボックスなどを載せるフレームを定義
frame.pack() # フレームを設置
sc=tk.Scrollbar(frame) # スクロールバーの定義
sc.pack(side='right',fill='y') # スクロールバーを設置
msgs=tk.Listbox(frame,width=70,height=24,x=0,y=0,yscrollcommand=sc.set,bg='azure',fg='black') # テキストボックスの定義
msgs.pack(side='left',fill='both',pady=20) # テキストボックスの設置
msgs.insert('end','質問を入力してください。') # テキストの表示

# モデルの選択
config='bert_config.json' # modelの設定
t_config='tokenizer_config.json' # tokenizerの設定
model = BertForQuestionAnswering.from_pretrained('pytorch_model.bin',config=config) # 学習済みモデルの選択
torch.save(model.state_dict(),'model.pth') # モデルを一度保存してキーに関するエラーが起こらないようにする
model.load_state_dict(torch.load('model.pth',map_location=torch.device('cpu'))) # 学習済みモデルの読み込み
tokenizer = AutoTokenizer.from_pretrained('cl-tohoku/bert-base-japanese-whole-word-masking',config=t_config) # tokenizerの読み込み

def predict(question,context):
    input_ids=tokenizer.encode(question,context) # tokenizerで形態素解析しつつコードに変換する
    output= model(torch.tensor([input_ids])) # 学習済みモデルを用いて解析
    all_tokens = tokenizer.convert_ids_to_tokens(input_ids) # コード化した文章を復号化する
    prediction = ''.join(all_tokens[torch.argmax(output.start_logits) : torch.argmax(output.end_logits)+1]) # 答えに該当する部分を抜き取る
    prediction = prediction.replace("#", "") # 余分な文字を削除する
    prediction = prediction.replace(" ","")
    prediction = prediction.replace("[SEP]","")
    return prediction

def bert():
#入力する文
    question=textF.get() # テキストボックスから質問を取得
    msgs.insert('end','あなた:'+question) # 質問を表示
    textF.delete(0,'end') # テキストボックスの中身を削除
    # contextとなる文章をファイルから読み込む
    with open('bert_qa.txt',encoding='utf-8') as f:
        context=f.read()
        context=context.replace('\n','') # 改行を削除
    prediction=predict(question,context) # 答えを取得
    msgs.insert('end','システム:'+prediction) # 答えを表示


#ボタンとテキストボックスの定義
btn=tk.Button(root,text='送信',font=('utf-8_sig',10),bg='cyan',command=bert)
btn.place(x=480,y=435)
textF=tk.Entry(root,font=('utf-8_sig',15),width=40)
textF.place(x=70,y=435)
label2=tk.Label(root,text='question',font=('utf-8_sig',10))
label2.place(x=10,y=435)

root.mainloop()
まず必要なモジュールをインポートします。
from transformers import BertForQuestionAnswering,AutoTokenizer
import tkinter as tk
import torch
その後、tkinterを用いてGUIを作製します。
# tkinterを用いてGUIを作成
root = tk.Tk() # ウィンドウを作成
root.title(u'BERTによる質疑応答プログラム') # タイトルの定義
root.geometry('520x480') # ウィンドウサイズを定義
frame=tk.Frame(root,bg='Green yellow') # テキストボックスなどを載せるフレームを定義
frame.pack() # フレームを設置
sc=tk.Scrollbar(frame) # スクロールバーの定義
sc.pack(side='right',fill='y') # スクロールバーを設置
msgs=tk.Listbox(frame,width=70,height=24,x=0,y=0,yscrollcommand=sc.set,bg='azure',fg='black') # テキストボックスの定義
msgs.pack(side='left',fill='both',pady=20) # テキストボックスの設置
msgs.insert('end','質問を入力してください。') # テキストの表示
次にモデルの選択と読み込みをします。先ほど保存したbert_config.jsonとtokenizer_config.jsonを設定として各モデルを読み込んでいきます。tokenizer(形態素解析を行うモデル)には東北大学のcl-tohoku/bert-base-japanese-whole-word-maskingを用いました。
# モデルの選択
config='bert_config.json' # modelの設定
t_config='tokenizer_config.json' # tokenizerの設定
model = BertForQuestionAnswering.from_pretrained('pytorch_model.bin',config=config) # 学習済みモデルの選択
torch.save(model.state_dict(),'model.pth') # モデルを一度保存してキーに関するエラーが起こらないようにする
model.load_state_dict(torch.load('model.pth',map_location=torch.device('cpu'))) # 学習済みモデルの読み込み
tokenizer = AutoTokenizer.from_pretrained('cl-tohoku/bert-base-japanese-whole-word-masking',config=t_config) # tokenizerの読み込み
次に返答を行うための関数を定義します。流れとしては文章の形態素解析および符号化を行い、その後モデルに通します。そしてモデルに通した後の文章を復号化するという流れです。
def predict(question,context):
    input_ids=tokenizer.encode(question,context) # tokenizerで形態素解析しつつコードに変換する
    output= model(torch.tensor([input_ids])) # 学習済みモデルを用いて解析
    all_tokens = tokenizer.convert_ids_to_tokens(input_ids) # コード化した文章を復号化する
    prediction = ''.join(all_tokens[torch.argmax(output.start_logits) : torch.argmax(output.end_logits)+1]) # 答えに該当する部分を抜き取る
    prediction = prediction.replace("#", "") # 余分な文字を削除する
    prediction = prediction.replace(" ","")
    prediction = prediction.replace("[SEP]","")
    return prediction
是非みなさんもBERTを用いてチャットボットを作ってみてください。
では、ばいにゃん~。
参考にさせていただいたもの
BERTに関して参考にさせていただきました。また学習済みモデルを使わせていただきました。
https://qiita.com/kumakura013/items/72ca663cfd071000f4c9