swiftを学習してから10日経ちましたが、Autolayautといい、UserDefaultsといい、なんやら覚えることがたくさんです。
今回はメモ的なものとしての作成なため、参考になるような記事ではないです。
やろうとしていること
下のコードのdays, place, priceの独自クラスを作成し、
それを永久保存したい。
目標:どこからか引っ張って来たデータを配列に格納してそれを表示する予定。
import UIKit

class ViewController: UIViewController, UITableViewDelegate, UITableViewDataSource, UITabBarDelegate{

    @IBOutlet weak var TableView: UITableView!

    let days = [
        "2018/07/02 09:00",
        "2018/07/03 09:00",
        "2018/07/04 09:00",
        "2018/07/05 09:00",
        "2018/07/06 09:00",
        "2018/07/09 09:00",
        "2018/07/10 09:00",
        "2018/07/11 09:00",
        "2018/07/12 09:00"
    ]

    let place = [
        "711",
        "家族市場",
        "元気になろう",
        "ちょっと立ち寄る",
        "All100yen?",
        "輪K",
        "日々ザキヤマ",
        "午前午後",
        "POP"
    ]
    let price = [
        "1",
        "2",
        "3",
        "4",
        "5",
        "6",
        "7",
        "8",
        "9"
    ]

    override func viewDidLoad() {
        super.viewDidLoad()
    }

    override func didReceiveMemoryWarning() {
        super.didReceiveMemoryWarning()
        // Dispose of any resources that can be recreated.
    }

    //行数を返却する
    func tableView(_ tableView: UITableView, numberOfRowsInSection section: Int) -> Int {
        return days.count
    }


    //テーブルの行毎のセルを返却する
    func tableView(_ tableView: UITableView, cellForRowAt indexPath: IndexPath) -> UITableViewCell {
        let cell : UITableViewCell = tableView.dequeueReusableCell(withIdentifier: "tableCell", for: indexPath)

        //ラベルにデータを格納していく
        let label1 = cell.viewWithTag(1) as! UILabel
        label1.text = String(describing: days[indexPath.row])

        let label2 = cell.viewWithTag(2) as! UILabel
        label2.text = String(describing: place[indexPath.row])

        let label3 = cell.viewWithTag(3) as! UILabel
        label3.text = "¥" + String(describing: price[indexPath.row])

        return cell
    }
}
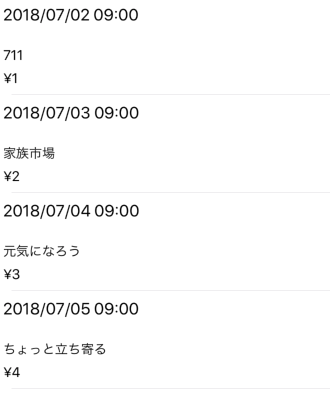
イメージとしてはこのようにTableCellにぶっこんでいく形
ーーーーーーーーーーーーーーーーーーーーーーー
ーーーーーーーーーーーーーーーーーーーーーーー
挑戦
import UIKit

class ViewController: UIViewController, UITableViewDelegate, UITableViewDataSource, UITabBarDelegate{

    @IBOutlet weak var TableView: UITableView!
    @IBOutlet weak var button: UIButton!

    //使用する配列
    var someObjArray = [SomeObj]()

    let someObj = [
        SomeObj(days: "2018/07/02 09:00", place: "711", price: "1"),
        SomeObj(days: "2018/07/03 09:00", place: "家族市場", price: "2"),
        SomeObj(days: "2018/07/04 09:00", place: "元気になろう", price: "3"),
        SomeObj(days: "2018/07/05 09:00", place: "ちょっと立ち寄る", price: "4"),
        SomeObj(days: "2018/07/06 09:00", place: "All100yen?", price: "5"),
        SomeObj(days: "2018/07/09 09:00", place: "輪K", price: "6"),
        SomeObj(days: "2018/07/10 09:00", place: "日々ザキヤマ", price: "7"),
        SomeObj(days: "2018/07/11 09:00", place: "午前午後", price: "8"),
        SomeObj(days: "2018/07/12 09:00", place: "POP", price: "9")
    ]

    override func viewDidLoad() {
        super.viewDidLoad()
        //buttonプロパティ
        button.layer.borderColor = UIColor.blue.cgColor
        button.layer.borderWidth = 1.0
        button.layer.cornerRadius = 5.0
        button.clipsToBounds = true

        //UserDefaultsへの保存処理
        someObjArray.insert(someObj[0], at: 0)
        someObjArray.insert(someObj[1], at: 1)
        someObjArray.insert(someObj[2], at: 2)
        someObjArray.insert(someObj[3], at: 3)
        someObjArray.insert(someObj[4], at: 4)
        someObjArray.insert(someObj[5], at: 5)
        someObjArray.insert(someObj[6], at: 6)
        someObjArray.insert(someObj[7], at: 7)
        someObjArray.insert(someObj[8], at: 8)

        UserDefaults.standard.set(NSKeyedArchiver.archivedData(withRootObject: someObjArray), forKey: "someObjs")
    }

    override func didReceiveMemoryWarning() {
        super.didReceiveMemoryWarning()
        // Dispose of any resources that can be recreated.
    }

    //行数を返却する
    func tableView(_ tableView: UITableView, numberOfRowsInSection section: Int) -> Int {
        print(someObjArray.count)
        return someObjArray.count
    }


    //テーブルの行毎のセルを返却する
    func tableView(_ tableView: UITableView, cellForRowAt indexPath: IndexPath) -> UITableViewCell {
        let cell : UITableViewCell = tableView.dequeueReusableCell(withIdentifier: "tableCell", for: indexPath)

        //ラベルにデータを格納していく
        let label1 = cell.viewWithTag(1) as! UILabel
        label1.text = someObj[indexPath.row].days!

        let label2 = cell.viewWithTag(2) as! UILabel
        label2.text = someObj[indexPath.row].place!

        let label3 = cell.viewWithTag(3) as! UILabel
        label3.text = "¥" + someObj[indexPath.row].price!

        return cell
    }

    func loadSomeObjs() -> [SomeObj]?{
        if let loadedData = UserDefaults().data(forKey: "someObjs"){
            let someObjs = NSKeyedUnarchiver.unarchiveObject(with: loadedData) as! [SomeObj]
            return someObjs
        }else{
            return nil
        }
    }
}

//TableCell用のデータ型クラス
class SomeObj: NSObject, NSCoding {
    var days: String?
    var place: String?
    var price: String?

    init(days: String, place: String, price: String){
        self.days = days
        self.place = place
        self.price = price
    }

    required init?(coder aDecoder: NSCoder) {
        days = aDecoder.decodeObject(forKey: "days") as? String
        place = aDecoder.decodeObject(forKey: "place") as? String
        price = aDecoder.decodeObject(forKey: "price") as? String
    }
    func encode(with aCoder: NSCoder) {
        aCoder.encode(days, forKey: "days")
        aCoder.encode(place, forKey: "place")
        aCoder.encode(price, forKey: "place")
    }
}
ーーーーーーーーーーーーーーーーーーーーーーー
ーーーーーーーーーーーーーーーーーーーーーーー
これからの取り組み
・Edit機能をつけて削除後、保存されているかの確認
・オブジェクト指向の理解
・動的に配列を格納
特に
let someObj = [
        SomeObj(days: "2018/07/02 09:00", place: "711", price: "1"),
        SomeObj(days: "2018/07/03 09:00", place: "家族市場", price: "2"),
        SomeObj(days: "2018/07/04 09:00", place: "元気になろう", price: "3"),
        SomeObj(days: "2018/07/05 09:00", place: "ちょっと立ち寄る", price: "4"),
        SomeObj(days: "2018/07/06 09:00", place: "All100yen?", price: "5"),
        SomeObj(days: "2018/07/09 09:00", place: "輪K", price: "6"),
        SomeObj(days: "2018/07/10 09:00", place: "日々ザキヤマ", price: "7"),
        SomeObj(days: "2018/07/11 09:00", place: "午前午後", price: "8"),
        SomeObj(days: "2018/07/12 09:00", place: "POP", price: "9")
    ]
と
someObjArray.insert(someObj[0], at: 0)
        someObjArray.insert(someObj[1], at: 1)
        someObjArray.insert(someObj[2], at: 2)
        someObjArray.insert(someObj[3], at: 3)
        someObjArray.insert(someObj[4], at: 4)
        someObjArray.insert(someObj[5], at: 5)
        someObjArray.insert(someObj[6], at: 6)
        someObjArray.insert(someObj[7], at: 7)
        someObjArray.insert(someObj[8], at: 8)
の部分が気持ち悪すぎて、
"2018/07/02 09:00", "711", "1"
"2018/07/03 09:00", "家族市場", "2"
"2018/07/04 09:00", "元気になろう", "3"
"2018/07/05 09:00", "ちょっと立ち寄る", "4"
"2018/07/06 09:00", "All100yen?", "5"
"2018/07/09 09:00", "輪K", "6"
"2018/07/10 09:00", "日々ザキヤマ", "7"
"2018/07/11 09:00","午前午後", "8"
"2018/07/12 09:00", "POP", "9"
みたいなCSVファイルから同様なデータを読み取って動きを持てるようにしたい。
今の時点では9つ限定の動きになってしまってる。
atの部分は変更前コードで1や2などの指定はしてなくとも上から順に入っていってくれるので、実装するのはもうひと踏ん張りな気がするが、、
なにかアドバイスや指摘等いただけると幸いです!
追加
//UserDefaultsへの保存処理
for index in 0..<listsomeObj.count {
    listsomeObjArray.insert(listsomeObj[index], at: index)
}
/*
listsomeObjArray.insert(listsomeObj[0], at: 0)
listsomeObjArray.insert(listsomeObj[1], at: 1)
listsomeObjArray.insert(listsomeObj[2], at: 2)
listsomeObjArray.insert(listsomeObj[3], at: 3)
listsomeObjArray.insert(listsomeObj[4], at: 4)
listsomeObjArray.insert(listsomeObj[5], at: 5)
listsomeObjArray.insert(listsomeObj[6], at: 6)
listsomeObjArray.insert(listsomeObj[7], at: 7)
listsomeObjArray.insert(listsomeObj[8], at: 8)
*/
少し休憩して考えたら簡単なことでした。。。笑
これでデータの数に応じた配列は作成できた気がします。