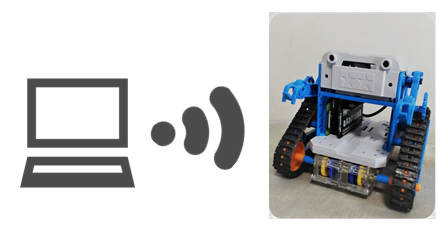
1. はじめに
カムロボット(『楽しい工作シリーズ No.227 カムロボット工作セット』)に RaspberryPiZeroと
Explorer pHATを搭載して、無線LANでSSH接続したPCのキーボードからリモートコントロールできるように作ってみました。
2. 使用したパーツ
| No. | パーツ名 | コメント |
|---|---|---|
| 1 | カムロボット 『楽しい工作シリーズ No.227 カムロボット工作セット』 |
|
| 2 | Raspberry Pi Zero WH | |
| 3 | microSDカード | class10 |
| 4 | Pimoroni Explorer pHAT | 同封のピンヘッダーをはんだ付けします |
| 5 | Raspberri Pi 用スペーサー | パーツ3とパーツ4を連結しますが、必須ではないです |
| 6 | バッテリー | ロボットの中に入れられるサイズ 電源スイッチつきだと便利です |
| 7 | 電源ケーブル | Raspberry Pi Zero WH とバッテリーを接続します |
| その他 | はんだ付け道具 | パーツ4のPINヘッダーを付けるのに必要です |
| 各パーツは店舗により、価格、納期、郵送料が違いますので、色々と検討した方が良いです。 |
3. カムプログラムロボットの組み立て
説明図と組立手順が違う箇所を記載します。
尚、1ページ目に動作について、AタイプがBタイプを選択するように書かれていますが、両方の動作ができますので、選択しなくて大丈夫です。
➊ 説明書通りに組立
➋ 説明書通りに組立
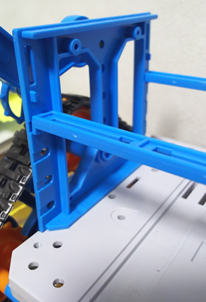
➌ 一部変更(完成後でも変更できます)
・A2は使用しません
・A3前・後とも一番上に取り付ける
・A3前・後で上下面を同じにする
➍ 説明書通りに組立
➎ 説明書通りに組立
➏ 説明書通りに組立
➐ 一部変更
・B3は取り付けない
・コイルスプリング、3×8mmタッピングビスは使用しません
➑ 説明書通りに組立
➒ 説明書通りに組立
➓ 説明書通りに組立
⓫ 説明書通りに組立
⓬ 説明書通りに組立
⓭ 一部変更
・使用するのはB6、B7だけ
・電子ボックス、スイッチ、コードは使用しません
以上で「カムプログラムロボットの組み立て」完了です。
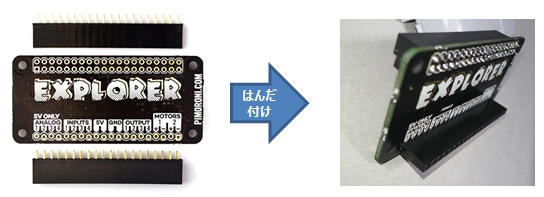
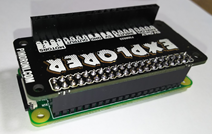
4. Pimoroni Explorer pHAT のPINヘッダをはんだ付け
Explorer pHATには1列と2列のPINヘッダがついてきますので、これをpHATにはんだ付けします。
「EXPLORER」と書かれている面に1列PINヘッダを付けます。裏面は2列PINヘッダを付けます。
5. Raspberry Pi Zero WHにOS Raspbianをインストール
※最新のOSを使用してください。
OS Raspbianのインストール手順は割愛させていただきます。
”「Raspberry Pi Zero WH」をWindows10PCだけでセットアップ”をご参照ください。
尚、「5-1. 疎通確認」の箇所で ping raspberrypi.local だと、IPv6で返答される可能性があります。その際は、 ping raspberrypi.local -4 で確認してみてください。
これで、Raspberry Pi ZeroにアサインされたIPアドレスがわかります。
5. Raspberry Pi Zero WHにPimoroni Explorer pHAT 関連プログラムをインストール
Raspberry Pi ZeroにSSH接続します。ここではTeraTermを使用しました。
パッケージリスト、パッケージを更新します。
pi@raspberrypi:~ $ sudo apt-get update
pi@raspberrypi:~ $ sudo apt-get -y upgrade
pimoroni/explorer-hatのGitからPimoroni Explorer pHAT関連プログラムをインストールします。
curl https://get.pimoroni.com/explorerhat | bash
OSを再起動
sudo reboot
6. カムプログラムロボットに組み込み
6-1. モータコードの加工
モータコードは Explorer phat に接続しますので、コードを加工します。
直接はんだで強引に付ける方法もありますが、Explorer phat を別用途で使用する場合、取り外しが面倒ですので、ここでは下記2つの方法のどちらかで加工します。
⓵モータコードにピンコネクタターミナル(オス)を直接接続する。
ピンコネクターターミナルは、専用の工具でなくてもペンチで圧着できます。
⓶モータコードにブレッドボード・ジャンパーワイヤ(オス)を接続する。
ここでは、たまたま持っていたで⓵の方法で加工しましたが、⓶が安くて楽です。
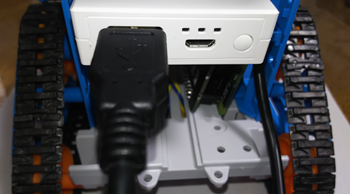
6-2. Raspberry Pi Zero と Explorer phat の接続
ピンを挿すだけですので、特に問題ないと思います。
がたつきが気になるようでしたら、Raspberri Pi 用スペーサーで固定してください。
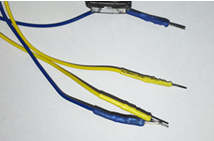
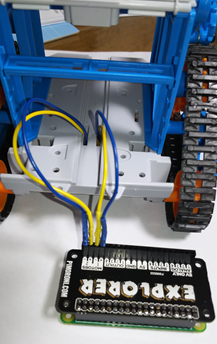
6-3. モータコードと Explorer phat の接続
下記表の通り接続します。
| モータコード | Explorer phat MOTORS |
|---|---|
| 右モータ青コード | MOTORS 1 + |
| 右モータ黄コード | MOTORS 1 - |
| 左モータ黄コード | MOTORS 2 + |
| 左モータ青コード | MOTORS 2 - |
 |
6-4. Raspberry Pi Zero、Explorer phat、バッテリーの組み込み
ルーフ(B6,B7)と全面(B5)を外すと、楽に組み込み作業が行えます。
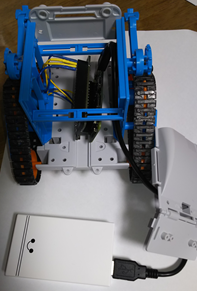
バッテリーは上の段にセットします。
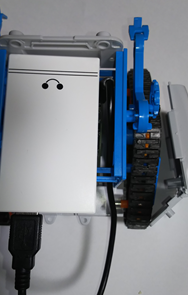
これで組み込み完了です。
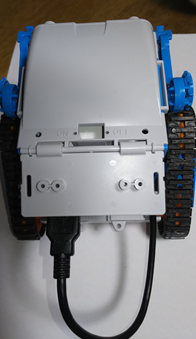
スイッチ付きのバッテリーは起動が楽です。またバッテリーを取り外す必要なく、充電ができます。
7. プログラムについて
SSH接続したPCのキーボードから、1文字入力でロボットを操作します。
7-1. getch、pip3のインストール
操作性を考え、文字入力してからエンターを押さなくても良いように getch()を使用します。
getchのインストールは下記になります。
pi@raspberrypi:~ $ pip3 install getch
尚、pip3がインストールされていないときは、下記を参考にインストールしてください。
pi@raspberrypi:~ $ sudo apt install python3-pip
7-2. 操作のキー配置
| 操作 | キー |
|---|---|
| 停止 | s |
| 終了 | q |
| 前進 | w |
| 後退 | z |
| 右折 | d |
| 左折 | a |
| 時計回り回転 | v |
| 反時計回り回転 | c |
7-3. モータの操作
接続された2つのモータは、それぞれ以下の命令で動きます。
explorerhat.motor.one
explorerhat.motor.two
| 命令 | |
|---|---|
| invert() | モーターの回転方向を逆にする |
| forwards(speed) | モーターを指定した速度で「前進」 (デフォルトは100%) |
| backwards(speed) | モーターを指定した速度で「後退」 (デフォルトは100%) |
| speed(-100~100) | モーターの速度設定 |
| stop() | 速度を0に設定してモーターを停止 |
例えば、カムロボットを75%の速度で前進させるのは、
explorerhat.motor.one.forwards(75)
explorerhat.motor.two.forwards(75)
です。
7-4. プログラム
# coding: UTF-8
import explorerhat
from getch import getch
while True:
    indata = getch()
    #print(indata)
    #
    if indata == 'q':
        exit()
    # 停止
    if indata == 's':
        explorerhat.motor.one.forwards(0)
        explorerhat.motor.two.forwards(0)
    # 前進
    if indata == 'w':
        explorerhat.motor.one.forwards(75)
        explorerhat.motor.two.forwards(75)
    # 後退
    if indata == 'z':
        explorerhat.motor.one.backwards(75)
        explorerhat.motor.two.backwards(75)
    # 時計回り回転
    if indata == 'v':
        explorerhat.motor.one.backwards(75)
        explorerhat.motor.two.forwards(75)
    # 反時計回り回転
    if indata == 'c':
        explorerhat.motor.one.forwards(75)
        explorerhat.motor.two.backwards(75)
    # 右
    if indata == 'd':
        explorerhat.motor.one.forwards(0)
        explorerhat.motor.two.forwards(75)
    # 左
    if indata == 'a':
        explorerhat.motor.one.forwards(75)
        explorerhat.motor.two.forwards(0)
8. おわりに
Raspberry Pi Zero 起動時にモータが回り続けてしまうので、少々強引ですが下記プログラムで
停止させました。
# -*- coding: utf-8 -*-
import time
import explorerhat
def main():
    explorerhat.motor.one.forwards(0)
    explorerhat.motor.two.forwards(0)

if __name__ == "__main__":
    main()
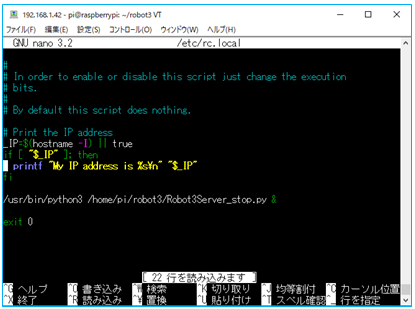
ここではプログラムを ~/robot3 ディレクトリーに保存し、起動時に自動実行するように、rc.localを修正しました。
sudo nano /etc/rc.local
最終行の exit 0 の前に下記内容を追加します。
/usr/bin/python3 /home/pi/robot3/Robot3Server_stop.py &
次回は、指ジェスチャーでコントロールできるようにしたいと思います。