1. はじめに
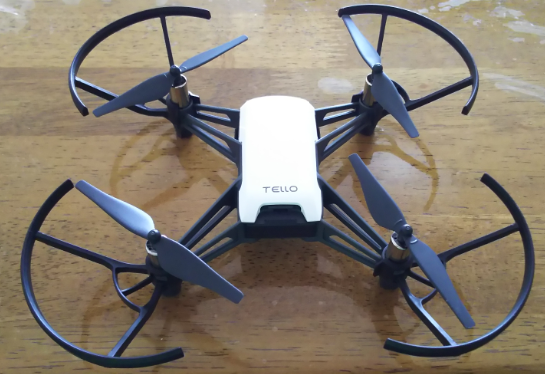
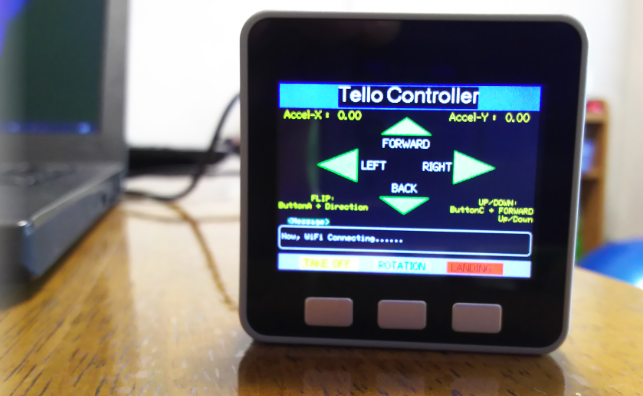
ドローン「Tello」をM5Stackでコントロールするスケッチを作ってみました。
M5StackはBASICではなく、加速度、ジャイロ、磁気を計測可能な9軸センサ、MPU9250を搭載したモデルの「M5Stack Gray」を使用しました。

2. 環境
「Tello」と「M5Stack Gray」間は、WiFi無線、UDPプロトコルで通信を行います。
Telloのコマンドは公式のTello SDKを使用しました。多少ぎこちない動作となっていますが我慢してください。
https://www.ryzerobotics.com/jp/tello/downloads
2-1. 開発環境
・Arduino IDE 1.8.9
3. 操作方法
(1)ボタン操作
・ボタンA(左端)-----離陸
・ボタンB(真ん中)---時計回りに45度回転
・ボタンC(右端)-----着陸離
(2)前進・後退・左・右移動
・「M5Stack Gray」を傾けた方向に「Tello」が移動します。
(3)フリップ
・フリップしたい方向に傾けながら、ボタンA(左端)を押す。
(4)上・下移動
・後退に傾けながら、ボタンC(左端)を押す-----上昇
・前進に傾けながら、ボタンC(左端)を押す-----下降
4. スケッチ
# define LOAD_FONT2
# define LOAD_FONT4
# include <M5Stack.h>
# include "utility/MPU9250.h"
# include <WiFi.h>
# include <WiFiUdp.h>
// TELLOのSSID
const char* TELLO_SSID = "TELLO-XXXXXX";  // 自分のTelloのWi-Fi SSIDを入力
// TELLOのIP
const char* TELLO_IP = "192.168.10.1";
// TELLO_PORT
const int PORT = 8889;
// UDPまわり
WiFiUDP Udp;
char packetBuffer[255];
String message = "";

MPU9250 IMU;

float x;
float y;
char msgx[6];
char msgy[6];
String status_msg;
void setup() {
  //M5Stackの初期設定
  M5.begin();
  //画面表示
  //---タイトル
  M5.Lcd.fillRect(0,0,320,30,TFT_BLUE);
  M5.Lcd.drawCentreString("Tello Controller",160,2,4);
  //---X, Yの表示
  M5.Lcd.setTextColor(TFT_YELLOW,TFT_BLACK);
  M5.Lcd.drawCentreString(" Accel-X : ",20,30,2);
  sprintf(msgx,"%-2.2f",x);
  M5.Lcd.drawCentreString(msgx,88,30,2);
  //---X, Y値の表示
  M5.Lcd.drawCentreString(" Accel-Y : ",240,30,2);
  sprintf(msgy,"%-2.2f",y);
  M5.Lcd.drawCentreString(msgy,294,30,2);
  //---ボタンエリア
  M5.Lcd.fillRect(0,217,320,20,TFT_LIGHTGREY);
  //---ボタン文字
  M5.Lcd.setTextColor(TFT_BLACK,TFT_YELLOW);
  M5.Lcd.drawCentreString(" TAKE OFF ",64,220,2);
  M5.Lcd.setTextColor(TFT_BLACK,TFT_RED);
  M5.Lcd.drawCentreString(" LANDING  ",250,220,2);
  M5.Lcd.setTextColor(TFT_BLACK,TFT_CYAN);
  M5.Lcd.drawCentreString(" ROTATION ",160,220,2);
  //---方向矢印
  M5.Lcd.fillTriangle(159,40,189,60,129,60,TFT_GREEN);
  M5.Lcd.fillTriangle(159,160,189,140,129,140,TFT_GREEN);
  M5.Lcd.fillTriangle(269,100,220,80,220,120,TFT_GREEN);
  M5.Lcd.fillTriangle(98,80,98,120,49,100,TFT_GREEN);
  //---方向の文字
  M5.Lcd.setTextColor(TFT_WHITE,TFT_BLACK);
  M5.Lcd.drawCentreString("FORWARD",160,64,2);
  M5.Lcd.drawCentreString("BACK",160,120,2);
  M5.Lcd.drawCentreString("LEFT",120,92,2);
  M5.Lcd.drawCentreString("RIGHT",200,92,2);
  //---FLIP文字
  M5.Lcd.setTextColor(TFT_YELLOW,TFT_BLACK);
  M5.Lcd.drawCentreString("FLIP: ",60,140,1);
  M5.Lcd.drawCentreString("ButtonA + Direction",50,150,1);
  //---UP/DOWN文字
  M5.Lcd.setTextColor(TFT_YELLOW,TFT_BLACK);
  M5.Lcd.drawCentreString("UP/DOWN: ",280,140,1);
  M5.Lcd.drawCentreString("ButtonC + FORWARD",280,150,1);
  M5.Lcd.drawCentreString("Up/Down",300,160,1);
  //---メッセージ領域
  M5.Lcd.drawRoundRect(0,180,319,30,4,TFT_WHITE);
  //---メッセージのタイトル文字
  M5.Lcd.setTextColor(TFT_WHITE,TFT_DARKGREEN);
  M5.Lcd.drawCentreString("<Message>",38,170,1);
  //---メッセージの文字
  //M5.Lcd.setTextColor(TFT_WHITE,TFT_BLACK);
  //M5.Lcd.drawString(msg,4,190,1);
  //初期設定
  //Wireライブラリを初期化
  Wire.begin();
  //MPU9250を初期化
  IMU.initMPU9250();
  //WiFi通信の開始
  WiFi.begin(TELLO_SSID, "");
  //WiFi接続 接続するまでループ
  while (WiFi.status() != WL_CONNECTED) {
        print_msg("Now, WiFi Connecting......");
        delay(500);
  }
  print_msg("WiFi Connected.");
  // UDP
  Udp.begin(PORT);
  //Telloへ”command”送信
  print_msg("sendMessage commend");
  tello_command_exec("command");
}

void loop() {
  // put your main code here, to run repeatedly:
  //x,y値の取得と表示
  if (IMU.readByte(MPU9250_ADDRESS, INT_STATUS) & 0x01){
    IMU.readAccelData(IMU.accelCount);
    IMU.getAres();
    x = IMU.accelCount[0] * IMU.aRes;
    y = IMU.accelCount[1] * IMU.aRes;
    sprintf(msgx,"%-2.2f",x);
    M5.Lcd.drawCentreString("      ",88,30,2);
    M5.Lcd.drawCentreString(msgx,88,30,2);
    sprintf(msgy,"%-2.2f",y);
    M5.Lcd.drawCentreString("      ",294,30,2);
    M5.Lcd.drawCentreString(msgy,294,30,2);
    print_msg("Operation Start!");

    //ボタンA処理
    //0.3は実測値から閾値を設定した
    if(M5.BtnA.wasPressed()) {
      //Telloフリップと離陸
      if (fabs(x)> 0.3){
          if (x > 0){
            //フリップ左
            print_msg("LEFT FLIP");
            tello_command_exec("flip l");
          }
          if (x < 0){
            //フリップ右
            print_msg("RIGHT FLIP");
            tello_command_exec("flip r");
          }
      }
      if (fabs(y)> 0.3){
          if (y > 0){
            //フリップ後
            print_msg("BACK FLIP");
            tello_command_exec("flip b");
          }
          if (y < 0){
            //フリップ前
            print_msg("FRONT FLIP");
            tello_command_exec("flip f");
          }
      }else{
        //離陸
        print_msg("TAKE OFF");
        tello_command_exec("takeoff");
      }
    }

    //ボタンB処理
    //時計回り45度回転
    if(M5.BtnB.wasPressed()) {
        print_msg("CW");
        tello_command_exec("cw 45");
    }

    //ボタンC処理
    if(M5.BtnC.wasPressed()) {
      //着陸
      if (fabs(y)> 0.3){
        //上昇50cm
        if (y > 0){
          tello_command_exec("up 50");
        }
        //下降50cm
        if (y < 0){
          print_msg("DOWN");
          tello_command_exec("down 50");
        }
      }else{
        //着陸
        print_msg("LAND");
        tello_command_exec("land");
      }
    }

    //tello移動
    if (fabs(x)> 0.3){
        //左移動50cm
        if (x > 0){
          print_msg("LFT");
          tello_command_exec("left 50");
        }
        //右移動50cm
        if (x < 0){
          print_msg("RIGHT");
          tello_command_exec("right 50");
        }
    }
    if (fabs(y)> 0.3){
        //後退50cm
        if (y > 0){
          print_msg("BACK");
          tello_command_exec("back 50");
        }
        //前進50cm
        if (y < 0){
          print_msg("FRONT");
          tello_command_exec("forward 50");
        }
    }
    delay(500);
  }
  M5.update();
}

/////////////////////////////
//      ユーザ関数定義       //
/////////////////////////////

// 画面メッセージエリアへ状況メッセージ表示
void print_msg(String status_msg){
  M5.Lcd.setTextColor(TFT_WHITE,TFT_BLACK);
  M5.Lcd.drawString("                          ",4,190,1);
  M5.Lcd.drawString(status_msg,4,190,1);
  status_msg="";
}

// Telloへメッセージ送信&コマンド実行
void tello_command_exec(char* tello_command){
  Udp.beginPacket(TELLO_IP, PORT);
  Udp.printf(tello_command);
  Udp.endPacket();
  message = listenMessage();
  delay(100);
}

// Telloからのメッセージ受信
String listenMessage() {
  int packetSize = Udp.parsePacket();
  if (packetSize) {
    IPAddress remoteIp = Udp.remoteIP();
    int len = Udp.read(packetBuffer, 255);
    if (len > 0) {
      packetBuffer[len] = 0;
    }
  }
  delay(100);
  return (char*) packetBuffer;
}
4-1. 変数
| 型 | 変数名 | コメント |
|---|---|---|
| const char* | TELLO_SSID | 自分のTello WiFi1SSIDを設定 |
| const char* | TELLO_IP | TelloのIPアドレス(初期値:192.168.10.1) |
| const int | PORT | Telloのポート番号(初期値:8889) |
| WifiUDP | Udp | WifiUDPクラスからUdpインスタンス作成 |
| char | packetBuffer[255] | TelloからのUDPメッセージ受信バッファー |
| String | message | Telloからの受信メッセージ |
| MPU9250 | IMU | MPU9250クラスからIMUインスタンス作成 |
| float | x | 加速度x |
| float | y | 加速度y |
| char | msgx[6] | 加速度x文字列 |
| char | msgy[6] | 加速度y文字列 |
| String | status_msg | 状況メッセージ |
4-2. ユーザ関数
| ユーザ関数 | コメント |
|---|---|
| void print_msg(String status_msg) | 画面メッセージエリアへ状況メッセージ表示 |
| void tello_command_exec(char* tello_command) | Telloへメッセージ送信&コマンド実行 |
| String listenMessage() | Telloからのメッセージ受信 |
5. スケッチでの注意点
(1)TelloのWiFi SSIDの修正
8行目
const char* TELLO_SSID = "TELLO-XXXXXX"; // 自分のTelloのWi-Fi SSIDを入力
自分のTelloの値に置き換える。
Tello本体のバッテリー装着するところにSSIDが書かれたシールがあります。
(2)加速度X,Y基準値の調整
118行目
if (fabs(x)> 0.3){
130行目
if (fabs(y)> 0.3){
左右前後の移動がうまくいかないときはこの値を調整してください。
6. 終わりに
Telloコマンドの実行後に、delay(500)で500ms待つようにしましたが、値を小さくすると
スムーズに動くようになります。
バイナリーコマンドでの実行やM5StickCでのスケッチも書く予定です。
