When using the Sharperlight publisher to create a web report and publish it to the company LAN, the information is usually shared in real time between departments or employees. However, the employee viewing the report cannot take any action through the report.
In actual business, there are many cases where you want to prompt the viewer to input data through a web report.
In such cases, you can easily extend your Sharperlight web reports into interactive reports using HTML and JavaScript. By doing so, Sharperlight comes standard with a Writeback function that can incorporate security functions, so it is also possible to write values entered via the Sharperlight RESTful service to the database.
In this article, we will look at how to place text boxes and buttons on the report, and how to create a simple interactive web report that displays the values entered by pressing the button.
Placement of Text Boxes and Buttons
Launch Sharperlight Publisher and add a new Published Query. When the Published Query definition dialog appears, enter the Group and Code.

Next, open the Query Builder with the Edit Query button. Specify System for Product and Custom Defined Dataset for Table. Prepare a dataset as shown in the figure below as Define Dataset.

Set the ID, Code, Description and Amount in the output area. Name the output fields Id, Code, Desc, and Amount respectively.
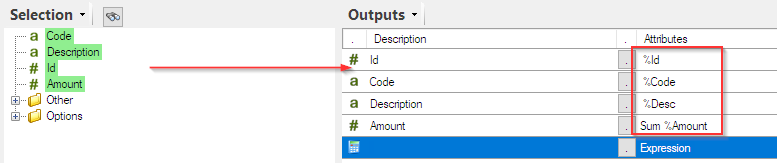
Finally, add an Expression to define the HTML code as shown below.
"<div id='div_" + {%Id} + "' "
+ "data-id='" + {%Id} + "' "
+ "data-code='" + {%Code} + "' "
+ "data-description='" + {%Desc} + "' "
+ "data-amount='" + {%Amount} + "' "
+ ">"
+ "<input type='text' id='input_" + {%Id} + "'>"
+ "<button id='bt_" + {%Id} + "' class='testButton' onClick='btn_Click(this.id)'></button>"
+ "</div>"

When it works, the HTML code looks like this.

Now the placement of the text box and button is complete. Save with the [OK] button.

Defining Button Event Handler
Now prepare an event handler for when the buttons on the report is pressed.
Go to the Options tab of the Published Query definition dialog and use the Footer and CSS properties to write event handlers.
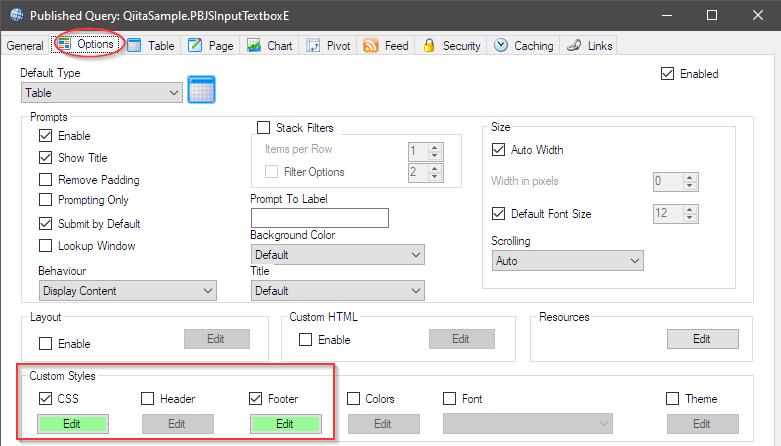
First, from the Footer property. The Header property is also OK, but this time we will explain it with the Footer property. When you press the Edit button, the text editor will start up, so write the JavaScript code like this shown below.
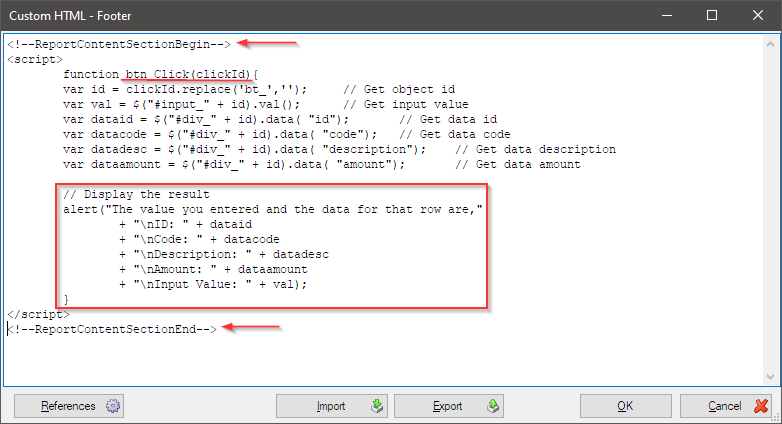
Since the event handler name specified when the button was defined was btn_Click(this.id), write the function btn_Click(clickId). Use the Id passed as an argument to get the input value and other values of the target row and display them in alert.
<!--ReportContentSectionBegin--> and <!--ReportContentSectionEnd--> are Sharperlight control tags that tell the engine to place this JavaScript code in the main part of the report.
<!--ReportContentSectionBegin-->
<script>
    function btn_Click(clickId){
	var id = clickId.replace('bt_','');	// Get object id
	var val = $("#input_" + id).val();	// Get input value
	var dataid = $("#div_" + id).data( "id");	// Get data id
	var datacode = $("#div_" + id).data( "code");	// Get data code
	var datadesc = $("#div_" + id).data( "description");	// Get data description
	var dataamount = $("#div_" + id).data( "amount");	// Get data amount

	// Display the result
	alert("The value you entered and the data for that row are,"
		+ "\nID: " + dataid
		+ "\nCode: " + datacode
		+ "\nDescription: " + datadesc
		+ "\nAmount: " + dataamount
		+ "\nInput Value: " + val);
    }
</script>
<!--ReportContentSectionEnd-->
Let's press OK button to save.
Finally, define the CSS for the button. Press the Edit button of the CSS property to open the text editor.
<style type="text/css">
.testButton{
    height: 15px;
    margin-left: 2px;
}
</style>

Let's press OK button to save.
This completes the Published Query settings. Press OK button to save.
Operation Check
Start the Sharperlight service and view the created WEB report in a browser.
You should see a report like this.
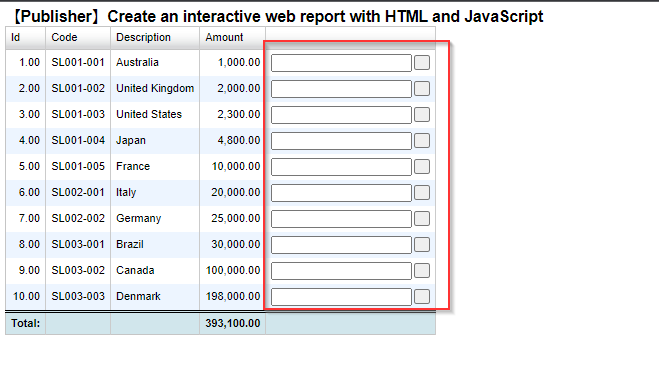
Enter something in the text box and press the button. Creation is successful if such an alert is displayed.

Here, I tried to describe such a simple process, but it is also possible to write to the database via a RESTful service using the Sharperlight writeback URL.
This way, you can focus your time on writing the frontend by letting Sharperlight take care of the data access layer development.
Thank you for reading this article.