Happy Holidays!!
遅ればせながら kintone Advent Calendar 2019 21日目の記事です🎄
最近ゲットした**「みんなの M5Stack 入門本」をきっかけに、M5StickC** を使ったカスタマイズにチャレンジしました!
時々やっちゃう MTG 忘れ...
そんなうっかりを未然に防ぎたい!
ということで、スケジュール忘れ防止アラーム付きの、なんちゃってスマートウォッチを kintone & M5StickC & Slack 連携で開発したので、その方法を紹介していきます。
題して、**「kintone スマートウォッチ対応を夢見るカスタマイズ![]() 」**です(`・∀・´)
」**です(`・∀・´)
これ見て第一声 「スマホで良いんじゃん」 と言う人がいて∑(゚Д゚)ってなりましたが、お手洗いに行くとき含めいつも着けてる時計だからこそ意味があるんです...!
🕰 概要
まずシステム構成・完成イメージ・詳細シナリオなどの紹介です。
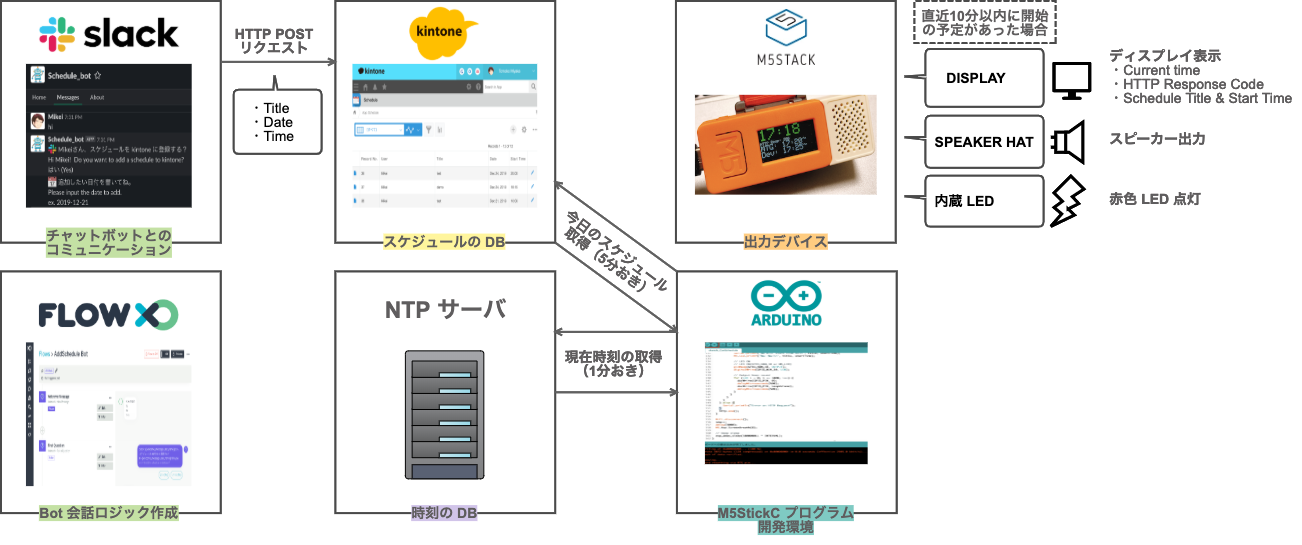
ざっくりシステム構成
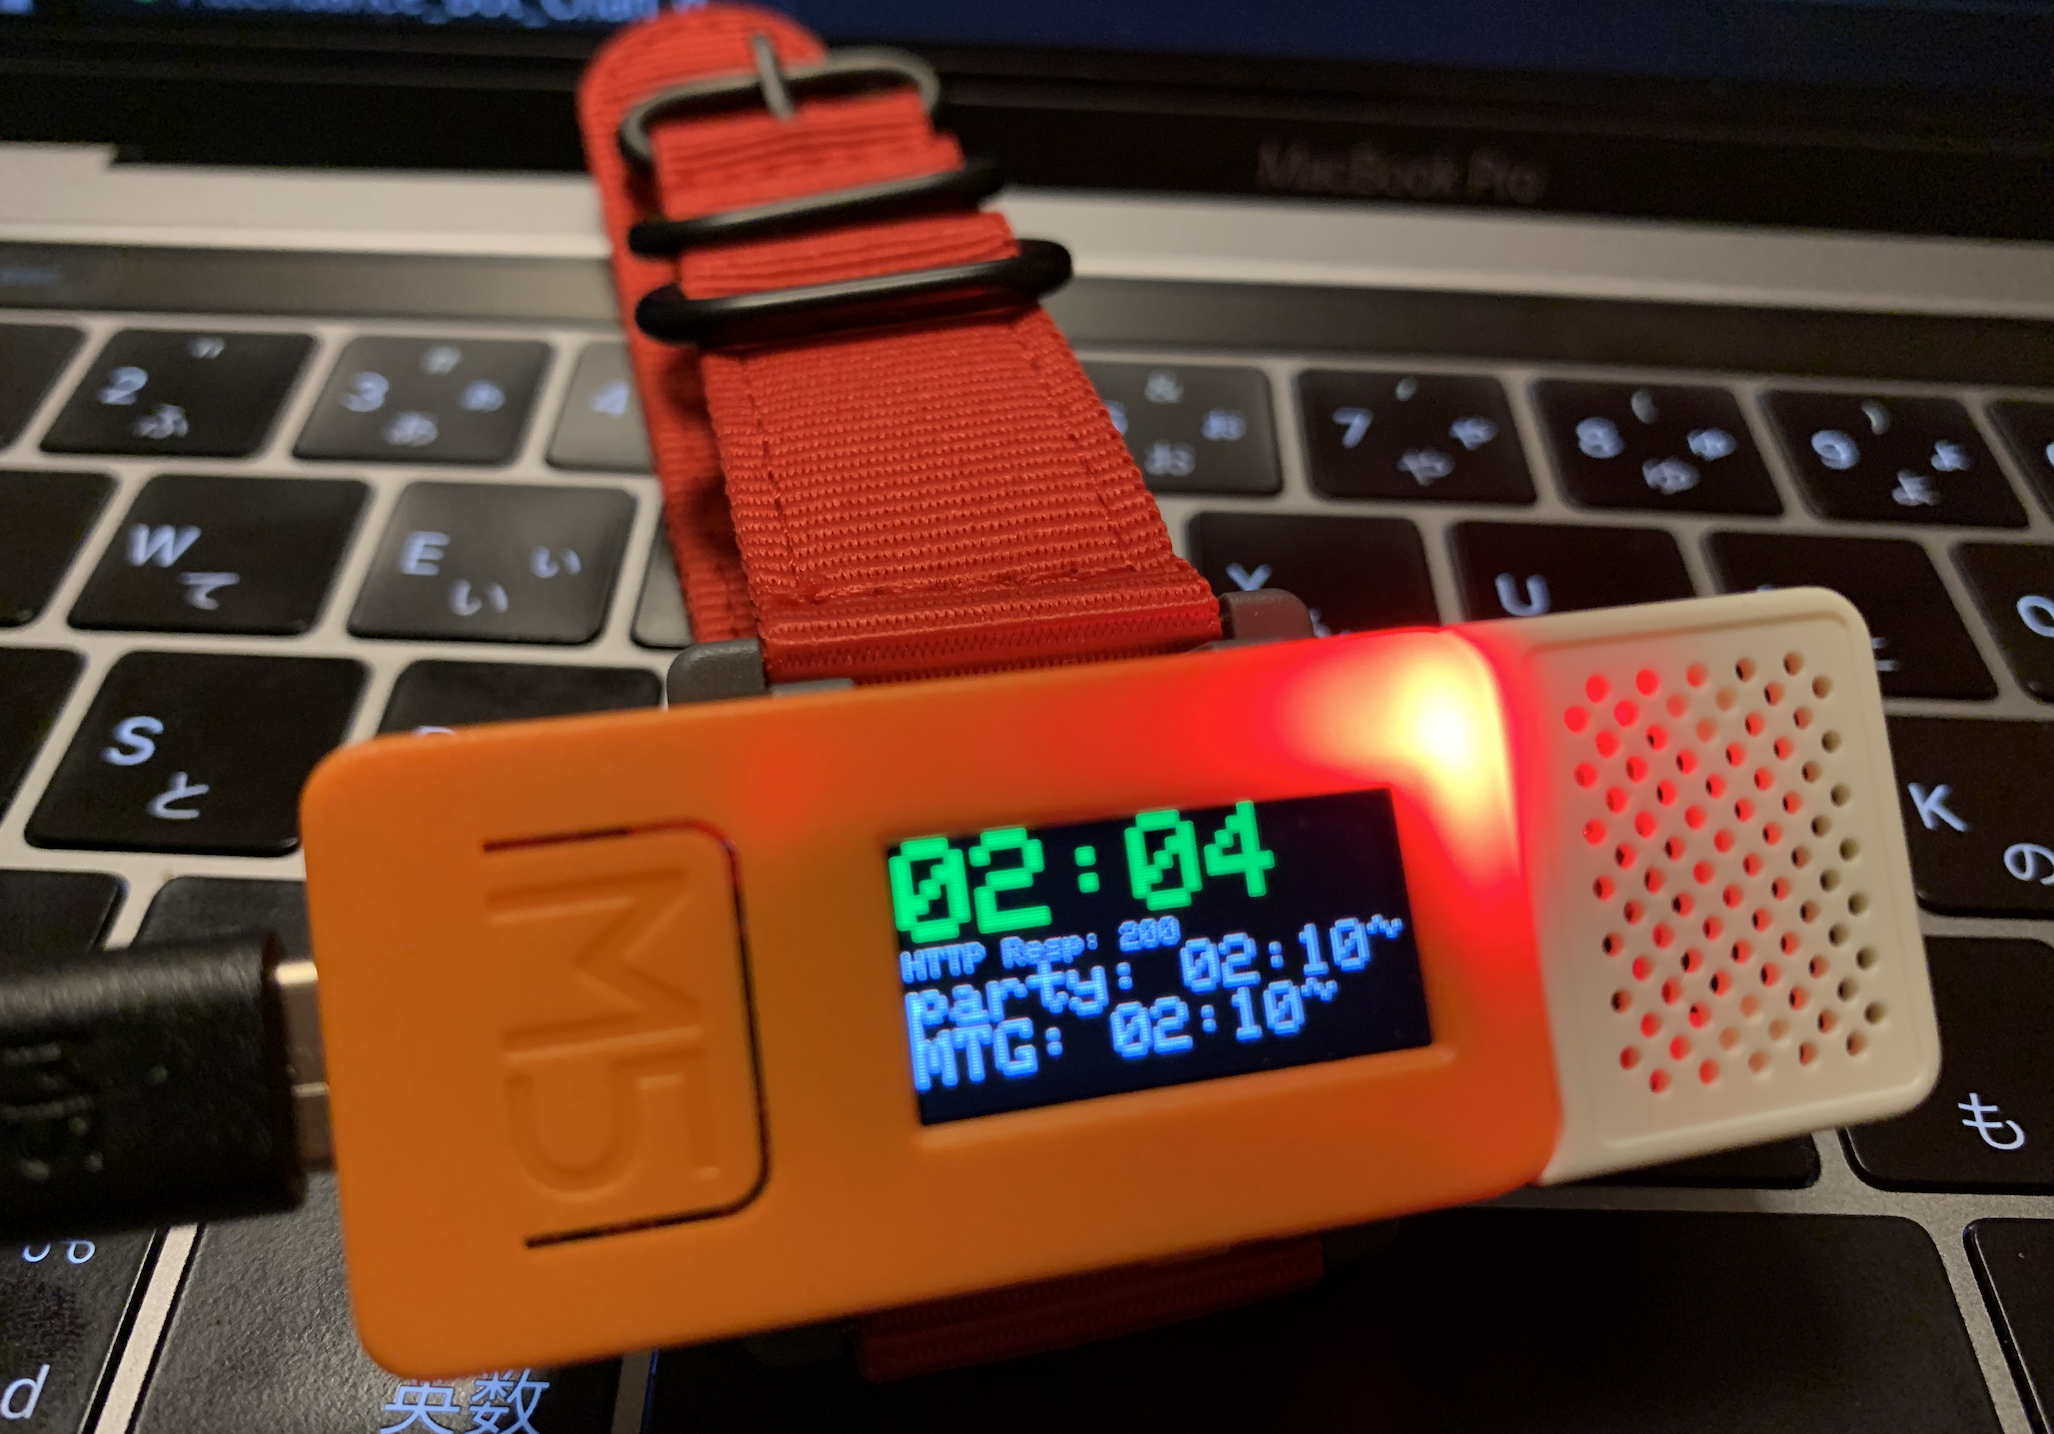
完成イメージ
#kintone #M5StickC #slack でスケジュール忘れ防止のスマートウォッチカスタマイズ⌚️ pic.twitter.com/YdmhkN26GQ
— Tomoko Miyake (@tomo63ko) December 24, 2019
M5StickC のディスプレイがみづらいので拡大ver.です↓

詳細シナリオ
- 前提
- kintone でスケジュール管理をしている
- カスタマイズ内容
- Slack チャットボットとの対話で kintone にスケジュール登録
- M5StickC で NTP 時刻サーバにアクセスして、現在時刻表示(1分おき)
- M5StickC から kintone に HTTP リクエストして、直近10分以内に開始のスケジュールがあった場合にお知らせ(5分おき)
- ディスプレイにスケジュールタイトルと開始時刻の表示
- SPEAKER HAT から Beep音出力
- 内蔵 LED 点灯
注意事項
- 今回 Arduino での日本語フォント対応はしていないので、スケジュールのタイトルは英語で入力してください。
- SPEAKER HAT のノイズ音が少しうるさいです。色々カスタマイズしたら何とかできるみたいですが、今回はスキップします。ノイズもご愛嬌(笑)
- HTTP リクエストをしているため、M5StickC ウォッチ着用時はプログラムに記述した WiFi の通信圏内にいる必要がありますのでご注意ください。(仕事場利用のイメージ)
🕰 カスタマイズ手順
- kintone アプリ作成
- Slack App 作成
- Flow XO フロー作成
- M5StickC 開発環境セットアップ
- Arduino IDE でのプログラム開発
Slack チャットボット連携は「スケジュールも毎回 kintone に登録しにいくの面倒だな」と思って作ったおまけです。
Step2, 3 をスキップして M5StickC 連携のみ試すこともできます。
🕰 1. kintone アプリ作成
スケジュールデータの DB となる kintone アプリを作成します。
- 以下のフィールド構成で
Schedule アプリを作成

| フィールド名 | フィールドタイプ | フィールドコード |
|---|---|---|
| User | 文字列一行(Text) | User |
| Title | 文字列一行(Text) | Title |
| Date | 日付(Date) | Date |
| Start Time | 時刻(Time) | StartTime |
- API トークンの生成(Arduino IDE に認証情報として記載)

🕰 2. Slack App 作成
kintone にスケジュール登録をするための Slack チャットボットを作成します。
- 以下のボタンリンクより Schedule Bot を Slack Workspace に追加(事前に Slack Workspace 作成が必要)
- Workspace へのアクセスを許可

- この画面に移動して、Schedule Bot が話しかけてきたら準備 OK!

🕰 3. Flow XO フロー作成
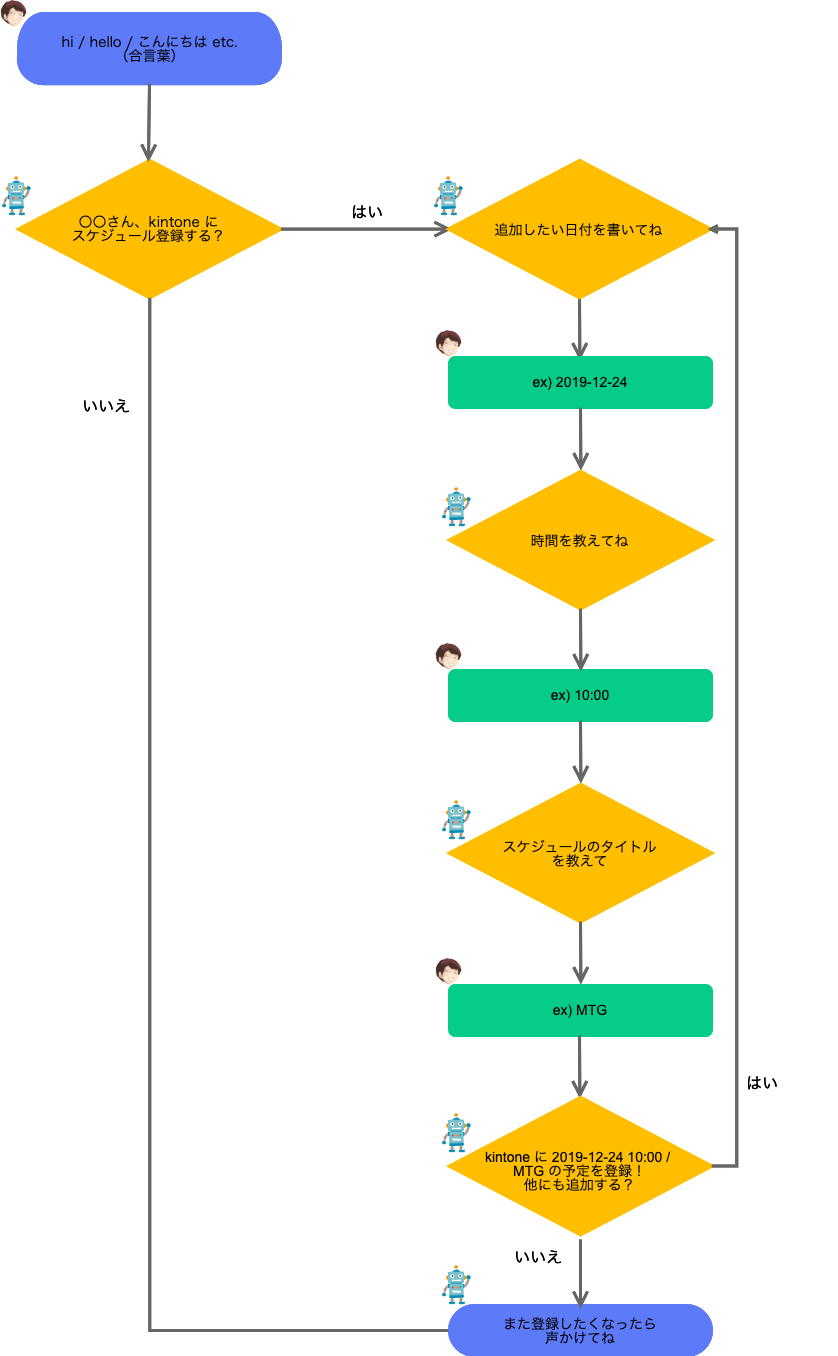
チャットボットの会話ロジックを Flow XO というツールで作成します。(kintone への HTTP POST リクエストを含む)
2つ以上のスケジュールを連続で追加できるように繰り返し処理を組んでいるところが今回のポイントです💡
-
こちらのページより
Flow XO のアカウントを作成

-
こちらのページ より
AddSchedule Bot Flowをインストール


- 少し下にスクロールして、
Make a HTTP RequestAction のみ、自分の環境情報(ドメイン名とAPI トークン)に変更して設定保存(Next>Saveで保存)


-
Bots項目より Slack App との連携作成(こちらの記事のFlow XO の設定>手順 11を参照)

- 設定完了したら、以下のような対話が可能

Flow XO での一からのフロー作成手順については、以前別の記事で紹介しているので、気になる方はご覧ください。
SlackとkintoneとFlow XOを使って出勤連絡ボットを作ろう!
🕰 4. M5StickC 開発環境セットアップ
ここからが本題です。いよいよ M5StickC のセットアップと開発フェーズになります。
-
以下の記事を参考に、デバイスと開発環境のセットアップ
-
以下は追加のボードマネージャとライブラリマネージャの設定(Built-in の設定利用も複数あり)
| ボードマネージャURL | ボードマネージャ | ライブラリマネージャ |
|---|---|---|
| https://dl.espressif.com/dl/package_esp32_index.json | esp32 | M5StickC |
| ArduinoJson |
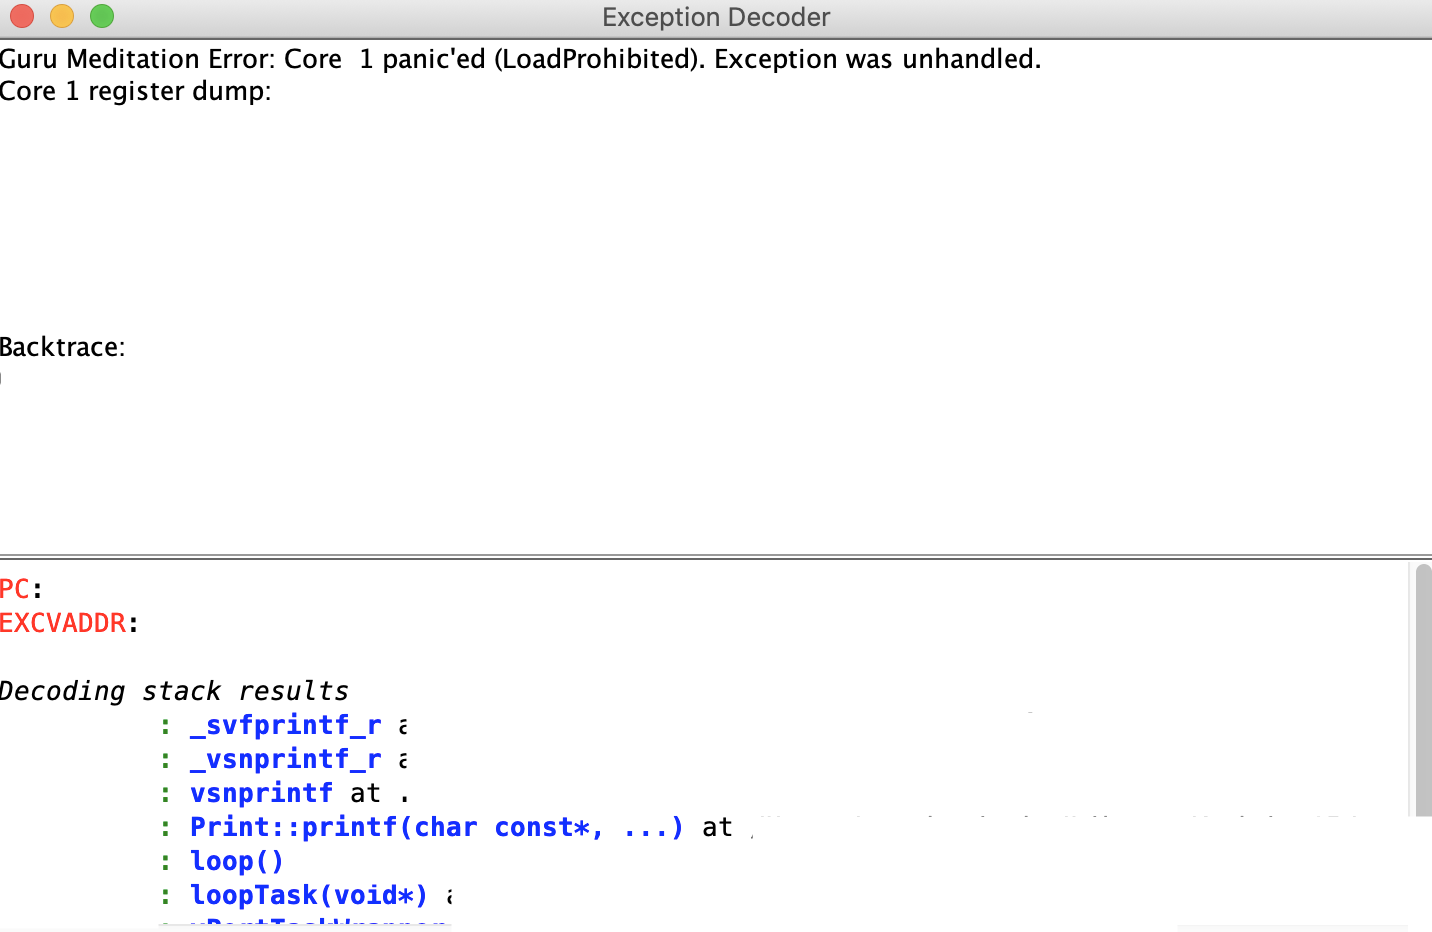
EspExceptionDecoder もインストールしておくとエラー箇所特定に役立ちます。
🕰 5. Arduino IDE でのプログラム開発
M5StickC は、M5Stack が提供している Web ベースのプログラミングツール UIFlow にて MicroPython や Blockly(ビジュアルプログラミング) での開発も可能ですが、今回は Arduino IDE を使って C/C++言語で開発を行います。
- 以下の
スケッチを作成して保存
| プログラム内の要編集箇所 |
|---|
| WiFi SSID |
| WiFi PASSWORD |
| ドメイン名 |
| アプリID |
| API トークン |
# include <M5StickC.h>
# include <WiFi.h>
# include <time.h>
# include <HTTPClient.h>
# include <ArduinoJson.h>
# include <stdio.h>
# include <string.h>

// WiFi setting
const char* ssid       = "[WiFi SSID]";
const char* password   = "[WiFi PASSWORD]";

// Time setting
const char* ntpServer =  "ntp.jst.mfeed.ad.jp";
const long  gmtOffset_sec = 9 * 3600;
const int   daylightOffset_sec = 0;

// Sound setting
# define GPIO_PIN 26
uint8_t beepVolume = 50;

# define INTERVAL 58
RTC_DATA_ATTR static uint8_t seq = 1;

void setup() {

  M5.begin();
  Serial.begin(115200);
  Serial.println("\nStart processing...");

  M5.Axp.ScreenBreath(9);
  M5.Lcd.setRotation(3);
  M5.Lcd.fillScreen(BLACK);

  WiFi.begin(ssid, password);
  int i = 0;
  while (WiFi.status() != WL_CONNECTED) {
    if (i > 10) break;
    delay(100);
    Serial.println("Connecting to WiFi...");
    i++;
  }
  Serial.println("Connected to the WiFi network");
  delay(2000);
}

void loop() {

  // Get the current time
  Serial.println("\nStart loop processing...");
  M5.Lcd.setCursor(0, 0, 1);
  M5.Lcd.setTextColor(GREEN);
  M5.Lcd.setTextSize(4);
  configTime(gmtOffset_sec, daylightOffset_sec, ntpServer);
  struct tm timeinfo;
  char s[20];
  if (!getLocalTime(&timeinfo)) {
    M5.Lcd.println("Error!");
  }else{
    sprintf(s, "%02d:%02d", timeinfo.tm_hour, timeinfo.tm_min);
    Serial.println(s);
    M5.Lcd.println(s);
  }

  if((seq % 5) == 1){
    // Get the record datas from kintone
    int respCode = 0;
    HTTPClient http;
    http.begin("https://[ドメイン名].cybozu.com/k/v1/records.json?app=[アプリID]&query=Date=TODAY()&totalCount=true");
    http.addHeader("X-Cybozu-API-Token", "[API トークン]");
    respCode = http.GET();
    if (respCode > 0) {
      M5.Lcd.setTextColor(WHITE);
      M5.Lcd.setTextSize(1);
      Serial.printf("HTTP Response Code = %d \n", respCode);
      M5.Lcd.printf("HTTP Resp: %d \n", respCode);
      String payload = http.getString();
      Serial.println(payload);
      DynamicJsonDocument doc(50000);
      deserializeJson(doc, payload);

      // totalCount of Get Records
      const char* totalCount = doc["totalCount"];
      Serial.printf("totalCount = %s \n", totalCount);
      int numTotalCount = atoi(totalCount);

      if (int(strcmp(totalCount, "null")) == 0) {
        Serial.println("No schedules today");
      } else {
        // datas of Get Records
        JsonObject obj = doc.as<JsonObject>();
        String getRecords = obj[String("records")];
        Serial.println(getRecords);

        // Loop getRecords to find upcoming schedules
        int i;
        for (int i = 0; i < numTotalCount; i++) {
          DynamicJsonDocument doc(50000);
          deserializeJson(doc, getRecords);
          JsonObject datas = doc[i];
          const char* title = datas["Title"]["value"];
          const char* startTime = datas["StartTime"]["value"];

          // Display the schedule title if it begins in 10 mins
          #define N 3
          char hours[N];
          char mins[N];

          snprintf(hours, N, "%.*s", 2, startTime);
          snprintf(mins, N, "%.*s", 2, startTime + 3);
          int numHours = atoi(hours);
          int numMins = atoi(mins);

          // Change to time_t type data
          struct tm hm;
          time_t currentT, startT;
          double diffTime;
          memset(&hm, 0, sizeof(hm));
          hm.tm_hour = timeinfo.tm_hour;
          hm.tm_min = timeinfo.tm_min;
          currentT = mktime(&hm);
          hm.tm_hour = numHours;
          hm.tm_min = numMins;
          startT = mktime(&hm);

          diffTime = difftime(startT, currentT);
          Serial.println(diffTime);

          if (0 <= diffTime && diffTime <= 600) {
            M5.Lcd.setTextSize(2);
            Serial.printf("%s will start from %s\n", title, startTime);
            M5.Lcd.printf("%s: %s~\n", title, startTime);

            // LED ON
            pinMode(GPIO_NUM_10, OUTPUT);
            digitalWrite(GPIO_NUM_10, LOW);

            // Output beep sound
            for (int i = 0; i <= 1000; i++) {
              dacWrite(GPIO_PIN, 0);
              delayMicroseconds(500);
              dacWrite(GPIO_PIN, beepVolume);
              delayMicroseconds(500);
            }
          }
        }
      }
    } else {
      Serial.println("Error on HTTP Request");
    }
    http.end();
  }

  WiFi.disconnect();
  seq++;
  delay(3000);
  M5.Axp.ScreenBreath(8);

  // Deep sleep
  esp_deep_sleep(1000000LL * INTERVAL);
}
-
コンパイルして、マイコンボードに書き込み

- エラーの場合は、
シリアルモニタへの出力結果も見ながらデバッグ

プログラムのポイント解説
ポイントとなる箇所をピックアップして簡単に説明します。
- 必要なライブラリは、最初にインクルード
# include <M5StickC.h>
# include <WiFi.h>
# include <time.h>
# include <HTTPClient.h>
# include <ArduinoJson.h>
# include <stdio.h>
# include <string.h>
-
基礎関数をセット
- void setup():起動時に一回実行される処理を記載(初期設定)
- WiFi の接続確認
- void loop():繰り返し実行したい処理を記載(メイン)
- 時刻表示
- スケジュールの表示(kintone への HTTP リクエスト)
- LED 点灯 / SPEAKER HAT からの Beep音出力
- void setup():起動時に一回実行される処理を記載(初期設定)
-
NTP 時刻サーバにアクセスして、現在時刻を取得
// Time setting
const char* ntpServer =  "ntp.jst.mfeed.ad.jp";
const long  gmtOffset_sec = 9 * 3600;
const int   daylightOffset_sec = 0;

/// 中略 ///

void loop() {

  configTime(gmtOffset_sec, daylightOffset_sec, ntpServer);
  struct tm timeinfo;
  char s[20];
  if (!getLocalTime(&timeinfo)) {
    M5.Lcd.println("Error!");
  }else{
    sprintf(s, "%02d:%02d", timeinfo.tm_hour, timeinfo.tm_min);
    Serial.println(s);
    M5.Lcd.println(s);
  }
}
- ArduinoJson ライブラリを利用して、kintone への GET リクエストで取得した JSON オブジェクトを扱う
- ArduinoJson Assistant がテストに便利!
String payload = http.getString();
Serial.println(payload);
DynamicJsonDocument doc(50000);
deserializeJson(doc, payload);
- time_t型に変換して、difftime関数で時間比較(直近10分以内に開始の予定があるかの確認のため)
const char* title = datas["Title"]["value"];
const char* startTime = datas["StartTime"]["value"];

// Display the schedule title if it begins in 10 mins
# define N 3
char hours[N];
char mins[N];

snprintf(hours, N, "%.*s", 2, startTime);
snprintf(mins, N, "%.*s", 2, startTime + 3);
int numHours = atoi(hours);
int numMins = atoi(mins);

// Change to time_t type data
struct tm hm;
time_t currentT, startT;
double diffTime;
memset(&hm, 0, sizeof(hm));
hm.tm_hour = timeinfo.tm_hour;
hm.tm_min = timeinfo.tm_min;
currentT = mktime(&hm);
hm.tm_hour = numHours;
hm.tm_min = numMins;
startT = mktime(&hm);

diffTime = difftime(startT, currentT);
Serial.println(diffTime);

if (0 <= diffTime && diffTime <= 600) {
  M5.Lcd.setTextSize(2);
  Serial.printf("%s will start from %s\n", title, startTime);
  M5.Lcd.printf("%s: %s~\n", title, startTime);
}
- GPIO ピンを指定して、LED 点灯と SPEAKER HAT からの Beep音の出力
// Sound setting
# define GPIO_PIN 26
uint8_t beepVolume = 50;

/// 中略 ///

// LED ON
pinMode(GPIO_NUM_10, OUTPUT);
digitalWrite(GPIO_NUM_10, LOW);

// Output beep sound
for (int i = 0; i <= 1000; i++) {
  dacWrite(GPIO_PIN, 0);
  delayMicroseconds(500);
  dacWrite(GPIO_PIN, beepVolume);
  delayMicroseconds(500);
}
その他、Deep Sleep による省電力化 / カウントアップして kintone への HTTP リクエスト頻度の制限などを行なっています。
🕰 今後やってみたいこと
開発してると色々とアイデアも浮かぶもので、次回この辺もチャレンジしてみたいところです。
- スケジュールの内容を Beep音ではなく、テキストの読み上げにて出力する
- M5Stack(画面が大きな別デバイス)単独でのスケジュール登録 ~ お知らせまでの実装
- 併せて買った GROVE ポート用の Unit(Button, Proto) を使ってみる
🕰 参考リンク
色んな記事を参考にさせていただきました。
Special thanks to...![]()
kintone
M5Stack
- M5StickC ESP32-PICO Mini IoT Development Kit
- M5StickC Quick Start - Arduino Mac
- M5StickC非公式日本語リファレンス
- M5StickCで小型環境センサ端末を作る
- M5StickC で kintone に環境計測データをアップする時計を作る
- M5StickC + Speaker Hat で音を出す
- M5StickCの内蔵LEDを使う
Arduino
- Arduino IDE Development
- ArduinoJson API Reference
- ArduinoJson Assistant
- Arduino 日本語リファレンス
- Arduinoで遊ぶページ
- 公開 NTP
- ESP32でネットワーク上から現在時刻を取得する(NTP)
- ESP8266でHTTP GETするならWiFiClientじゃなくてHTTPClientのほうが良い
- ESP8266のスタックトレースから原因の調査を試みる
- ESP32のディープスリープを調べる
![]()
![]()
![]()
![]()
![]()
![]()
![]()
![]()
![]()
![]()
![]()
![]()
最後まで読んでいただきありがとうございましたm(_ _)m
Arduino と C/C++言語は初チャレンジだったので、もしおかしなところがあったらぜひご指摘ください。
![]()
![]()
![]()
![]()
![]()
![]()
![]()
![]()
![]()
![]()
![]()
![]()


