MQTTを試す
家庭内やオフィス内などの一つのWiFiルーターを使うローカルIPアドレス環境ではなく、遠く離れたところでも双方向の通信をするためにCloudのMQTTを試してみたい。CloudのMQTTとして、hiveMQ Cloudを使う。デバイスは複数のM5StickC Plusを使う。
動作のイメージはこれ。

1-ft seabassさんの記事を参考にさせていただいた。
https://www.1ft-seabass.jp/memo/2025/05/15/nodered-connect-hivehq-mqtt-broker/
https://www.1ft-seabass.jp/memo/2025/2025-07-08-atoms3-hivemq-mqtt-display-on-off/
https://www.1ft-seabass.jp/memo/2025/2025-07-10-atoms3-hivemq-mqtt-display-on-off-m5unified/
hiveMQ Cloudに登録
hiveMQ Cloudのサイトに行く。
https://www.hivemq.com/
[Sign Up FREE Now]のボタンを押す

[Create Serverless Cluster]のボタンを押す

Your Clustersの画面が出たら、[Manage Cluster]のボタンを押す
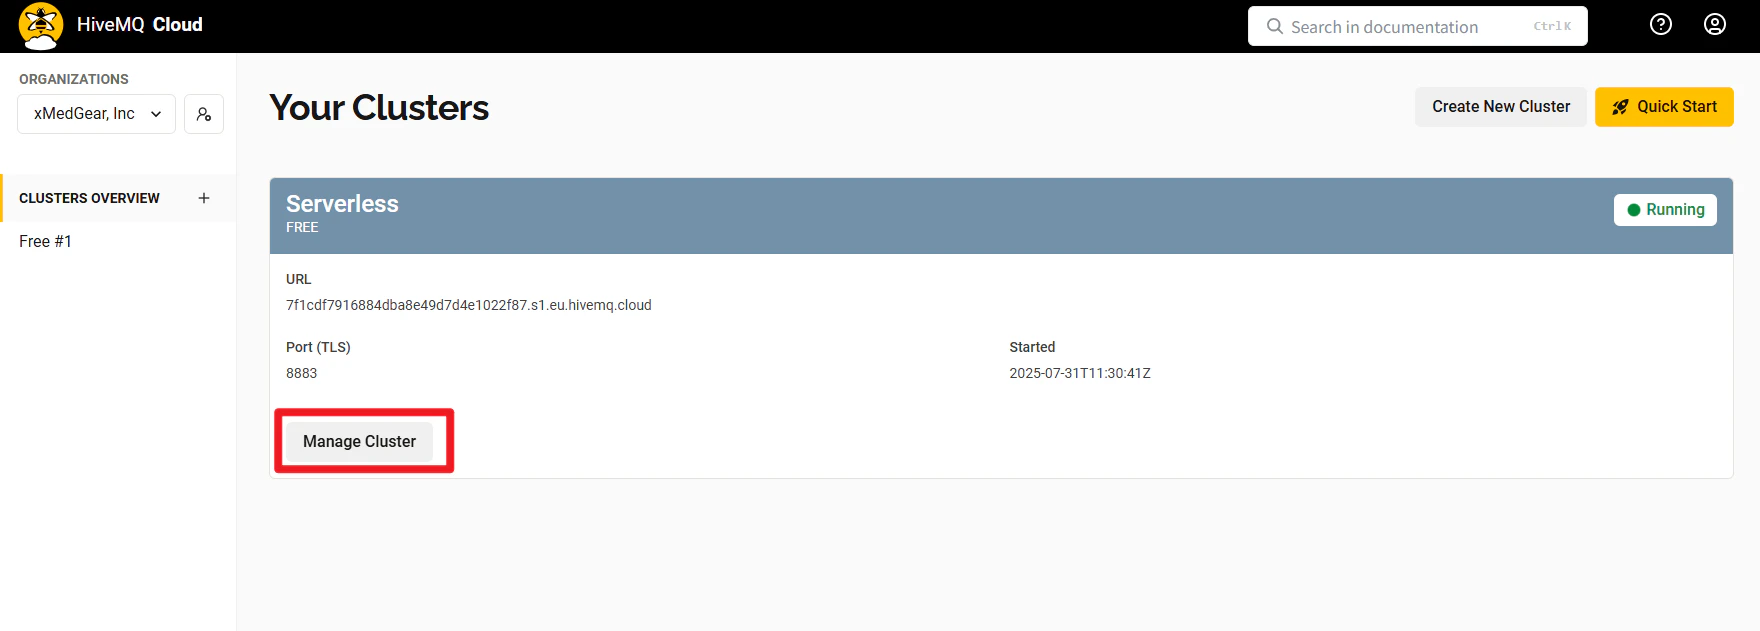
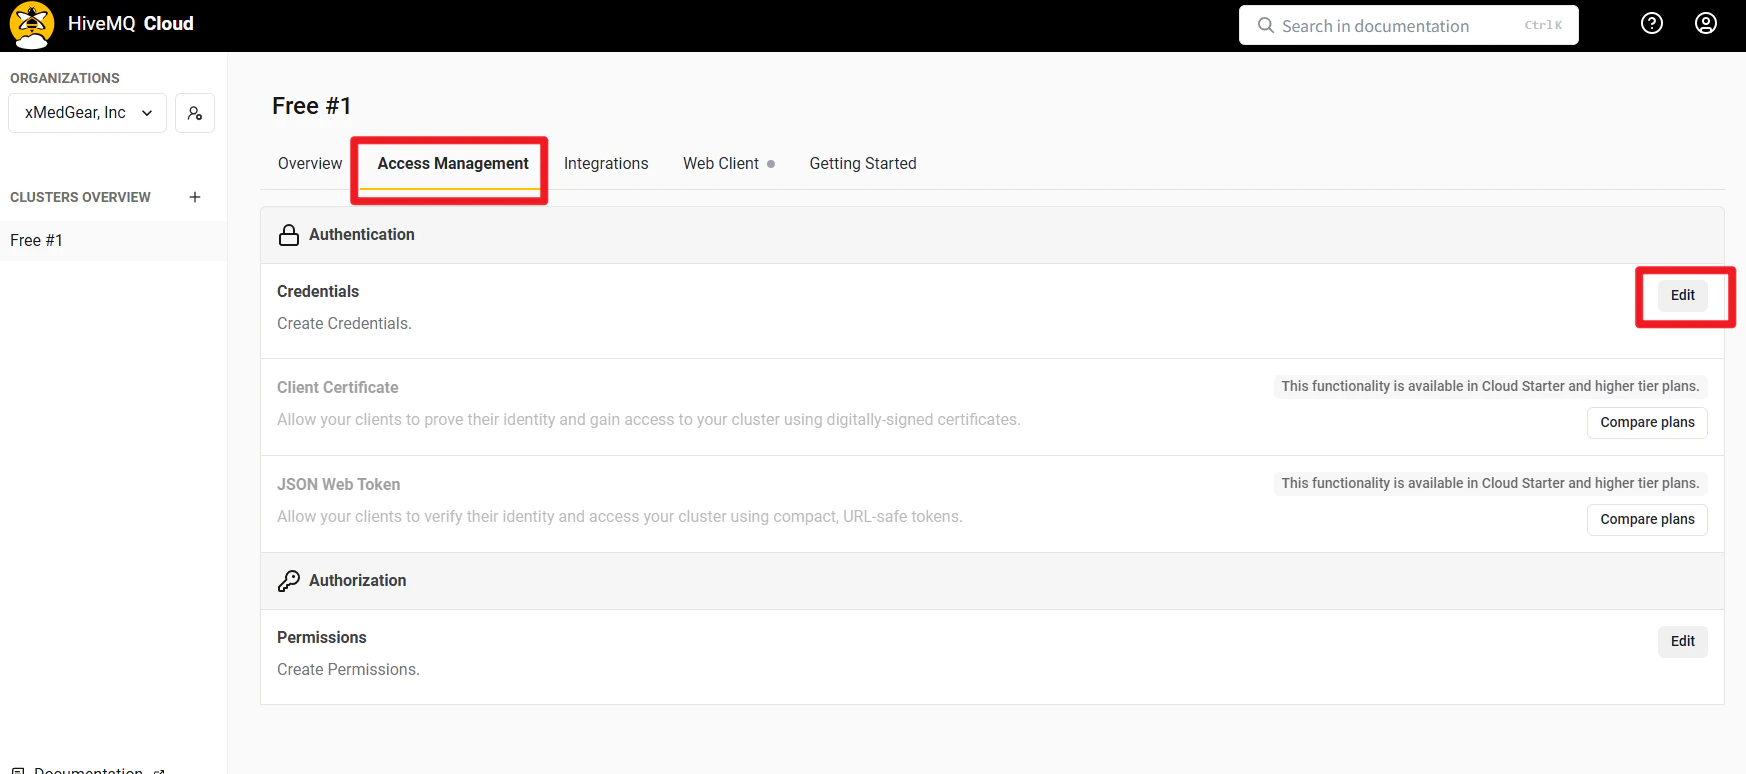
Free #1画面が表示される。

上のタブで [Access Management] をクリックします。Credentials の [Edit] をクリックします。
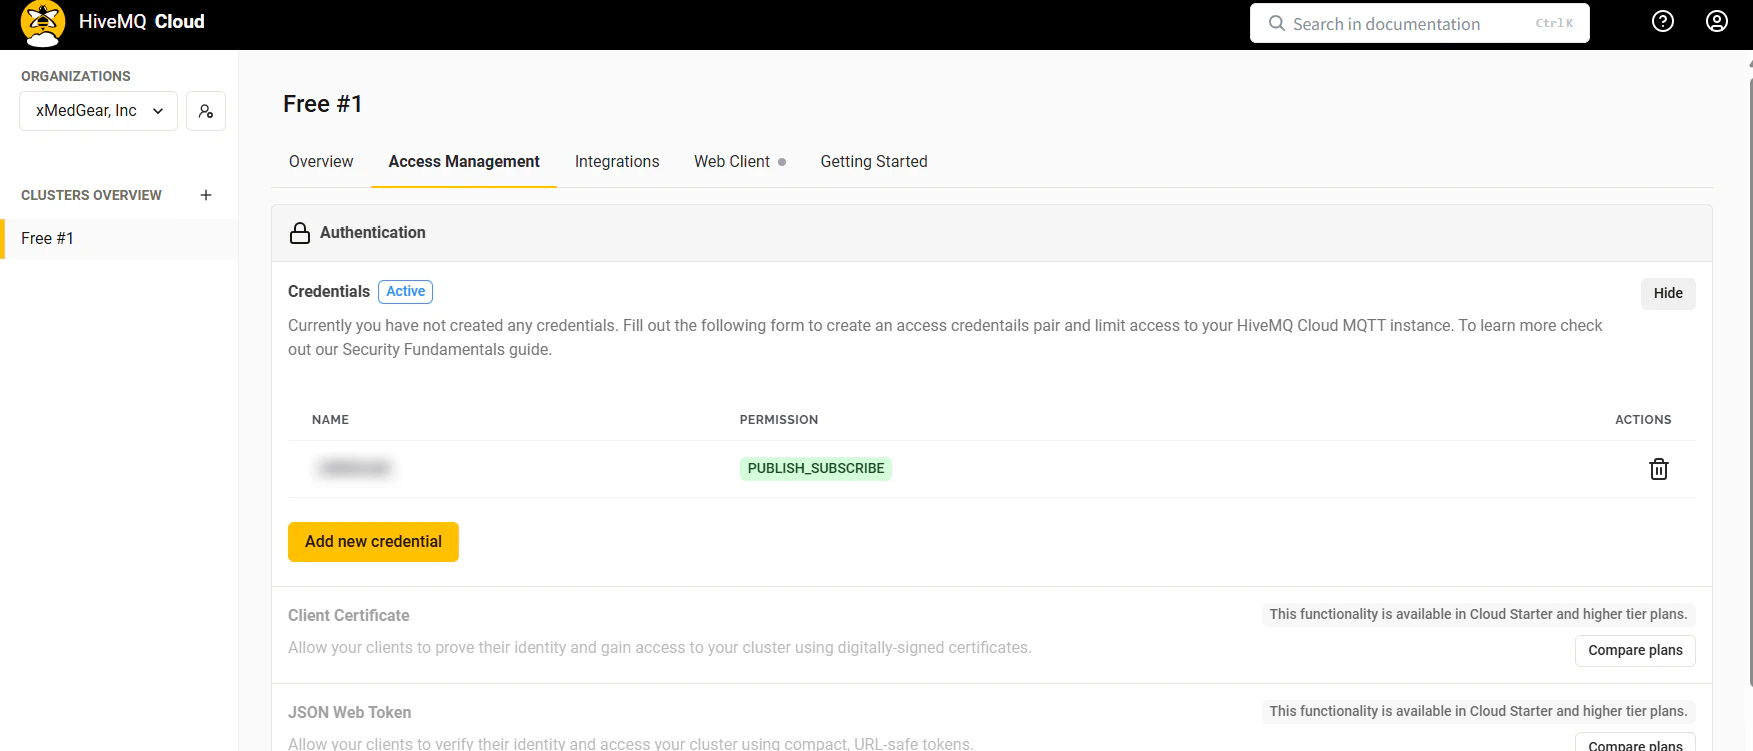
[Add Credential]ボタンを押す

Freee #1画面に入力する

Username, Password, Permission, Confirmed Passwordを入力して[SAVE]ボタンを押す

この画面が出たら設定完了
M5StickC Plusの準備
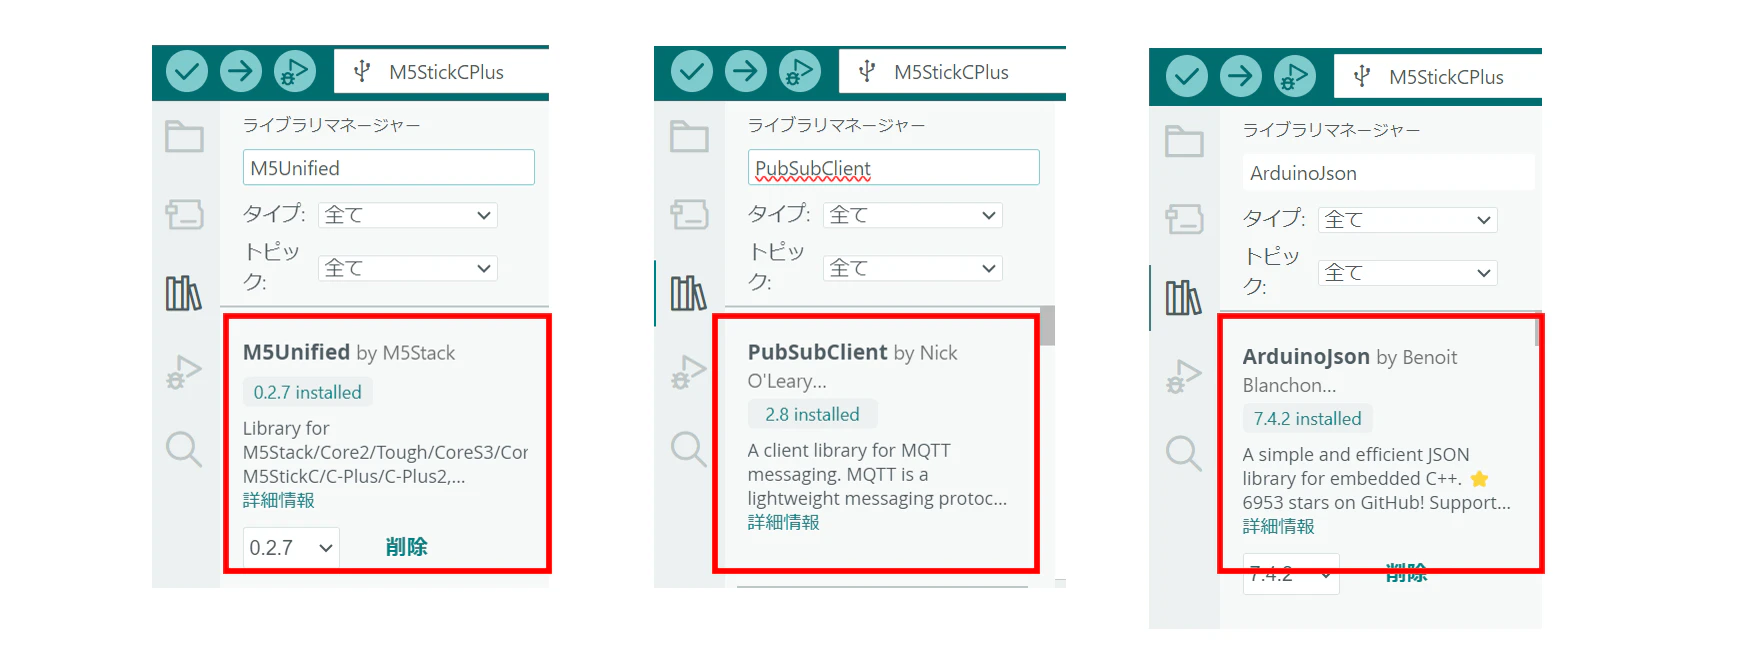
Arduino IDEにライブラリを入れる。
Arduino IDEに、ライブラリとして、M5Unified、PubSubClient、ArduinoJsonの最新版を入れる。
M5StickC Plusに以下のスケッチを入れる。
// =================================================================
// M5StickC Plus - MQTT Pub/Sub with HiveMQ Cloud (TLS/ID/PW)
// =================================================================
//
// ## 概要
// このスケッチは、M5StickC PlusにMQTTのPublisher(発行者)と
// Subscriber(購読者)の両方の機能を持たせます。
// HiveMQ CloudのClusterに対して、TLS+ID/Password認証で安全に接続します。
//
// ## 機能
// - WiFiに接続
// - HiveMQ Cloud MQTTブローカーにTLS接続
// - ボタンAでメッセージをPublish
// - メッセージをSubscribeして画面の色を変更
//
// ## 必要なライブラリ
// - M5Unified
// - PubSubClient
// - ArduinoJson
//
// =================================================================

#include <M5Unified.h>
#include <WiFi.h>
#include <WiFiClientSecure.h>         // TLS(SSL)用クライアント
#include <PubSubClient.h>
#include <ArduinoJson.h>
#include "time.h"

// --- WiFi設定 (複数のM5StickC Plusで共通である必要なし)---
const char* ssid     = "XXXXXX";
const char* password = "XXXXXXXXX";

// --- MQTT設定(HiveMQ Cloud用:URL, 認証情報, トピックなど, 複数のM5StickC Plusで共通) ---
const char* mqttServer   = "xxxxxxxxxxxxxxxxxxxxxxxxxxxxxxxx.s1.eu.hivemq.cloud";   // ClusterのURL例: xxx.hivemq.cloud
const int   mqttPort     = 8883;  // TLS用標準ポート
const char* mqttUser     = "xxxxxxxxxxx";  // HiveMQ Cloudで設定したユーザー名
const char* mqttPassword = "xxxxxxxxxxxx"; // HiveMQ Cloudで設定したパスワード
char clientId[30];    // クライアントID(MACから生成)
const char* topic = "/xxxxxxx/xxxxxxxx"; // 使用するMQTTトピック(任意の文字 例"/abcdefg/xyz")

// --- NTP(時刻同期)設定 ---
const char* ntpServer = "ntp.nict.jp";
const long  gmtOffset_sec = 9 * 3600;
const int   daylightOffset_sec = 0;

// --- グローバル変数 ---
WiFiClientSecure wifiClientTLS;              // TLS通信用のクライアント
PubSubClient mqttClient(wifiClientTLS);      // MQTTクライアント

unsigned long lastDisplayRefresh = 0;
unsigned long redScreenStartTime = 0;        // 画面を赤にした時刻

// --- MQTTメッセージ受信時の処理(JSON解析→画面色変更) ---
void mqttCallback(char* receivedTopic, byte* payload, unsigned int length) {
    Serial.print("[INFO] Message arrived on topic: ");
    Serial.println(receivedTopic);

    String message;
    for (int i = 0; i < length; i++) {
        message += (char)payload[i];
    }

    Serial.print("[INFO] Payload: ");
    Serial.println(message);

    JsonDocument doc;
    DeserializationError error = deserializeJson(doc, message);
    if (error) {
        Serial.print("[ERROR] JSON parse failed: ");
        Serial.println(error.c_str());
        return;
    }

    // メッセージ内容に応じて画面を変更
    if (strcmp(doc["action"], "changecolor") == 0) {
        Serial.println("[INFO] Action 'changecolor' received. Switching to RED.");
        M5.Lcd.fillScreen(RED);
        redScreenStartTime = millis();  // 赤画面の開始時刻
    }
}

// --- MQTTブローカーへTLS接続・Subscribe処理 ---
void connectToMqttAndSubscribe() {
    Serial.println("[INFO] Connecting to MQTT Broker (TLS)...");
    M5.Lcd.setCursor(0, 78);
    M5.Lcd.println("MQTT TLS Connecting...");

    wifiClientTLS.setInsecure(); // TLS証明書検証を無効化(開発用)

    while (!mqttClient.connected()) {
        if (mqttClient.connect(clientId, mqttUser, mqttPassword)) {
            Serial.println("[INFO] MQTT Connected!");
            M5.Lcd.fillRect(0, 78, 240, 20, BLACK);

            // トピック購読
            if (mqttClient.subscribe(topic)) {
                Serial.printf("[INFO] Subscribed to topic: %s\n", topic);
            } else {
                Serial.println("[ERROR] Failed to subscribe.");
            }
        } else {
            Serial.printf("[ERROR] MQTT connect failed. rc=%d. Retrying...\n", mqttClient.state());
            delay(5000);
        }
    }
}

// --- 初期設定 ---
void setup() {
    M5.begin();
    Serial.begin(115200);

    // --- WiFi接続 ---
    Serial.printf("[INFO] Connecting to WiFi: %s\n", ssid);
    WiFi.begin(ssid, password);
    while (WiFi.status() != WL_CONNECTED) {
        delay(500);
        Serial.print(".");
    }
    Serial.println("\n[INFO] WiFi Connected!");

    // --- ユニークなクライアントIDを生成(MACアドレス利用) ---
    String mac = WiFi.macAddress();
    mac.replace(":", "");
    snprintf(clientId, sizeof(clientId), "M5TLS-%s", mac.c_str());

    // --- LCD初期設定 ---
    M5.Lcd.setRotation(1);
    M5.Lcd.fillScreen(BLACK);
    M5.Lcd.setCursor(0, 10);
    M5.Lcd.setTextFont(2);
    M5.Lcd.setTextSize(1);
    M5.Lcd.println("MQTT TLS Pub/Sub");
    M5.Lcd.printf("%s (%d)\n", WiFi.SSID().c_str(), WiFi.RSSI());
    M5.Lcd.println(WiFi.localIP());

    // --- MQTTクライアント設定 ---
    mqttClient.setServer(mqttServer, mqttPort);
    mqttClient.setCallback(mqttCallback);

    // --- 時刻同期(NTP) ---
    configTime(gmtOffset_sec, daylightOffset_sec, ntpServer);
}

// --- メインループ ---
void loop() {
    M5.update(); // ボタン状態更新

    // MQTT未接続なら再接続
    if (!mqttClient.connected()) {
        connectToMqttAndSubscribe();
    }
    mqttClient.loop();

    // --- ボタンA押下時:画面変更アクションをPublish ---
    if (M5.BtnA.wasPressed()) {
        JsonDocument doc;
        doc["action"] = "changecolor";
        char payload[64];
        serializeJson(doc, payload, sizeof(payload));

        if (mqttClient.publish(topic, payload)) {
            Serial.printf("[INFO] Published: %s\n", payload);
        } else {
            Serial.println("[ERROR] Failed to publish.");
        }
    }

    // --- 赤画面になって3秒後に黒に戻す ---
    if (redScreenStartTime != 0 && millis() - redScreenStartTime >= 3000) {
        Serial.println("[INFO] Reverting to BLACK screen.");
        M5.Lcd.fillScreen(BLACK);
        M5.Lcd.setCursor(0, 10);
        M5.Lcd.println("MQTT TLS Pub/Sub");
        M5.Lcd.printf("%s (%d)\n", WiFi.SSID().c_str(), WiFi.RSSI());
        M5.Lcd.println(WiFi.localIP());
        redScreenStartTime = 0;
    }

    // --- 1秒ごとに時刻表示(赤画面でない場合) ---
    if (redScreenStartTime == 0 && millis() - lastDisplayRefresh >= 1000) {
        lastDisplayRefresh = millis();
        M5.Lcd.fillRect(0, 58, 240, 20, BLACK);
        M5.Lcd.setCursor(0, 58);
        struct tm timeinfo;
        if (getLocalTime(&timeinfo)) {
            M5.Lcd.printf("%04d/%02d/%02d %02d:%02d:%02d",
                          timeinfo.tm_year + 1900, timeinfo.tm_mon + 1, timeinfo.tm_mday,
                          timeinfo.tm_hour, timeinfo.tm_min, timeinfo.tm_sec);
        } else {
            M5.Lcd.print("Getting time...");
        }
    }
}
相互通信の確認
いずれかのM5StickC PlusのボタンAが押されると、MQTTトピック 例abcdef/xyz にJSON形式の {"action":"changecolor"} のメッセージがPublishされる。すべてのM5StickC Plusは、あらかじめ指定したトピック例abcdef/xyzに登録(Subscribe)して待機している。Publishされた瞬間、MQTTブローカーがそれを検知して、該当トピックをサブスクしている全クライアントに即座に転送する。受信したメッセージの action が "changecolor" である場合、すべてのM5StickC Plusの画面が、3秒間赤色表示に切り替わる。
このスケッチの応用について
以下の部分を変更することで、いろいろな場面に応用できますね。
(1)ボタンAを押すところのif条件。
(2)画面を赤にするところ。
(3)JSONに、他のアクション(例えば "soundalarm" や "showmessage")を追加する。
(4)個体別に別のメッセージをパブリッシュする。
パブリックブローカー broker.hivemq.comに接続する方法
HiveMQ のパブリックブローカー broker.hivemq.com は、ポート1883を非暗号化・認証不要の状態で公開しています。これは「テストやプロトタイピング用途」に限り、誰でも使えるようにしているホスティングです。
- メリット
-- TLSやパスワード設定なしで、非常に簡単に実装・動作確認できる。
-- MQTTの仕組みをすばやく試すには最適。 - 注意点
-- 誰でもアクセス可能なので、メッセージを盗み見されたり書き換えられる可能性がある。
-- 商用やセキュリティが重要な用途には、TLS + 認証付きのMQTTブローカーを使うべき。
パブリックブローカー broker.hivemq.comに接続するM5StickC Plus用のスケッチは以下
// =================================================================
// M5StickC Plus - MQTT Publisher & Subscriber
// =================================================================
//
// ## 概要
// このスケッチは、M5StickC PlusにMQTTのPublisher(発行者)と
// Subscriber(購読者)の両方の機能を持たせます。
// パブリックブローカー broker.hivemq.comに接続します。
//
// ## 機能
// - WiFiに接続し、指定されたMQTTブローカーに接続します。
// - ボタンAが押されると、もう一方のデバイスに画面の色を変えるよう
//   メッセージをPublish(発行)します。
// - メッセージをSubscribe(購読)し、受信すると画面の色を3秒間
//   赤に変え、その後自動で黒に戻します。
//
// ## 必要なライブラリ
// - M5Unified
// - PubSubClient
// - ArduinoJson
//
// =================================================================

#include <M5Unified.h>
#include <WiFi.h>
#include <PubSubClient.h>
#include <ArduinoJson.h>
#include "time.h"

// --- WiFi設定 (複数のM5StickC Plusで共通である必要なし)---
const char* ssid     = "XXXXXX";
const char* password = "XXXXXXXXX";

// --- MQTT設定 ---
const char* mqttServer = "broker.hivemq.com";
const int   mqttPort = 1883; //パブリックブローカーbroker.hivemq.com使用時のポート
char clientId[30];
const char* topic = "/xxxxxxx/xxxxxxxx"; // 使用するMQTTトピック(任意の文字 例"/abcdefg/xyz")

// --- NTPサーバー設定 ---
const char* ntpServer = "ntp.nict.jp";
const long  gmtOffset_sec = 9 * 3600;
const int   daylightOffset_sec = 0;

// --- グローバル変数 ---
WiFiClient wifiClient;
PubSubClient mqttClient(wifiClient);
unsigned long lastDisplayRefresh = 0;
unsigned long redScreenStartTime = 0; // 画面を赤にした時刻を記録

// --- MQTTメッセージ受信時のコールバック関数 ---
void mqttCallback(char* receivedTopic, byte* payload, unsigned int length) {
    Serial.print("[INFO] Message arrived on topic: ");
    Serial.println(receivedTopic);

    String message;
    for (int i = 0; i < length; i++) {
        message += (char)payload[i];
    }
    Serial.print("[INFO] Payload: ");
    Serial.println(message);

    JsonDocument doc;
    DeserializationError error = deserializeJson(doc, message);

    if (error) {
        Serial.print("[ERROR] deserializeJson() failed: ");
        Serial.println(error.c_str());
        return;
    }

    // "action"キーの値が"changecolor"の場合、画面を赤くする
    if (strcmp(doc["action"], "changecolor") == 0) {
        Serial.println("[INFO] Action 'changecolor' received. Changing screen to RED.");
        M5.Lcd.fillScreen(RED);
        redScreenStartTime = millis(); // 画面を赤にした時刻を記録
    }
}

// --- MQTTブローカーへの再接続とトピック購読 ---
void connectToMqttAndSubscribe() {
    Serial.println("[INFO] Connecting to MQTT Broker...");
    M5.Lcd.setCursor(0, 78);
    M5.Lcd.println("MQTT Connecting...");

    while (!mqttClient.connected()) {
        if (mqttClient.connect(clientId)) {
            Serial.println("[INFO] MQTT Connected!");
            M5.Lcd.fillRect(0, 78, 240, 20, BLACK); // 接続メッセージを消去

            // トピックをSubscribe(購読)
            if (mqttClient.subscribe(topic)) {
                Serial.printf("[INFO] Subscribed to topic: %s", topic);
            } else {
                Serial.println("[ERROR] Failed to subscribe.");
            }
        } else {
            Serial.print("[ERROR] MQTT connection failed, rc=");
            Serial.print(mqttClient.state());
            Serial.println(" | Retrying in 5 seconds...");
            M5.Lcd.fillRect(0, 78, 240, 20, BLACK);
            M5.Lcd.setCursor(0, 78);
            M5.Lcd.printf("MQTT Failed(rc=%d)", mqttClient.state());
            delay(5000);
        }
    }
}

// --- 初期設定 ---
void setup() {
    M5.begin();
    Serial.begin(115200);

    // --- WiFi接続 ---
    Serial.printf("[INFO] Connecting to %s", ssid);
    WiFi.begin(ssid, password);
    while (WiFi.status() != WL_CONNECTED) {
        delay(500);
        Serial.print(".");
    }
    Serial.println("[INFO] WiFi Connected!");

    // --- ユニークなクライアントIDを生成 ---
    String mac = WiFi.macAddress();
    mac.replace(":", "");
    snprintf(clientId, 30, "M5-PubSub-%s", mac.c_str());

    // --- LCD初期設定 ---
    M5.Lcd.setRotation(1);
    M5.Lcd.fillScreen(BLACK);
    M5.Lcd.setCursor(0, 10);
    M5.Lcd.setTextFont(2);
    M5.Lcd.setTextSize(1);
    M5.Lcd.println("MQTT Pub/Sub");
    M5.Lcd.printf("%s (%d)", WiFi.SSID().c_str(), WiFi.RSSI());
    M5.Lcd.println(WiFi.localIP());

    // --- MQTTクライアント設定 ---
    mqttClient.setServer(mqttServer, mqttPort);
    mqttClient.setCallback(mqttCallback);

    // --- 時刻同期 ---
    configTime(gmtOffset_sec, daylightOffset_sec, ntpServer);
}

// --- メインループ ---
void loop() {
    M5.update(); // M5StickCの状態を更新(ボタン入力など)

    // MQTTブローカーに接続されていない場合は再接続
    if (!mqttClient.connected()) {
        connectToMqttAndSubscribe();
    }
    mqttClient.loop(); // MQTTクライアントの処理を維持

    // --- ボタンAが押されたらメッセージをPublish ---
    if (M5.BtnA.wasPressed()) {
        JsonDocument doc;
        doc["action"] = "changecolor";
        char payload[64];
        serializeJson(doc, payload, sizeof(payload));

        if (mqttClient.publish(topic, payload)) {
            Serial.printf("[INFO] Published to %s: %s", topic, payload);
        } else {
            Serial.println("[ERROR] Failed to publish message.");
        }
    }

    // --- 画面が赤くなってから3秒経過したら黒に戻す ---
    if (redScreenStartTime != 0 && millis() - redScreenStartTime >= 3000) {
        Serial.println("[INFO] 3 seconds passed. Changing screen to BLACK.");
        M5.Lcd.fillScreen(BLACK);
        // LCDの基本情報を再表示
        M5.Lcd.setCursor(0, 10);
        M5.Lcd.println("MQTT Pub/Sub");
        M5.Lcd.printf("%s (%d)", WiFi.SSID().c_str(), WiFi.RSSI());
        M5.Lcd.println(WiFi.localIP());
        redScreenStartTime = 0; // タイマーをリセット
    }

    // --- 1秒ごとに画面の時刻を更新(画面が黒の時のみ) ---
    if (redScreenStartTime == 0 && millis() - lastDisplayRefresh >= 1000) {
        lastDisplayRefresh = millis();
        M5.Lcd.fillRect(0, 58, 240, 20, BLACK);
        M5.Lcd.setCursor(0, 58);

        struct tm timeinfo;
        if (getLocalTime(&timeinfo)) {
            M5.Lcd.printf("%04d/%02d/%02d %02d:%02d:%02d",
                          timeinfo.tm_year + 1900, timeinfo.tm_mon + 1, timeinfo.tm_mday,
                          timeinfo.tm_hour, timeinfo.tm_min, timeinfo.tm_sec);
        } else {
            M5.Lcd.print("Getting time...");
        }
    }
}
応用例として:遠隔の人に異常を知らせる
上記1つ目のスケッチの応用例として、遠隔の人に異常を知らせることを想定したスケッチに変更してみる。異常時にボタンAを押せば、すべてのデバイスのディスプレイが赤色に変わる(Step2)。赤色に変わったことに気づいた遠隔の人が、「わかったよ。対応するよ。」という意味でボタンAを押すと、赤色が消え、通常ディスプレイモードに戻る(Step3)。
動作のイメージはこれ。

// ============================================================================
// M5StickC Plus - MQTT Pub/Sub with HiveMQ Cloud (TLS/ID/PW) WiFi常時監視再接続
// ============================================================================

#include <M5Unified.h>
#include <WiFi.h>
#include <WiFiClientSecure.h>
#include <PubSubClient.h>
#include <ArduinoJson.h>
#include "time.h"

// --- WiFi設定 (複数のM5StickC Plusで共通である必要なし)---
const char* ssid     = "XXXXXX";
const char* password = "XXXXXXXXX";

// --- MQTT設定(HiveMQ Cloud用:URL, 認証情報, トピックなど, 複数のM5StickC Plusで共通) ---
const char* mqttServer   = "xxxxxxxxxxxxxxxxxxxxxxxxxxxxxxxx.s1.eu.hivemq.cloud";   // ClusterのURL例: xxx.hivemq.cloud
const int   mqttPort     = 8883;  // TLS用標準ポート
const char* mqttUser     = "xxxxxxxxxxx";  // HiveMQ Cloudで設定したユーザー名
const char* mqttPassword = "xxxxxxxxxxxx"; // HiveMQ Cloudで設定したパスワード
char clientId[30];    // クライアントID(MACから生成)
const char* topic = "/xxxxxxx/xxxxxxxx"; // 使用するMQTTトピック(任意の文字 例"/abcdefg/xyz")

// --- NTP設定 ---
const char* ntpServer = "ntp.nict.jp";
const long  gmtOffset_sec = 9 * 3600;
const int   daylightOffset_sec = 0;

// --- グローバル変数 ---
WiFiClientSecure wifiClientTLS;
PubSubClient mqttClient(wifiClientTLS);
unsigned long lastDisplayRefresh = 0;
bool isRedScreen = false;

// --- 通常画面の再描画 ---
void drawNormalScreen() {
    M5.Lcd.fillScreen(BLACK);
    M5.Lcd.setCursor(0, 10);
    M5.Lcd.setTextFont(2);
    M5.Lcd.setTextSize(1);
    M5.Lcd.println("MQTT TLS Pub/Sub");
    M5.Lcd.printf("%s (%d)\n", WiFi.SSID().c_str(), WiFi.RSSI());
    M5.Lcd.println(WiFi.localIP());
    lastDisplayRefresh = 0;
}

// --- MQTTメッセージ受信処理 ---
void mqttCallback(char* receivedTopic, byte* payload, unsigned int length) {
    Serial.print("[INFO] Message arrived on topic: ");
    Serial.println(receivedTopic);

    String message;
    for (int i = 0; i < length; i++) {
        message += (char)payload[i];
    }

    Serial.print("[INFO] Payload: ");
    Serial.println(message);

    JsonDocument doc;
    DeserializationError error = deserializeJson(doc, message);
    if (error) {
        Serial.print("[ERROR] JSON parse failed: ");
        Serial.println(error.c_str());
        return;
    }

    const char* action = doc["action"];

    if (strcmp(action, "change_red") == 0) {
        Serial.println("[INFO] Action 'change_red' received. Forcing RED screen.");
        M5.Lcd.fillScreen(RED);
        isRedScreen = true;
    }
    else if (strcmp(action, "change_normal") == 0) {
        Serial.println("[INFO] Action 'change_normal' received. Switching to normal screen.");
        drawNormalScreen();
        isRedScreen = false;
    }
}

// --- MQTT再接続&購読 ---
void connectToMqttAndSubscribe() {
    Serial.println("[INFO] Attempting to reconnect to MQTT Broker (TLS)...");
    M5.Lcd.setCursor(0, 78);
    M5.Lcd.println("MQTT TLS Reconnecting...");

    if (mqttClient.connect(clientId, mqttUser, mqttPassword)) {
        Serial.println("[INFO] MQTT Reconnected!");
        M5.Lcd.fillRect(0, 78, 240, 20, BLACK);

        if (mqttClient.subscribe(topic)) {
            Serial.printf("[INFO] Resubscribed to topic: %s\n", topic);

            // --- retainメッセージを即処理 ---
            unsigned long start = millis();
            while (millis() - start < 500) {
                mqttClient.loop();
                delay(10);
            }
        } else {
            Serial.println("[ERROR] Failed to resubscribe.");
        }
    } else {
        Serial.printf("[ERROR] MQTT reconnect failed. rc=%d. Will retry...\n", mqttClient.state());
        M5.Lcd.fillRect(0, 78, 240, 20, BLACK);
    }
}

// --- WiFi再接続 ---
void reconnectWifi() {
    Serial.println("[WARN] WiFi connection lost. Attempting to reconnect...");
    M5.Lcd.fillScreen(BLACK);
    M5.Lcd.setCursor(0, 10);
    M5.Lcd.println("Reconnecting WiFi...");

    WiFi.disconnect(true);
    delay(100);
    WiFi.begin(ssid, password);

    int retry_count = 0;
    while (WiFi.status() != WL_CONNECTED && retry_count < 30) {
        delay(500);
        Serial.print(".");
        retry_count++;
    }

    if (WiFi.status() == WL_CONNECTED) {
        Serial.println("\n[INFO] WiFi reconnected successfully!");
        drawNormalScreen();
        connectToMqttAndSubscribe();
    } else {
        Serial.println("\n[ERROR] Failed to reconnect to WiFi.");
        M5.Lcd.setCursor(0, 30);
        M5.Lcd.println("WiFi reconnect failed.");
    }
}

void setup() {
    M5.begin();
    Serial.begin(115200);

    Serial.printf("[INFO] Connecting to WiFi: %s", ssid);
    WiFi.begin(ssid, password);
    while (WiFi.status() != WL_CONNECTED) {
        delay(500);
        Serial.print(".");
    }
    Serial.println("\n[INFO] WiFi Connected!");

    String mac = WiFi.macAddress();
    mac.replace(":", "");
    snprintf(clientId, sizeof(clientId), "M5TLS-%s", mac.c_str());

    M5.Lcd.setRotation(1);
    drawNormalScreen();

    Serial.println("[INFO] Configuring time from NTP...");
    M5.Lcd.setCursor(0, 58);
    M5.Lcd.print("Waiting for NTP sync...");
    configTime(gmtOffset_sec, daylightOffset_sec, ntpServer);
    struct tm timeinfo;
    while (!getLocalTime(&timeinfo)) {
        delay(500);
        Serial.print(".");
    }
    Serial.println("\n[INFO] NTP time synced!");
    lastDisplayRefresh = 0;

    mqttClient.setServer(mqttServer, mqttPort);
    mqttClient.setCallback(mqttCallback);
    wifiClientTLS.setInsecure();

    Serial.println("[INFO] Performing initial MQTT connection...");
    M5.Lcd.setCursor(0, 78);
    M5.Lcd.println("MQTT TLS Connecting...");
    while (!mqttClient.connected()) {
        if (mqttClient.connect(clientId, mqttUser, mqttPassword)) {
            Serial.println("[INFO] Initial MQTT connection successful!");
            M5.Lcd.fillRect(0, 78, 240, 20, BLACK);
            if (mqttClient.subscribe(topic)) {
                Serial.printf("[INFO] Subscribed to topic: %s\n", topic);
                unsigned long start = millis();
                while (millis() - start < 500) {
                    mqttClient.loop();
                    delay(10);
                }
            } else {
                Serial.println("[ERROR] Failed to subscribe.");
            }
        } else {
            Serial.printf("[ERROR] Initial MQTT connect failed, rc=%d. Retrying in 5s...\n", mqttClient.state());
            delay(5000);
        }
    }
}

unsigned long lastMqttAttempt = 0;

void loop() {
    M5.update();

    if (WiFi.status() != WL_CONNECTED) {
        reconnectWifi();
        lastMqttAttempt = 0;
    }

    if (WiFi.status() == WL_CONNECTED) {
        if (!mqttClient.connected()) {
            if (millis() - lastMqttAttempt >= 5000) {
                lastMqttAttempt = millis();
                connectToMqttAndSubscribe();
            }
        } else {
            mqttClient.loop();
        }
    }

    if (M5.BtnA.wasPressed() && mqttClient.connected()) {
        JsonDocument doc;
        doc["action"] = isRedScreen ? "change_normal" : "change_red";

        char payload[64];
        serializeJson(doc, payload, sizeof(payload));

        // retain=true を指定してメッセージをPublish
        // これにより、後から接続したクライアントも最新の状態を取得できる
        if (mqttClient.publish(topic, payload, true)) {
            Serial.printf("[INFO] Published: %s\n", payload);
        } else {
            Serial.println("[ERROR] Failed to publish.");
        }
    }

    if (!isRedScreen && millis() - lastDisplayRefresh >= 1000) {
        lastDisplayRefresh = millis();
        M5.Lcd.fillRect(0, 58, 240, 20, BLACK);
        M5.Lcd.setCursor(0, 58);
        struct tm timeinfo;
        if (getLocalTime(&timeinfo)) {
            M5.Lcd.printf("%04d/%02d/%02d %02d:%02d:%02d",
                          timeinfo.tm_year + 1900, timeinfo.tm_mon + 1, timeinfo.tm_mday,
                          timeinfo.tm_hour, timeinfo.tm_min, timeinfo.tm_sec);
        } else {
            M5.Lcd.print("Getting time...");
        }
    }
}
おわりに
MQTT Cloud は、双方向通信で、遠く離れているセンサーやデバイスが常時つながった状態でメッセージをやり取りできるので、いろいろ応用できますね。MQTT、便利! hiveMQ Cloud、無料枠をありがとう!