
風速計を設置したい。
急に強い風が吹くことがある。安全管理や環境管理の観点から、特に建設業界や厳格な空調管理が必要な建物・工場等では、現場に吹く風を監視しておくことは大切です。
気象予報や気象データでは、実際に監視したい現場の風の強さは全くわかりません。現場に吹く風を実際に測定し監視し、データ保存しておく必要があります。
現場の風速監視の必要性の延長線上で、自宅にもどれくらいの強さの風が吹いたかを記録監視するために風速計を設置したいと考えました。
目立たないことが第一優先で回らない風速計を設置したい。
ベランダに設置することを前提に、風杯型のようにクルクル回るタイプではなく、外部から目立たない風速計を作ろうと考えました。
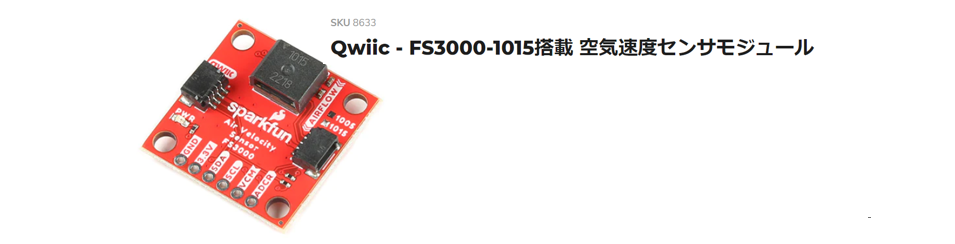
そして、SWITCHSCIENCEから販売されている空気速度センサを使ってみることにしました。
sparkfun Qwiic-FS3000-1015搭載空気速度センサモジュール
https://www.switch-science.com/products/8633
このセンサーは、MEMS thermopile-based sensor です。熱エネルギーを電気エネルギーに変えるタイプで、超音波でも、圧力でもないです。
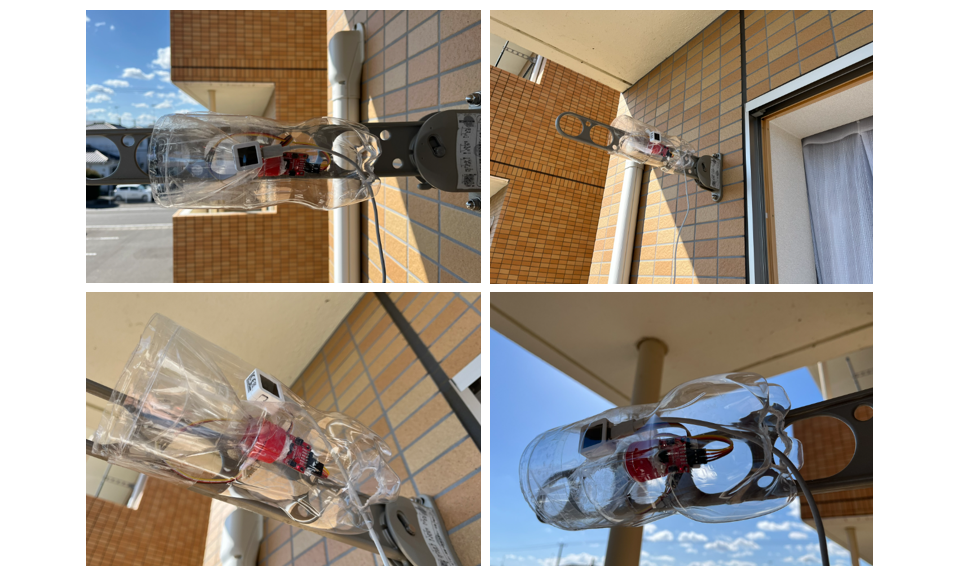
最終的に設置した姿はこれ
このセンサーの注意する点は、2点あります。
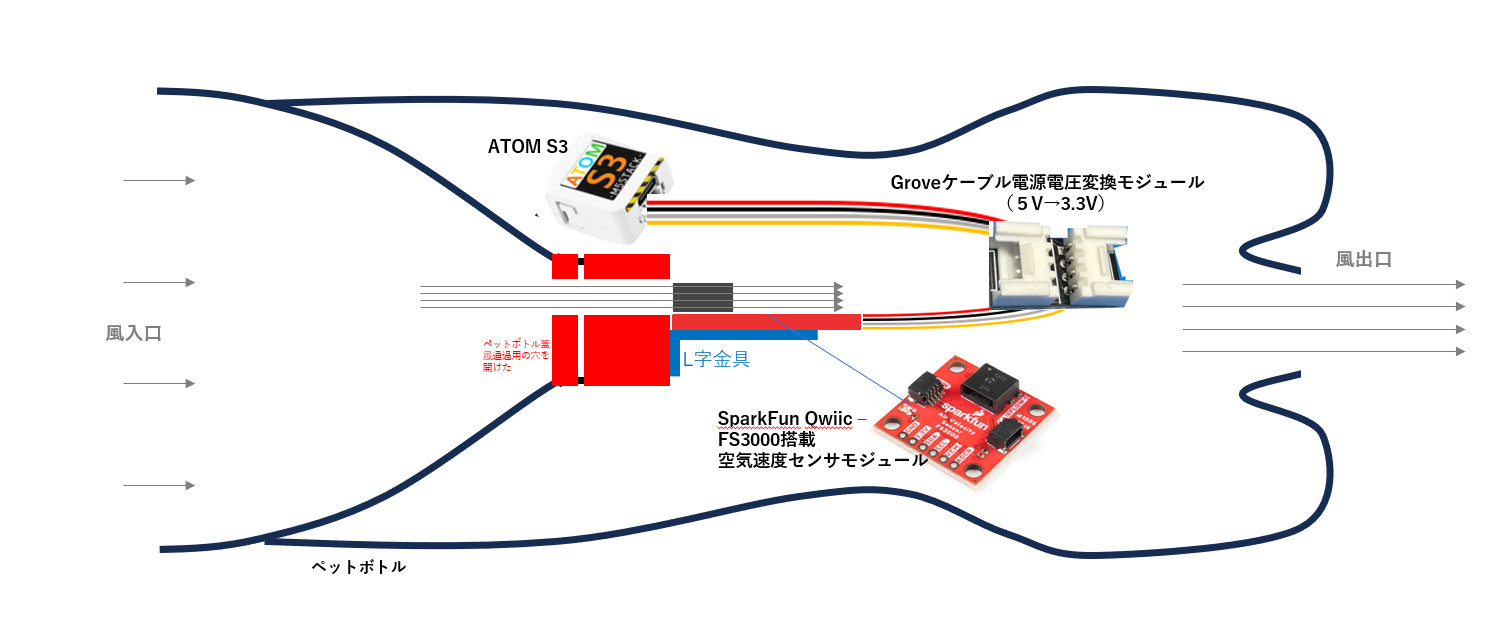
(1)センサーの入力電圧が3.3Vであること。
マイコンは、M5 Stack社のATOM S3を使います。ATOM S3のgrove端子からの出力は+5Vです。センサーは3.3V入力です。この目的を達成するために、Groveケーブル電源電圧変換モジュール が使いました。(秋田先生に感謝)
https://www.switch-science.com/products/9461
(2)ベランダに設置するため雨に濡れることがないよう、防水に気をつけないといけない。
これは、写真のようにペットボトルを加工して、微風も測定できるよう風を集めることと雨に濡れないようにセンサーとATOM S3をペットボトル内に収める工夫をしました。
ペットボトルに入れる前の写真はこれ

ペットボトルを防水ケースに使って、かつ、風を集める工夫をした説明図はこれ
使った技術
使った技術はこれ。

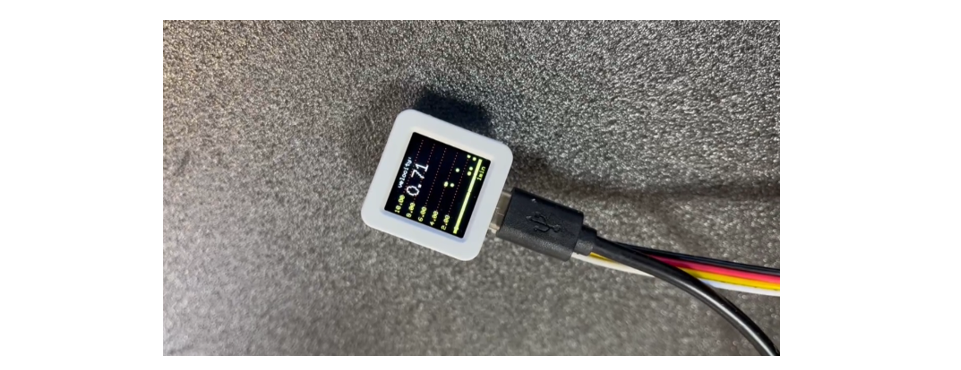
ディスプレイはグラフ表示
風が吹くとセンサーが反応していることがすぐわかるように、ATOMS3のディスプレイにはグラフ表示にした。横軸:時間、縦軸:風速とし、縦軸は風速によりスケールが変化し、微風時、強風時にも表示対応できるようにした。)
ATOM S3画面のグラフ表示はこれ。
グラフ表示
グラフ表示は以下の部分
int sequence[128] = {};
int SequencePosition = 0;

void loop(){
    //グラフプロット
    SequencePosition = (SequencePosition + 1) % (sizeof(sequence) / sizeof(int));
    sequence[SequencePosition] = airvelocity;
    int len = sizeof(sequence) / sizeof(int);
    for (int i = 0; i < len; i++) {
        auto value = sequence[(SequencePosition + 1 + i) % len];
        M5.Lcd.fillCircle(i, (int)(115-value/ymax*100), 2, YELLOW);
        }
}
Ambientにデータ送信
Ambientにデータ送信の部分は以下の部分。
30秒おきにデータを送る。
#include <Ambient.h>

WiFiClient client;
Ambient ambient;
unsigned int channelId = XXXXX; // AmbientのチャネルID
const char* writeKey = "XXXXXXXXXXXXXXX"; // Ambientのライトキー

unsigned long previoustime = 0;
float airvelocitypriodmax = 0;

void setup(){
  ambient.begin(channelId, writeKey, &client);
}

void loop(){
    float airvelocity = fss.readMetersPerSecond();
    airvelocitypriodmax = airvelocity > airvelocitypriodmax ? airvelocity : airvelocitypriodmax;
    // 値をAmbientに送信する
    if (now - previoustime >= 30000) {  //ambientへの送信間隔(msec)を設定する
      if(WiFi.status() == WL_CONNECTED){
      ambient.set(1, airvelocitypriodmax);
      ambient.send();
      Serial.println("ambient send");
      airvelocitypriodmax = 0;
      previoustime = now;
      }
}
Google Spread Sheetにデータを送りGoogle Apps Scriptで閾値超えたらLINEにお知らせ
閾値を状況に応じて変更したいので、Google Spread Sheetにデータを送りGoogle Apps Scriptを使う。
Google Spread Sheetにデータを送る部分はここ。
Google Spread Sheetにデータを送る間隔は、後のMQTTを利用して(valueを書き換え)、送信間隔を2パターン変更できる。
#include <HTTPClient.h>   //https POST
#include <WiFiClientSecure.h>
#include <ArduinoJson.h>  //Json送信

//google spreadsheet:AirVelocity in mikihrs7@gmail.com
const char* host = "https://script.google.com/macros/s/xxxxxxxxx.....xxxxxx/exec"; //デプロイ後のウェブアプリURLを入力する。

unsigned long previoustime02 = 0;
float airvelocitypriodmax02 = 0;
int value = 0;         // (デフォルト)
int gas_send_intervaltime = 30000;   // (デフォルト)


void loop(){

    if (value == 0){
    gas_send_intervaltime = 900000;
    }else{
    gas_send_intervaltime = 300000;
    }

     airvelocitypriodmax02 = airvelocity > airvelocitypriodmax02 ? airvelocity : airvelocitypriodmax02;

    // 値をGoogle Spreadsheetに送信する
    if (now - previoustime02 >= gas_send_intervaltime) {
        //サイズ計算サイト https://arduinojson.org/v6/assistant/#/step1
        StaticJsonDocument<128> doc;
        char buffer[128];

        doc["airvelocity"] = airvelocitypriodmax02;

        serializeJson(doc, Serial);
        Serial.println("");
        serializeJson(doc, buffer, sizeof(buffer));

        HTTPClient http;
        http.begin(host);
        http.addHeader("Content-Type", "application/json");
        int status_code = http.POST((uint8_t*)buffer, strlen(buffer));
        Serial.printf("status_code=%d\r\n", status_code);

        if (status_code == 200) {
        Stream* resp = http.getStreamPtr();

        DynamicJsonDocument json_response(255);
        deserializeJson(json_response, *resp);

        serializeJson(json_response, Serial);
        Serial.println("");
        }
        http.end();
        Serial.println("sent to google spread sheet");

        airvelocitypriodmax02 = 0;
        previoustime02 = now;
    }

}
データを送信する先のGoogle Spread Sheetはこれ
緑色セルのAirVelocity ThreshouldとInterval_Threshouldを入力する。

Google Spread Sheetの拡張機能でのApps Scriptはこれ。
AirVelocity Threshould以上の風速値が観測され、かつ、前回LINE Notifyに送った時間から、Interval_Threshouldの時間以上経過した場合に、LINE Notifyに「Air VelocityがX.xxm/secに上昇しました。」とメッセージを送る。
const LINE_NOTIFY_API = 'https://notify-api.line.me/api/notify';
const LINE_NOTIFY_TOKEN = PropertiesService.getScriptProperties().getProperty('LINE_NOTIFY_TOKEN');


function doPost(e) {
  //sheetにAirVelocitySheet01を代入します。
  var sheet = SpreadsheetApp.getActiveSpreadsheet().getSheetByName('AirVelocitySheet01');
  //送られてきたデータをJSON形式に変換してparamsに代入
  var params = JSON.parse(e.postData.getDataAsString());
  // params内の値を取得する。
  var airvelocity = params.airvelocity;

  // スプレッドシートにM5ATOMS3からの送信データを代入
  //5行目に1行挿入
  sheet.insertRows(5, 1);
  //5行1列目のセル(A5)に日付を書き込む
  sheet.getRange(5, 1).setValue(new Date());
  //5行目2列目のセル(B5)にairvelocity値を書き込む
  sheet.getRange(5, 2).setValue(airvelocity);
  //2行1列目のセル(A2)に日付を書き込む
  sheet.getRange(2, 1).setValue(new Date());
  //2行目2列目のセル(B2)にairvelocity値を書き込む
  sheet.getRange(2, 2).setValue(airvelocity);

  //セルC2からAirVelocityThreshouldを取得する
  let airvelocitythreshould = sheet.getRange(2,3).getDisplayValue();

  //セルE2にintervalを設定する。
  sheet.getRange(2,5).setFormula('=A2-D2');
  //セルE2からintervalを取得する
  let interval = sheet.getRange(2,5).getDisplayValue();
  //セルF2からinterval_threshouldを取得する
  let interval_threshould = sheet.getRange(2,6).getDisplayValue();
  //セルB2からairvelocitynumberを取得する
  let airvelocitynumber = sheet.getRange(2,2).getDisplayValue();

 if((airvelocity > Number(airvelocitythreshould)) && (Number(interval)>Number(interval_threshould))){
    let message1 = "AirVelocityが、" + airvelocitynumber + "m/sec に上昇しました。";
    lineNotify(message1);
    sheet.getRange(2,4).setValue(new Date());
  }
  //60x24=1440データを残して、それ以降の行は削除する。
  sheet.deleteRow(1445);
}


function lineNotify(text) {
  const options = {
      "method"  : "post",
      "payload" : {"message": text},
      "headers" : {"Authorization":"Bearer " + LINE_NOTIFY_TOKEN}
   }
  UrlFetchApp.fetch(LINE_NOTIFY_API, options)
}
Apps Scriptの左欄のプロジェクトの設定でスクリプト プロパティを追加して
プロパティ:LINE_NOTIFY_TOKEN
値:LINE Notifyで取得したトークンを入力する。
デプロイ後のウェブアプリURLは、ATOMS3に書き込むスケッチに入力しておく。
MQTT送信で、アプリIoT OnOff® でリアルタイムでデータ監視
ベランダの物干しに固定したら、ATOMS3のディスプレイも見にくいことが分かった。
スマホでリアルタイムの風速を見るためにMQTT送信も付加した。
スマホのアプリ「アプリIoT OnOff® 」を利用する。
MQTT送信する部分はこれ
風速値をpublish
valueをsubcribe(valueはgoogle spread sheetに送信する間隔の変更に使う)
#include <PubSubClient.h>       // MQTTライブラリ

#define MQTT_TOPIC_ID     "xxxxxxxxxx" // トピック識別用ID
#define MQTT_CLIENT_ID    MQTT_TOPIC_ID "-1"  // クライアントID(ユニークなID)
#define MQTT_BROKER_ADDR  "test.mosquitto.org" // MQTTブローカーのアドレス
#define MQTT_TOPIC_AIRVELOCITY  MQTT_TOPIC_ID "/airvelocity/velocity" // 風速 for publish
#define MQTT_TOPIC_VALUE  MQTT_TOPIC_ID "/airvelocity/value" // value for subscribe

WiFiClient mqttwclient;             // WiFi用クライアントオブジェクト for MQTT
PubSubClient mqwclient(MQTT_BROKER_ADDR, 1883, mqttwclient); // MQTT用オブジェクト for MQTT

unsigned long previoustime01 = 0;
float airvelocitypriodmax01 = 0;

int value = 0;         // (デフォルト)

// MQTT接続/接続確認
void connectMQTT() {
  //connectWiFi();                // WiFiに接続/接続確認
  while (!mqwclient.connected()) { // MQTTブローカーの接続確認
    Serial.print("Attempting MQTT connection...");
    if (mqwclient.connect(MQTT_CLIENT_ID)) { // MQTTブローカーに接続
      Serial.println("connected");
    } else {
      Serial.print("Retying in 5 seconds - failed, rc=");
      Serial.println(mqwclient.state());
      delay(5000);
    }
    mqwclient.subscribe(MQTT_TOPIC_VALUE); // valueトピックを購読
  }
  mqwclient.loop();                // 接続維持用
}


// 購読しているトピックを受信した時に呼び出される関数
void callback(char* topic, byte* payload, unsigned int length) {
  // 文字列で送られてくるvalue値を数値に変換
  value = 0;
  for (int i=0; i<length; i++) {
  value = value * 10;
  value += ((char)payload[i] - 0x30); // ASCIIコードの0x30は'0'
  }
}

void setup(){
  mqwclient.setCallback(callback); // データを受信した時に呼び出される関数 for MQTT
}

void loop(){
    connectMQTT();

    airvelocitypriodmax01 = airvelocity > airvelocitypriodmax01 ? airvelocity : airvelocitypriodmax01;
    // 値をMQTTに送信する
    if (now - previoustime01 >= 1000) {
    connectMQTT();              // MQTT接続/接続確認
    mqwclient.publish(MQTT_TOPIC_AIRVELOCITY, String(airvelocitypriodmax01).c_str()); // 値を発行 for MQTT
    airvelocitypriodmax01 = 0;
    previoustime01 = now;
    }
}
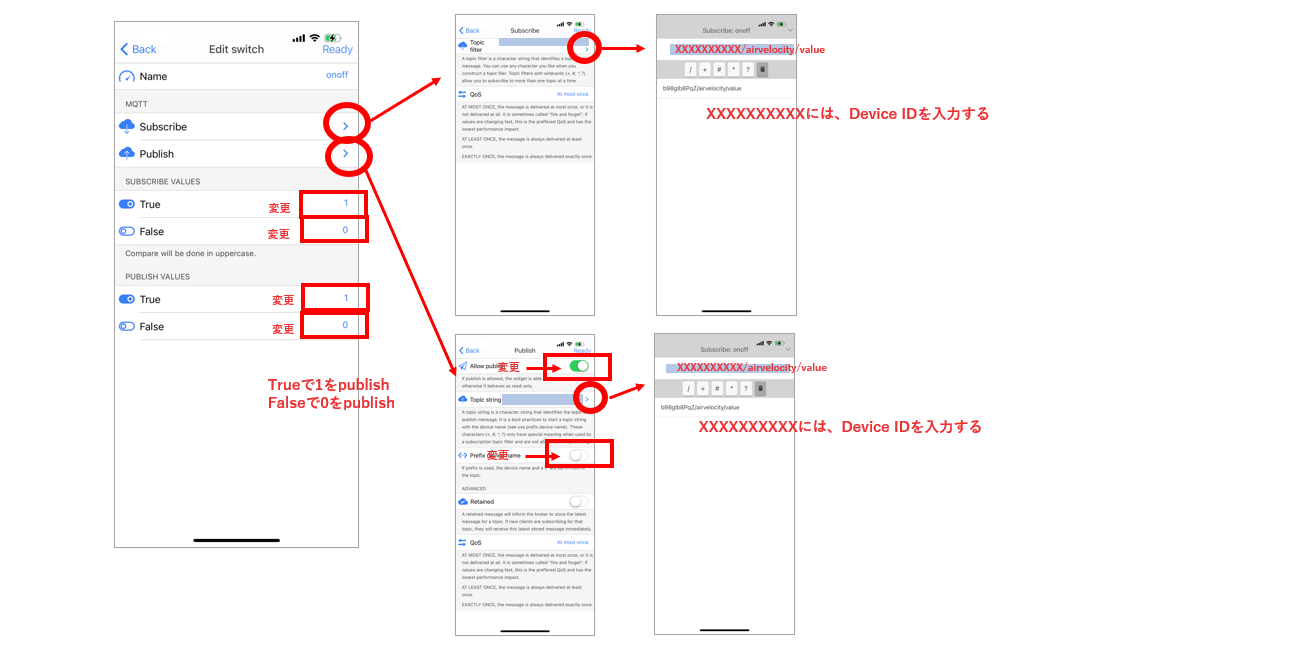
アプリIoT ONOFFの設定
アプリIoT ONOFFの設定は以下の通り
SwitchウィジッドでOFFにすると、Google Spread Sheetへのデータ送信間隔は15分、ONにするとGoogle Spread Sheetへのデータ送信間隔は5分になる。
IoT ONOFF内で作る画面とウィジットを追加する方法

固有のDevice IDを確認する方法。

風速表示用 (Subscribeの設定)ValueウィジットとGraphウィジット内で設定する方法はこれ。

ATOMS3にvalueを送信用(publishの設定) Switchウィジットで設定する方法はこれ。
最終的にATOMS3に書き込んだプログラムはこれ。
・Arduino IDEで、libraryとして以下をインストールする。
・M5Unified library
・FastLED library
・PubSubClient library
・SarkFun_FS3000_Arduino library
・Ambient ESP32/ESP8266 library
・ArduinoJson library
ボード:M5Stack>M5AtomS3を選択してから、以下のスケッチをATOM S3に書き込む。
#include <M5Unified.h>
#include <WiFi.h>
#include <FastLED.h>
#include <Wire.h>
#include <SparkFun_FS3000_Arduino_Library.h>
#include <Ambient.h>
#include <PubSubClient.h>       // MQTTライブラリ
#include <HTTPClient.h>   //https POST
#include <WiFiClientSecure.h>
#include <ArduinoJson.h>  //Json送信

#define MQTT_TOPIC_ID     "xxxxxxxxxx" // トピック識別用ID(Iot ONOFFなDevice IDを入力)
#define MQTT_CLIENT_ID    MQTT_TOPIC_ID "-1"  // クライアントID(ユニークなID)
#define MQTT_BROKER_ADDR  "test.mosquitto.org" // MQTTブローカーのアドレス
#define MQTT_TOPIC_AIRVELOCITY  MQTT_TOPIC_ID "/airvelocity/velocity" // 風速fot publish
#define MQTT_TOPIC_VALUE  MQTT_TOPIC_ID "/airvelocity/value" // value for subscribe

FS3000 fss;

const char* ssid = "xxxxxxx"; // WiFi SSID
const char* password = "xxxxxxxxxx"; // WiFi Password


WiFiClient client;  //
Ambient ambient;
unsigned int channelId = XXXXX; // AmbientのチャネルID
const char* writeKey = "xxxxxxxxxxxxxxx"; // Ambientのライトキー

WiFiClient mqttwclient;             // WiFi用クライアントオブジェクト for MQTT
PubSubClient mqwclient(MQTT_BROKER_ADDR, 1883, mqttwclient); // MQTT用オブジェクト for MQTT


//google spreadsheet:AirVelocityにデータを送る
const char* host = "https://script.google.com/macros/s/xxxxxxxxxxxxxxxxxxxxxxxxxxxxxxxxxxxxxxxxxxxxxxxxxxxxxxxxxxxxxxxxxxxxx/exec";  //デプロイ後のウェブアプリURLを入力


int sequence[128] = {};
int SequencePosition = 0;
unsigned long previoustime = 0;
float ymax =0.1;
float airvelocitypriodmax = 0;

unsigned long previoustime01 = 0;
float airvelocitypriodmax01 = 0;

unsigned long previoustime02 = 0;
float airvelocitypriodmax02 = 0;

int value = 0;         // (デフォルト)
int gas_send_intervaltime = 30000;   // (デフォルト)

// MQTT接続/接続確認
void connectMQTT() {
  //connectWiFi();                // WiFiに接続/接続確認
  while (!mqwclient.connected()) { // MQTTブローカーの接続確認
    Serial.print("Attempting MQTT connection...");
    if (mqwclient.connect(MQTT_CLIENT_ID)) { // MQTTブローカーに接続
      Serial.println("connected");
    } else {
      Serial.print("Retying in 5 seconds - failed, rc=");
      Serial.println(mqwclient.state());
      delay(5000);
    }
    mqwclient.subscribe(MQTT_TOPIC_VALUE); // valueトピックを購読
  }
  mqwclient.loop();                // 接続維持用
}


// 購読しているトピックを受信した時に呼び出される関数
void callback(char* topic, byte* payload, unsigned int length) {
  // 文字列で送られてくるvalue値を数値に変換
  value = 0;
  for (int i=0; i<length; i++) {
  value = value * 10;
  value += ((char)payload[i] - 0x30); // ASCIIコードの0x30は'0'
  }
}


void setup(){
  auto cfg = M5.config();
  M5.begin(cfg);
  M5.In_I2C.release();
  M5.Display.setTextSize(1);
  M5.Lcd.fillRect(0,0,128,128,BLACK);

  Serial.begin(115200);

  WiFi.begin(ssid, password);
  while (WiFi.status() != WL_CONNECTED) {
    delay(500);
    Serial.print(".");
  }
  delay(10); // will pause Zero, Leonardo, etc until serial console opens
  Wire.begin(2, 1); //grove SDA-G2, SCL-G1 ATOMS3 Groveケーブル--5V-3.3V電源電圧変換モジュール

if (fss.begin() == false) //Begin communication over I2C
    {
        Serial.println("The sensor did not respond. Please check wiring.");
        while(1); //Freeze
    }
        // Set the range to match which version of the sensor you are using.
        // FS3000-1005 (0-7.23 m/sec) --->>>  AIRFLOW_RANGE_7_MPS
        // FS3000-1015 (0-15 m/sec)   --->>>  AIRFLOW_RANGE_15_MPS
        //fs.setRange(AIRFLOW_RANGE_7_MPS);
        //fs.setRange(AIRFLOW_RANGE_15_MPS);
    fss.setRange(AIRFLOW_RANGE_15_MPS);
    Serial.println("Sensor is connected properly.");

  ambient.begin(channelId, writeKey, &client);
  mqwclient.setCallback(callback); // データを受信した時に呼び出される関数 for MQTT
}

void loop(){
    auto now = millis();
    connectMQTT();

    //グラフ表示の開始前に全部消す
    M5.Lcd.fillRect(0, 0, 128, 128, BLACK);

    if (fss.begin() == false) //Begin communication over I2C
    {
        Serial.println("The sensor did not respond. Please check wiring.");
        while(1); //Freeze
    }

    float airvelocity = fss.readMetersPerSecond();

    M5.Display.setCursor(40, 2); M5.Lcd.setTextFont(1);M5.Lcd.setTextColor(WHITE, BLACK);
    M5.Display.print("velocity:");
    M5.Lcd.fillRect(35,12,82,32,BLACK); M5.Display.setTextSize(2);M5.Lcd.setTextFont(2);M5.Display.setCursor(35, 12);
    M5.Lcd.printf("%3.2f", fss.readMetersPerSecond());
    M5.Display.setTextSize(1);

    // y軸表示
    M5.Lcd.setTextFont(1);
    M5.Lcd.fillRect(0, 12, 15, 6, BLACK);M5.Lcd.setCursor(0,12,1);M5.Lcd.setTextColor(YELLOW);M5.Lcd.println(float(ymax));
    M5.Lcd.fillRect(0, 32, 15, 6, BLACK);M5.Lcd.setCursor(0,32,1);M5.Lcd.setTextColor(YELLOW);M5.Lcd.println(float(ymax/5*4));
    M5.Lcd.fillRect(0, 52, 15, 6, BLACK);M5.Lcd.setCursor(0,52,1);M5.Lcd.setTextColor(YELLOW);M5.Lcd.println(float(ymax/5*3));
    M5.Lcd.fillRect(0, 72, 15, 6, BLACK);M5.Lcd.setCursor(0,72,1);M5.Lcd.setTextColor(YELLOW);M5.Lcd.println(float(ymax/5*2));
    M5.Lcd.fillRect(0, 92, 15, 6, BLACK);M5.Lcd.setCursor(0,92,1);M5.Lcd.setTextColor(YELLOW);M5.Lcd.println(float(ymax/5));
    M5.Lcd.fillRect(0, 112, 15, 6, BLACK);M5.Lcd.setCursor(0,112,1);M5.Lcd.setTextColor(YELLOW);M5.Lcd.println(" 0");

    //中間水平線赤
    for(int i=0; i <= 24; i++){
    M5.Lcd.drawPixel(5+5*i, 15, RED);
    M5.Lcd.drawPixel(5+5*i, 35, RED);
    M5.Lcd.drawPixel(5+5*i, 55, RED);
    M5.Lcd.drawPixel(5+5*i, 75, RED);
    M5.Lcd.drawPixel(5+5*i, 95, RED);
    M5.Lcd.drawPixel(5+5*i, 115, RED);
    }

    //グラフ横軸の表示
    M5.Lcd.setCursor(95,120,1);M5.Lcd.setTextColor(YELLOW);M5.Lcd.setTextFont(1);M5.Lcd.print("1min"); //loop最後delay()-->graph横軸時間250-->32sec, 500-->64sec(1min), 1000-->128sec(2min), 2000-->256sec(4min), 3000-->384sec(6min)

    //グラフプロット
    SequencePosition = (SequencePosition + 1) % (sizeof(sequence) / sizeof(int));
    sequence[SequencePosition] = airvelocity;
    int len = sizeof(sequence) / sizeof(int);
    for (int i = 0; i < len; i++) {
        auto value = sequence[(SequencePosition + 1 + i) % len];
        M5.Lcd.fillCircle(i, (int)(115-value/ymax*100), 2, YELLOW);
        }

    airvelocitypriodmax01 = airvelocity > airvelocitypriodmax01 ? airvelocity : airvelocitypriodmax01;
    // 値をMQTTに送信する
    if (now - previoustime01 >= 1000) {
    connectMQTT();              // MQTT接続/接続確認
    mqwclient.publish(MQTT_TOPIC_AIRVELOCITY, String(airvelocitypriodmax01).c_str()); // 値を発行 for MQTT
    airvelocitypriodmax01 = 0;
    previoustime01 = now;
    Serial.print("value=");
    Serial.println(value);
    }

    if (value == 0){
    gas_send_intervaltime = 900000;
    }else{
    gas_send_intervaltime = 300000;
    }

    airvelocitypriodmax02 = airvelocity > airvelocitypriodmax02 ? airvelocity : airvelocitypriodmax02;
    // 値をGoogle Spreadsheetに送信する
    if (now - previoustime02 >= gas_send_intervaltime) {
        //サイズ計算サイト https://arduinojson.org/v6/assistant/#/step1
        StaticJsonDocument<128> doc;
        char buffer[128];

        doc["airvelocity"] = airvelocitypriodmax02;

        serializeJson(doc, Serial);
        Serial.println("");
        serializeJson(doc, buffer, sizeof(buffer));

        HTTPClient http;
        http.begin(host);
        http.addHeader("Content-Type", "application/json");
        int status_code = http.POST((uint8_t*)buffer, strlen(buffer));
        Serial.printf("status_code=%d\r\n", status_code);

        if (status_code == 200) {
        Stream* resp = http.getStreamPtr();

        DynamicJsonDocument json_response(255);
        deserializeJson(json_response, *resp);

        serializeJson(json_response, Serial);
        Serial.println("");
        }
        http.end();
        Serial.println("sent to google spread sheet");

        airvelocitypriodmax02 = 0;
        previoustime02 = now;
    }

    airvelocitypriodmax = airvelocity > airvelocitypriodmax ? airvelocity : airvelocitypriodmax;
    // 値をAmbientに送信する
    if (now - previoustime >= 30000) {  //ambientへの送信間隔(msec)を設定する
      if(WiFi.status() == WL_CONNECTED){
      ambient.set(1, airvelocitypriodmax);
      ambient.send();
      Serial.println("ambient send");
      airvelocitypriodmax = 0;
      previoustime = now;
      }
    }

    //最小値と最大値を求める
    float min_value = 10000000;
    float max_value = 0;
    float total = 0;
    float average = 0;

    for (int i = 0; i < len ; i++) {
    if(sequence[(SequencePosition + 1 + i) % len ] < min_value){
        min_value = sequence[(SequencePosition + 1 + i) % len ];
        }
    }
    for (int i = 0; i < len ; i++) {
    if (sequence[(SequencePosition + 1 + i) % len ] > max_value){
        max_value = sequence[(SequencePosition + 1 + i) % len ];
        }
    }
    for (int i = 0; i < len ; i++) {
        total += sequence[(SequencePosition + 1 + i) % len ];
    }
    average =  total/len;


    //グラフの縦軸を変更する
    if (max_value < 0.1){
        ymax = 0.1;
    }
    else if (max_value < 0.3){
        ymax = 0.3;
    }
    else if (max_value < 1){
        ymax = 1;
    }
    else if (max_value < 3){
        ymax = 3;
    }
    else if (max_value < 10){
        ymax = 10;
    }
    else{
        ymax = 15;
    }

    delay(500); //delay()-->graph横軸時間250-->32sec, 500-->64sec(1min), 1000-->128sec(2min), 2000-->256sec(4min), 3000-->384sec(6min)
    M5.update();
}
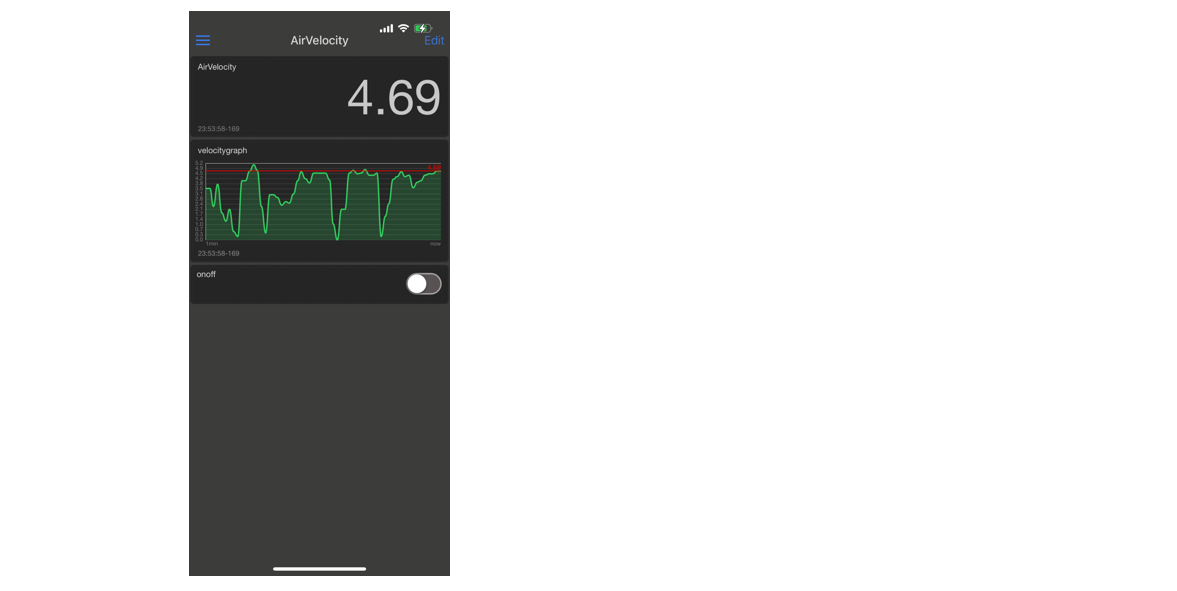
スマホアプリ「IoT ONOFF」でリアルタイムに風速を監視できた。
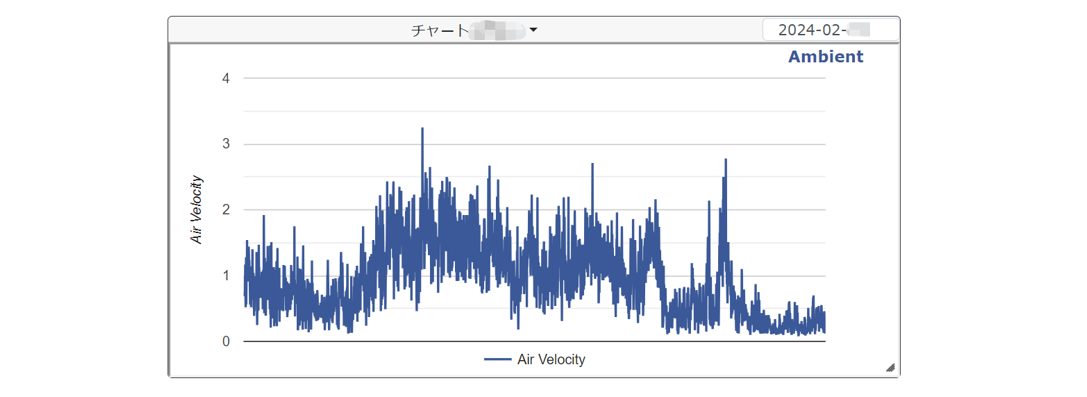
Ambientでグラフで風速を監視できた。(グラフで可視化、長期データ保存)
設定した閾値以上の風速が吹けば、LINEでお知らせがきた。

さいごに
一方向に流れる風速を測定する風速計が完成しました。今回は熱式空気速度センサを使いました。
風速計のタイプとしては、熱式風速計(熱線式風速計)、風杯型風速計(カップ型風速計)、ベーン式風速計(プロペラ式風速計)、空気の流れの中で発生する圧力を測定するピトー管式、レーザー光線や超音波を利用したレーザー流速計や超音波風速計があります。
これらの中で最も手軽で汎用的に利用されている風速計は熱式風速計です。
風杯型風速計やプロペラ式風速計のように回る部分がなく、ベランダに取り付けても、外側から目立たないので、一家に一台あればいいですね。
参考文献・参考記事
MQTTアプリ IoT ONOFFについて参考
M5StackではじめるIoT工作(技術評論社)伊藤浩之著
グラフ表示について参考
https://qiita.com/YujiSoftware/items/ed29527393d8effa8657