この記事について
前回の続きです。
コード解説
前回の続きをどんどん解説していきます。まずはこれ。
Flex Message
let flex = {
  'type': 'bubble',
  'size': 'giga',
  'body': {
    'type': 'box',
    'layout': 'vertical',
    'contents': [
      {
        'type': 'text',
        'text': today,
        'weight': 'bold',
        'size': 'xxl',
        'flex': 0
      }, {
        'type': 'box',
        'layout': 'horizontal',
        'contents': [
          {
            'type': 'filler'
          }, {
            'type': 'text',
            'text': weather,
            'size': 'lg',
            'color': '#444444',
            'flex': 0,
            'gravity': 'center'
          }
        ]
      }, {
        'type': 'box',
        'layout': 'horizontal',
        'contents': [
          {
            'type': 'filler'
          }, {
            'type': 'text',
            'text': temp_l + '℃',
            'size': 'lg',
            'color': '#3f51b5',
            'flex': 0
          }, {
            'type': 'text',
            'text': '/',
            'size': 'lg',
            'color': '#444444',
            'margin': 'xs',
            'flex': 0
          }, {
            'type': 'text',
            'text': temp_h + '℃',
            'size': 'lg',
            'color': '#f44336',
            'margin': 'xs',
            'flex': 0,
            'gravity': 'center'
          }
        ]
      }, {
        'type': 'separator',
        'margin': 'xl',
        'color': '#808080'
      }, {
        'type': 'box',
        'layout': 'vertical',
        'contents': [
          //EVENTS
        ],
        'margin': 'xl'
      }
    ]
  }
};
これがBotの送信するデータの中核になるわけです。これはFlex Messageというもので、LINEのメッセージをCSS Flexboxライクのフォーマットで表示するものなのだそう。
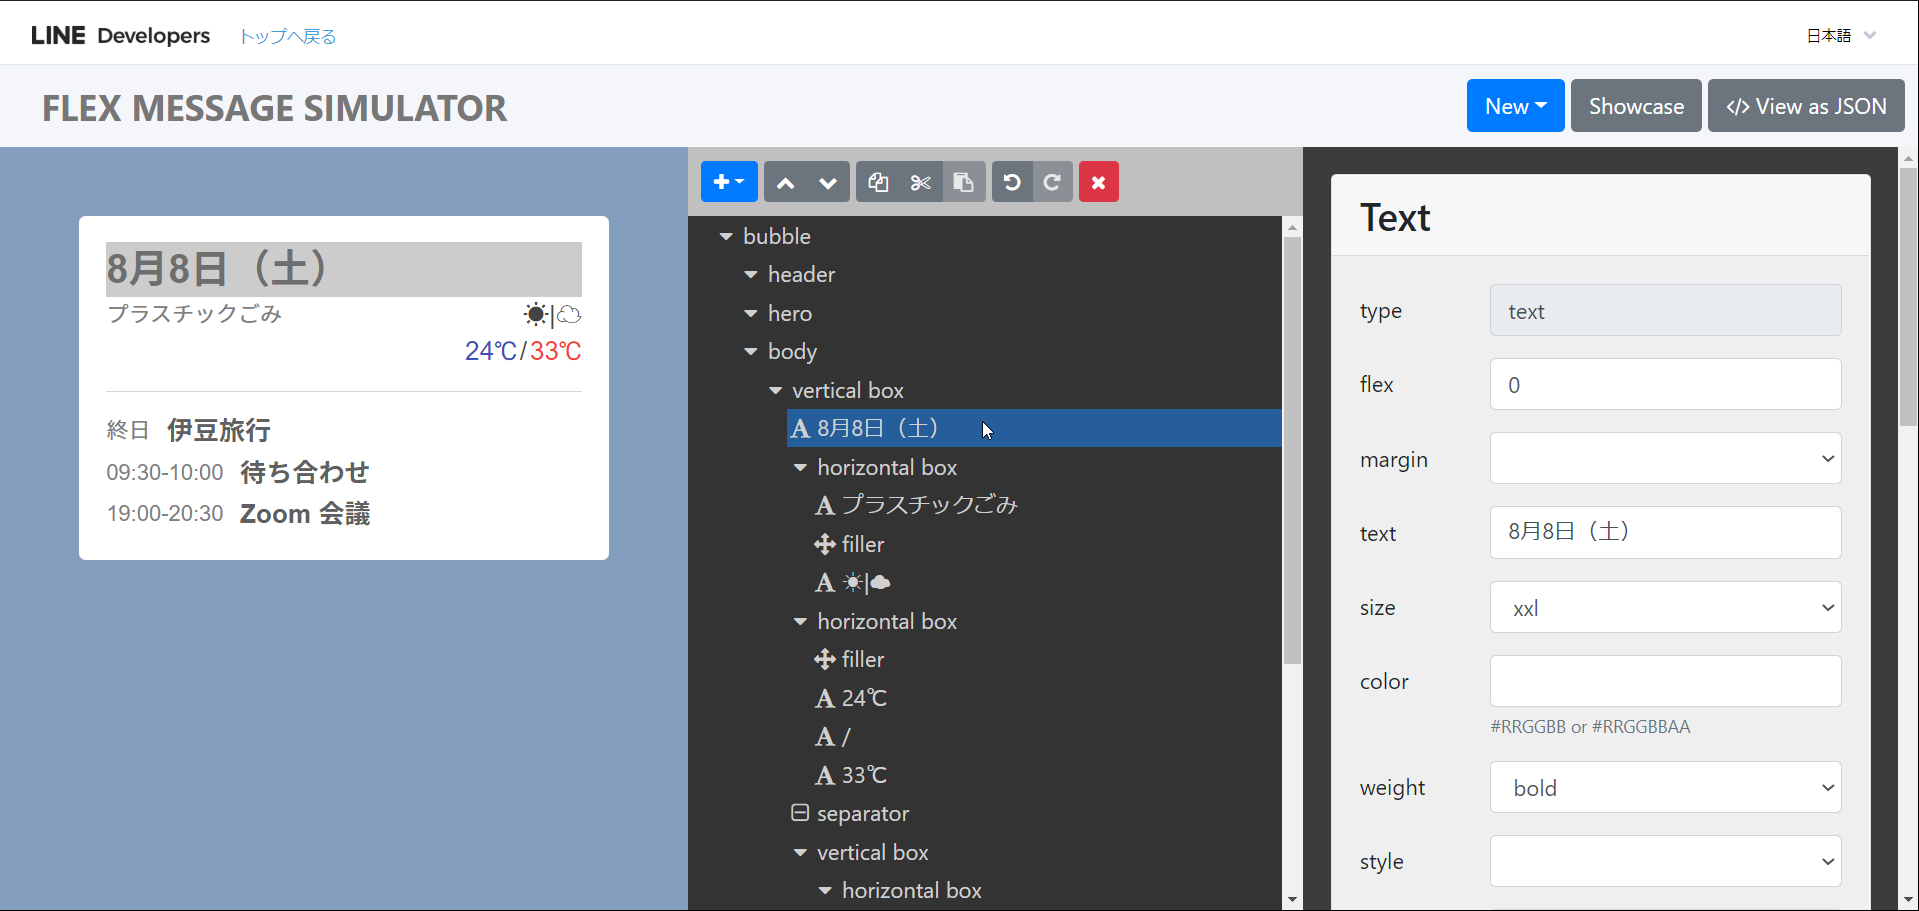
無の状態からこのデータを作ったわけではなく、LINEがシミュレータを公開してくれている。

右上のView as JSONでJSONデータを見ることができます。これをコピペして変数に置き換えるなどの処理をするだけでFlex Messageのデータを作れます。
祝日・ごみ収集日の表示
if (holiday != '') {
  flex.body.contents[1].contents.splice(0, 0, {
    'type': 'text',
    'text': holiday,
    'size': 'md',
    'color': '#808080',
    'flex': 0,
    'gravity': 'center'
  });
}
holidayの中身があるときに実行されます。
splice(start, count, data)でJSONデータに割り込む形でデータを挿入します。startで割り込む位置、countで割り込む際に元データから消去するstartからの要素の数を、dataに挿入するデータを指定します。
flex.body.contents[1].contents[0]の位置にデータを割り込ませ、countは0なので元のデータは1ずつずれて更新されます。
if (garbage[d.getDay()]) {
  let line = holiday == '' ? 1 : 2;
  flex.body.contents[line].contents.splice(0, 0, {
    'type': 'text',
    'text': garbage[d.getDay()],
    'size': 'md',
    'color': '#808080',
    'flex': 0,
    'gravity': 'center'
  });
}
ごみ収集日が0(=false)以外である時に実行されます。
その日が祝日なら2行目、祝日でないなら1行目に表示させるため、三項演算子を用いてlineを指定しています。
こちらも同じくsplice(start, count, data)で挿入。
予定の表示
予定にはTimeTreeに登録したデータを利用します。
const props = PropertiesService.getScriptProperties();

const TIMETREE_TOKEN = props.getProperty('TIMETREE_TOKEN');
const opt = {
  'headers': {
    'Authorization': 'Bearer ' + TIMETREE_TOKEN
  },
  'method': 'get'
};
propsには、GAS拡張サービスのPropertiesServiceでgetScriptProperties()を実行し、プロジェクトのプロパティに保存したAPIのトークンの配列を読み込んで代入しています。
getProperty(key)で指定したキーに対応する値を返します。
optには、UrlFetchApp.fetch(url, option)のオプションを設定しています。
主にデータを取得する際に用いられるGETリクエストでは、オプションには基本的に以下のような内容を利用できます。
{
  "method": "get",
  "headers": {
    /* header */
  }
}
"method"は"get","headers"にはヘッダというものを入れます。
今回のHTTPリクエストではAPIが要求するリクエストタイプ('method': 'get')とAPIキー(トークン)をAPI側に送信する必要があるため、ヘッダに認証情報を入れています。
このトークンは、IDやパスワードなしにAPIが利用可能なので、Bearerトークンとよばれており、
'Authorization': 'Bearer XXXXXXXXという記法で認証を受けるのが一般的です。
const calendars = JSON.parse(UrlFetchApp.fetch('https://timetreeapis.com/calendars', opt).getContentText()).data;
const z = (t) => ('0' + t).slice(-2);
TimeTree API > カレンダー一覧の取得
https://timetreeapis.com/calendars
TimeTree API ドキュメント
calendarsにはリクエストして返ってきたカレンダー一覧のJSONデータが入ります。
const z = (t) => ('0' + t).slice(-2);
ここでは、tが1文字の'X'だった時、'0X'となる「ゼロ埋め」の処理になっています。
slice(n, m)は、配列のn番目からm番目まで(m番目は含まない)をコピーする関数です。
mを省略し、nに負の数を入れると、最後からn番目までをコピーします。
第3回でも書きましたが、文字列は配列の一種なのでこの関数を利用できます。最後から2文字分を取得できるわけです。
アロー関数V8 という記法で、zに関数を定義しています。
let x = (a, b) => {
  return a * b;
}

//1行にすると、その計算結果がそのまま返される
let x = (a, b) => a * b;
let ev_exists = false;
for (let calendar of calendars) {
  let cal = JSON.parse(UrlFetchApp
                       .fetch('https://timetreeapis.com/calendars/' + calendar.id + '/upcoming_events?timezone=Asia/Tokyo&days=1', opt)
                       .getContentText()).data;
  for (let event of cal) {
    let {title, start_at, end_at, all_day} = event.attributes;
    start_at = new Date(start_at);
    end_at = new Date(end_at);
    let time = all_day ? '終日' : z(start_at.getHours()) + ':' + z(start_at.getMinutes()) + '-' +
      z(end_at.getHours()) + ':' + z(end_at.getMinutes());
    let schedule = {
      'type': 'box',
      'layout': 'horizontal',
      'contents': [
        {
          'type': 'text',
          'text': time,
          'flex': 0,
          'color': '#808080',
          'gravity': 'center',
          'size': 'md'
        }, {
          'type': 'text',
          'text': title,
          'size': 'lg',
          'weight': 'bold',
          'color': '#606060',
          'flex': 0,
          'gravity': 'center',
          'margin': 'lg'
        }
      ],
      'margin': 'sm'
    };
    flex.body.contents[4].contents.push(schedule);
    ev_exists = true;
  }
}
第3回ではfor-in関数を紹介しましたが、今回は**for-of関数**V8 です。
let json = {a: 1, b: 3, c: 5};
let x = 0;
for (let data of json) {
  x += data;
}
// x => 9;
配列(連想配列含む)の要素ひとつひとつに対して処理を行う反復処理です。
配列の要素の数だけ実行されます。dataには要素のデータが入ります。
let cal = JSON.parse(UrlFetchApp
                       .fetch('https://timetreeapis.com/calendars/' + calendar.id + '/upcoming_events?timezone=Asia/Tokyo&days=1', opt)
                       .getContentText()).data;
ここでは、取得した全種類のカレンダーひとつひとつのその日の予定を取得します。
そこから先は、
- 予定をひとつひとつ取り出して
- 分割代入で時間とタイトルと終日かどうかのデータを取得して
- 三項演算子で
timeに終日なら'終日'、そうでないなら時間をゼロ埋めして代入して - JSONデータ作って
- Flex Messageに突っ込む
だけです。
もし予定が何もないなら、ev_existsはfalseとなり、以下のコードが実行されます。
if (!ev_exists) {
  flex.body.contents.splice(3, 2);
}
splice(start, count, data)についてはすでにご紹介しましたが、ここでは、dataを省略すると、startからcountの分だけデータが削除されるという仕様を使っています。
予定の上に引かれている罫線と、予定を格納するボックスを削除しています。
Messaging APIに送信
さあ、いよいよ大詰めです。
const LINE_TOKEN = props.getProperty('LINE_TOKEN');
const payload = {
  'messages': [
    {
      'type': 'flex',
      'altText': today,
      'contents': flex
    }
  ]
};

const opt_line = {
  'headers': {
    'Content-Type': 'application/json; charset=UTF-8',
    'Authorization': 'Bearer ' + LINE_TOKEN
  },
  'method': 'post',
  'payload': JSON.stringify(payload)
};
UrlFetchApp.fetch('https://api.line.me/v2/bot/message/broadcast', opt_line);
PropertiesServiceから、保存しているMessaging APIのトークンをLINE_TOKENに代入します。
今回のHTTPリクエストの種類はPOSTなので、GAS側からデータを送信します。
payloadにデータを代入します。
opt_lineにUrlFetchApp.fetch(url, option)のオプションを設定します。
データを送信するので、今回はヘッダに'Content-Type'を設定します。データの形式です。
また、TimeTree APIと同様に認証情報を設定します。
POSTのリクエストの場合は、'method': 'post'となります。
'payload'にデータを入れることで、Massaging APIにメッセージのデータが送信されます。
まとめ
いかがでしたでしょうか。記事を書いている途中から力尽きそうになっていましたが、書ききることができました。
分割代入やアロー関数など、まだあまり使用例が多くないものをご紹介できたかと思います。
ご感想やご指摘などありましたらコメントいただけますと幸いです。
それでは、よいプログラミングライフを!