やること
Joystickの操作をArduinoで読みます。
USB接続のJoystickをArduinoで扱いたいなと思ったので、手持ちのJoystickとArduinoとホストシールドで動かそうとしたところ、サンプルプログラムが意外と初心者向けじゃなかったので何をどうすればいいのか、記録がてら記事にします。
この記事としてやることはJoystickの欲しいボタンの操作のbitを吐き出すところまで。
C++を読める人からするとサンプルプログラムとやってることは何も変わらないんだけど、Arduinoやりたい層ってC++完全理解したところから始める人ばかりではないので、そういう人が読んで応用できるようにと。
使うもの
- Arduino UNO(互換品のfreaduino)
- USB Host Shield(互換品のelecfreaks製V1.4)
- ジョイスティック(なんでもいいけど今回はバッファローの8ボタン)
なお、Host Shieldを使う際は基本的にArduino UNOを使ってください。SPI通信を使うので、SPIピンの配置が異なるLeonardoとかだと通信できなくて
OSC did not start.
を吐き出して終わります。
これに2時間ぐらい費やした人がいるとかいないとか。
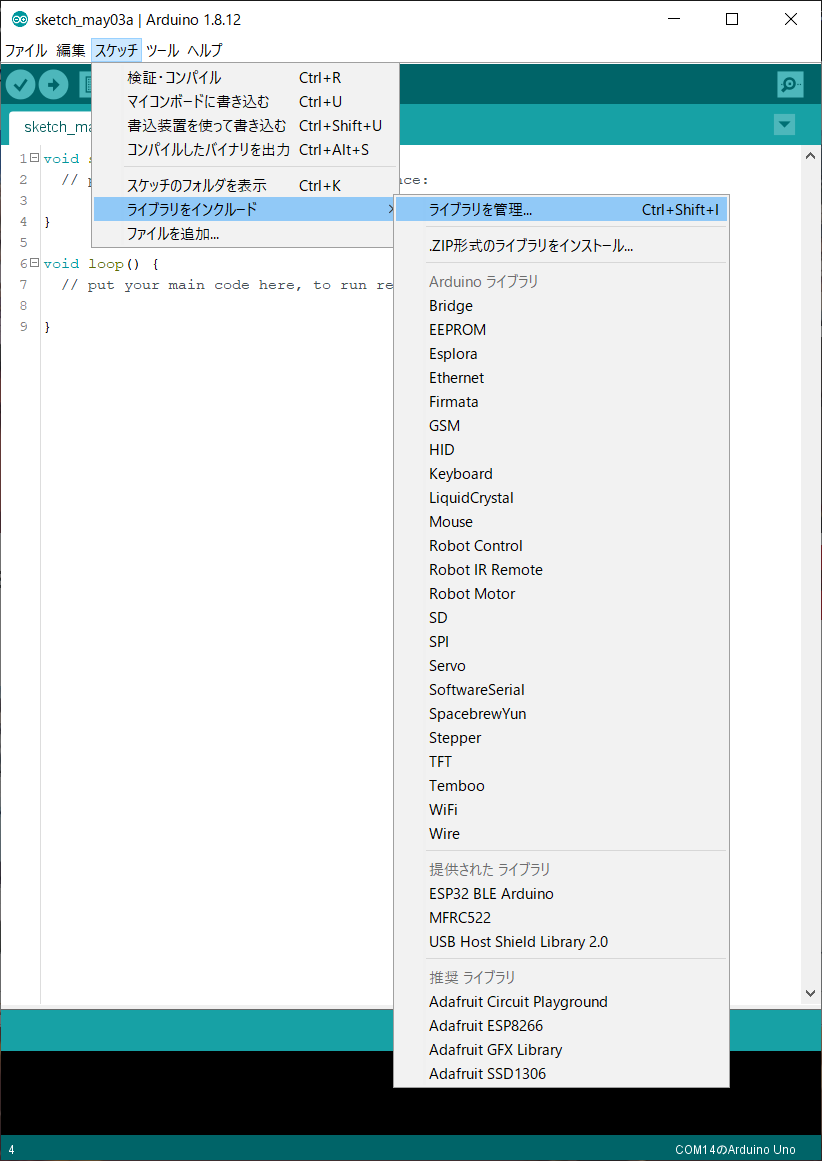
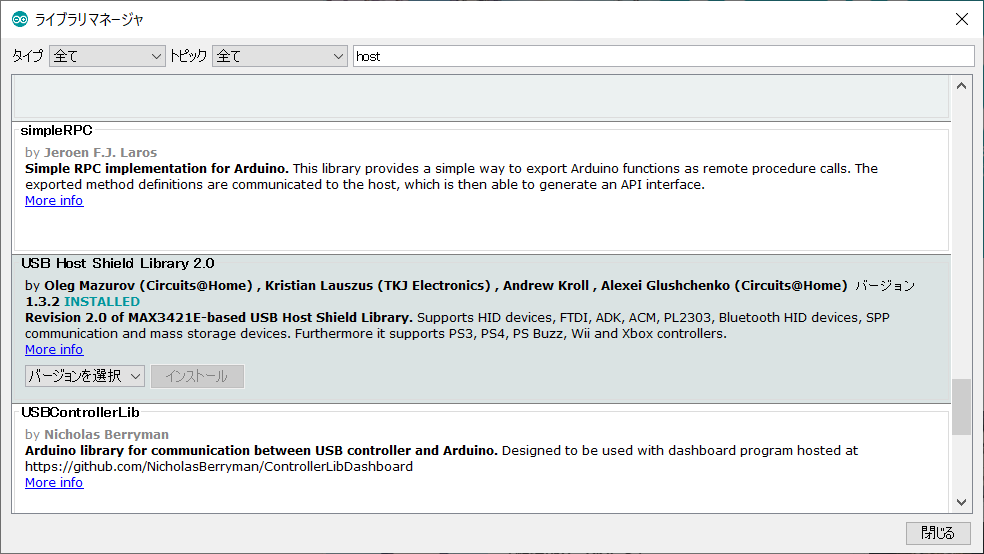
ライブラリとサンプルプログラム
USB Host Shield Library2.0をインストールします(画像ではインストール済み)。
これ↓
サンプルプログラムを読み込みます。
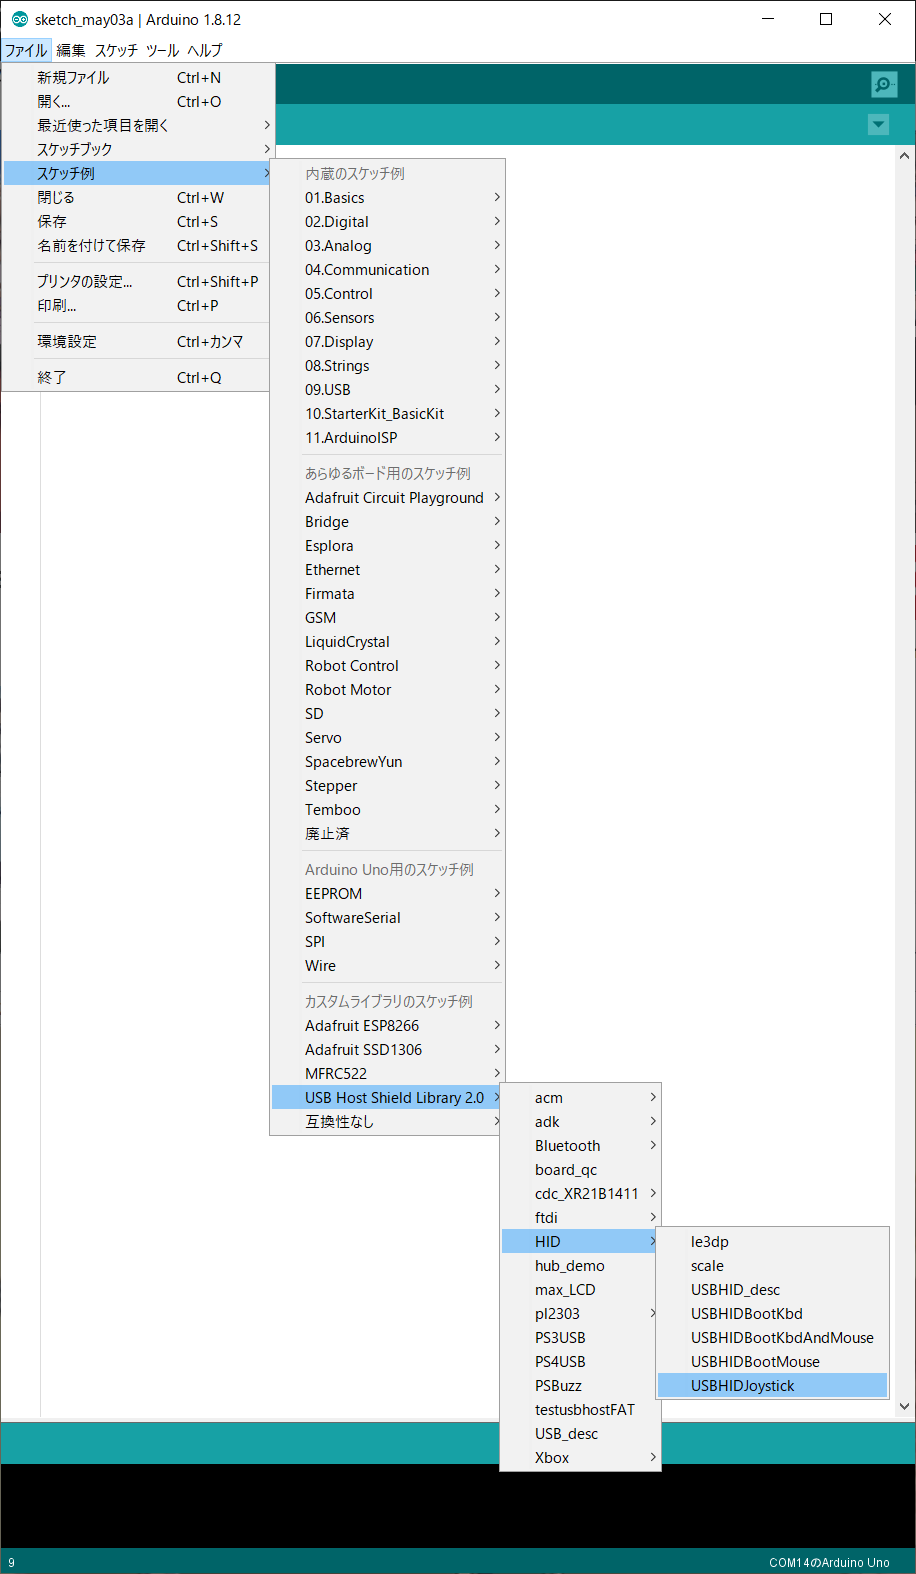
ここから始めます。
サンプルプログラムの内容と記事の方針
プログラム本文
とりあえずそのままのコードが次の通り。
# include <hid.h>
# include <hiduniversal.h>
# include <usbhub.h>

// Satisfy IDE, which only needs to see the include statment in the ino.
# ifdef dobogusinclude
# include <spi4teensy3.h>
# include <SPI.h>
# endif

# include "hidjoystickrptparser.h"

USB Usb;
USBHub Hub(&Usb);
HIDUniversal Hid(&Usb);
JoystickEvents JoyEvents;
JoystickReportParser Joy(&JoyEvents);

void setup() {
        Serial.begin(115200);
# if !defined(__MIPSEL__)
        while (!Serial); // Wait for serial port to connect - used on Leonardo, Teensy and other boards with built-in USB CDC serial connection
# endif
        Serial.println("Start");

        if (Usb.Init() == -1)
                Serial.println("OSC did not start.");

        delay(200);

        if (!Hid.SetReportParser(0, &Joy))
                ErrorMessage<uint8_t > (PSTR("SetReportParser"), 1);
}

void loop() {
        Usb.Task();
}
で、初見ではこのloop()の中で何をやってるのかがわからないというわけです。
JoystickEventsクラスのインスタンスJoyEventsの関数が、ボタンの状態変化を検知して都度シリアルに書き出すというプログラムになっています。
今回はこれの動きを変えたいわけです。
ライブラリ
出力される情報と直接関係する部分を以下に抜粋して貼っておきます。
class JoystickEvents {
public:
        virtual void OnGamePadChanged(const GamePadEventData *evt);
        virtual void OnHatSwitch(uint8_t hat);
        virtual void OnButtonUp(uint8_t but_id);
        virtual void OnButtonDn(uint8_t but_id);
};
void JoystickEvents::OnGamePadChanged(const GamePadEventData *evt) {
        Serial.print("X1: ");
        PrintHex<uint8_t > (evt->X, 0x80);
        Serial.print("\tY1: ");
        PrintHex<uint8_t > (evt->Y, 0x80);
        Serial.print("\tX2: ");
        PrintHex<uint8_t > (evt->Z1, 0x80);
        Serial.print("\tY2: ");
        PrintHex<uint8_t > (evt->Z2, 0x80);
        Serial.print("\tRz: ");
        PrintHex<uint8_t > (evt->Rz, 0x80);
        Serial.println("");
}

void JoystickEvents::OnHatSwitch(uint8_t hat) {
        Serial.print("Hat Switch: ");
        PrintHex<uint8_t > (hat, 0x80);
        Serial.println("");
}

void JoystickEvents::OnButtonUp(uint8_t but_id) {
        Serial.print("Up: ");
        Serial.println(but_id, DEC);
}

void JoystickEvents::OnButtonDn(uint8_t but_id) {
        Serial.print("Dn: ");
        Serial.println(but_id, DEC);
}
PrintHexとか誰だよお前って話なわけですよね。テンプレートとか使われるとちょっとビビっちゃいますけど一生懸命ライブラリ遡って読んだ割には大したことしてなかったので、バッサリ捨ててもっと使いやすい形で出力しようと思います。
そもそもSerialどこで扱ってるのという話ですよ。
方針
ライブラリを直接編集する方法もあるんですが、汎用性とか可読性とか(?)を考慮してライブラリは一切手を加えず、プログラム本文中に継承したクラスを作り直そうと思います。
途中の考えはともかく、最終的なコードは読めばわかると思うので、あとは煮るなり焼くなりしてください。
クラスの継承
以下に、本文に追加するコードを書きます。
プログラムファイルの名称はなんでもいいんですけど、MyUSBHIDJoystick.inoとしました。
JoystickEventsクラスを継承して子クラス側にMyをつけました。これで自由に書き換えられます。
//追加ここから
class MyJoystickEvents : public JoystickEvents {
public:
        void OnGamePadChanged(const GamePadEventData *evt);
        void OnHatSwitch(uint8_t hat);
        void OnButtonUp(uint8_t but_id);
        void OnButtonDn(uint8_t but_id);
};

void MyJoystickEvents::OnGamePadChanged(const GamePadEventData *evt) {
        Serial.print("X1: ");
        Serial.print(evt->X | 0x100, BIN);
        Serial.print("\tY1: ");
        Serial.print(evt->Y | 0x100, BIN);
        Serial.print("\tX2: ");
        Serial.print(evt->Z1 | 0x100, BIN);
        Serial.print("\tY2: ");
        Serial.print(evt->Z2 | 0x100, BIN);
        Serial.print("\tRz: ");
        Serial.print(evt->Rz | 0x100, BIN);
        Serial.println("");
}

void MyJoystickEvents::OnHatSwitch(uint8_t hat) {
        Serial.print("Hat Switch: ");
        PrintHex<uint8_t > (hat, 0x80);
        Serial.println("");
}

void MyJoystickEvents::OnButtonUp(uint8_t but_id) {
        Serial.print("Up: ");
        Serial.println(but_id, DEC);
}

void MyJoystickEvents::OnButtonDn(uint8_t but_id) {
        Serial.print("Dn: ");
        Serial.println(but_id, DEC);
}
//追加ここまで

//書換えここから
USB Usb;
USBHub Hub(&Usb);
HIDUniversal Hid(&Usb);
MyJoystickEvents MyJoyEvents;  //継承した新しいクラスに書き換える
JoystickReportParser Joy(&MyJoyEvents);  //新しいクラスのインスタンスを使う
//書換えここまで
ここで
evt->X | 0x100
と、orをとっているのは、8bit値の桁を調整するために下から9bit目をHighにしたというだけです。
本文にこれを追記して実行すると、次のようにシリアル出力されます。
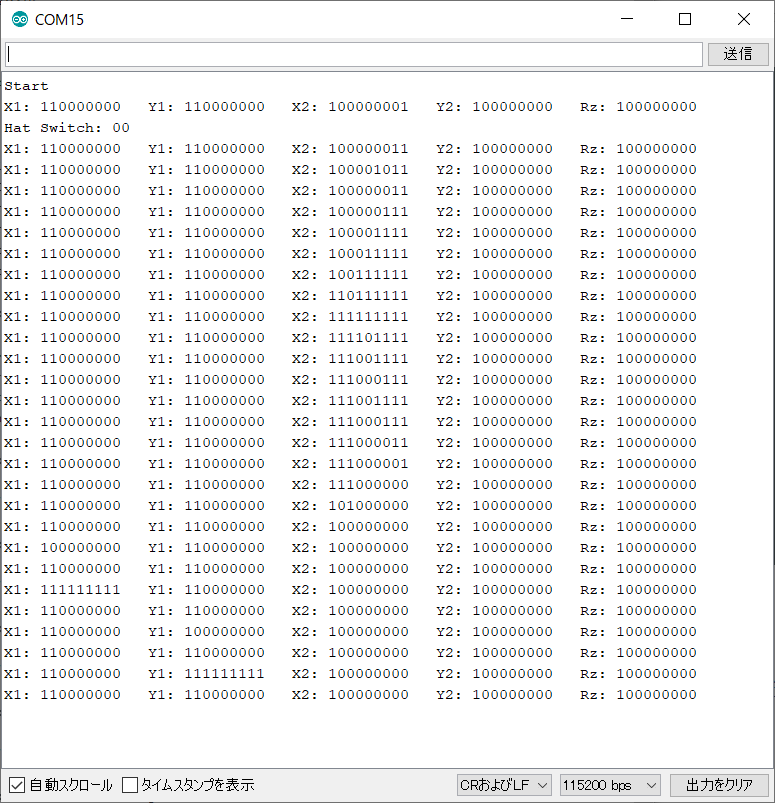
今回使用したJoystickは8ボタンで、X2で8bit分のデータが表現されます。
参考までに、今回使用したJoyStickでは上のbitから順に
START / SELECT / R / L / Y / X / B / A
です。これは製品毎に異なるので注意が必要です。
十字キーはX1が横、Y1が縦です。10進数で
(左・上)0 ← 128 → 255(右・下)
を離散的に3つの値で出力します。
これらはボタンの状態に変化があるたび出力され、変化がない間は出力されません。
Hatスイッチについては今回使ったJoystickにはないので検証ができませんが、最初のボタン操作の直後に一度だけ状態を出力するようです。
必要ないなら、OnHatSwitchを空にすることで解決できます。後で消します。
特定のボタン出力を抜き出す
もうちょっと特定の用途に使いやすいような書き方に変えます。
具体的には、十字キーの右入力とRボタンとYボタンにだけ反応させたいとします。
なお、大人の事情だと思いますが、サンプルプログラムで出力される
X1 / Y1 / X2 / Y2 / Rz
は、コードでは
X / Y / Z1 / Z2 / Rz
と、ラベルが違うので注意しましょう。
//追加ここから
class MyJoystickEvents : public JoystickEvents {
public:
        void OnGamePadChanged(const GamePadEventData *evt);
        void OnHatSwitch(uint8_t hat);
        void OnButtonUp(uint8_t but_id);
        void OnButtonDn(uint8_t but_id);
};

void MyJoystickEvents::OnGamePadChanged(const GamePadEventData *evt) {
        /*
        Serial.print("X1: ");        Serial.print(evt->X | 0x100, BIN);
        Serial.print("\tY1: ");      Serial.print(evt->Y | 0x100, BIN);
        Serial.print("\tX2: ");      Serial.print(evt->Z1 | 0x100, BIN);
        Serial.print("\tY2: ");      Serial.print(evt->Z2 | 0x100, BIN);
        Serial.print("\tRz: ");      Serial.print(evt->Rz | 0x100, BIN);
        Serial.println(""):
        */
        if(evt->X == 255)Serial.print(" -> ");
        if(evt->Z1 & 0b00100000)Serial.print(" R ");
        if(evt->Z1 & 0b00001000)Serial.print(" Y ");
}

void MyJoystickEvents::OnHatSwitch(uint8_t hat) {
        //Serial.print("Hat Switch: ");
        //PrintHex<uint8_t > (hat, 0x80);
        //Serial.println("");
}

void MyJoystickEvents::OnButtonUp(uint8_t but_id) {
        Serial.print("Up: ");
        Serial.println(but_id, DEC);
}

void MyJoystickEvents::OnButtonDn(uint8_t but_id) {
        Serial.print("Dn: ");
        Serial.println(but_id, DEC);
}
//追加ここまで

//書換えここから
USB Usb;
USBHub Hub(&Usb);
HIDUniversal Hid(&Usb);
MyJoystickEvents MyJoyEvents;  //継承した新しいクラスに書き換える
JoystickReportParser Joy(&MyJoyEvents);  //新しいクラスのインスタンスを使う
//書換えここまで
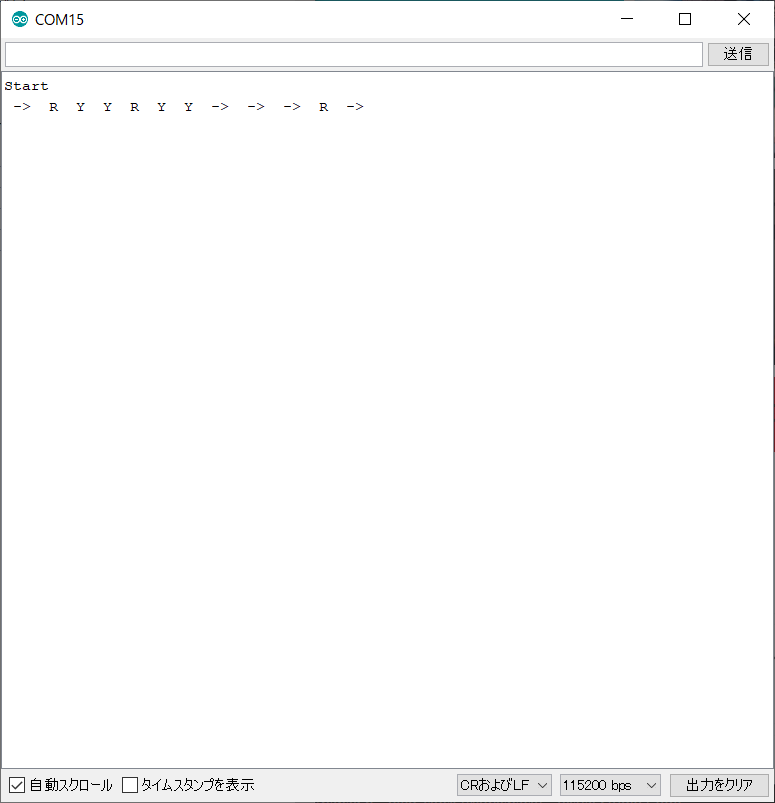
ボタン変化があるたびにOnGamePadChanged()が呼び出され、かつ特定のONのときにシリアル出力する書き方なので、例えばYボタンを押したままRボタンを押すと一度にRとYが出力され、あるいは、OFFになっても何も出力されないように書いているので、用途に応じた書き換えてください。
例えばボタンの状態を記憶する変数を作ってバッファにし、200msごとに繰り返し出力するなら次のような書き方ができます。
byte buttonBuf = 0;
unsigned long sentTime = 0;  // 最後に送信した時刻[ms]
unsigned long period = 200;  // 周期[ms]

void MyJoystickEvents::OnGamePadChanged(const GamePadEventData *evt) {
        // Serial.print("X1: ");        Serial.print(evt->X | 0x100, BIN);
        buttonBuf = evt->Z1;
}

void loop() {
        Usb.Task();

        if(sentTime/period != millis()/period)
        {
          sentTime = millis();
          Serial.println(buttonBuf | 0x100,BIN);
        }
}
ちなみに、Joystickひとつを接続した場合は、1msにおよそ2回ぐらいの周期でloop()が動作しているようです。
おわりに
本当はアナログパッドのあるJoystickでこれをやろうと思ったんですけど、手持ちになかったので今回は十字キーと8ボタンのでやってます。
あと、なぜこれを記事にしようと思ったかというと、提供されたサンプルコードのままだと、そこそこ真面目にC++勉強した人以外は調べても思い通りに使えないレベルだと思ったからなんですね。
自分にはUSBHIDの知識もないし、逆立ちしてもこんなライブラリ書けないので提供してくる方には感謝していますけど、そもそも使えなきゃ意味がないと思うので、誰かの参考になればと思います。
間違いとか見つけたらコメントください。
キーワード
記事で何してるのか気になった人向けにキーワードだけ書いておきます。
ボタン変化があるたびに呼び出される関数について、親クラスで元から仮想関数として記述されていたので(virtual)、子クラスでメンバ関数が動的に結合されて、継承しても子クラスの関数が動作するようになっています。
コード全文
サンプルプログラムを開いて、USBHIDJoystick.inoを以下に置き換えれば動くと思います。
# include <hid.h>
# include <hiduniversal.h>
# include <usbhub.h>

// Satisfy IDE, which only needs to see the include statment in the ino.
# ifdef dobogusinclude
# include <spi4teensy3.h>
# include <SPI.h>
# endif

# include "hidjoystickrptparser.h"


//追加ここから
class MyJoystickEvents : public JoystickEvents {
public:
        void OnGamePadChanged(const GamePadEventData *evt);
        void OnHatSwitch(uint8_t hat);
        void OnButtonUp(uint8_t but_id);
        void OnButtonDn(uint8_t but_id);
};

void MyJoystickEvents::OnGamePadChanged(const GamePadEventData *evt) {
        /*
        Serial.print("X1: ");        Serial.print(evt->X | 0x100, BIN);
        Serial.print("\tY1: ");      Serial.print(evt->Y | 0x100, BIN);
        Serial.print("\tX2: ");      Serial.print(evt->Z1 | 0x100, BIN);
        Serial.print("\tY2: ");      Serial.print(evt->Z2 | 0x100, BIN);
        Serial.print("\tRz: ");      Serial.print(evt->Rz | 0x100, BIN);
        Serial.println(""):
        */
        if(evt->X == 255)Serial.print(" -> ");
        if(evt->Z1 & 0b00100000)Serial.print(" R ");
        if(evt->Z1 & 0b00001000)Serial.print(" Y ");
}

void MyJoystickEvents::OnHatSwitch(uint8_t hat) {
        //Serial.print("Hat Switch: ");
        //PrintHex<uint8_t > (hat, 0x80);
        //Serial.println("");
}

void MyJoystickEvents::OnButtonUp(uint8_t but_id) {
        Serial.print("Up: ");
        Serial.println(but_id, DEC);
}

void MyJoystickEvents::OnButtonDn(uint8_t but_id) {
        Serial.print("Dn: ");
        Serial.println(but_id, DEC);
}
//追加ここまで

//書換えここから
USB Usb;
USBHub Hub(&Usb);
HIDUniversal Hid(&Usb);
MyJoystickEvents MyJoyEvents;  //継承した新しいクラスに書き換える
JoystickReportParser Joy(&MyJoyEvents);  //新しいクラスのインスタンスを使う
//書換えここまで

void setup() {
        Serial.begin(115200);
# if !defined(__MIPSEL__)
        while (!Serial); // Wait for serial port to connect - used on Leonardo, Teensy and other boards with built-in USB CDC serial connection
# endif
        Serial.println("Start");

        if (Usb.Init() == -1)
                Serial.println("OSC did not start.");

        delay(200);

        if (!Hid.SetReportParser(0, &Joy))
                ErrorMessage<uint8_t > (PSTR("SetReportParser"), 1);
}

void loop() {
        Usb.Task();
}