シーン設定
ある問題に対して、深層学習モデルを作成しました、それで内部で使ってもらうとき、使う人がpythonやプログラミングに詳しくない(上司?笑う)、そのとき簡単で使えるGUIが欲しい、しかしC++やpygameなどでGUI作るのがメンド、如何すればいいの?
Jupyter ipywidgets
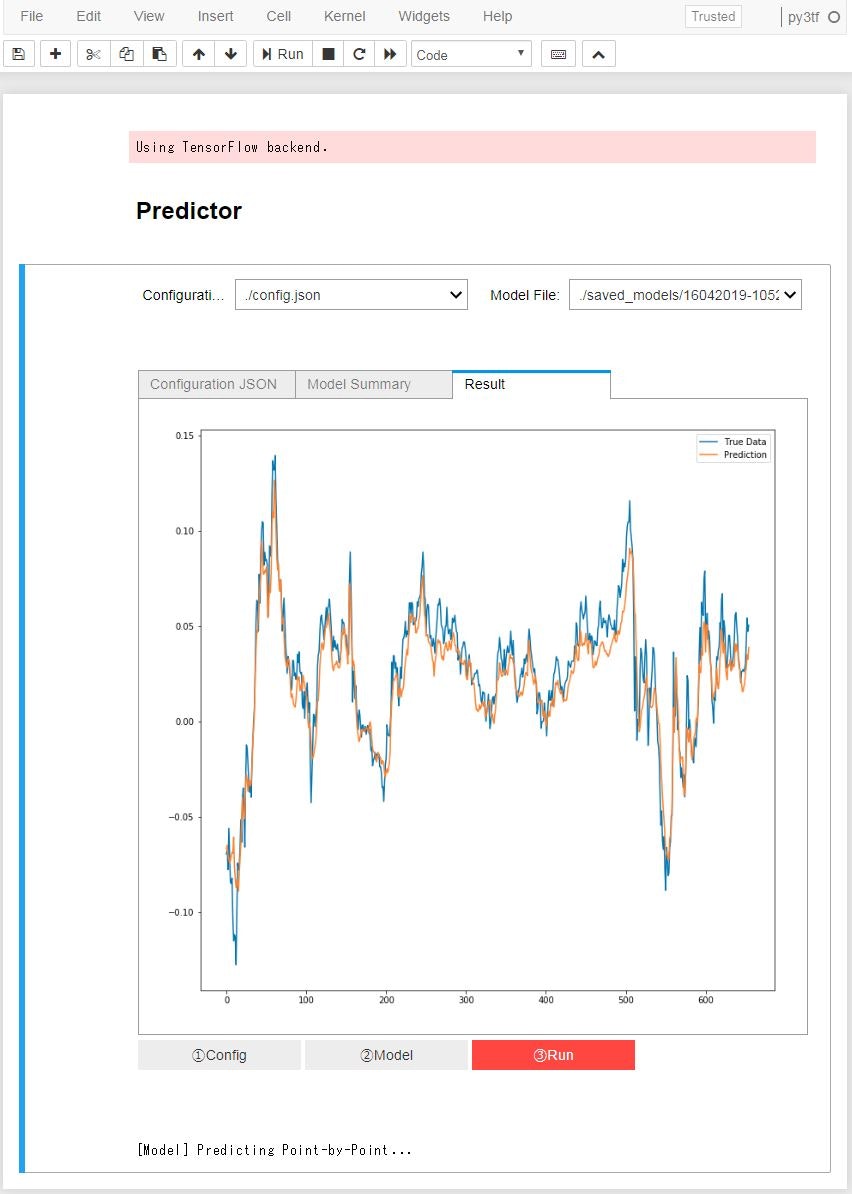
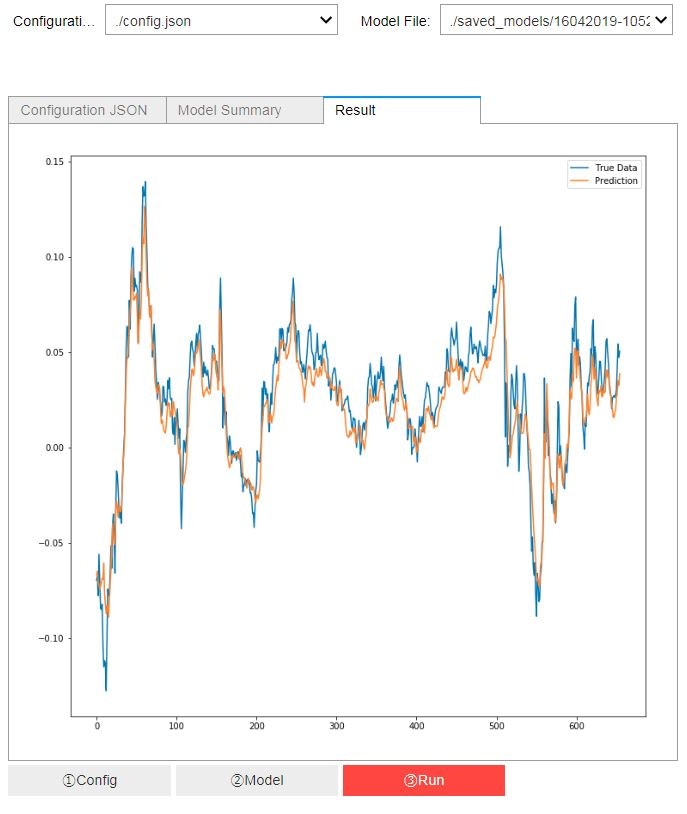
先に、完成品はこんな感じ。
Imports
# 基本機能とIO
import os
import json
import matplotlib.pyplot as plt
from pprint import pprint as jprint

# 深層学習モデル
from core.data_processor import DataLoader
from core.model import Model

# JupyterUI関連
import ipywidgets as widgets
from IPython.display import display
機能クラス
いろいろ試作で分かったことはwidgetsの機能methodに引数がないように設計すれば、簡単になる、それのため以下のクラスを作成しました:
class GUI_DI():
    def __init__(self):
        self.config_file = self.config_loader()#設定ファイルPATHの読み込み
        self.model_file = self.model_loader()#モデルファイルPATHの読み込み
        self.pmodel = Model()#モデルクラスの作成

    @staticmethod
    def show_config(cls, config_file):
    """
          選択した設定ファイルの内容を出力、確認用
       """
        cls.configs = json.load(open(config_file, 'r'))
        jprint(cls.configs)
        cls.data = DataLoader(
                    os.path.join('data', cls.configs['data']['filename']),
                    cls.configs['data']['train_test_split'],
                    cls.configs['data']['columns'])

    @staticmethod
    def load_models(cls, model):
    """
          選択した学習済みのモデル読み込みまたその構造を出力、確認用
       """
        cls.pmodel.load_model(model)
        print(cls.pmodel.model.summary())

    def config_loader(self):
    """
          設定ファイルのListを作成
       """
        file_list = []
        for file in os.listdir("./"):
            if file.endswith(".json"):
                file_list.append(os.path.join("./", file))
        return file_list

    def model_loader(self):
    """
          学習済みのモデルファイルのListを作成
       """
        file_list = []
        for file in os.listdir("./saved_models/"):
            if file.endswith(".h5"):
                file_list.append(os.path.join("./saved_models/", file))
        return file_list

    def generate_data(self):
    """
          学習済みのモデルで使うデータ作成
       """
        if self.data is not None:
            self.x_test, self.y_test = self.data.get_test_data(
                            seq_len = self.configs['data']['sequence_length'],
                            normalise = self.configs['data']['normalise'])
        else:
            print("Please Load Config File First")

    def predict(self):
    """
          学習済みのモデルを使う
       """
        self.predictions = self.pmodel.predict_point_by_point(self.x_test)

    def plot_it(self):
    """
          結果を図にする
       """
        predicted_data, true_data = self.predictions, self.y_test
        fig = plt.figure(facecolor='white',figsize=(12,12))
        ax = fig.add_subplot(111)
        ax.plot(true_data, label='True Data')
        plt.plot(predicted_data, label='Prediction')
        plt.legend()
        plt.show()
Jupyterとclassの連携
見た目
先に、クラスの実体を作りましょう
gdi = GUI_DI()
それで各widgetsを作ります
item_layout = widgets.Layout(margin='0 0 50px 0')#layoutの設定

config_output = widgets.Output()#設定ファイルの出力セクション
config_output.clear_output()

model_summary = widgets.Output()#モデル構造の出力セクション
model_summary.clear_output()

plot_output = widgets.Output()#最終図の出力セクション
plot_output.clear_output()

show_c = widgets.Button(description='①Config')#設定ファイルの出力ボタン
show_m = widgets.Button(description='②Model')#モデル構造の出力ボタン
run_m = widgets.Button(description='③Run', button_style='danger')#モデルを動かすボタン
さらに、人が選択できるようにまた選択したファイルが目標ファイルになるため
config = widgets.Dropdown(
                options=gdi.config_loader(),
                description='Configuration File:',
                disabled=False,
            ) #gdi.config_loader()の内容がDropListのないようになる、そして選択された内容(PATH to file)がconfigとして

model = widgets.Dropdown(
                options=gdi.model_loader(),
                description='Model File:',
                disabled=False,
            )#gdi.model_loader()の内容がDropListのないようになる、そして選択された内容(PATH to Model)がmodel として
見た目のために、Boxに分ける
input_widgets = widgets.HBox(
                [config, model],
                layout=item_layout)

button_widgets = widgets.HBox(
                [show_c, show_m, run_m],
                layout=item_layout)
そして、出力をTabで分ける
tab = widgets.Tab([config_output, model_summary, plot_output])
tab.set_title(0, 'Configuration JSON')
tab.set_title(1, 'Model Summary')
tab.set_title(2, 'Result')
最終に、NoteBookに表せる
dashboard = widgets.VBox([input_widgets, tab, button_widgets])
display(dashboard)
ここまで見た目が終わり
機能実装
各ipywidgetsの実装機能をつくりましょう
def run_p(obj):
  """
       モデル実行するまた結果を最終図の出力セクションに伝える
    """
    gdi.generate_data()
    gdi.predict()
    plot_output.clear_output()
    with plot_output:
        gdi.plot_it()

def show_json(obj):
  """
       設定ファイルの内容を設定ファイル出力セクションに伝える
    """
    config_output.clear_output()
    with config_output:
        gdi.show_config(gdi, config.value)

def show_model(obj):
  """
      モデルの構造をモデル構造出力セクションに伝える
    """
    model_summary.clear_output()
    with model_summary:
        gdi.load_models(gdi, model.value)
ここで書くメソッドの引数objは必要です。
さらに、これらを作成したボタンのclickイベントと連携します
show_c.on_click(show_json)
show_m.on_click(show_model)
run_m.on_click(run_p)
これで終わります。
終わりに
このコードとjupyterのHide inputエクステンションと一緒に使うとこんな感じ