
やっとテストメールが送信できたので、忘れない様に手順をメモ。
4時間~6時間は短縮できる。
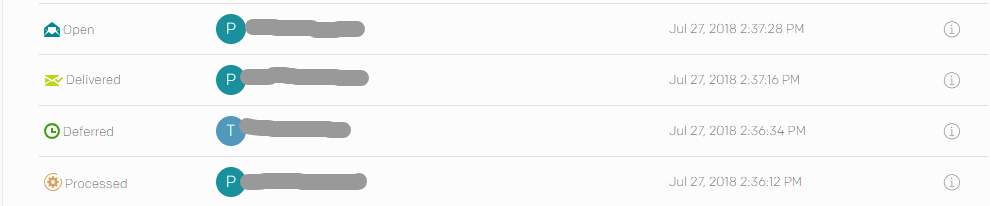
- SendGridの画面で
- Processed 処理中
- Delivered 送信した
- Open 開封した
この様な感じで確認できました。
独自ドメインのメールはどうなるのか不安だったが、どうやら独自ドメインで送れました。
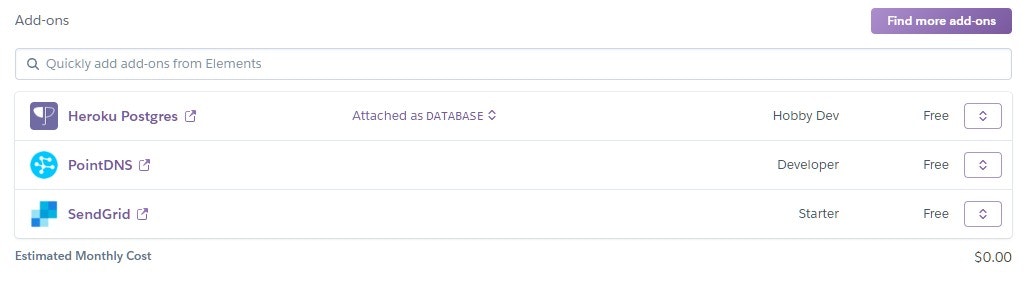
Herokuのアドオン
PointDNS
SendGrid
この2つのアドオンは既に入っている状態とします。
手順
1 SMTPを記述する
ローカルだと飛ばせないと思うのでリモートにアップしてから試します。
※ローカルでも飛ばせるなら development.eb へ記述すればよいはず。
SendGridのSMTP情報を記入します。
  # Use SendGrid - Add-ons - Heroku
  config.action_mailer.delivery_method = :smtp
  config.action_mailer.default_url_options = { host: '独自ドメイン' }
  config.action_mailer.perform_deliveries = true
  config.action_mailer.smtp_settings = {
      user_name: ENV['SENDGRID_USERNAME'],
      password: ENV['SENDGRID_PASSWORD'],
      domain: '独自ドメイン',
      address: 'smtp.sendgrid.net',
      port: 587,
      authentication: :plain,
      enable_starttls_auto: true
  }
2 テストメーラー作成
$ rails g mailer TestMailer notify
3 送信元の独自ドメインセット
class ApplicationMailer < ActionMailer::Base
  default from: 'info@独自ドメイン'
  layout 'mailer'
end
4 送信先のアドレスセット
class TestMailer < ApplicationMailer
  def notify
    @greeting = "Hi"
    mail to: "送信先メールアドレス"
  end
end
5 メール本文を編集
<h1>メール本文です</h1>
<p>
  <%= @greeting %>, find me in app/views/test_mailer/notify.html.erb
</p>
6 メール送信テスト
$ heroku run rails c
irb(main):001:0> TestMailer.notify.deliver
これで送信されました。
もし失敗したら?
たぶんいらないと思いますが、何回もやり直していたので、
もしかしたらこのコマンドで設定する必要があるかも知れません。
1 USER_NAMEの確認
$ heroku config:get SENDGRID_USERNAME
2 PASSWORDの確認
$ heroku config:get SENDGRID_PASSWORD
3 USER_NAMEの設定
$ heroku config:set SENDGRID_USERNAME=上記1のSENDGRID_USERNAME
ユーザー名がセットされます。
4 PASSWORDの設定
$ heroku config:set SENDGRID_PASSWORD=上記2のSENDGRID_PASSWORD
パスワードがセットされます。
追記
確認・サンクスページ付送信フォームを実装
確認ページ+サンクスページ付のメールフォームを実装します。
Heroku に PointDNS、Sendgridが入っていることが前提
入ってない場合は、
Herokuでサブドメインなしの独自ドメインとSSLを設定する方法。Heroku内で完結。Cloudflare は使わない方法。を参考にPointDNSを設定しておく。
送信設定
  # Setup the mailer config
  # Use SendGrid - Add-ons - Heroku
  config.action_mailer.delivery_method = :smtp
  config.action_mailer.default_url_options = { host: '独自ドメイン.com' }
  config.action_mailer.perform_deliveries = true
  config.action_mailer.smtp_settings = {
      user_name: ENV['SENDGRID_USERNAME'],
      password: ENV['SENDGRID_PASSWORD'],
      domain: '独自ドメイン.com',
      address: 'smtp.sendgrid.net',
      port: 587,
      authentication: :plain,
      enable_starttls_auto: true
  }
上記で既に設定している場合は不要。
ControllerとViewsを作成
$ rails g controller inquiry index confirm thanks
- index フォーム
- confirm 確認ページ
- thanks サンクスページ
InquiryController
class InquiryController < ApplicationController
  def index
    # 入力画面を表示
    @inquiry = Inquiry.new
    render :action => 'index'
  end

  def confirm
    # 入力値のチェック
    @inquiry = Inquiry.new(inquiry_params)
    if @inquiry.valid?
      # OK。確認画面を表示
      render :action => 'confirm'
    else
      # NG。入力画面を再表示
      render :action => 'index'
    end
  end

  def thanks
    # メール送信
    @inquiry = Inquiry.new(inquiry_params)
    InquiryMailer.received_email(@inquiry).deliver

    # 完了画面を表示
    render :action => 'thanks'
  end

  private
  def inquiry_params
    params.require(:inquiry).permit(:name, :email, :message)
  end
end
routes設定
  Rails.application.routes.draw do
    get 'inquiry' => 'inquiry#index'              # 入力画面
    post 'inquiry/confirm' => 'inquiry#confirm'   # 確認画面
    post 'inquiry/thanks' => 'inquiry#thanks'     # 送信完了画面
  end
最下部で良いので追加する
modelsを作成する
class Inquiry
  include ActiveModel::Model

  attr_accessor :name, :email, :message

  validates :name, :presence => {:message => '名前を入力してください'}
  validates :email, :presence => {:message => 'メールアドレスを入力してください'}
end
app/models/inquiry.rb は無いのでファイルを作成する。
※右クリックから作成すれば良い。
バリデーションを設定できます。
送信者情報を作成
class InquiryMailer < ActionMailer::Base
  # これ入れないと送れいない。
  default from: "info@独自ドメイン.com"

  def received_email(inquiry)
    @inquiry = inquiry
    # form: "info@独自ドメイン.com", としてmail()の中に入れても良い様だ。
    # mail(to: @inquiry.email, :subject => 'お問い合わせありがとうございます。')
    mail( from: '"送信者名" <info@独自ドメイン.com>',
          to: @inquiry.email,
          subject: 'お問い合わせありがとうございます。',
          bcc: 'BBC用のメールアドレス',
          reply_to: 'info@独自ドメイン.com' )
  end
end
これも無いので作成する。
※右クリックからで良い。
コマンドからだと
$ rails g mailer inqury
送信フォームを作成
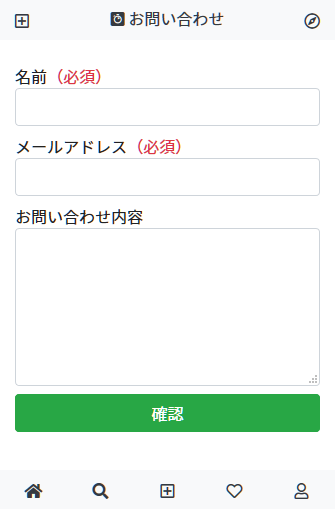
<div class="newWrap">
  <div class="newTitle">
    <h1>お問い合わせ</h1>
  </div>
  <div class="newContent">
    <%= form_for @inquiry, :url => inquiry_confirm_path do |f| %>
      <% if @inquiry.errors.any? %>
        <div class="alert alert-danger" role="alert">
          <strong>入力内容にエラーがあります</strong>
          <ul>
            <% @inquiry.errors.each do |attr, msg| %>
              <li><%= msg %></li>
            <% end %>
          </ul>
        </div>
      <% end %>
      <div class="row">
        <div class="col-sm-4">名前<span class="text-danger">(必須)</span></div>
        <div class="col-sm-8"><%= f.text_field :name, class: 'form-control mb-2' %></div>
        <div class="col-sm-4">メールアドレス<span class="text-danger">(必須)</span></div>
        <div class="col-sm-8"><%= f.text_field :email, class: 'form-control mb-2' %></div>
        <div class="col-sm-4">お問い合わせ内容</div>
        <div class="col-sm-8"><%= f.text_area :message, class: 'form-control mb-2', rows: '6' %></div>
      </div>
      <%= f.submit '確認', class: 'btn btn-block btn-success' %>
    <% end %>
  </div>
</div>
確認ページを作成
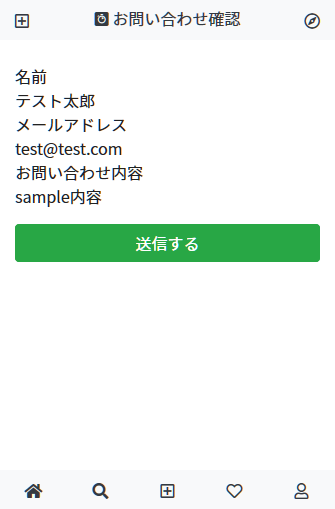
<div class="newWrap">
  <div class="newTitle">
    <h1>お問い合わせ:確認</h1>
  </div>
  <div class="newContent">
    <%= form_for @inquiry, :url => inquiry_thanks_path do |f| %>
      <div class="row">
        <div class="col-sm-4">名前</div>
        <div class="col-sm-8"><%= f.hidden_field :name %><%= @inquiry.name %></div>
        <div class="col-sm-4">メールアドレス</div>
        <div class="col-sm-8"><%= f.hidden_field :email %><%= @inquiry.email %></div>
        <div class="col-sm-4">お問い合わせ内容</div>
        <div class="col-sm-8"><%= f.hidden_field :message %><%= simple_format(@inquiry.message) %></div>
      </div>
      <%= f.submit '送信する', class: 'btn btn-block btn-success' %>
    <% end %>
  </div>
</div>
サンクスページを作成

<div class="newWrap">
  <div class="newTitle">
    <h1>お問い合わせ:送信しました</h1>
  </div>
  <div class="newContent">
    <p>お問い合わせありがとうございます。</p>
  </div>
</div>
送信テンプレートを作成 TEXT
------------------------<br>
Name: <%= @inquiry.name %><br>
Email: <%= @inquiry.email %><br>
Message: <%= @inquiry.message %><br>
-------------------------
送信テンプレートを作成 HTML
<h1>お問い合わせ内容</h1>
Name: <%= @inquiry.name %><br>
Email: <%= @inquiry.email %><br>
Message: <%= @inquiry.message %><br>
これで確認・サンクスページ付のメール送信フォームの完成。
◆参考
初心者向けRailsで画像を簡単にアップロードする方法。CarrierWaveを使う。
Ruby on Rails5でコメント付きブログを簡単に作成してデザインも一緒にする手順 初心者向けの無料講座
プログラミングで挫折しそうなら読むべき記事