はじめに
背景
ある案件でビューを40個とそれぞれにフィルタ40個、そして目標20個などを作ることになりました。でも、手作業でこれだけの量を設定するのは、面倒くさがりの僕には気の長いことに感じられました。それにまた同じようなことがあったら発狂するかもしれません。そこで効率的に作業する方法を調べたところ、「Management API」というGoogleアナリティクスのAPIを使うと良さげなことが分かりました。
問題点
しかし、ビュー関連の設定を「Management API」を使ったスクリプトによって完全に自動化しようとすることはかえって効率が悪い、ということが分かりました。なぜならば、
①各設定値を送るために作るJSONデータの構造が各設定項目・設定値で変わる
②このような多数のビュー設定をすることは滅多にない
そのため、手間をかけてJSON生成→APIメソッド実行→レスポンスデータのハンドリングの処理をスクリプトで自動化しても、得るものが少ないという結論に至りました(コード書きたかったのでちょっと残念...笑)
最終的な設定方法
したがってちょっと中途半端ですが、最終的には半手動でJSONを作ってAPIコールを行ったり、設定対象が少ない設定項目についてはむしろ通常通りアナリティクスの管理画面で設定することにしました。
すべきこと
各設定項目を下の図の親子関係に沿って作る。
(アカウントやプロパティは既に作ってあるものとする。)

| 設定内容 | 必要なキー情報 |
|---|---|
| ビュー | アカウントID,プロパティID |
| 目標 | アカウントID,プロパティID,ビューID |
| フィルタ | アカウントID |
| ビュー・フィルタの紐づけ | アカウントID,プロパティID,ビューID |
設定方法の概要
(ここに記載された設定のIDなどはすべて架空か削除済みです)
設定の流れ
-
設計
各設定内容を定義してシートにまとめる。 -
データ準備
各設定内容をJSON形式で表現する。
※Management APIコールで送るデータをJSON形式で準備する。 -
API認証
Management APIの認証をする。 -
APIコール
[2]の内容を送信する。
※APIコールのレスポンスのHTTPステータス=200ならば登録成功。
設定方法の種類
以下どちらの方法でも設定できる。
※ 「問題点」にも書いたとおり、スクリプトで設定を自動化する方法はかえって面倒なので、各APIメソッドを手動実行する方法で設定しました。
Management APIの前提
- ドキュメント
- オブジェクト
| 論理名 | 物理名 |
|---|---|
| アカウントID | accountId |
| プロパティID | webPropertyId |
| ビューID | profileId |
| フィルタID | filterRef.id(ビュー・フィルタをリンクするとき) |
- APIコール
詳しくはAPI リファレンスを参照。「フィルタ: insert」など、各オブジェクトで主にget,insertメソッドを使う。
| 名称 | 内容 |
|---|---|
| get | Google Analyticsのデータを取得したい場合に使うメソッド |
| insert | Google Analyticsのデータを登録したい場合に使うメソッド |
| Request | サーバーに送信するデータ |
| Request(getメソッド時に指定) | 取得するデータの条件 |
| Request(insertメソッド時に指定) | 登録するデータの内容 |
| Response | Requestの実行結果 |
| Response(getメソッド時に指定) | 取得できたデータ |
| Response(insertメソッド時に指定) | 登録できたデータ(データのIDなどを取得可能) |
各APIメソッドを手動実行する方法
API リファレンス - Management APIの"Try this API"というページ内の機能でAPIを手動実行できる。

1. 設計
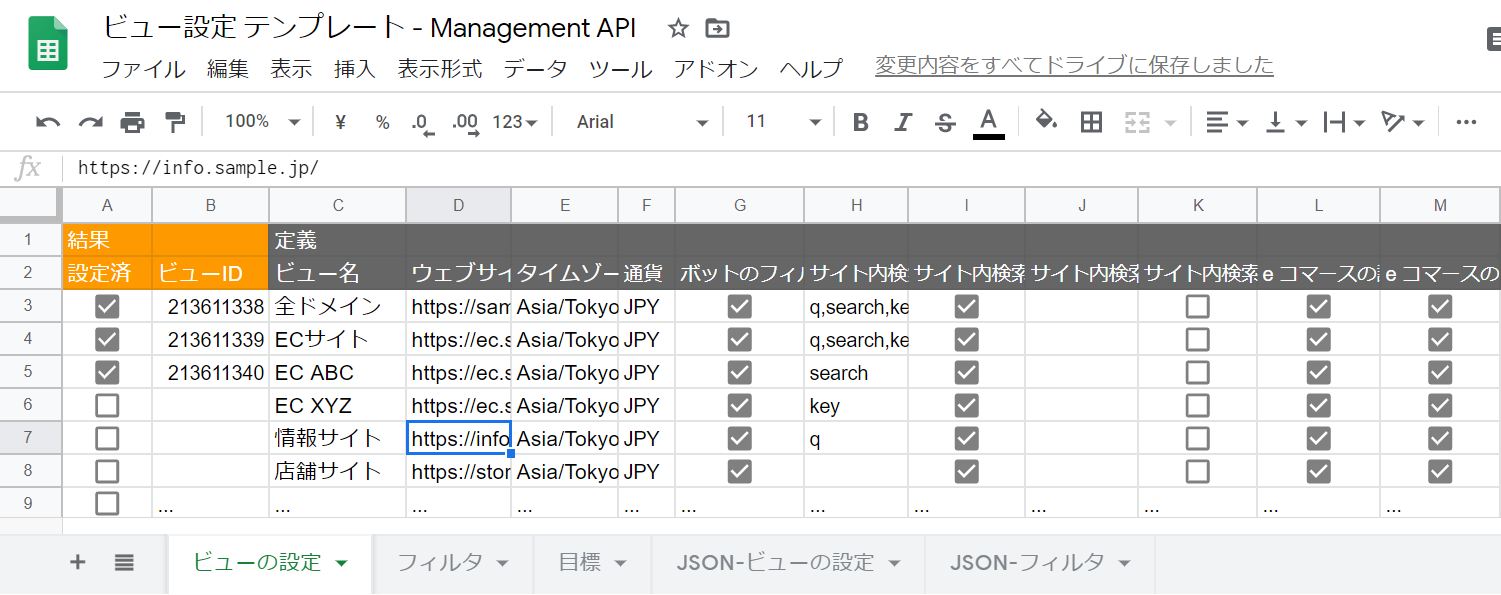
各設定内容を定義してシートにまとめる(サンプル)
- 定義書「ビューの設定」
- 定義書「フィルタ」

2. データ準備
各設定内容をJSON形式で表現する(Management APIコールで送るデータ)
※各JSONに使う値は定義シートから動的に取得するようにする(サンプル)。
- 送信データ「JSON-ビューの設定」

{
    "name": "全ドメイン",
    "websiteUrl": "https://sample.jp",
    "timezone": "Asia/Tokyo",
    "currency": "JPY",
    "botFilteringEnabled": true,
    "siteSearchQueryParameters": "q,search,key",
    "stripSiteSearchQueryParameters": true,
    "stripSiteSearchCategoryParameters": false,
    "eCommerceTracking": true,
    "enhancedECommerceTracking": true
}
- 送信データ「JSON-フィルタ」
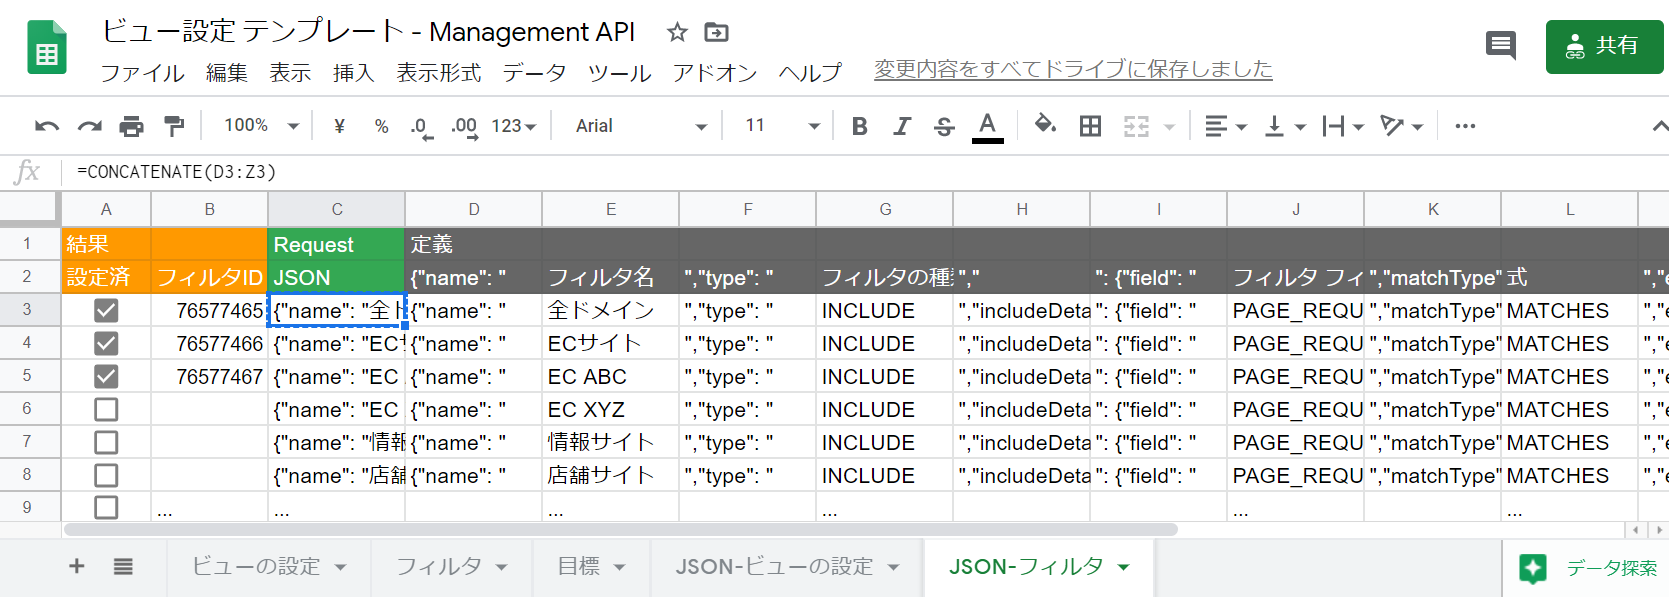
{
    "name": "全ドメイン",
    "type": "INCLUDE",
    "includeDetails": {
        "field": "PAGE_REQUEST_URI",
        "matchType": "MATCHES",
        "expressionValue": "https://sample.jp",
        "caseSensitive": false
    }
}
3. API認証
Management APIの認証をする。
手動の場合は各メソッドの初回実行時には認証画面が立ち上がるのでGoogleアカウントを選択する。

4. APIコール
[2]の内容をリクエストする(APIコールのレスポンスのHTTPステータス=200ならば登録成功)
- 送信データ「JSON-ビューの設定」
{
  "id": "213613741",
  "kind": "analytics#profile",
  "selfLink": "https://www.googleapis.com/analytics/v3/management/accounts/137429915/webproperties/UA-137429915-1/profiles/213613741",
  "accountId": "137429915",
  "webPropertyId": "UA-137429915-1",
  "internalWebPropertyId": "197891938",
  "name": "全ドメイン",
  "currency": "JPY",
  "timezone": "Asia/Tokyo",
  "websiteUrl": "https://sample.jp",
  "siteSearchQueryParameters": "q,search,key",
  "stripSiteSearchQueryParameters": true,
  "type": "WEB",
  "permissions": {
    "effective": [
      "COLLABORATE",
      "EDIT",
      "MANAGE_USERS",
      "READ_AND_ANALYZE"
    ]
  },
  "created": "2020-03-15T15:41:59.456Z",
  "updated": "2020-03-15T15:41:59.456Z",
  "eCommerceTracking": true,
  "botFilteringEnabled": true,
  "parentLink": {
    "type": "analytics#webproperty",
    "href": "https://www.googleapis.com/analytics/v3/management/accounts/137429915/webproperties/UA-137429915-1"
  },
  "childLink": {
    "type": "analytics#goals",
    "href": "https://www.googleapis.com/analytics/v3/management/accounts/137429915/webproperties/UA-137429915-1/profiles/213613741/goals"
  }
}
- 送信データ「JSON-フィルタ」
{
  "id": "80726173",
  "kind": "analytics#filter",
  "selfLink": "https://www.googleapis.com/analytics/v3/management/accounts/137429915/filters/80726173",
  "accountId": "137429915",
  "name": "全ドメイン",
  "type": "INCLUDE",
  "created": "2020-03-15T15:49:33.823Z",
  "updated": "2020-03-15T15:49:33.823Z",
  "parentLink": {
    "type": "analytics#account",
    "href": "https://www.googleapis.com/analytics/v3/management/accounts/137429915"
  },
  "includeDetails": {
    "kind": "analytics#filterExpression",
    "field": "PAGE_REQUEST_URI",
    "matchType": "MATCHES",
    "expressionValue": "https://sample.jp",
    "caseSensitive": false
  }
}
5. 各設定項目の紐づけ、未設定項目の作成など
下記設定項目はむしろ手動のほうが早そうだったのでちょっと中途半端だけど管理画面から手動で設定しました。
-
ビューへフィルタを紐づける
1つのビューへ複数のフィルタを紐づけることができれば良かったのですが、このページ機能の仕様上、「1つのビューへ1つのフィルタ」というJSONを一回一回実行していくしかありませんでした。一方、アナリティクスの管理画面で1つのビューへ複数のフィルタをまとめて紐づけ可能です。そのため、管理画面で設定しました。 -
目標を作る
目標は各フィルタごとに20個作るのではなく、全作業で20個作ればよかったので目標の種類(各URLやイベント)ごとにJSONデータを準備するほうが手間に感じられました。
各APIメソッドをスクリプトで実行する方法
※実際には手動で設定したし今後もスクリプトで設定する予定はないので完全に蛇足な記載ですが、趣味の一環でメモしておきます。
1. 設計
各設定内容を定義してシートにまとめる
※「各APIメソッドを手動実行する方法≫設計」と同じ。
2. データ準備
各設定内容をJSON形式で表現する(Management APIコールで送るデータ)。
※記事「スプレッドシートをJSON形式に出力する方法」と同じ要領で、シートから設計したデータをJSONで出力する。
3. API認証
Management APIの認証をする
###3-1. 「サービスアカウント」のJSONキーを発行・取得する (環境の初期設定)
サービスアカウントページから、プロジェクトの選択≫サービスアカウントの選択≫鍵の生成 をする。

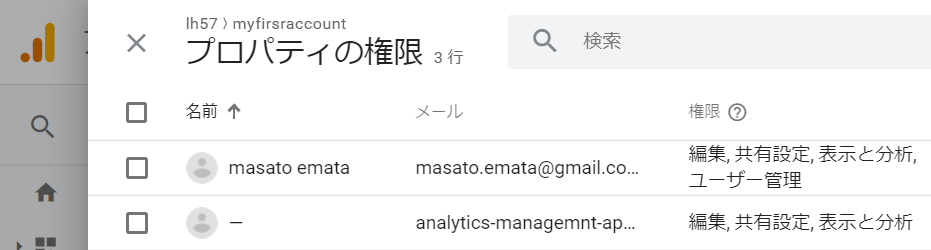
3-2. Googleアナリティクスで管理者権限をサービスアカウントに付与する (環境の初期設定)
4. APIコール
[2.データ準備]の内容をリクエストする(APIコールのレスポンスのHTTPステータス=200ならば登録成功)
###4-1. Googleクライアントライブラリをインストール (環境の初期設定)
pip install --upgrade google-api-python-client
4-2. APIクライアント(ライブラリ)の認証・読込
- まずは「Python クイックスタート」サンプルコードを書き変えて、APIクライアントの認証・読込の部分を流用する。そのために必要最小限な処理のみ行われるようなコードに削る。
- 取得したJSONキーファイルを任意のディレクトリに置き、サンプルコードでそのパスを指定する
#サンプルコードを必要最低限にする
"""A simple example of how to access the Google Analytics API."""

from apiclient.discovery import build
from oauth2client.service_account import ServiceAccountCredentials

def get_service(api_name, api_version, scopes, key_file_location):
    """Get a service that communicates to a Google API.

    Args:
        api_name: The name of the api to connect to.
        api_version: The api version to connect to.
        scopes: A list auth scopes to authorize for the application.
        key_file_location: The path to a valid service account JSON key file.

    Returns:
        A service that is connected to the specified API.
    """

    credentials = ServiceAccountCredentials.from_json_keyfile_name(
            key_file_location, scopes=scopes)

    # Build the service object.
    service = build(api_name, api_version, credentials=credentials)

    return service

def get_first_profile_id(service):
    # Use the Analytics service object to get the first profile id.

    # Get a list of all Google Analytics accounts for this user
    accounts = service.management().accounts().list().execute()

    if accounts.get('items'):
        # Get the first Google Analytics account.
        account = accounts.get('items')[0].get('id')

        # Get a list of all the properties for the first account.
        properties = service.management().webproperties().list(
                accountId=account).execute()

        if properties.get('items'):
            # Get the first property id.
            property = properties.get('items')[0].get('id')

            # Get a list of all views (profiles) for the first property.
            profiles = service.management().profiles().list(
                    accountId=account,
                    webPropertyId=property).execute()

            if profiles.get('items'):
                # return the first view (profile) id.
                return profiles.get('items')[0].get('id')

    return None

#<削除>
#def get_results(service, profile_id):
#    # Use the Analytics Service Object to query the Core Reporting API
#    # for the number of sessions within the past seven days.
#    return service.data().ga().get(
#            ids='ga:' + profile_id,
#            start_date='7daysAgo',
#            end_date='today',
#            metrics='ga:sessions').execute()

#<削除>
#def print_results(results):
#    # Print data nicely for the user.
#    if results:
#        print 'View (Profile):', results.get('profileInfo').get('profileName')
#        print 'Total Sessions:', results.get('rows')[0][0]
#
#    else:
#        print 'No results found'

def main():
    # Define the auth scopes to request.
    scope = 'https://www.googleapis.com/auth/analytics.readonly'
#<修正> 鍵を置いたディレクトリパス/鍵ファイル名を指定する
    key_file_location = 'myfirsraccount-329f2bcc6773.json'

    # Authenticate and construct service.
    service = get_service(
            api_name='analytics',
            api_version='v3',
            scopes=[scope],
            key_file_location=key_file_location)

#<削除>
#    profile_id = get_first_profile_id(service)
#    print_results(get_results(service, profile_id))
#<追加>
    print(get_first_profile_id(service))

if __name__ == '__main__':
    main()
4-3. APIメソッドを任意のものに変更する
先ほどのサンプルコードによりAPIクライアント認証・読込までできるようになった。次は任意のAPIメソッド読込を実行する。
- メソッドがアカウント一覧の取得「アカウント: list」になっているので、メソッド実行部分をビューの取得「ビュー(旧プロファイル): get」のサンプルコードに変更する(
def get_first_profile_id():をそのまま書き変える)。
"""A simple example of how to access the Google Analytics API."""

from apiclient.discovery import build
from oauth2client.service_account import ServiceAccountCredentials


def get_service(api_name, api_version, scopes, key_file_location):
    """Get a service that communicates to a Google API.

    Args:
        api_name: The name of the api to connect to.
        api_version: The api version to connect to.
        scopes: A list auth scopes to authorize for the application.
        key_file_location: The path to a valid service account JSON key file.

    Returns:
        A service that is connected to the specified API.
    """

    credentials = ServiceAccountCredentials.from_json_keyfile_name(
            key_file_location, scopes=scopes)

    # Build the service object.
    service = build(api_name, api_version, credentials=credentials)

    return service

def getViews(analytics):
    # Note: This code assumes you have an authorized Analytics service object.
    # See the View (Profile) Developer Guide for details.

    # This request gets an existing view (profile).
    try:
        profile = analytics.management().profiles().get(
            accountId='137429915',
            webPropertyId='UA-137429915-1',
            profileId='192634958').execute()

    except TypeError:#, error:
        # Handle errors in constructing a query.
        print ('There was an error in constructing your query : %s' % error)

#    except HttpError:#, error:
#        # Handle API errors.
#        print ('There was an API error : %s : %s' %
#            (error.resp.status, error.resp.reason))
#
    return profile

def main():
#    # Define the auth scopes to request.
    scope = 'https://www.googleapis.com/auth/analytics.readonly'
    key_file_location = 'myfirsraccount-329f2bcc6773.json'

#    # Authenticate and construct service.
    service = get_service(
            api_name='analytics',
            api_version='v3',
            scopes=[scope],
            key_file_location=key_file_location)

    print(getViews(service))


if __name__ == '__main__':
    main()
4-4. APIコールのレスポンスをもとに次のAPIコールを行う
(例:ビューとフィルタを作って紐づける)
| ステップ | 使う情報 | 処理の内容 |
|---|---|---|
| 1 | ビュー情報の定義一覧 | アカウントID,プロパティIDを指定して各ビューを作る |
| 2 | [1]のレスポンスボディのビューID・ビュー名 | 左記を取得する |
| 3 | フィルタ情報の定義一覧 | アカウントIDを指定して各フィルタを作る |
| 4 | [3]のレスポンスボディのフィルタID・フィルタ名 | 左記を取得する |
| 5 | ビュー・フィルタの対応表 | 対応表のビュー名・フィルタ名をもとに[2][4]のビューID・フィルタIDを指定して紐づける |
何かあればお手数ですが、本記事か以下アカウントでお知らせください!
\ Follow Me! /
Qiitaアカウント
Twitterアカウント