この記事は、資産管理製品「Tanium」についてです。
TaniumのComplyというモジュールを使うと、拠点内に脆弱性を保有している端末がないかをスキャンすることができます。この記事ではスキャン設定について手順を記載します。
コンソールの画面キャプチャを載せていますが、変わる可能性が大いにあります。
キャプチャは2025/12/1 時点です。
1.モジュールアイコンから、[Comply]>[Assesments]をクリック。

2.右端の[Create Assesments]をクリックし、[Vulnerability]を選択します。
※別に、矢印を律儀にクリックしなくても選択肢は表示されました。

3.アセスメントを定義していきます。
3-1. 「Summary」項目の設定を行います。

ここでの入力項目は、
・アセスメントの名前
・スキャン方法
Client-Based Scan
→端末自身でスキャンを行う。結果がTaniumサーバへ収集される。
その他のメソッドの説明は下記をご参考ください。
Client-Based: Client-based scanning uses Tanium Clients installed on endpoints. This is the recommended method of scanning. (The following instructions are for this scan method.)
Remote Authenticated: Remote authenticated scanning uses Tanium Clients as satellites to scan endpoints that do not have the Tanium Client installed. This scan type is useful for obtaining information from endpoints that do not support having the Tanium Client installed. For more information, see Configure a remote authenticated scan assessment.
Network unauthenticated: Find vulnerabilities on unmanaged endpoints in your environment using Tanium Clients as satellites to scan endpoints that do not have the Tanium Client installed and cannot be authenticated to. You can also do distributed scans using the Discover module. For more information, see Configure a network unauthenticated scan assessment.
SBOM (Software Bill of Materials): (requires a Tanium SBOM license) An SBOM vulnerability scan has visibility into libraries and all files that are known to Software Manager. The results of an SBOM assessment analysis are mapped to CVEs on the endpoint. For more information, see Configure an SBOM scan assessment.
Container Registries: Container registry scanning is useful for determining vulnerabilities in images within the registry based on the results of a Software Bill of Materials assessment. Tanium SBOM and Tanium Cloud Workloads are required. For more information, see Configure a container registry scan assessment.
引用元:
https://help.tanium.com/bundle/ug_comply_cloud/page/comply/vulnerability_assessment.html
・アセスメントのラベル(任意)
タグみたいなイメージ?

複数選べます(対象OSの設定ではないです。それはこの後に出てきます)

次に進みます。
3-2. 「Targeting」項目の設定を行います。

ここでの入力項目は、
・対象のコンピュータグループ(予め作成しておく必要があります)
・プラットフォーム(OSを選択します)
・スキャンエンジン
・Complyスキャンの実行優先度(デフォルトはLow)
・ネットワークドライブのスキャン有無
「Low」を選ぶとリソース高負荷への回避には効果的ですが、実行時間が長くなる可能性があります。
さらに次に進みます。
3-3. 「Vulnerability Content」項目の設定を行います。
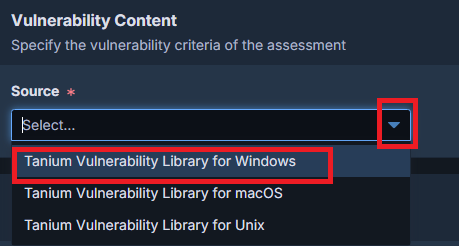

ここでの入力項目は、
・Assessmentのソース(Windows/Linux/MacOSから選択)
・OS名(選択式。1つしか選べません!なのでアセスメントはOS分作る必要があります)
・CVE定義
下記を参考ください。
Standard Resource CVEs – Select this option to include only standard resource CVEs in the assessment. This would exclude from scans CVEs that use OVAL definitions known to impact endpoint performance and reduce overall vulnerability scan coverage.
Click View excluded high resource CVEs in the informational notice to go to the CVE List page where you can filter to view high resource CVEs.
High Resource CVEs – Select this option to include only CVEs that use OVAL definitions known to impact endpoint performance. Scanning for these CVEs can result in higher levels of resource consumption, which may have a negative impact on the endpoint. In most cases, you would select this option for an assessment to run on a controlled schedule based on endpoint resource availability. Click View high resource CVEs in the informational notice to go to the CVE List page where you can filter to view high resource CVEs.
Both Standard and High Resource CVEs - Select this option to scan for all CVE definitions types regardless of resource consumption. Click View high resource CVEs in the informational notice to go to the CVE List page where you can filter to view high resource CVEs. - Select this option to scan for all CVE definitions types regardless of resource consumption. Click View high resource CVEs in the informational notice to go to the CVE List page where you can filter to view high resource CVEs.
引用元:
https://help.tanium.com/bundle/ug_comply_cloud/page/comply/vulnerability_assessment.html
3-4. 「CVEs」項目の設定を行います。

ここでの入力項目は、
・評価対象とする、CVE発行年を入力(カンマ区切りで複数可能)
・CVSSの対象Severityを選択
・スキャンに含めたい個別のCVE番号がある場合は入力
・スキャンに含めたくない、個別のCVE番号がある場合は入力
次で最後です。
3-5. 「Schedule」項目の設定を行います。
End Onを指定しない場合は、恒久的に動作します。
もしスケジュールした実行時間にPCがオフラインの場合は、次にオンラインになった時点でスキャンが実行されます。この設定時間は端末側のローカル時間です。

[Create & Deploy]をクリックします。