こんにちはっ🌟八ツ橋まろんです
今回はUnityのHDRPで透過のスクリーンショットを撮る方法とスクリプトを紹介していきます。HDRPでより綺麗な立ち絵を撮りたいVtuberなどに有効です(超限定的)
※以前『UnityのGame画面をスクショするスクリプト』を紹介しましたが、Unityのバージョンによっては再生中でないと使えないことがあったので、今回は再生中でなくとも使えるように改良しています。よってスクリプトは上記記事の上位互換です。(スクリプトはHDRPでなくとも使えます)
HDRPって何?って方はこの単語で検索してみてください。たくさんの方が記事を書いてくださっています。乱暴に説明すると、
『高品質なライティングができる、より美しいUnity』
です。
ただし、
『PCの負荷が増えます、つよつよPCを使いましょう』
『従来のshaderはほとんどが使えません。HDRP専用のshaderが用意されているので、それを使う必要があります』
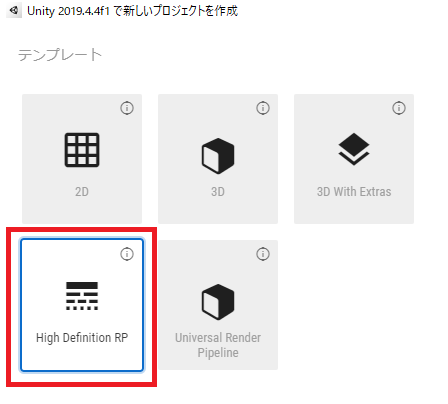
HDRPはUnityHubでプロジェクトを作成する際にここ↓↓↓↓を選択することで使用可能です
HDRP環境の基本的な構築はこの記事では解説しませんので、基礎的な部分は他の記事を参照してください。
環境
Windows10
Unity 2019.4.4f
HDRP 7.3.1
必要な設定
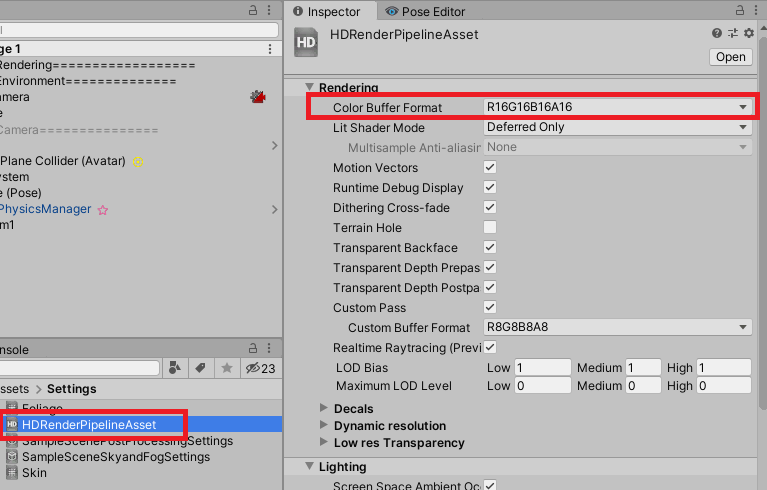
・HDRPで透過背景を扱うには、HDRenderPipelineAssetのColor Buffer Formatを R16G16B16A16にする必要があります(デフォルトではR11G11B10となっていてA成分が無い)
・Volumeの設定のうち、BloomとVignetteを使っている場合はオフにしておきましょう(どちらも画面全体に適用されるエフェクトなので、透過画像全体に効果が残るため)
・Volumeの設定のうち、Fogを使っている場合はオフにしておきましょう(透過せず背景として映り込んでしまうため)
・Cameraの設定のうち、Background TypeはColorにしておきましょう(Skyだと透過せず背景として映り込んでしまうため)
撮影方法
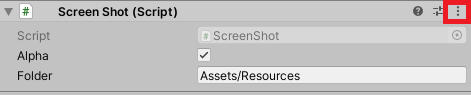
・以下のスクリプトを空のGameObjectにアタッチし、コンポーネントの右上のアイコンを開いてScreenShotを選択するとGame画面に映っている画面が透過pngとしてResourcesフォルダに保存されます。(Game画面が見えない状態では保存されません)
using System;
using System.Collections;
using System.IO;
using UnityEngine;
using UnityEngine.UI;
# if UNITY_EDITOR
using UnityEditor;
# endif

public class ScreenShot : MonoBehaviour
{
    public bool Alpha = true;
    public string Folder = "Assets/Resources";

    IEnumerator CaptureWithAlpha()
    {
        yield return new WaitForEndOfFrame();

        var rtex = new RenderTexture(Screen.width, Screen.height, 0, RenderTextureFormat.ARGBFloat, RenderTextureReadWrite.Default);
        //var tex = ScreenCapture.CaptureScreenshotAsTexture();
        ScreenCapture.CaptureScreenshotIntoRenderTexture(rtex);

        var width = rtex.width;
        var height = rtex.height;
        var texNoAlpha = new Texture2D(width, height, TextureFormat.RGB24, false);
        var texAlpha = new Texture2D(width, height, TextureFormat.ARGB32, false);

        if (Alpha)
        {
            // Read screen contents into the texture
            texAlpha.ReadPixels(new Rect(0, 0, width, height), 0, 0);
            texAlpha.Apply();
        }
        else
        {
            // Read screen contents into the texture
            texNoAlpha.ReadPixels(new Rect(0, 0, width, height), 0, 0);
            texNoAlpha.Apply();
        }

# if UNITY_EDITOR
        SafeCreateDirectory(Folder);
# endif
        // Encode texture into PNG
        var bytes = texAlpha.EncodeToPNG();
        if (!Alpha)
        {
             bytes = texNoAlpha.EncodeToPNG();
        }
        DestroyImmediate(rtex);
        File.WriteAllBytes(Folder + "/" + DateTime.Now.ToString("yyyy-MM-dd_HH-mm-ss") + ".png", bytes);
        AssetDatabase.Refresh();
    }
    public static DirectoryInfo SafeCreateDirectory(string path)
    {
        return Directory.Exists(path) ? null : Directory.CreateDirectory(path);
    }
    [ContextMenu("Screenshot")]
    public void Screenshot()
    {
        StartCoroutine(CaptureWithAlpha());
    }
}
以下、補足です。
・InspectorのAlphaのチェックを外すと透過なしのpngになります
・pngの解像度はGame画面の画面設定と同じになります
・Resourcesフォルダが無い場合は自動で作成されます
・保存フォルダを変えたい場合はInspectorのFolderを適当に変えてください
以上になります。快適なHDRPライフを~🌟
八ツ橋まろん