1. 概要
今回はvuexでのデータ管理とvuex-persistedstateを使ったフロントエンドでのデータ永続化について説明します。 vuex-persistedstateを使うとデータはブラウザのlocalStorageを使って永続化されブラウザのリロード時もフォームの入力結果などを保持してくれるようになります。
また、デバックしやすいようにChromeのVueプラグインの事前インストールを推奨しています。
2. 前提条件
Railsにvueをインストールのチュートリアルを終了してフロントエンド開発に慣れておきましょう。
3. インストール
yarn add vuex vuex-persistedstate
4. コーディング
Vue.jsのチュートリアルを最初から学習した場合にstoreパターンを利用してアプリケーション内でデータストアの一意性を保持するようにという概念について学ぶのですが、こちらはデザインパターンの話であり実際にはvuexというデータストアライブラリを使って開発する事をお勧めします。
まず、store.jsというファイルを作成して下記のライブラリをimportします。
4.1 データストアの作成とVueインスタンスへの登録
import Vue from 'vue'
import Vuex from 'vuex'
Vue.use(Vuex)
js内でVueコンポーネントを生成する際にstoreに読み込んだVuex.StoreをVueオブジェクト生成時にstoreに指定します。こうすることで、生成されたVueインスタンスの中でthis.$storeという指定方法でstoreのデータを参照したり機能を呼び出したりする事ができるようになります。
import Vue from 'vue'
import App from '../app.vue'
import store from './store.js'

document.addEventListener('DOMContentLoaded', () => {
  new Vue({
    el: '#app',
    store: store,
    router,
    render: (h) => h(App)
  })
})
store.jsに機能を追加していきます。
export default new Vuex.Store({
  state: {
    count: 0
  },
  getters: {
    getCounter: function(state){
      return state.count
    }
  },
  mutations: {
    increment (state) {
      console.log("mutations > increment is called")
      state.count++
    },
    assign: function(state, args){
      console.log("mutations > assign is called")
      state.count = args.amount
    }
  },
  actions: {
    increment (context) {
      console.log("action > increment is called")
      console.log(context)
      context.commit('increment')
    },
    assignValue(context,arg1) {
      console.log("assignValue")
      console.log(arg1.amount)
      console.log(context)
      context.commit({
        type: 'assign',
        amount: arg1.amount
      })
    }
  }
})
new Vuex.Store()に記載するオプションについては、
Vuex.Store コンストラクタオプションに全てのオプションが記載されています。今回は代表的な機能について確認します。
-
State
データを格納しておく箱です。Vuexインスタンス作成時に指定します。 -
Getter
stateに格納したデータを取り出すメソッドを定義していきます。Vuex.Store インスタンスプロパティを参照しましょう。 -
Mutation
storeのデータを操作するロジックを定義していきます。 -
Action
mutationで定義したメソッドを利用して変更をコミットするロジックを定義していきます。
上記のサンプルでは、stateにcounterという変数を定義して、mutationsのincrementメソッドで値を変更、actionsのincrementメソッドで実際のデータをコミットしています。
4.2 データストアの呼び出し
アクションのincrementを呼び出します。
vuexインスタンスメソッドというのが定義されておりstoreインスタンスから呼び出しが可能になっています。よく使う2つのメソッドについて紹介します。
action経由での呼び出し
store.dispatch('increment')
mutationのincrementメソッド直接呼び出し
store.commit({
  type: 'increment',
  amount: 10
})
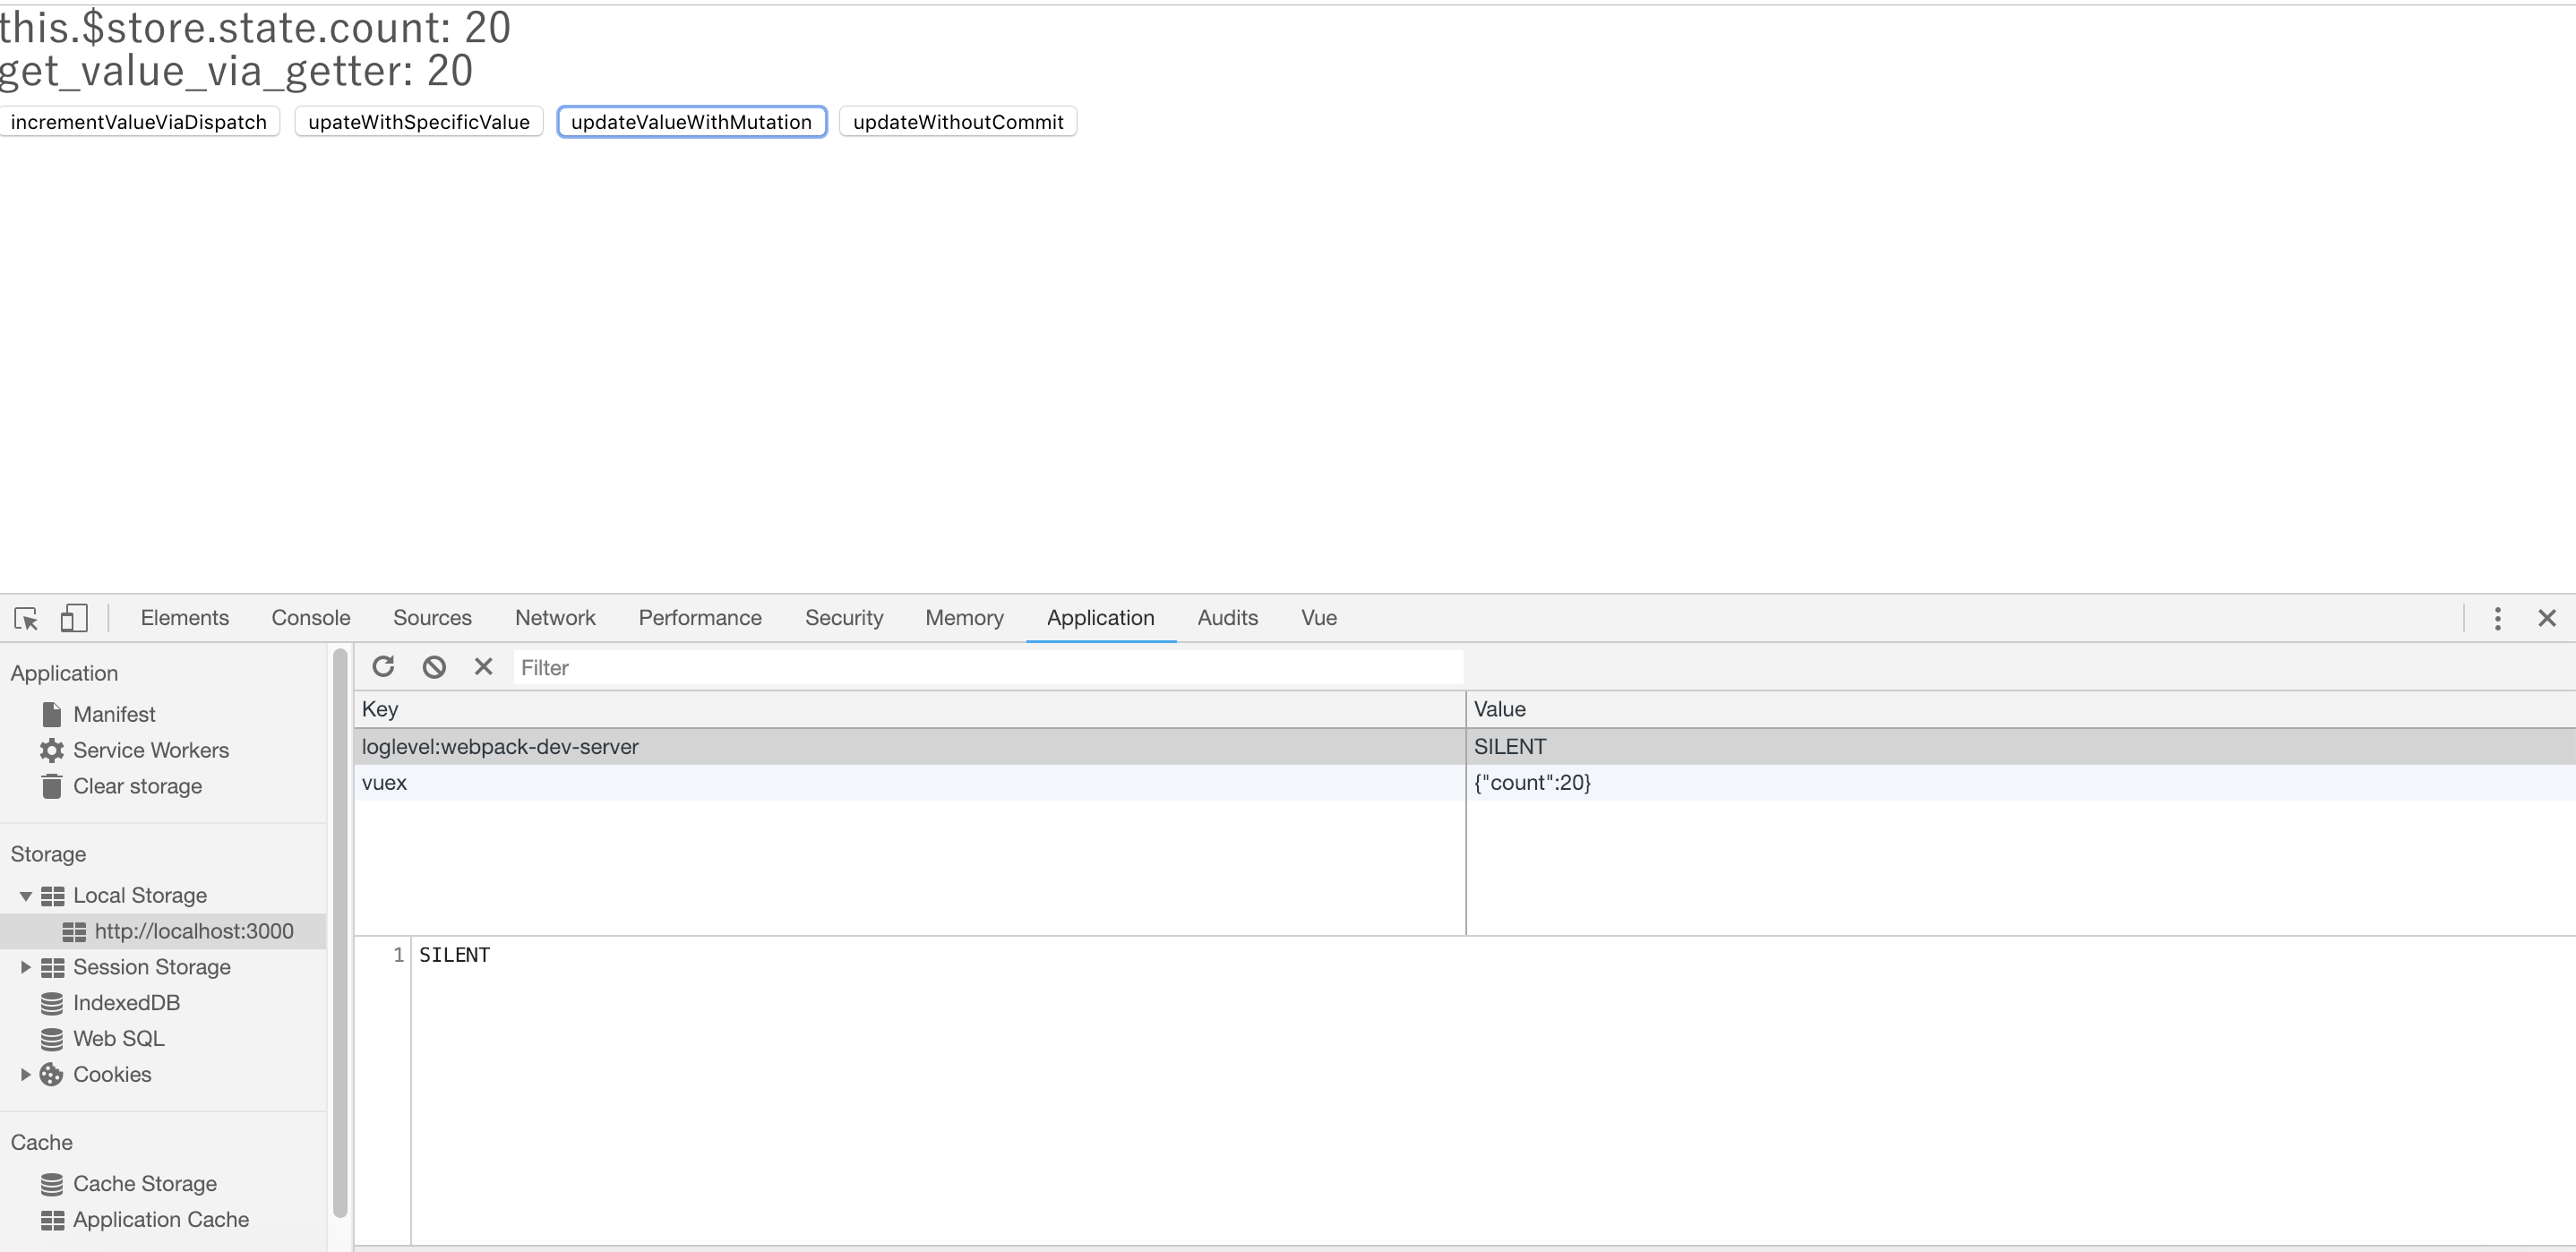
stateのcounterの値を直接書き換える事はできるのですがstore.commitをするまで変更は適用されません。Vueインスペクタを開いて下記のサンプルを実行して、値の変化を確認しながらボタンを押してみましょう。一番右の「updateWithoutCommit」では画面の値が更新されているにも関わらず、Vuexのモニターの中身がコミットされていない事が分かります。
<template>
  <div>
    <div>
      this.$store.state.count: {{get_value_directory}}<br>
    </div>
    <div>
      get_value_via_getter: {{get_value_via_getter}}<br>
    </div>
    <button v-on:click="incrementValueViaDispatch">incrementValueViaDispatch</button>
    <button v-on:click="upateWithSpecificValue">upateWithSpecificValue</button>
    <button v-on:click="updateValueWithMutation">updateValueWithMutation</button>
    <button v-on:click="updateWithoutCommit">updateWithoutCommit</button>
  </div>
</template>
<script>
  export default {
    name: 'page_test',
    props: {

    },
    components: {

    },
    data: function () {
      return {
        isActive: false
      }
    },
    mounted: function (event) {
    },
    computed: {
      get_value_directory: function() {
        return this.$store.state.count
      },
      get_value_via_getter: function() {
        return this.$store.getters.getCounter
      }
    },
    methods: {
      incrementValueViaDispatch: function(){
        this.$store.dispatch('increment')
      },
      upateWithSpecificValue: function(){
        this.$store.dispatch({
          type: 'assignValue',
          amount: 10
        })
      },
      updateValueWithMutation: function(){
        this.$store.commit({
          type: 'assign',
          amount: 20
        })
      },
      updateWithoutCommit(){
        this.$store.state.count = 100
      }
    }
  }
</script>
<style scoped lang="scss">

</style>
4.3 データの永続化
データの永続化をするにあたってcreatePersistedStateをpluginsオブジェクトに追加する事でlocalStorageを利用したデータの永続化が実現できます。storeオブジェクト生成時にpluginsの値を指定します。
import createPersistedState from "vuex-persistedstate";

export default new Vuex.Store({
  plugins: [createPersistedState()]
})

インスペクタでlocalStorageの中身を参照するとvuexというキーでstoreのstateのオブジェクトがリアルタイムに保存されていく状態が確認できます。
* IE対応
今回、IEに対応するという特別な要件がありましたが、こちらwebpackを使っている場合には一行でサクッと解決です。
Babelを使ってhtml/sass/jsなどをコンパイルしていると開発者自身がIE対応のタグかどうかを意識してコードを書くことは難しいのですが、babel-polyfillというライブラリを追加する事で一瞬で解決してしまいます。ブラウザごとの書き分けなどはpolyfillにお任せして綺麗なES6記法のコードを書くことに集中できますね :-D
yarn add babel-polyfill
* ESLintの使い方
ES6記法に慣れないという問題もあり、ESLintの構文チェックを導入しています。
-
構文チェック
.vueファイルを解析して構文が正しいかどうかチェックします
eslint, eslint-plugin-vue, vue-eslint-parser
開発環境でしか利用しないので、--devを付与してdevDependencies以下に追加されるようにします。
gitコマンドのcommitの直前の動作で構文チェックを実行しています。
eslintの実行時に--fixオプションを付与する事で自動で修正してくれます。
yarn add --dev eslint eslint-plugin-vue vue-eslint-parser ghooks husky
作成されるpackage.jsonは下記のようになるので確認しておきましょう。
{
  "name": "***************",
  "private": true,
  "dependencies": {
    "@rails/webpacker": "https://github.com/rails/webpacker",
    "axios": "^0.18.0",
    "babel-polyfill": "^6.26.0",
    "eslint": "^5.14.0",
    "vue": "^2.5.21",
    "vue-eslint-parser": "^5.0.0",
    "vue-loader": "^15.4.2",
    "vue-router": "^3.0.2",
    "vue-template-compiler": "^2.5.21",
    "vuex": "^3.0.1",
    "vuex-persistedstate": "^2.5.4"
  },
  "devDependencies": {
    "babel-eslint": "^10.0.1",
    "eslint-plugin-vue": "^5.2.1",
    "ghooks": "^2.0.4",
    "husky": "^1.3.1",
    "webpack-dev-server": "^3.1.14"
  },
  "scripts": {
    "precommit": "./node_modules/.bin/eslint --fix app/frontend/packs/"
  }
}
gonというRailsのgemを利用してバックエンド側のデータを一部ページ内に埋め込んでいたり、こちらのグローバル変数がerror '****' is not defined no-undefというエラーになってしまいます。エラー抑止のために.eslintrc.jsの設定をします。globalsに変数チェックの有無を定義する事ができます。
.eslintignoreというファイルでチェックの除外ファイルも指定できるのでこちらの設定も覚えておくと便利です。
module.exports = {
  "extends": "vue",
  "globals": {
    "gon": true,
    "window": true
  }
};
おまけ
railsで利用するenvをvueJSフレームワーク内で設定する方法
https://github.com/rails/webpacker/blob/master/docs/env.md