VueCLIでのSPAではなくRails内でVueを一部だけ利用するという方法をご紹介します。
VueJSのGetStartedが終了していてRailsのチュートリアルも終了している人が対象です。
概要説明

通常のSPAとどう違うのかという所だけ簡単に触れておきます。
一般的なSPAはgulpやgruntを使ってHTMLを生成してAJAXでサーバーサイドアプリケーションに連携するのが普通です。
デメリットとして下記のようなものがあげられます。
✗ OAuth認証の場合には処理が複雑
✗ サーバーサイドレンダリングで利用している共通のデザインなどの使い回しが面倒
✗ 画像やその他リソースのキャッシュ対策が面倒
Railsの一部としてSPAを組み込む場合には上記のデメリットが解消する事とよりセキュアなアプリ開発が実現できます。
○ OAuthなどの認証機能はRailsのものを流用できる
○ erbの一部として表示するのでRailsで利用している共通のリソースの利用が可能
(共通のリソースとはerbファイル、画像、JS、CSS)
○ アセットパイプラインを通す事で通常Railsで利用しているリソースのキャッシュ対策ができる
1.前提条件
MAC Darwin 18.2.0
Rails 5.2.2
rbenv 1.1.1
yarn 1.12.3
rails newが済んでいる既存のプロジェクト
2.参考
https://qiita.com/cohki0305/items/582c0f5ed0750e60c951
https://github.com/rails/webpacker
3.準備
3.1 インストール
今回はRailsをしてある既存のプロジェクトにembedします。
gemfileに下記を追加してbundle installを実行しましょう。
gem 'webpacker', github: 'rails/webpacker'
yarnのインストールも行います。
brew install yarn
yarn -v
3.2 Webpacker & vueの初期化
bin/rails webpacker:install
config/webpacker.ymlが作成されます。

(※注: 画像ではconflictと表示されていますが新規プロジェクトで初めてコマンドを実行する際にはcreateと表示されます
既にwebpacker.ymlが存在する場合にはconflictと表示されますので、その場合にはバックアップを取得してもう一度createしてdiffで中身の違いを確認する事を推奨します)
bin/rails webpacker:install:vue
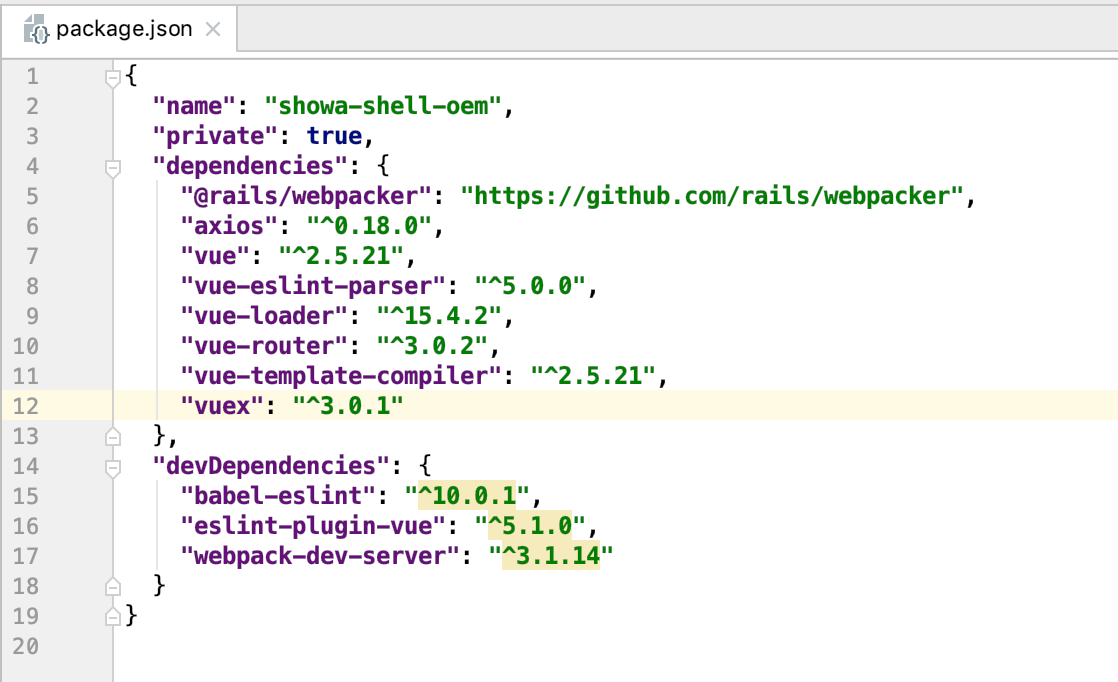
今回はRails内で一部だけSPAにしたいという要望のためにvue-routerを組み込んでいきます。
yarnで追加のライブラリを入れていきます。
yarn add axios
yarn add vue-router
yarn add vue-template-compiler
yarn add vuex
yarn add vue-eslint-parser

4. 開発作業開始
4.1 コントローラーを作成します。
bin/rails g controller Page index
4.2 Rails側に色々設定
webpackのルートディレクトリはデフォルトでapp/javascriptになります。
先程作成したコントローラにvue jsの読み込み設定をします。
<div id='app'></div>と書いてる部分にvue-routerで設定したページが入れ替わるように構成しています。
<%= javascript_pack_tag 'application' %>というタグでwebpackでコンパイルしたJSを読み込んでいます。
<%= stylesheet_pack_tag 'application' %>というタグでwebpackでコンパイルしたCSSを読み込んでいます。
asset_pack_pathというのを使うとwebpack内のアセットが読み込めます。
下記のサンプルではどのフォルダの画像を読み込むかが分かるようになっているので、コメントに従って好きな画像をディレクトリに格納してください。
<h1>
<!-- app/assets/images/cat.png -->
<img class="page_index_img_title" src="<%= image_url('cat.png') %>" />
This part is written on ERB file
<!-- app/javascript/packs/images/logo.png -->
<img class="page_index_img_title" src="<%= asset_pack_path 'packs/images/logo.png' %>" />
</h1>
<p class="page_index_p_title" class="page_index">Find me in app/views/page/index.html.erb</p>

<!-- Rendered by vue JS -->
<div id='app'></div>
<!-- // Rendered by vue JS -->
<%= javascript_pack_tag 'application' %>
<%= stylesheet_pack_tag 'application' %>
4.3 webpack-dev-serverの起動
下記コマンドでwebpack-dev-serverを起動します。
rails sをしてrailsサーバーも起動しておきましょう。
開発時はリアルタイムに変更結果が反映されるのでずっと起動しておくと便利です。
http://localhost:3000/page/index でページが閲覧できるのを確認します。
bin/webpack-dev-server
4.4 routerの設定
まずrouterの設定をしてしまいます。
Page1とPage2を作成する想定でroutingの設定をします。
それぞれのURLは下記のようになります。
http://localhost:3000/{Railsのルーティング}#{Vueのルーティング}
http://localhost:3000/page/index#/
http://localhost:3000/page/index#/page2
import VueRouter from 'vue-router';
import Page1 from './pages/page1.vue'
import Page2 from './pages/page2.vue'

const routes = [
  {path: '/', component: Page1},
  {path: '/page2', component: Page2}
  ];

export default new VueRouter({ routes });
4.5 app.vueの設定
全てのページのルートとなるファイルです。
railsでいう所のlayouts/application.html.erbと同じような働きをします。
<div id="app"></div>がerbファイルの同じタグの部分に入れ替わります。
ここでも、<router-view/>というのを設定します。
そうする事でPage1とPage2の表示切り替えが出来るようになります。
詳しくはこちらを参照してください。
<template>
  <div id="app">
    <Header msg="This is common header rendered by vue's single file components"></Header>
    <div id="nav">
    </div>
    <router-link to="/">Page1</router-link> |
    <router-link to="/page2">Page2</router-link>
    <router-view/>
    <Footer msg="This is common footer rendered by vue's single file components"></Footer>
  </div>
</template>

<script>
  import Header from './packs/components/header.vue'
  import Footer from './packs/components/footer.vue'

  export default {
    name: 'MyApp',
    props: {
      msg: String
    },
    components: {
      Header,Footer
    }
  }
</script>

<style>
  #app {
    font-family: 'Avenir', Helvetica, Arial, sans-serif;
    -webkit-font-smoothing: antialiased;
    -moz-osx-font-smoothing: grayscale;
    text-align: center;
    color: #2c3e50;
    margin-top: 60px;
  }
</style>
4.6 frontend/packs/application.jsの設定
erb側に<%= javascript_pack_tag 'application' %>を記載してあるのでその参照先のapplication.jsを作成します。
この中でVueのインスタンスを生成して、erb中のElementである'#app'にバインドします。
/* eslint no-console:0 */
// This file is automatically compiled by Webpack, along with any other files
// present in this directory. You're encouraged to place your actual application logic in
// a relevant structure within app/javascript and only use these pack files to reference
// that code so it'll be compiled.
//
// To reference this file, add <%= javascript_pack_tag 'application' %> to the appropriate
// layout file, like app/pages/layouts/application.html.erb
import 'babel-polyfill'
import Vue from 'vue'
import Vuex from 'vuex'
import App from '../app_application.vue'
import store from './store1.js'

Vue.use(Vuex)

Vue.config.productionTip = false

document.addEventListener('DOMContentLoaded', () => {
  new Vue({
    el: '#app',
    store: store,
    render: (h) => h(App)
  })
})
4.7 ページの作成
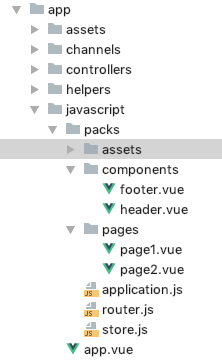
app以下のディレクトリ構成は下記の様な感じにしました。
管理しやすいように自由にディレクトリ構成を決めてもいいと思います。
その際は、config/webpacker.ymlのresolved_pathsの設定を忘れないようにしましょう。
VueJSといえば単一ファイルコンポーネントなので、今回はそれをフル活用していきたいと思います。
componentsには分割したフォームパーツなどを格納。
pagesには<router-view/>に入れ替わるページを格納します。
<template>
<div class="page1">
  <h1>{{ msg }}</h1>
  <div class="message">
  <p class="page1_message_inner">これはページ1です。</p><br>
  ここが他のページに入れ替わります。<br>
  この中はふつーのHTMLで記載できます。<br>
  スタイルシートのスコープなんてきにしなくてへいき。<br>
  </div>
  <router-link to="/page2">次のページへ</router-link>
</div>
</template>

<script>
export default {
  name: 'global_footer',
  props: {
    msg: "ページ1"
  },
  methods: {
    testAJAX(id){
      axios.get(`api/books/${id}.json`)
        .then(res => {
          this.bookInfo = res.data;
          this.bookInfoBool = true;
        });
    }
  }
}
</script>

<style scoped lang="scss">
.page1{
  .message{
    margin: 1em;
    padding: 1em;
    background: #EFEFEF;
    border: solid darkblue;
  }
}

$color-red1: #730E15;
.page1{
  &_message{
    &_inner{
      color: $color-red1;
    }
  }
}
</style>
<template>
<div class="footer">
  <h1>{{ msg }}</h1>
  <div class="message">
    <h3>app/javascript/packs/assetsのロゴ</h3>
    <img class="img" src="../assets/logo.png" /><br>
    これはページ2です。<br>
    <h3>app/assets/images/のねこ</h3>
    <div class="cat_image" /><br>
    この中にスタイルをまとめて書いてね<br>
  </div>
  <router-link to="/">前のページへ</router-link>
</div>
</template>

<script>
  export default {
  name: 'global_footer',
  props: {
    msg: "ページ1"
  }
}
</script>

<style scoped lang="scss">
.footer{
  background: aliceblue;
}
.message{
  margin: 0.2em;
  margin: 1em;
  padding: 1em;
  background: #EFEFEF;
  border: solid darkred;
}
img{
  background-image: image-url('/cat.png');
}
</style>
<template>
<div class="header">
  <h1>{{ msg }}</h1>
</div>
</template>

<script>
export default {
  name: 'global_header',
  props: {
    msg: String
  }
}
</script>

<style scoped>
# header{
  background: aliceblue;
}
</style>
<template>
<div class="footer">
  <h1>{{ msg }}</h1>
</div>
</template>

<script>
export default {
  name: 'global_footer',
  props: {
    msg: String
  }
}
</script>

<style scoped>
# header{
  background: aliceblue;
}
</style>
4.7 ページの確認
5.本番へのデプロイ準備
このまま本番デプロイすると失敗してしまうのでプリコンパイルを事前に試してみて修正すべきコードがない事を確認します。
RAILS_ENV=production bundle exec rails assets:precompile
config/environments/production.rb内に
config.public_file_server.enabledという設定があるのですがこちらに値がはいっていないとpublic以下に吐き出されたcssやjsが見えないという事になります。なので環境変数にRAILS_SERVE_STATIC_FILESを設定してからサーバーを起動します。初めて起動する時はcredentialsの作成を促されるのでその際はメッセージに従ってcredentials.yml.encを作成してください。
export RAILS_SERVE_STATIC_FILES=true
bundle exec rails s -e production


