この記事は以下の記事を参考にさせて頂き、最新のバージョンに対応しました。
https://qiita.com/G-awa/items/a5b2cc7017b1eceeb002
https://qiita.com/otanu/items/2c522a652e5843a5e2c5
モダンフロントエンド技術の重要性
本チュートリアルはモダンフロントエンド技術概論を語る一貫として用意しました。
(これについての記事も後日ちゃんと書こうと思います。)
高速プロトタイピング
アイデアを最速でカタチにするために高速プロトタイピングのスキルセットが必要です。
そのためには、効率的なアーキテクチャと、テンプレートが必要です。
今回のチュートリアルではテンプレートを立ち上げ、デプロイする手順について説明しています。
高速プロトタイピングのベースコードとして利用してみてください。
Githubはこちら
https://github.com/makotunes/starter-kit-react-gq-amplify
今からたった数コマンドで、アイデアを最速でカタチにする、上記のアプリをデプロイします。
コマンドをcreate-react-appとamplifyを入れておきます。
npm i -g create-react-app
npm install -g @aws-amplify/cli
筆者環境
$ create-react-app --version
4.0.3

$ node -v
v16.1.0

$ npm -v
7.11.2

$ amplify --version
4.49.0
まずは雛形を作っていきます。
create-react-app speedy-app-starter-kit  --template typescript
cd speedy-app-starter-kit
AWSにおけるGraphQLのマネージド・サービスがAppSyncという位置づけです。
そしてマネージド・サービスを容易にデプロイするためのCI/CDサービスとして、Amplifyが使用できます。
構成を対話形式のコマンドで設定していきます。AWSのクレデンシャル等お好みの設定で。
amplify init

? Enter a name for the project (speedyappstarterkit)
? Initialize the project with the above configuration? (Y/n)
? Select the authentication method you want to use: (Use arrow keys)
? Please choose the profile you want to use (Use arrow keys)
この時点でamplifyには空のアプリがデプロイされます。
ここでGraphQLのAPIを設定します。
amplify add api

? Please select from one of the below mentioned services: (Use arrow keys)
> GraphQL

? Provide API name:
> speedyappstarterkit

? Choose the default authorization type for the API (Use arrow keys)
> API key

? Enter a description for the API key:
> test

? After how many days from now the API key should expire (1-365):
> 90

? Do you want to configure advanced settings for the GraphQL API
> No, I am done.

? Do you have an annotated GraphQL schema? No
> No

? Choose a schema template: (Use arrow keys)
> Single object with fields (e.g., “Todo” with ID, name, description)

? Do you want to edit the schema now?
> No
以下のファイルにデータ型の定義が記述されたGraphQLスキーマファイルが作成されます。
今回はこれをこのまま使っていきます。
type Todo @model {
  id: ID!
  name: String!
  description: String
}
GraphQLはサービスにスキーマを登録する必要がありますが、
ユーザーが設定する情報はミニマムでこれだけです。
amplifyのCLIでこのデータ型定義に応じて、
AppSyncに与えるスキーマと
フロントエンドに必要な基本的なクエリパターンを自動で生成してくれます。
amplify push

? Are you sure you want to continue? (Y/n)
> Y

? Do you want to generate code for your newly created GraphQL API (Y/n)
> Y

? Choose the code generation language target
> typescript

? Enter the file name pattern of graphql queries, mutations and subscriptions (src/graphql/**/*.ts)
> src/graphql/**/*.ts

? Do you want to generate/update all possible GraphQL operations - queries, mutations and subscriptions (Y/n)
> Y

? Enter maximum statement depth [increase from default if your schema is deeply nested] (2)
> 2

? Enter the file name for the generated code (src/API.ts)
> src/API.ts
最低限必要なモジュールをインストールしておきます。
yarn add aws-amplify
# yarn add aws-amplify-react
yarn add react-router-dom
yarn add @types/react-router-dom
エンジニアでもイケてるデザインを作れるように
material-uiを導入しておきます。
yarn add @material-ui/core @material-ui/icons @material-ui/data-grid
import React from "react";
import { BrowserRouter as Router, Route, Switch } from "react-router-dom";

import SimpleTodoPage from "./components/pages/SimpleTodoPage";

const App: React.FC = () => {
  return (
    <Router>
      <Switch>
        <Route path="/" component={SimpleTodoPage} exact />
      </Switch>
    </Router>
  );
};

export default App;
import React from 'react';
import ReactDOM from 'react-dom';
import './index.css';
import App from './App';
import reportWebVitals from './reportWebVitals';
import Amplify from "aws-amplify"  // 追加
import config from "./aws-exports" // 追加
Amplify.configure(config)          // 追加

ReactDOM.render(
  <React.StrictMode>
    <App />
  </React.StrictMode>,
  document.getElementById('root')
);

// If you want to start measuring performance in your app, pass a function
// to log results (for example: reportWebVitals(console.log))
// or send to an analytics endpoint. Learn more: https://bit.ly/CRA-vitals
reportWebVitals();
import GenericTemplate from "../templates/GenericTemplate";
import { makeStyles } from "@material-ui/core/styles";
import Table from "@material-ui/core/Table";
import TableBody from "@material-ui/core/TableBody";
import TableCell from "@material-ui/core/TableCell";
import TableContainer from "@material-ui/core/TableContainer";
import TableHead from "@material-ui/core/TableHead";
import TableRow from "@material-ui/core/TableRow";
import Paper from "@material-ui/core/Paper";

import { ThemeProvider } from '@material-ui/styles';
import { createMuiTheme } from '@material-ui/core/styles';
import Box from "@material-ui/core/Box";
import TextField from "@material-ui/core/TextField";
import Button from "@material-ui/core/Button";


import React, { useEffect, useState } from "react";
import { API, graphqlOperation } from "aws-amplify";
import { listTodos } from "../../graphql/queries";
import { createTodo } from "../../graphql/mutations";
import { onCreateTodo } from "../../graphql/subscriptions";
import {
    ListTodosQuery,
    OnCreateTodoSubscription,
    CreateTodoMutationVariables
} from "../../API";

const theme = createMuiTheme({
    palette: {
        primary: { main: '#00838f' },
        secondary: { main: '#e0f7fa' },
    },
});

type Todo = {
    id: string;
    name: string;
    description?: string | null | undefined;
    createdAt: string;
    updatedAt: string;
};

type FormState = {
    name: string;
    description: string;
};

type TodoSubscriptionEvent = { value: { data: OnCreateTodoSubscription } };

const useTodos = () => {
    const [todos, setTodos] = useState<Todo[]>([]);

    useEffect(() => {
        (async () => {
            // 最初のTodo一覧取得
            const result = await API.graphql(graphqlOperation(listTodos));
            if ("data" in result && result.data) {
                const todos = result.data as ListTodosQuery;
                if (todos.listTodos) {
                    setTodos(todos.listTodos.items as Todo[]);
                }
            }

            // Todo追加イベントの購読
            const client = API.graphql(graphqlOperation(onCreateTodo));
            if ("subscribe" in client) {
                client.subscribe({
                    next: ({ value: { data } }: TodoSubscriptionEvent) => {
                        if (data.onCreateTodo) {
                            const todo: Todo = data.onCreateTodo;
                            setTodos(prev => [...prev, todo]);
                        }
                    }
                });
            }
        })();
    }, []);

    return todos;
};


const useStyles = makeStyles({
    table: {
        minWidth: 650,
    },
});

const ProductPage: React.FC = () => {
    const classes = useStyles();
    const [input, setInput] = useState<FormState>({
        name: "",
        description: ""
    });
    const todos = useTodos();

    const onFormChange = ({
        target: { name, value }
    }: React.ChangeEvent<HTMLInputElement>) => {
        setInput(prev => ({ ...prev, [name]: value }));
    };

    const onTodo = () => {
        if (input.name === "" || input.description === "") return;
        const newTodo: CreateTodoMutationVariables = {
            input: {
                name: input.name,
                description: input.description
            }
        };
        setInput({ name: "", description: "" });
        API.graphql(graphqlOperation(createTodo, newTodo));
    };

    return (
        <GenericTemplate title="TODO簡易版">
            <ThemeProvider theme={theme}>
                <Box p={2} bgcolor="primary.main" color="primary.contrastText">
                    新規登録
               </Box>

                <Box p={2} bgcolor="secondary.main" color="primary.main">
                    <form action="/users" acceptCharset="UTF-8" method="post">
                        <div><TextField id="name" type="text" name="name" label="名前" style={{ width: 500 }} value={input.name} onChange={onFormChange} /></div>
                        <div><TextField id="description" type="text" name="description" label="詳細" style={{ width: 500 }} value={input.description} onChange={onFormChange} /></div>
                        <Button variant="contained" color="primary" name="commit" onClick={onTodo}>登録</Button>
                    </form>
                </Box>
            </ThemeProvider>
            <TableContainer component={Paper}>
                <Table className={classes.table} aria-label="simple table">
                    <TableHead>
                        <TableRow>
                            <TableCell>名前</TableCell>
                            <TableCell>詳細</TableCell>

                        </TableRow>
                    </TableHead>
                    <TableBody>
                        {todos.map((row) => (
                            <TableRow key={row.id}>
                                <TableCell component="th" scope="row">
                                    {row.name}
                                </TableCell>
                                <TableCell>{row.description}</TableCell>

                            </TableRow>
                        ))}
                    </TableBody>
                </Table>
            </TableContainer>
        </GenericTemplate>
    );
};

export default ProductPage;
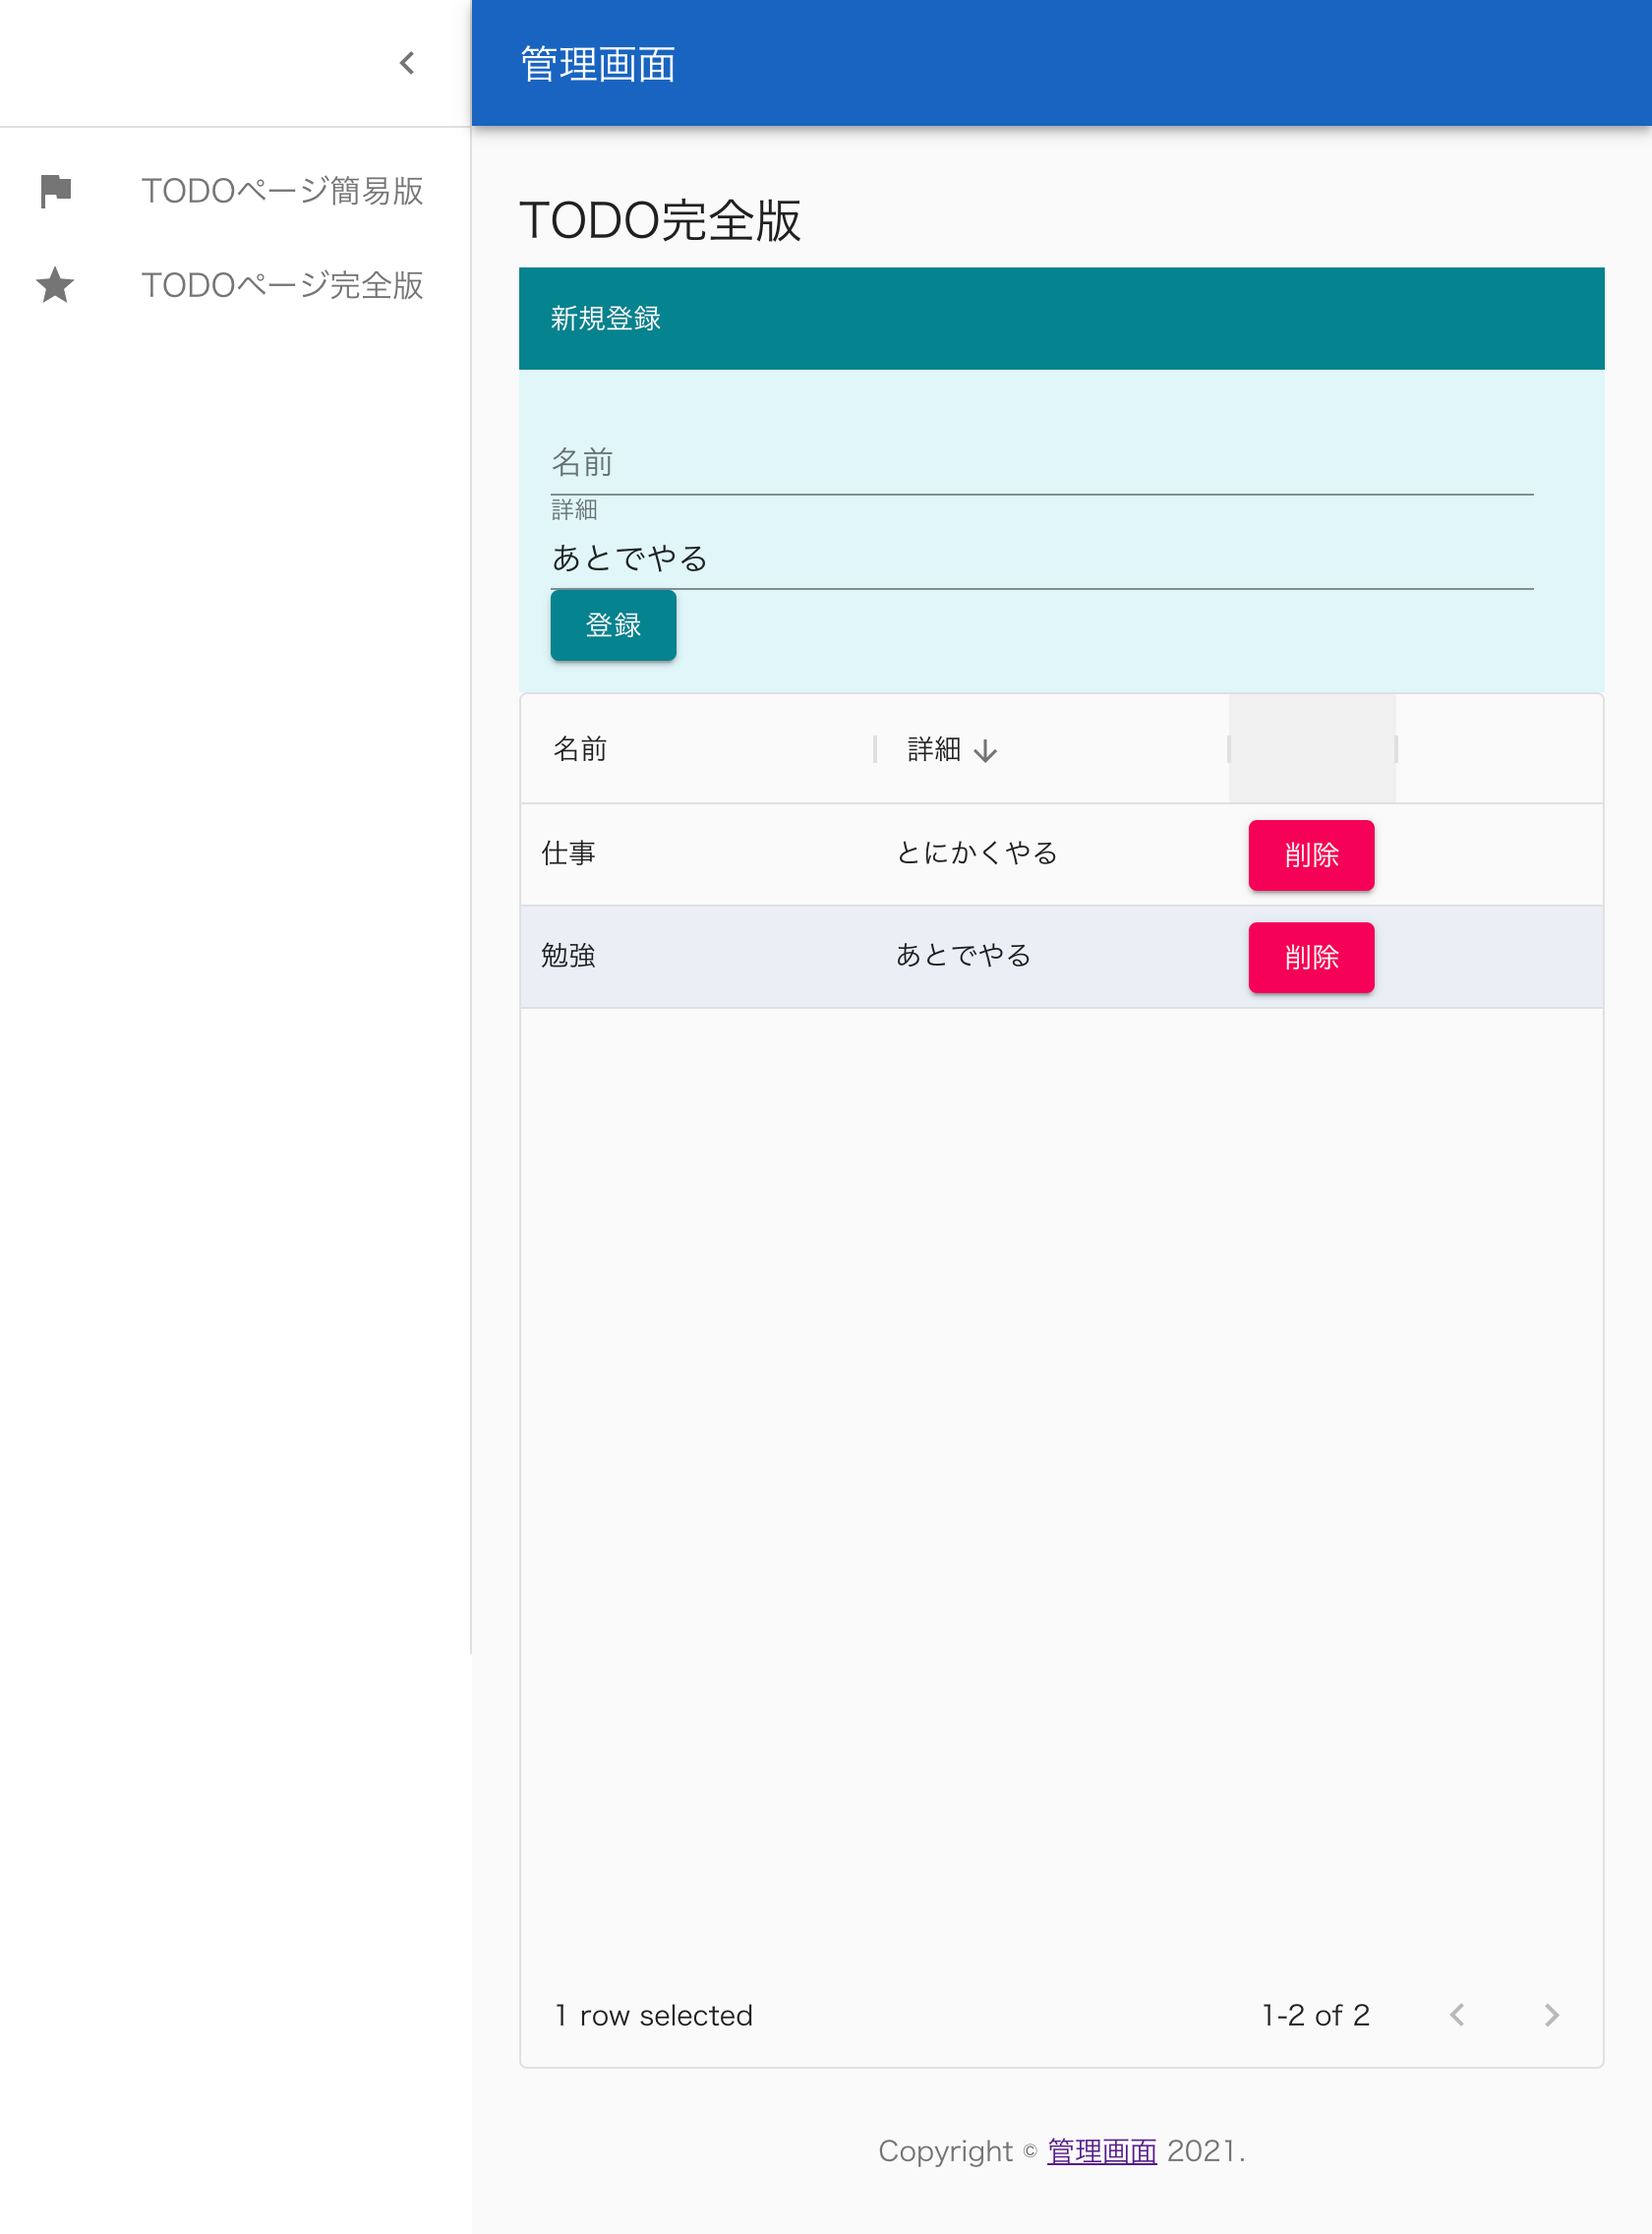
Webサービスを実行して操作を確認します。
ポートの競合がない限りhttp://localhost:3000/
でアクセス可能です。
yarn start
今回は簡易版のコードをのせていますが、
完全版もGithubで利用できます。
https://github.com/makotunes/starter-kit-react-gq-amplify
完全版では、閲覧追加に加え、削除と変更をサポートしてます。
フロントエンド概論についてのスライドも用意しています。
https://speakerdeck.com/makotunes/modanhurontoendoji-shu-gai-lun