はじめに
元々はsakura vpsとかでサービスデプロイしてたけどFirebaseなるものがあることを知って
試しにデプロイしたいなと思ったのが動機。Firebaseで動かすNode.jsアプリ入門🔥がとても参考になったのでこれを元に色々説明をしていく。
準備
Firebase CLIの導入
まずFirebaseを入れないことには始まらないのでFirebaseの導入やらをしていく。
まずは以下を叩き、Firebase CLIをインストールする。
npm install -g firebase-tools
インストールが完了したら
firebase login
色々質問がくるので適宜(Y/n)で答える。Googleアカウントの認証を済ませれば早速Firebaseが使える。
hosting, funtionsの作成
Node.jsをFirebaseにデプロイするためにhostingとfunctions(動的コンテンツが扱える)をinitする。
mkdir ~/firebase-tutorial
cd ~/firebase-tutorial
そしてワークスペース直下で以下のコマンドを入力。
firebase init hosting
firebase init functions
結果:
firebase-tutorial/
├── firebase.json
├── functions
│   ├── index.js
│   ├── node_modules
│   ├── package-lock.json
│   └── package.json
└── public
    ├── 404.html
    └── index.html
以降はindex.jsにサイトの大まかな設定を記述していく(index.jsの名前を紛らわしいのでapp.jsとかに変えようと思ったらエラー吐くんですけど誰か対処知ってたらコメントください)。
Expressの導入
yarnを使ってExpressを使えるようにする。
cd ~/firebase-tutorial/functions
yarn add express
addが完了したらfunctions直下にフォルダを作成。
mkdir -p ~/firebase-tutorial/functions/views
mkdir -p ~/firebase-tutorial/functions/routes
- views
- レイアウトや画面表示用のフォルダ
- routes
- ルーティング用フォルダ
これで動的サイト(Node.js)を立ち上げる準備が整った。簡単なプログラムをデプロイすることで動作を確認する。
Expressを用いたコンテンツをデプロイする
デプロイできるかのテストを簡単なプログラムで行う。
const functions = require('firebase-functions');
const express = require('express');
const path = require('path');

const app = express();

const indexRouter = require('./routes/index');

app.set('views', path.join(__dirname, 'views'));
app.set('view engine', 'jade');

app.use(express.json());
app.use(express.urlencoded({ extended: false }));
app.use(express.static(path.join(__dirname, 'routes')));
app.use('/', indexRouter);

exports.app = functions.https.onRequest(app);
FirebaseでNode.jsの動的コンテンツをデプロイするとき実質一行目のfirebase-functionsをrequireするだけで良い。あとはさっきのroutesフォルダとviewsフォルダへの設定を終わらせる。
ちなみに今回のviewsのエンジンはjadeを指定した。
useしたroutesフォルダのindex.jsでルーティングの詳細を書く。
var express = require('express');
const functions = require('firebase-functions');
var router = express.Router();
/* GET home page. */
router.get('/', function(req, res, next) {
  res.render('index', { title: 'Node.js Test' });
});

module.exports = router;
htmlファイルを生成するためのjadeコードを簡単に記述
extends layout
block content
  h1 Welcome to #{title}!
doctype html
html
  head
    meta(charset='utf-8')
    title= title
    block header
  body
    block content
ここまできたらローカルで実際に動かしてみる。
$ firebase serve --only hosting, functions

=== Serving from '/Users/hoge/firebase-tutorial'...

i  functions: Preparing to emulate functions.
i  hosting[nodejs-test-4d63e]: Serving hosting files from: public
✔  hosting[nodejs-test-4d63e]: Local server: http://localhost:5000
Warning: You're using Node.js v10.9.0 but Google Cloud Functions only supports v6.11.5.
✔  functions: app: http://localhost:5001/nodejs-test-4d63e/us-central1/app
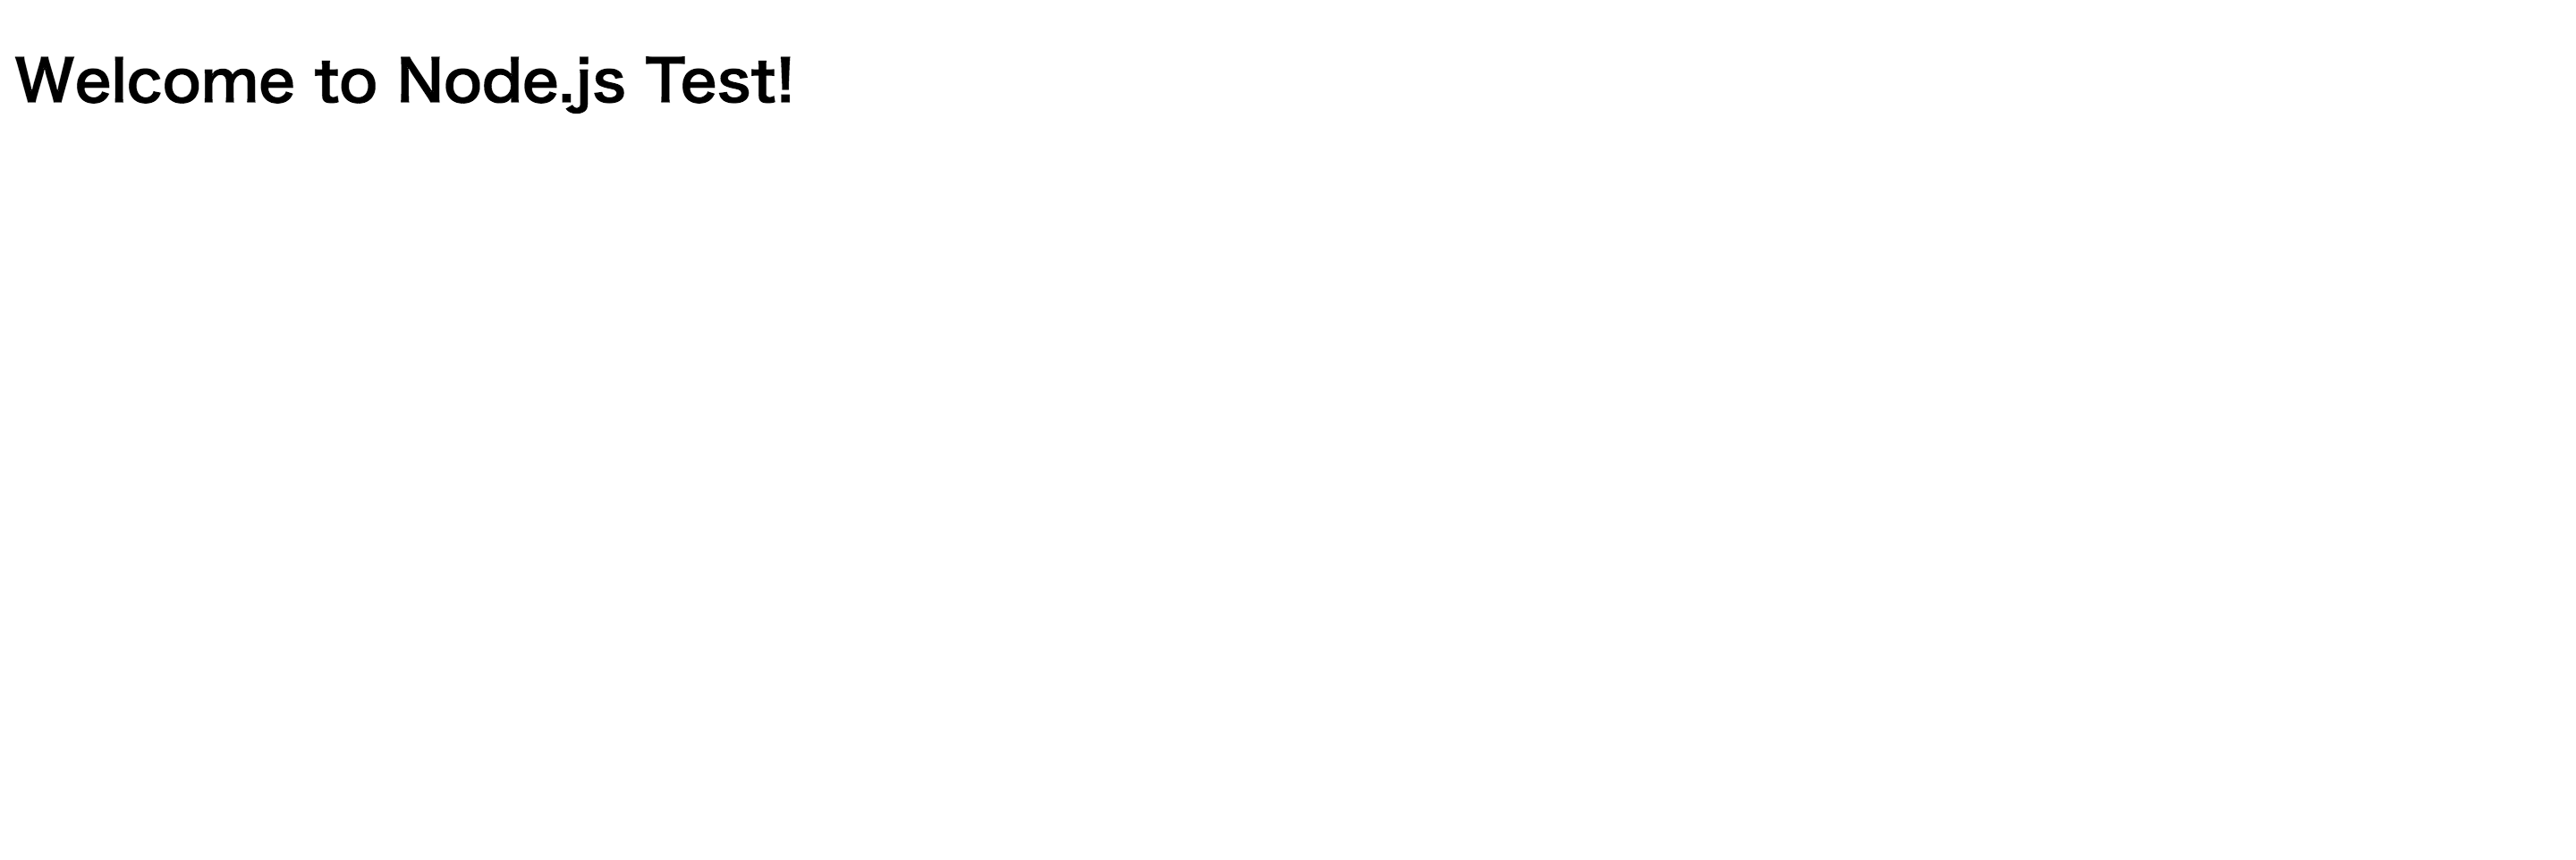
何事もなく起動したらlocalhost:5000で起動を確認する。
Errorが出た場合
Error: No project active. Run with --project <projectId> or define an alias by
running firebase use --add
このエラーが出た場合には、firebase上でプロジェクトを作成してから
firebase use --add
をすればコンソール上でプロジェクトの選択画面に移るので作成したプロジェクトを指定してやれば起動できます。
すっかり忘れてた
多分このまま読み進めてた人はlocalhostの画面を開いたらこの画面が出たと思います。
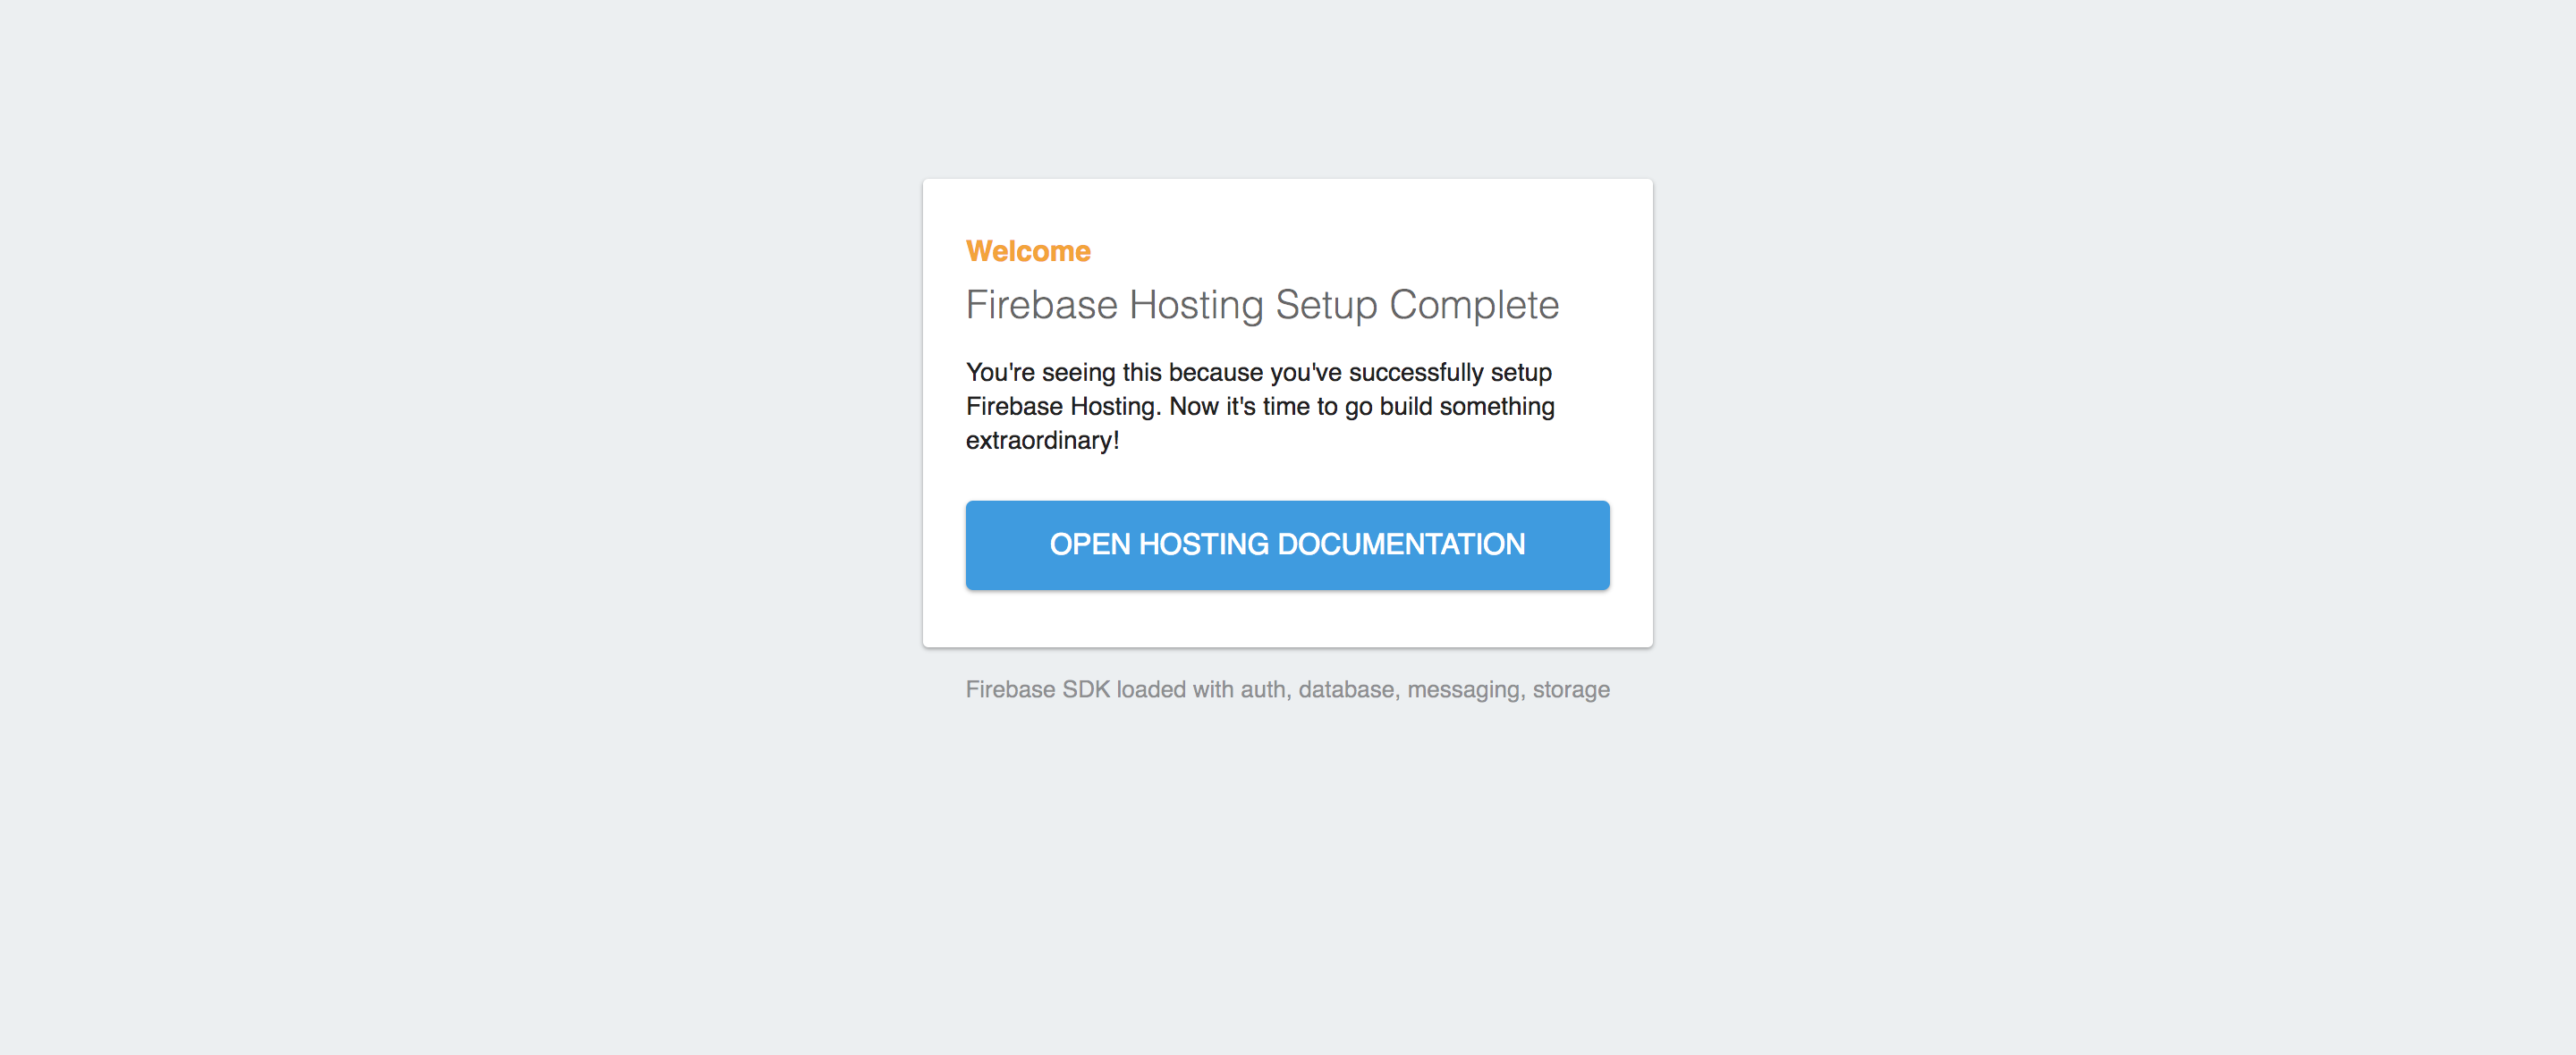
これはfirebaseでリクエストがあったURLに対してどのプログラムを動かすかを指定していなかったためこうなっています。まずはfirebase.jsonを書き換えます。
{
  "hosting": {
    "public": "public",
    "rewrites": [{
      "source": "**",
      "function": "app"
    }],
    "ignore": [
      "firebase.json",
      "**/.*",
      "**/node_modules/**"
    ]
  }
}
rewrites部分のsourceとfunctionに注目してください。sourceの"**"はどのURLが呼ばれてもfunctionを動かすという意味になります。またfunctionにはapp関数が入っているので、とりあえずどのURLが呼ばれてもapp関数が呼ばれる様な設定にしています。
次にfirebaseでは動的コンテンツよりも静的コンテンツが優先されるため、静的コンテンツのファイルを削除しておく必要があります。静的ファイルはpublicフォルダに保存されているのでこれを削除しましょう。
cd ~/firebase-tutorial
rm -rf public/*
そして再度firebaseをserveします。さっきのが立ち上がったままの場合はCtrl+Cで停止できます。
表示できましたね。あとはこれをデプロイしてみましょう〜。
$ firebase deploy --only hosting,functions

=== Deploying to 'nodejs-test-4d63e'...

i  deploying functions, hosting
i  functions: ensuring necessary APIs are enabled...
✔  functions: all necessary APIs are enabled
i  functions: preparing functions directory for uploading...
i  functions: packaged functions (72.14 KB) for uploading
✔  functions: functions folder uploaded successfully
i  hosting[nodejs-test-4d63e]: beginning deploy...
i  hosting[nodejs-test-4d63e]: found 1 files in public
✔  hosting[nodejs-test-4d63e]: file upload complete
i  functions: updating Node.js 6 function app(us-central1)...
✔  functions[app(us-central1)]: Successful update operation.
i  hosting[nodejs-test-4d63e]: finalizing version...
✔  hosting[nodejs-test-4d63e]: version finalized
i  hosting[nodejs-test-4d63e]: releasing new version...
✔  hosting[nodejs-test-4d63e]: release complete

✔  Deploy complete!

Project Console: hoge
Hosting URL: https://nodejs-test-4d63e.firebaseapp.com
はい、じゃあ試しにHosting URLにインしてみましょう〜。デプロイが成功していればローカルと同じ画面が表示されるはずです。
おわりに
Firebaseで動的サイトをデプロイするまでの一通りの工程をやってみました。どうでしたでしょうか。Firebaseはサーバサイドのエラー等もサイトのプロジェクトからfunctionsを見ればわかるので適宜対処しましょう。私は追加したパッケージの依存性を解決できてなくて何度も失敗したのでちゃんと--saveをつけてfirebase.jsonを確認しましょう〜。