SpringBootのライブラリーにTomcatが組み込まれており、開発時期で非常に便利だと思います。ただ、本番環境など、Tomcatの設定を修正しないといけない場合は別のTomcatにデプロイしかないです。なので、今回はIDEA + Spring BootでWARを作って別のTomcatにデプロイして動作させるまでの手順を書きたいと思います。
前提
- 環境はもろもろ揃っているものとします。
- 以下の公式を参照しています。
http://docs.spring.io/spring-boot/docs/current/reference/htmlsingle/#howto-create-a-deployable-war-file
プロジェクトの雛形を作る
- フレームワークを作る
- 以下のサイトを参照しています。
https://start.spring.io/
※DependenciesにThemleaf、MyBatisを追加します。
pom.xml
<?xml version="1.0" encoding="UTF-8"?>
<project xmlns="http://maven.apache.org/POM/4.0.0" xmlns:xsi="http://www.w3.org/2001/XMLSchema-instance"
         xsi:schemaLocation="http://maven.apache.org/POM/4.0.0 http://maven.apache.org/xsd/maven-4.0.0.xsd">
    <modelVersion>4.0.0</modelVersion>
    <parent>
        <groupId>org.springframework.boot</groupId>
        <artifactId>spring-boot-starter-parent</artifactId>
        <version>2.1.3.RELEASE</version>
        <relativePath/>
    </parent>

    <groupId>mjsss</groupId>
    <artifactId>MaJisss</artifactId>
    <version>0.0.1-SNAPSHOT</version>
    <packaging>war</packaging>
    <name>MaJisss</name>
    <description>Personal Website</description>

    <properties>
        <project.build.sourceEncoding>UTF-8</project.build.sourceEncoding>
        <project.reporting.outputEncoding>UTF-8</project.reporting.outputEncoding>
        <java.version>11</java.version>
        <mybatis.version>3.5.0</mybatis.version>
        <mybatis-spring.version>2.0.0</mybatis-spring.version>
        <spring-boot.version>2.1.3.RELEASE</spring-boot.version>
    </properties>

    <dependencies>
        <dependency>
            <groupId>org.springframework.boot</groupId>
            <artifactId>spring-boot-starter-jdbc</artifactId>
        </dependency>
        <dependency>
            <groupId>org.springframework.boot</groupId>
            <artifactId>spring-boot-starter-web</artifactId>
        </dependency>
     <dependency>
            <groupId>org.springframework.boot</groupId>
            <artifactId>spring-boot-starter-tomcat</artifactId>
            <scope>provided</scope>
        </dependency>
        <dependency>
            <groupId>org.mybatis.spring.boot</groupId>
            <artifactId>mybatis-spring-boot-starter</artifactId>
            <version>1.3.1</version>
        </dependency>
        <dependency>
            <groupId>org.springframework</groupId>
            <artifactId>spring-context</artifactId>
        </dependency>
        <dependency>
            <groupId>org.springframework.boot</groupId>
            <artifactId>spring-boot-starter-test</artifactId>
            <scope>test</scope>
        </dependency>
        <dependency>
            <groupId>net.minidev</groupId>
            <artifactId>json-smart</artifactId>
            <version>2.2.1</version>
        </dependency>
        <dependency>
            <groupId>org.postgresql</groupId>
            <artifactId>postgresql</artifactId>
            <scope>runtime</scope>
        </dependency>
        <dependency>
            <groupId>org.projectlombok</groupId>
            <artifactId>lombok</artifactId>
            <optional>true</optional>
        </dependency>
        <!-- Mybatis start -->
        <dependency>
            <groupId>org.mybatis</groupId>
            <artifactId>mybatis</artifactId>
            <version>${mybatis.version}</version>
        </dependency>
        <dependency>
            <groupId>org.mybatis</groupId>
            <artifactId>mybatis-spring</artifactId>
            <version>${mybatis-spring.version}</version>
        </dependency>
        <!--  Mybatis end -->
        <dependency>
            <groupId>org.springframework.boot</groupId>
            <artifactId>spring-boot-configuration-processor</artifactId>
            <optional>true</optional>
        </dependency>
        <!-- Themleaf -->
        <dependency>
            <groupId>org.springframework.boot</groupId>
            <artifactId>spring-boot-starter-thymeleaf</artifactId>
        </dependency>
    </dependencies>
    <build>
        <plugins>
            <plugin>
                <groupId>org.springframework.boot</groupId>
                <artifactId>spring-boot-maven-plugin</artifactId>
            </plugin>
        </plugins>
    </build>
</project>
注意すべきのは以下二つ要点です。
* パッケージを”war”に指定すること。
* Tomcatのライブラリースコープを”provided”に指定すること。
Application.javaの実装
package mjsss.com.java;

import org.springframework.boot.SpringApplication;
import org.springframework.boot.autoconfigure.SpringBootApplication;
import org.springframework.boot.builder.SpringApplicationBuilder;
import org.springframework.boot.web.servlet.support.SpringBootServletInitializer;

@SpringBootApplication
public class Application extends SpringBootServletInitializer{

    @Override
    protected SpringApplicationBuilder configure(SpringApplicationBuilder application) {
        return application.sources(Application.class);
    }

    public static void main(String[] args){
        SpringApplication.run(MaJisssApplicatiom.class, args);
    }
}
ここで重要なのは以下2点です。
- SpringBootServletInitializerクラスを継承すること
- configureメソッドをoverrideすること
index.html作成
<!DOCTYPE html>
<html xmlns:th="http://www.thymeleaf.org">
<head>
    <title>Home Page</title>
    <meta name="description" content="Home Page">
    <meta http-equiv="Content-Type" content="text/html; charset=UTF-8"/>
    <link th:href="@{/bootstrap/css/bootstrap.css}" rel="stylesheet"/>
    <script type="text/javascript" th:src="@{/jQuery/jquery.js}"></script>
    <style>
    </style>
</head>
<body>
<table style=" position: fixed; top: 25%;left: 40%; border: 2px">
    <tr></tr>
    <tr class="form-group">
        <td>
            <label>Name</label>
        </td>
        <td>
            <input type="text" class="form-control" placeholder="user name">
        </td>
    </tr>
    <tr class="form-group">
        <td>
            <label>Email</label>
        </td>
        <td>
            <input type="email" class="form-control" placeholder="example@example.com">
        </td>
    </tr>
    <tr class="form-group">
        <td align="middle" colspan="2">
            <button type="submit" class="btn btn-success">Send invitation</button>
        </td>
    </tr>
</table>
</body>
</html>
Thymeleafを使い場合は、index.xmlファイルをresources>templatesのフォルダに置くはずです。
Controller作成
package mjsss.com.java.controller;

import org.springframework.stereotype.Controller;
import org.springframework.web.bind.annotation.GetMapping;
import org.springframework.web.bind.annotation.RequestMapping;

@Controller
@RequestMapping("index")
public class HomePageController {

    @GetMapping
    public String hello() {
        return "index";
    }
}
Maven WARファイル作成
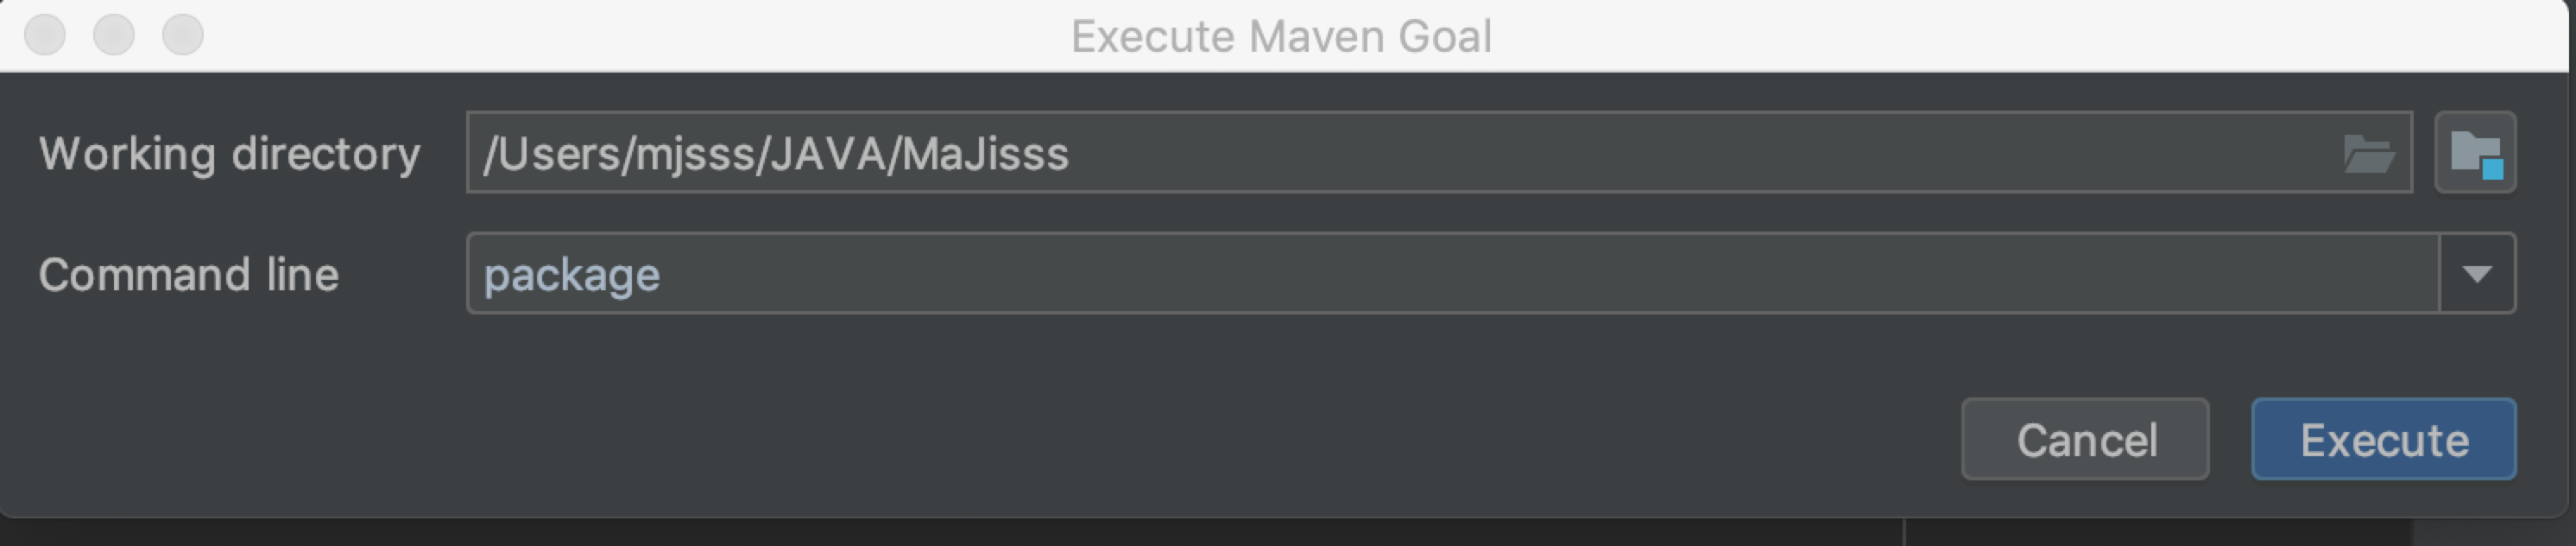
IDEAのMavenタグで”Execute Maven Goal”をクリックして、Command lineに”package”を入力し、実行する。
しばらくすると、プロジェクトルートのtargetフォルダの中にWARファイルが作成されます。
今回はMaJisss-0.0.1-SNAPSHOT.warという形で作成されました。
[INFO] --- spring-boot-maven-plugin:2.1.3.RELEASE:repackage (repackage) @ MaJisss ---
[INFO] Replacing main artifact with repackaged archive
[INFO] ------------------------------------------------------------------------
[INFO] BUILD SUCCESS
[INFO] ------------------------------------------------------------------------
[INFO] Total time: 8.026 s
[INFO] Finished at: 2019-04-22T22:18:22+09:00
[INFO] Final Memory: 31M/120M
[INFO] ------------------------------------------------------------------------
別のTomcatにデプロイする
本題ですがこれも簡単です。
出来あがったwarファイルを、デプロイしたいTomcatのwebapps配下に置きます。
あとはTomcatを起動すればOKです。
別のTomcatにデプロイしたアプリの動作確認をする
ここで動作確認してみます。
http://localhost:8080/MaJisss-0.0.1-SNAPSHOT/index
前項と同じようにブラウザ上に「ログインページ」と表示されればOKです。
ここで重要なのは以下2点です。
これまでのソースがGitから取得できます。
https://github.com/Mjsss/SpringBoot-Mybatis