はじめに
1月より参画した現場にてAWS Amplifyを使った開発を行っていくことになり、覚えたことを備忘録として記載します。
なお、Reactアプリをamplifyでホスティングする記事も掲載しています。
Reactアプリを作る再にcreate-react-appで作ろうと思っている場合は先にこちらの記事をみてReactアプリ作成までやった後に、amplifyの環境構築を行った方が無難かもしれません。
AWS Amplifyとは何か
AWS amplifyとはAWSが提供するサービスの一つで、このサービスを使ってフルスタックな開発が簡単に行えてしまいます。
Amplifyを使えばエンジニアはフロント部分だけを自分で実装、あとはAPIはAmplifyが自動で生成したものを利用し、その他バックエンドに纏わる設定はコンソールやコマンドによって簡単に設定するだけといった開発の進め方も可能です。
認証機能に関してもAmazon Cognito(コグニート)という機能を使って簡単に認証機能を実装できてしまいます。
Amplify用のユーザー作成
今回はWindows10のマシンを使って環境を構築していきます。
nodeのバージョンは19.4.0です。
はじめにAmplifyの設定等をコマンドライン上で行えるようにするために、Amplify CLIを以下のコマンドによってインストールします。
npm i -g @aws-amplify/cli
インストールが完了したらコマンドラインからAmplify CLIを使ってAWS上にログインをします。
amplify configure
コマンドを実行するとブラウザが開いてAWSにログインするように促されるのでログインします。
ログインしたらEnterを押します。
次にリージョンを聞かれます。
Specify the AWS Region
? region:
  eu-west-2
  eu-west-3
  eu-central-1
> ap-northeast-1
  ap-northeast-2
  ap-southeast-1
  ap-southeast-2
(Move up and down to reveal more choices)
東京リージョン(ap-northeast-1)を選択してEnterを押します。
次にIAMユーザの名前を決めるように言われます。
Specify the username of the new IAM user:
? user name:  (amplify-wdhUu)
ここで名前を決めてもいいですが、この後すぐに名前をまた決められるのでEnterを押してもらっても大丈夫です。
Enterを押すとブラウザが開いてIAMユーザを追加する流れになります。

ユーザ名はここでも変更可能ですので、別の名前にしたい場合は変更しておきます。
AWS認証情報タイプはアクセスキーの方を選択しておきます。
問題なければ次のステップに進みます。
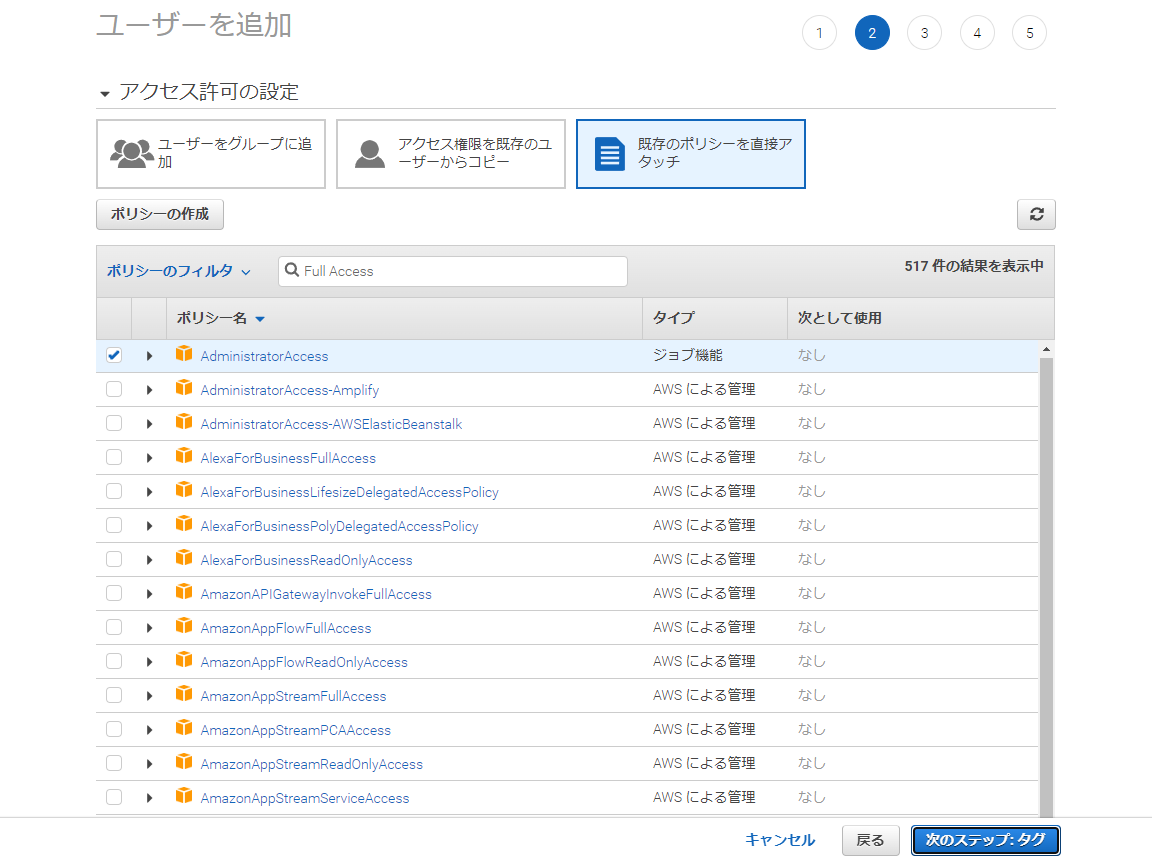
ポリシーを選択します。
今回はお試しなのでAdministratorAccessにしておきますが、実際はIAMユーザによってポリシー分けたほうがいいと思います。
問題なければ次のステップに進みます。

タグを追加できます。
特に追加するものはないので今回はスルーします。
問題なければ次のステップに進みます。

最後にいままでの設定を確認をします。
問題なければユーザーの作成を押します。
ユーザー作成が完了すると次のページでアクセスキー、シークレットキーが表示されます。
csvファイルをダウンロードするか忘れないようにメモをとっておきます。

ターミナルに戻るとアクセスキー、シークレットキー、プロファイル名を聞かれます。
プロファイル名の入力が終わるとユーザー作成は完了になります。
Amplify環境作成
作業したいディレクトリに移動または作成した後以下のコマンドを実行します。
amplify init
Note: It is recommended to run this command from the root of your app directory
? Enter a name for the project example
The following configuration will be applied:

Project information
| Name: example
| Environment: dev
| Default editor: Visual Studio Code
| App type: javascript
| Javascript framework: none
| Source Directory Path: src
| Distribution Directory Path: dist
| Build Command: npm.cmd run-script build
| Start Command: npm.cmd run-script start

? Initialize the project with the above configuration? (Y/n)
最初にプロジェクト名を聞かれるので入力します。
なお、英数字しか使えないようです。
入力が完了すると、Project informationの下に記載された構成でプロジェクトを初期化するか聞かれます。
Javascript frameworkを変更したいのでnを入力します。
? Initialize the project with the above configuration? No
? Enter a name for the environment dev
? Choose your default editor: (Use arrow keys)
> Visual Studio Code
  Android Studio
  Xcode (macOS only)
  Atom Editor
  Sublime Text
  IntelliJ IDEA
  Vim (via Terminal, macOS only)
(Move up and down to reveal more choices)
環境名を聞かれるので入力します。
次に使用するエディタを聞かれます。
好きなもので構わないですが、VSCodeを使うのでそれを選択します。
? Choose the type of app that you're building (Use arrow keys)
  android
  flutter
  ios
> javascript
アプリの種類を聞かれます。
今回はWEBアプリを実装予定なのでJavascriptを選んでいきます。
? Choose the type of app that you're building (Use arrow keys)
  android
  flutter
  ios
> javascript
使用するフレームワークを聞かれます。
今回はReact使いたいのでそれを選んでいきます。
? Source Directory Path:  src
? Distribution Directory Path: build
? Build Command:  npm.cmd run-script build
? Start Command: npm.cmd run-script start
ソースディレクトリのパス、配布用のパス、ビルドコマンド、スタートコマンドを聞かれましたが、特に指定はないので全てデフォルトのままで行きました。
? Select the authentication method you want to use: AWS profile

For more information on AWS Profiles, see:
https://docs.aws.amazon.com/cli/latest/userguide/cli-configure-profiles.html

? Please choose the profile you want to use (Use arrow keys)
> amplify-cli-user
認証方法を聞かれます。
AWS ProfileかAWS Accesskyeかの選択肢がありますが、先ほどProfileを作成したのでそちらを選びます。
作成したプロファイル名が表示されているのでそれを選びます。
そうすると環境の作成が始まるのでしばらく待ちます。
しばらく待つと以下のメッセージが表示されます。
√ Help improve Amplify CLI by sharing non sensitive configurations on failures (y/N)
内容を翻訳すると「障害時に機密性の低い構成を共有することにより、Amplify CLI の改善に役立ちます」と出ますが、いまいちよくわかっていないのでnを入力します。
AWSに構成などの情報を共有するという意味でしょうか?
Your project has been successfully initialized and connected to the cloud!
上記が表示されたら完了です。
下記コマンドでローカルの現在使用している環境を確認することができます。
amplify status
    Current Environment: dev

┌──────────┬───────────────┬───────────┬─────────────────┐
│ Category │ Resource name │ Operation │ Provider plugin │
└──────────┴───────────────┴───────────┴─────────────────┘
環境が作成できていれば上にあるような内容で表示されます。
また、ブラウザ上からも作成できているかを確認してみます。

AWSのAWS Amplifyのサービスを選択すると、先ほど作成したアプリケーションが見えているはずです。
アプリケーション名部分をクリックしてみます。

アプリケーションの構成がどうなっているか確認できます。
先ほど作成した環境が作成されているはずです。
また、このときAWS S3の方にもバケットが作成されていることを確認できます。

別のバックエンド環境を作ってみます。
以下のコマンドを実行してください。
amplify env add {環境名}
Note: It is recommended to run this command from the root of your app directory
Using default provider  awscloudformation
? Select the authentication method you want to use: AWS profile

For more information on AWS Profiles, see:
https://docs.aws.amazon.com/cli/latest/userguide/cli-configure-profiles.html

? Please choose the profile you want to use (Use arrow keys)
> amplify-cli-user
先程と同じように認証方法を選びます。
環境が出来るまでしばらく待ちます。
Your project has been successfully initialized and connected to the cloud!
上記メッセージが出来てたら完了です。
amplify statusを実行すると環境が切り替わっていることが確認できると思います。
またブラウザ上からも新たなバックエンド環境ができていることを確認できると思います。
別の環境に移動したいとなった場合は以下のコマンドを実行します。
amplify env checkout {環境名}
下記の表示がでたら環境の切り替え成功です。
√ Initialized provider successfully.
✅ Initialized your environment successfully.
amplify statusを実行すると環境が切り替わっていることが確認できると思います。
環境を削除したい場合は以下のコマンドを実行します。
なお、今いる環境が削除したい環境の場合は別環境に移動しないと削除できないので注意が必要です。
amplify env remove {環境名}
Are you sure you want to continue? This CANNOT be undone. (This will delete 'test' environment of the project from the cloud) (y/N)
環境の削除を続行しますか?といった質問がされるのでyを入力します。
√ Successfully removed environment from the cloud
✅ Successfully removed environment from your project locally
しばらく待って上記のメッセージが表示されれば削除完了です。
Amplifyのアプリケーションを削除したい場合は以下のコマンドを実行します。
なお、このコマンドはアプリケーションごと削除する非常に強力なコマンドであるため誤って実行しないように注意してください。
amplify delete
 Are you sure you want to continue? This CANNOT be undone. (This will delete all the environments of the project from the cloud and wipe out a
ll the local files created by Amplify CLI) (y/N)
Amplify CLI によって作成されたすべてのローカル ファイル、プロジェクトのすべての環境がクラウドから削除されますが続行しますか?といったような質問がされるのでyを入力します。
√ Project deleted in the cloud.
✅ Project deleted locally.
上記のメッセージが表示されれば完了です。
今回の内容はここまでとします。
次回はWEBアプリの作成やAPIの作成等を解説していきたいと思います。