導入
AndroidのオリジナルInput Method Editorを開発するぞ!!
・・・
ん!?
文献なさすぎて作れねぇ!ナンジャコリャーとなっている方多いと思います。
ここで一回ちゃんとまとめてみましょうよ...ということで現状得ている知見をまとめます。
少しでも役に立てば嬉しいです。
※本記事はAndroid StudioをIDEとして話を進めていきます。Xamarinでやりたいという人はこちらの記事を参考にしてください。
Android IMEの基本
AndroidのIMEはInputMethodServiceというServiceと、設定用のActivityによって構成されます。
Serviceの実装方法は通常のActivityのそれとは少し異なりますので注意が必要です。
しかし、通常のAndroidアプリが作れるスキルがあったほうが開発もスムーズですので、まずは通常のアプリを作れるようになることをお勧めします。(ちなみに私は初めてのAndroid開発がIMEでした汗)
参考:Androidアプリ開発を独学で学ぶ人への効果的な勉強法
シンプルなキーボード作成!
プロジェクトの立ち上げ
- Application nameを「CustomKeyboard」に、Company domainを「sample.com」にしてCreate Android Projectからプロジェクトを作成してください。
- APIのレベルは自分の必要な環境にしてください。(筆者はAPI 23: Android 6.0 Marshmallowで成功しています)
- Empty Activityを選択してください。
- Activity Nameを「NewKeyboard」に、Layout Nameを「keyboard_view」にしてください。
※ここでもしも「Gradle 'CustomKeyboard' project refresh failed」とエラーが出たら、Install missing platform(s) and sync projectを押してエラーを解決してください。
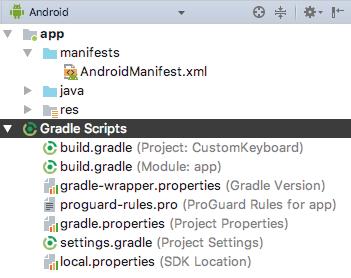
↑こんな感じになっていればOKです。
必要なファイルの用意
- まず、resの配下にxmlという名前のDirectoryを追加してください。
- 次に、xmlの配下に
method.xmlという名前のファイルを追加してください。(このとき、New -> XML resource fileとせずに、New -> Fileとするようにすること)
また、同じくxmlの配下にkeyboard.xmlという名前のファイルを追加してください。 - 続いて、res/layoutの配下に
keyboard_view.xmlという名前のLayout resource fileを追加してください。(この時、Root elementはKeyboardにすること)
下準備は以上です。
AndroidManifestの実装
app/manifests/AndroidManifest.xmlを開いてください。
内容を以下のようにします。
<?xml version="1.0" encoding="utf-8"?>
<manifest xmlns:android="http://schemas.android.com/apk/res/android"
    package="com.sample.customkeyboard">

    <application
        android:allowBackup="true"
        android:icon="@mipmap/ic_launcher"
        android:label="@string/app_name"
        android:supportsRtl="true"
        android:theme="@style/AppTheme">

        <service
            android:name=".NewKeyboard"
            android:label="@string/keyboard_name"
            android:permission="android.permission.BIND_INPUT_METHOD">
            <intent-filter>
                <action android:name="android.view.InputMethod" />
            </intent-filter>

            <meta-data
                android:name="android.view.im"
                android:resource="@xml/method" />
        </service>

    </application>

</manifest>
res/values/strings.xmlの編集
res/values/strings.xmlを開き、以下のように編集します。
<resources>
    <string name="app_name">CustomKeyboard</string>
    <string name="keyboard_name">NewKeyboard</string>
</resources>
res/xml/method.xmlの実装
res/xml/method.xmlを開き、以下のように編集します。
<?xml version="1.0" encoding="utf-8"?>
<input-method xmlns:android="http://schemas.android.com/apk/res/android">
    <subtype
        android:label="@string/keyboard_name"
        android:imeSubtypeLocale="en_US"
        android:imeSubtypeMode="keyboard" />
</input-method>
res/layout/keyboard_view.xmlの実装
res/layout/keyboard_view.xmlを開き、以下のように編集します。
<?xml version="1.0" encoding="utf-8"?>
<android.inputmethodservice.KeyboardView
    xmlns:android="http://schemas.android.com/apk/res/android"
    android:id="@+id/keyboard"
    android:layout_width="fill_parent"
    android:layout_height="wrap_content"
    android:layout_alignParentBottom="true" >
</android.inputmethodservice.KeyboardView>
res/xml/keyboard.xmlの実装
res/xml/keyboard.xmlを開き、以下のように編集します。
<?xml version="1.0" encoding="utf-8"?>
<Keyboard xmlns:android="http://schemas.android.com/apk/res/android"
    android:layout_width="match_parent"
    android:layout_height="match_parent"
    android:keyWidth="10%p"
    android:horizontalGap="0px"
    android:verticalGap="0px"
    android:keyHeight="40dp">

    <Row>
        <Key android:codes="8"  android:keyLabel="1" android:keyEdgeFlags="left" />
        <Key android:codes="9"  android:keyLabel="2" />
        <Key android:codes="10" android:keyLabel="3" />
        <Key android:codes="11" android:keyLabel="4" />
        <Key android:codes="12" android:keyLabel="5" />
        <Key android:codes="13" android:keyLabel="6" />
        <Key android:codes="14" android:keyLabel="7" />
        <Key android:codes="15" android:keyLabel="8" />
        <Key android:codes="16" android:keyLabel="9" />
        <Key android:codes="7"  android:keyLabel="0" android:keyEdgeFlags="right" />
    </Row>

    <Row>
        <Key android:codes="-5" android:keyLabel="Delete" android:isRepeatable="true" />
        <Key android:codes="66" android:keyLabel="Return" android:isRepeatable="true" />
    </Row>

</Keyboard>
KeyCodeの参照先1
[KeyCodeの参照先2]
(https://developer.android.com/reference/android/inputmethodservice/Keyboard.html)
※KeyEventのものとKeyboardのものとあるので注意!
InputMethodServiceの実装
キーボードのメインのコードに当たるNewKeyboard.java(InputMethodService)の実装を行います。最低限の実装ですので、エラー対策などが甘くクラッシュしやすいです。
package com.sample.customkeyboard;

import android.os.Bundle;
import android.util.Log;
import android.inputmethodservice.InputMethodService;
import android.inputmethodservice.Keyboard;
import android.inputmethodservice.KeyboardView;
import android.view.KeyEvent;
import android.view.View;
import android.view.inputmethod.EditorInfo;
import android.view.inputmethod.InputConnection;

public class NewKeyboard extends InputMethodService implements KeyboardView.OnKeyboardActionListener {

    private KeyboardView keyboardView;
    private Keyboard keyboard;

    //初回だけ呼ばれる
    @Override
    public void onCreate() {
        super.onCreate();
    }

    //初回だけ呼ばれる
    @Override
    public View onCreateInputView() {
        super.onCreateInputView();

        keyboardView = (KeyboardView) getLayoutInflater().inflate(R.layout.keyboard_view, null);
        keyboard = new Keyboard(this, R.xml.keyboard);
        keyboardView.setKeyboard(keyboard);
        keyboardView.setOnKeyboardActionListener(this);
        keyboardView.setPreviewEnabled(false);
        return keyboardView;
    }

    //キーボードが表示されるたびに呼ばれるメソッド
    @Override
    public void onStartInputView(EditorInfo editorInfo, boolean restarting) {
        //なんらかの処理
    }

    //キーボードが閉じる時に呼ばれるメソッド
    @Override
    public void onDestroy() {
        super.onDestroy();
    }

    //キーを押した時
    @Override
    public void onKey(int primaryCode, int[] keyCodes) {
        InputConnection ic = getCurrentInputConnection();
        switch (primaryCode) {
            case KeyEvent.KEYCODE_1:
                ic.commitText("1", 1);
                break;
            case KeyEvent.KEYCODE_2:
                ic.commitText("2", 1);
                break;
            case KeyEvent.KEYCODE_3:
                ic.commitText("3", 1);
                break;
            case KeyEvent.KEYCODE_4:
                ic.commitText("4", 1);
                break;
            case KeyEvent.KEYCODE_5:
                ic.commitText("5", 1);
                break;
            case KeyEvent.KEYCODE_6:
                ic.commitText("6", 1);
                break;
            case KeyEvent.KEYCODE_7:
                ic.commitText("7", 1);
                break;
            case KeyEvent.KEYCODE_8:
                ic.commitText("8", 1);
                break;
            case KeyEvent.KEYCODE_9:
                ic.commitText("9", 1);
                break;
            case KeyEvent.KEYCODE_0:
                ic.commitText("0", 1);
                break;
            case Keyboard.KEYCODE_DELETE:
                ic.deleteSurroundingText(1, 0);
                break;
            case KeyEvent.KEYCODE_ENTER:
                ic.sendKeyEvent(new KeyEvent(KeyEvent.ACTION_DOWN, KeyEvent.KEYCODE_ENTER));
                break;
            default:
                break;
        }
    }

    @Override
    public void onPress(int primaryCode) {
    }

    @Override
    public void onRelease(int primaryCode) {
    }

    @Override
    public void onText(CharSequence text) {
    }

    @Override
    public void swipeLeft() {
    }

    @Override
    public void swipeRight() {
    }

    @Override
    public void swipeDown() {
    }

    @Override
    public void swipeUp() {
    }

}
実装は簡単で、押されたキーのKEYCODEによってSwitch文で分岐して処理を割り当てています。
キーボードのテスト
現状ですとActivityがないので、そのままではRunできません。
Edit Configurations...からLaunchをNothingにしましょう。
Android エミュレータが起動したら、環境設定から、言語と入力を選び、NewKeyboardをONにしてください。(NewKeyboardが表示されない場合はAppsを確認してインストールされているか確かめてください。表示されないことはよくあり、原因を探るのは困難です。)
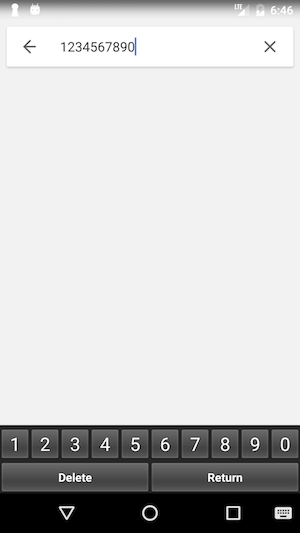
こんな感じで起動されればOKです。
設定アクティビティの作成
AndroidManifestの実装
<?xml version="1.0" encoding="utf-8"?>
<manifest xmlns:android="http://schemas.android.com/apk/res/android"
    package="com.sample.customkeyboard">

    <application
        android:allowBackup="true"
        android:icon="@mipmap/ic_launcher"
        android:label="@string/app_name"
        android:supportsRtl="true"
        android:theme="@style/AppTheme">

        <service
            android:name=".NewKeyboard"
            android:label="@string/keyboard_name"
            android:permission="android.permission.BIND_INPUT_METHOD">
            <intent-filter>
                <action android:name="android.view.InputMethod" />
            </intent-filter>

            <meta-data
                android:name="android.view.im"
                android:resource="@xml/method" />
        </service>

        <activity
            android:name=".Settings"
            android:label="@string/app_name"
            android:screenOrientation="portrait">
            <intent-filter>
                <action android:name="android.intent.action.MAIN" />
                <category android:name="android.intent.category.LAUNCHER" />
            </intent-filter>
        </activity>

    </application>

</manifest>
Activityを追加します。ここでLAUNCHER属性をつけるのを忘れずに。
res/layout/settings_view.xmlの追加・実装
res/layout配下に「settings_view.xml」というLayout resource fileを追加してください。(レイアウトはLinearLayoutにすると楽です。)
doubleKeyというidのついたボタンを一つ配置しましょう。
<?xml version="1.0" encoding="utf-8"?>
<LinearLayout xmlns:android="http://schemas.android.com/apk/res/android"
    android:orientation="vertical" android:layout_width="match_parent"
    android:layout_height="match_parent">

    <Switch
        android:id="@+id/doubleKey"
        android:layout_width="match_parent"
        android:layout_height="wrap_content"
        android:text="double key" />

</LinearLayout>
Activityの追加・実装
NewKeyboard.javaと同じ階層に「Settings.java」というJava Classを追加してください。
package com.sample.customkeyboard;

import android.app.Activity;
import android.os.Bundle;

/**
 * Created by Kyome on 2017/12/27.
 */

public class Settings extends Activity {

    @Override
    protected  void onCreate(Bundle savedInstanceState) {
        super.onCreate(savedInstanceState);
        setContentView(R.layout.settings_view);
    }

    @Override
    public void onDestroy() {
        super.onDestroy();
    }

}
共有データの保存・取得
SharedPreferencesを利用します。IME側と設定アクティビティ側で共有するためにモードはMODE_MULTI_PROCESSにします。(非推奨だが仕方がない)
設定アクティビティ側
package com.sample.customkeyboard;

import android.app.Activity;
import android.content.SharedPreferences;
import android.os.Bundle;
import android.view.View;
import android.widget.CompoundButton;
import android.widget.Switch;

public class Settings extends Activity {

    private SharedPreferences prefs;
    private SharedPreferences.Editor editor;
    private Switch doubleKeySwitch;

    @Override
    protected  void onCreate(Bundle savedInstanceState) {
        super.onCreate(savedInstanceState);
        setContentView(R.layout.settings_view);

        prefs = getSharedPreferences("NewKeyboardData", MODE_MULTI_PROCESS);
        editor = prefs.edit();

        doubleKeySwitch = (Switch) findViewById(R.id.doubleKey);
        doubleKeySwitch.setChecked(prefs.getBoolean("doubleKey", false));
        doubleKeySwitch.setOnCheckedChangeListener(new CompoundButton.OnCheckedChangeListener() {
            @Override
            public void onCheckedChanged(CompoundButton compoundButton, boolean b) {
                editor.putBoolean("doubleKey", b).apply();
            }
        });
    }

    @Override
    public void onDestroy() {
        super.onDestroy();
    }

}
キーボード側
//・・・
import android.content.SharedPreferences;

public class NewKeyboard extends InputMethodService implements KeyboardView.OnKeyboardActionListener {

    private KeyboardView keyboardView;
    private Keyboard keyboard;
    private SharedPreferences prefs;

    //・・・

    //キーボードが表示されるたびに呼ばれるメソッド
    @Override
    public void onStartInputView(EditorInfo editorInfo, boolean restarting) {
        prefs = getSharedPreferences("NewKeyboardData", MODE_MULTI_PROCESS);
    }

    //・・・

    //キーを押した時
    @Override
    public void onKey(int primaryCode, int[] keyCodes) {

        boolean doubleKey = prefs.getBoolean("doubleKey", false);

        InputConnection ic = getCurrentInputConnection();
        switch (primaryCode) {
            case KeyEvent.KEYCODE_1:
                ic.commitText(!doubleKey ? "1" : "11", 1);
                break;
            case KeyEvent.KEYCODE_2:
                ic.commitText(!doubleKey ? "2" : "22", 1);
                break;
            case KeyEvent.KEYCODE_3:
                ic.commitText(!doubleKey ? "3" : "33", 1);
                break;
            case KeyEvent.KEYCODE_4:
                ic.commitText(!doubleKey ? "4" : "44", 1);
                break;
            case KeyEvent.KEYCODE_5:
                ic.commitText(!doubleKey ? "5" : "55", 1);
                break;
            case KeyEvent.KEYCODE_6:
                ic.commitText(!doubleKey ? "6" : "66", 1);
                break;
            case KeyEvent.KEYCODE_7:
                ic.commitText(!doubleKey ? "7" : "77", 1);
                break;
            case KeyEvent.KEYCODE_8:
                ic.commitText(!doubleKey ? "8" : "88", 1);
                break;
            case KeyEvent.KEYCODE_9:
                ic.commitText(!doubleKey ? "9" : "99", 1);
                break;
            case KeyEvent.KEYCODE_0:
                ic.commitText(!doubleKey ? "0" : "00", 1);
                break;
            case Keyboard.KEYCODE_DELETE:
                ic.deleteSurroundingText(1, 0);
                break;
            case KeyEvent.KEYCODE_ENTER:
                ic.sendKeyEvent(new KeyEvent(KeyEvent.ACTION_DOWN, KeyEvent.KEYCODE_ENTER));
                break;
            default:
                break;
        }
    }
    //・・・
}
コラム
キャレットの位置を移動する
KEYCODE_DPAD_LEFTとかでキャレットを左右上下に動かせるらしいです.
複雑なキーレイアウトを行う

こんな感じのキーレイアウトを行う方法が意外と厄介だったので紹介。
horizontalGapを指定してあげることで解決。
<?xml version="1.0" encoding="utf-8"?>
<Keyboard xmlns:android="http://schemas.android.com/apk/res/android"
    android:layout_width="match_parent"
    android:layout_height="match_parent"
    android:keyWidth="50%p"
    android:horizontalGap="0px"
    android:verticalGap="0px"
    android:keyHeight="40dp">

    <Row>
        <Key android:codes="8"  android:keyLabel="1" android:keyHeight="80dp" android:keyEdgeFlags="left" />
        <Key android:codes="-5" android:keyLabel="Delete" android:keyWidth="50%p" android:isRepeatable="true" android:keyEdgeFlags="right" />
    </Row>

    <Row>
        <Key android:codes="66" android:keyLabel="Return" android:keyWidth="50%p" android:horizontalGap="50%" android:isRepeatable="true" />
    </Row>

</Keyboard>
ちゃんと動くReturnキーの実装
テキストフィールドが一行の時(検索ボックスなど)と複数行の時(メモ帳など)、用途が分かれる時などReturnキーの処理は場合分けが必要です。
自分なりによく反応する処理を考えてみましたので参考まで。
InputConnection ic = getCurrentInputConnection();
EditorInfo info = getCurrentInputEditorInfo();
if (ic != null) {
    int type = info.imeOptions & EditorInfo.IME_MASK_ACTION;
    switch (type) {
        case EditorInfo.IME_ACTION_UNSPECIFIED:
        case EditorInfo.IME_ACTION_NONE:
            ic.sendKeyEvent(new KeyEvent(KeyEvent.ACTION_DOWN, KeyEvent.KEYCODE_ENTER));
            break;
        default:
            if ((info.inputType & EditorInfo.TYPE_TEXT_FLAG_MULTI_LINE) != 0) {
                ic.sendKeyEvent(new KeyEvent(KeyEvent.ACTION_DOWN, KeyEvent.KEYCODE_ENTER));
            } else {
                ic.performEditorAction(type);
            }
            break;
    }
}
落ちないDeleteキーの実装
InputConnection ic = getCurrentInputConnection();
EditorInfo info = getCurrentInputEditorInfo();
if (ic != null) {
    CharSequence currentText = ic.getExtractedText(new ExtractedTextRequest(), 0).text;
    int length = ic.getTextBeforeCursor(currentText.length(), 0).length();
    if (length > 0) {
        ic.deleteSurroundingText(1, 0);
    }
}
カーソルより前の文字数をカウントして消しています。
参考文献
日本語で書かれたAndroid IMEの参考文献めっちゃ少ない!!
ソフトウェアキーボードの作り方(Android)
AndroidのIME機能を使って寿司ネタキーボードを作る(役に立つかは微my...ゴホン)
InputMethodService(キーボード)開発の勘所となりそうな項目(とてもありがたいサイト)