はじめに
Visual Studio 2017 community(2017/9/27時点)のXamarin.Androidを使ってAndroid向けのIME(カスタムキーボード)を作る方法およびコツをまとめます。
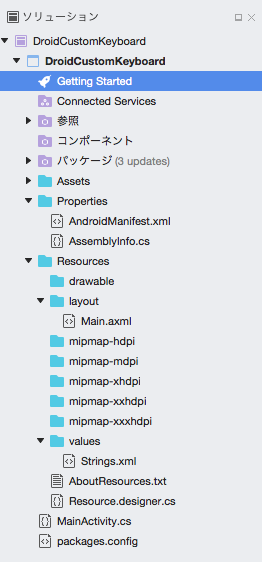
1.新規ソリューションを立ち上げる
メニューバーのファイル->新しいソリューションからソリューション立ち上げのモーダルを開きます。
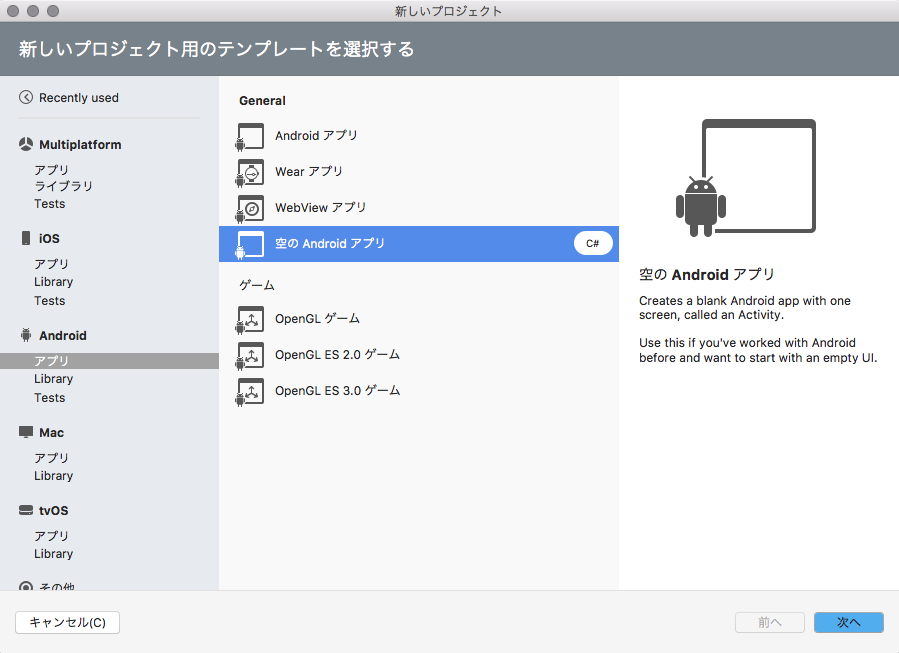
Android -> アプリ -> 空のAndroidアプリを選択して次へを押します。
 今回はアプリ名を**DroidCustomKeyboard**にして進めていきます。
 設定をいじらず`作成`を押します。
2.ファイルの下準備をする。
編集の前に必要なファイルがいくつかありますので先に準備をしてしまいます。
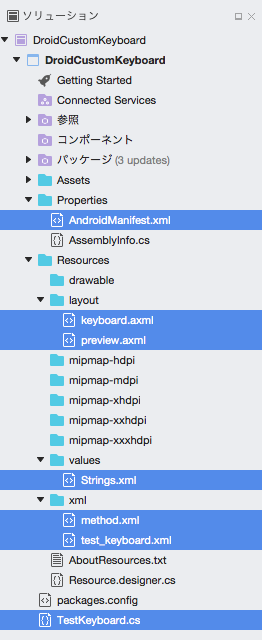
まずはResourcesフォルダに中にxmlフォルダを作ります。
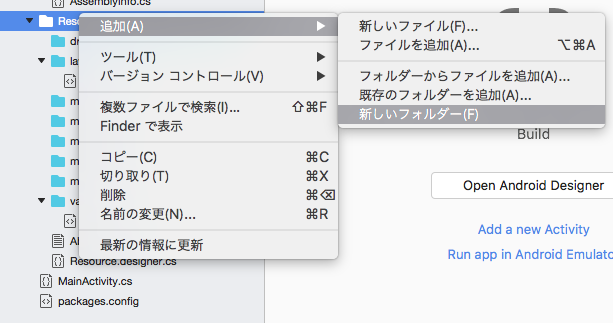
xmlフォルダができたら、さらにその中にXMLファイルを追加します。
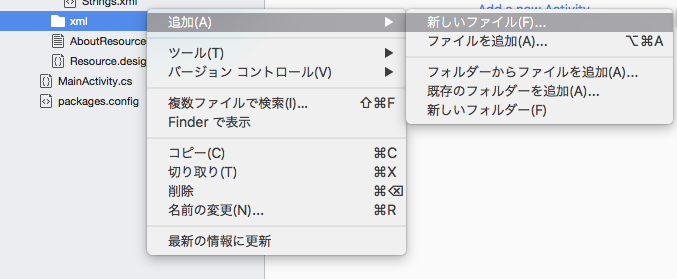
 `XML` -> `空のXMLファイル`を選択して、ファイル名を`method`にして`新規`を押してファイルを追加してください。
同様にしてtest_keyboardというXMLファイルを追加してください。
続いて、layoutフォルダにレイアウトファイルを追加します。
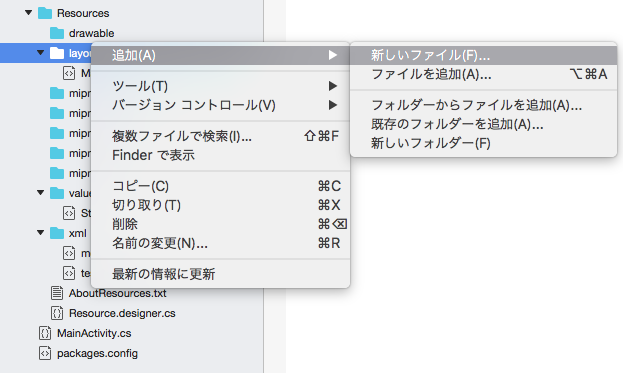
 `Android` -> `レイアウト`を選択して、ファイル名を`preview`にして`新規`を押してファイルを追加してください。
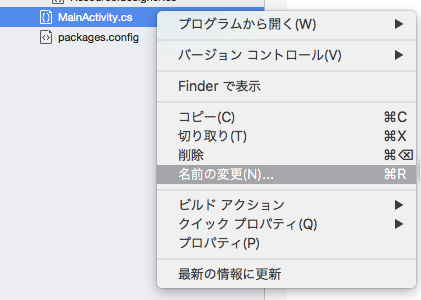
また、Main.axmlの名前を変更してkeyboard.axmlにします。
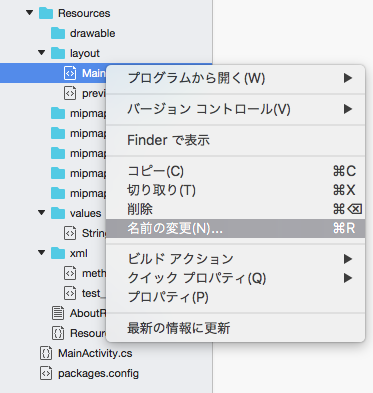
同様に、MainActivity.csの名前も変更してTestKeyboard.csにします。
3.コーディング1:Strings.xmlに追記
Resources/values/Strings.xmlに一行追記します。
<?xml version="1.0" encoding="utf-8"?>
<resources>
	<string name="app_name">DroidCustomKeyboard</string>
	<string name="test_keyboard">TestKeyboard</string> <!--追記-->
</resources>
4.コーディング2:keyboard.axmlの書き換え
Resources/layout/keyboard.axmlを書き換えます。
これがいわゆるキーボード全体のビューになります。
<?xml version="1.0" encoding="utf-8"?>
<LinearLayout xmlns:android="http://schemas.android.com/apk/res/android"
    android:orientation="vertical"
    android:layout_width="match_parent"
    android:layout_height="match_parent" />
<?xml version="1.0" encoding="utf-8"?>
<android.inputmethodservice.KeyboardView xmlns:android="http://schemas.android.com/apk/res/android"
    android:id="@+id/keyboard"
    android:layout_width="match_parent"
    android:layout_height="wrap_content"
    android:layout_alignParentBottom="true"
    android:keyPreviewLayout="@layout/preview" />
5.コーディング3:preview.axmlの書き換え
Resources/layout/preview.axmlを書き換えます。
このファイルはキーボードのボタンを押した時にキーの上に表示される小さい矩形のレイアウトを担っているようです。
<?xml version="1.0" encoding="utf-8"?>
<LinearLayout xmlns:android="http://schemas.android.com/apk/res/android"
    android:orientation="vertical"
    android:layout_width="match_parent"
    android:layout_height="match_parent" />
<?xml version="1.0" encoding="utf-8"?>
<TextView xmlns:android="http://schemas.android.com/apk/res/android"
    android:layout_width="match_parent"
    android:layout_height="match_parent"
    android:gravity="center"
    android:background="#CFD8DC"
    android:textStyle="bold"
    android:textSize="45sp" />
6.コーディング4:method.xmlを実装
Resources/xml/method.xmlを実装します。
このmethod.xmlがきちんと実装できていないと、Androidの環境設定のIME一覧にキーボードが表示されません。
@string/test_keyboardはvalues/Strings.xml内で定義したものがそのまま呼び出されます。
<?xml version="1.0" encoding="UTF-8" ?>
<input-method xmlns:android="http://schemas.android.com/apk/res/android">
    <subtype
        android:label="@string/test_keyboard"
        android:imeSubtypeLocale="en_US"
        android:imeSubtypeMode="keyboard" >
	</subtype>
</input-method>
7.コーディング5:test_keyboard.xmlを実装
Resources/xml/test_keyboard.xml を実装します。
このファイルはキーボードの中身のレイアウトを担います。キーを二段にしたい場合はRowタグを増やせばOKです。
android:codesはAndroidのKeyEventを参考にしてください。
<?xml version="1.0" encoding="UTF-8" ?>
<Keyboard xmlns:android="http://schemas.android.com/apk/res/android"
    android:keyWidth="25%p"
    android:horizontalGap="0px"
    android:verticalGap="0px"
    android:keyHeight="50sp" >

    <Row>
        <Key android:codes="29" android:keyLabel="A" android:keyEdgeFlags="left" />
        <Key android:codes="30" android:keyLabel="B" />
        <Key android:codes="31" android:keyLabel="C" />
		<Key android:codes="67" android:keyLabel="Del" android:keyEdgeFlags="right" android:isRepeatable="true"/>
    </Row>

</Keyboard>
8.コーディング6:TestKeyboard.csの実装(書き換え)
このcsファイルがキーボードの入力システム本体になります。
IMEのサービスとするためにInputMethodServiceを継承したクラスを実装します。
using Android.App;
using Android.Content;
using Android.Views;
using Android.Views.InputMethods;
using Android.InputMethodServices;
using Java.Lang;

namespace DroidCustomKeyboard
{

	//チェックポイント1
	[Service(Permission = "android.permission.BIND_INPUT_METHOD")]
	[IntentFilter(new[] { "android.view.InputMethod" })]
	[MetaData("android.view.im", Resource = "@xml/method")]
	public class TestKeyboard : InputMethodService, KeyboardView.IOnKeyboardActionListener
	{
		public KeyboardView kv;
        public Keyboard k;

	    //チェックポイント2
		public override View OnCreateInputView()
		{
            kv = (KeyboardView)this.LayoutInflater.Inflate(Resource.Layout.keyboard, null);
			k = new Keyboard(this, Resource.Xml.test_keyboard);
			kv.Keyboard = k;
			kv.OnKeyboardActionListener = this;
			return kv;
		}

	    //チェックポイント3
		public void OnKey(Android.Views.Keycode primaryCode, Android.Views.Keycode[] keyCodes)
		{
			IInputConnection ic = CurrentInputConnection;

			switch (primaryCode)
			{
                case Android.Views.Keycode.Del:
					ic.DeleteSurroundingText(1, 0);
					break;
				default:
                    if (Android.Views.Keycode.A <= primaryCode && primaryCode <= Android.Views.Keycode.Z)
                    {
                        char code = (char)(primaryCode - Android.Views.Keycode.A + 65);
                        ic.CommitText(new Java.Lang.String(code.ToString()), 1);
                    }
                    else if (Android.Views.Keycode.Num0 <= primaryCode && primaryCode <= Android.Views.Keycode.Num9)
                    {
                        char code = (char)(primaryCode - Android.Views.Keycode.Num0 + 48);
                        ic.CommitText(new Java.Lang.String(code.ToString()), 1);
                    }
					break;
			}
		}

	    //チェックポイント4
		public void OnPress(Android.Views.Keycode primaryCode)
		{ }

		public void OnRelease(Android.Views.Keycode primaryCode)
		{ }

		public void OnText(ICharSequence text)
		{ }

		public void SwipeLeft()
		{ }

		public void SwipeRight()
		{ }

		public void SwipeDown()
		{ }

		public void SwipeUp()
		{ }
	}
}
コードの説明
チェックポイント1
このクラスをIMEのサービスとして認識させるために必要なコードです。これが非常に重要なようで、ブレイクスルーするのが大変でした。Android StudioでIMEを作成する場合はManifestにxml形式で記述するようですが、Xamarin.Androidの場合はこのように直接csファイルに設定を行います。
チェックポイント2
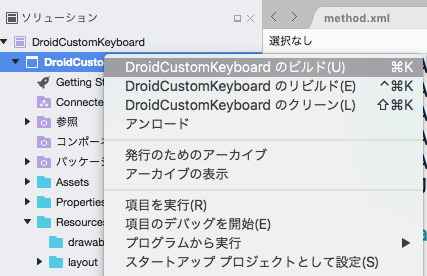
OnCreateInputViewにてキーボードが呼び出された時のキーボードのビューを生成しています。Resource.Layout.keyboardやResource.Xml.test_keyboardで警告が出ないようにするには、一度プロジェクトをビルドする必要があります。(ビルドをするとResource.designer.csファイルに呼び出し用の設定が加わります。)
チェックポイント3
OnKeyにてキーが押された時の反応を記述します。
キーコードが手に入るので、それで動作を分岐させます。普通の文字とDeleteやReturnなどのキーを区別するようにします。注意しなくてはならないのは、AndroidやXamarin.Androidで指定されているKeyCodeはASCIIコードとは異なるので、そのまま文字に変換できないという点です。ASCIIやUnicodeにするためのコードが余計に必要です。
チェックポイント4
InputMethodServiceおよびKeyboardView.IOnKeyboardActionListenerを実装する上で必要な最低限のメソッドたちです。とりわけ何か動作をさせたい場合は実装してあげてください。
6.実行(IMEのインストール)
まずは、プロジェクトの設定を変更します。
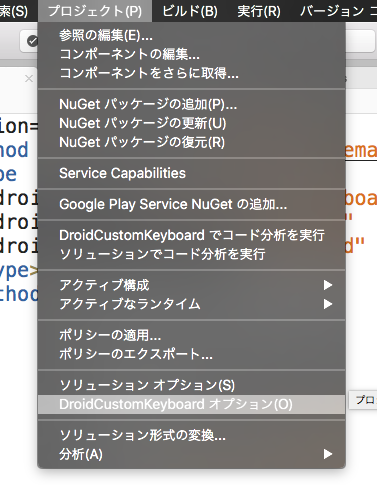
メニューバー -> プロジェクト -> DroidCustomKeyboard オプションを押します。
実行 -> 構成 -> Default の中のエントリポイントをサービスにし、明示的インテントのサービスをDroidCustomKeyboard.TestKeyboardにします。
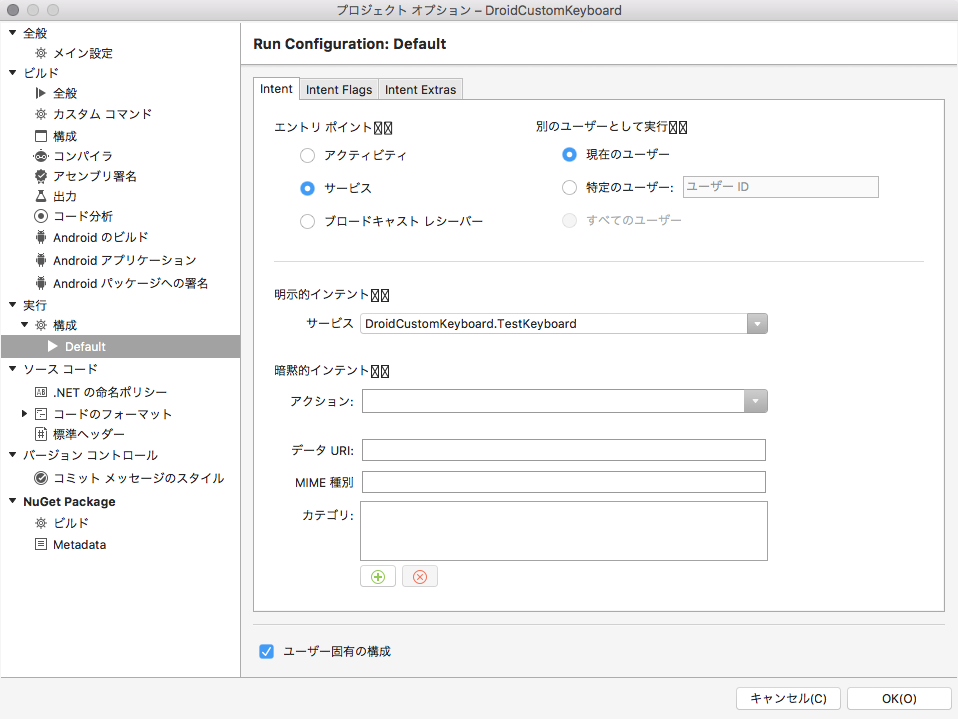
ビルドが成功したら実行します。
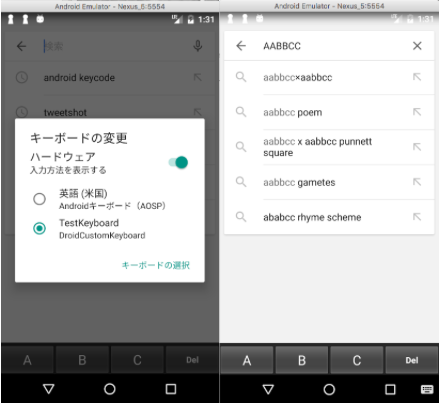
設定アプリ -> 言語と入力 -> 現在のキーボード -> キーボードの選択 -> DroidCustomKeyboard をON
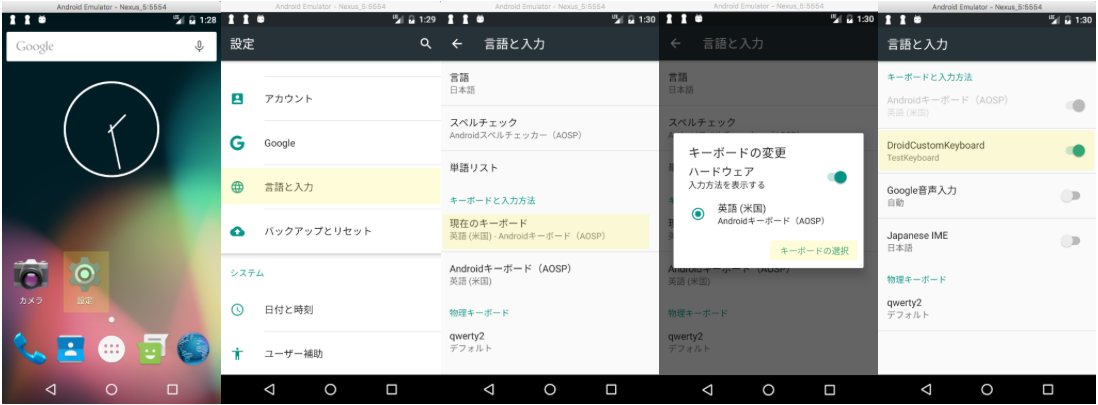
どこか文字入力ができるところでIMEを起動します。
IMEを切り替えたら自作のキーボードが使えます。
7.終わりに
Android Studioと同様の方法でIMEの実装を試みたところ、IMEのインストールに躓きteratailにお世話になりました。
Xamarin.Androidを使ったAndroidアプリ開発はAndroid Studioでの開発に非常に似ているようですが、実行やビルド設定など細かいところで差があったり、使用できるクラスやメソッドに差があったりして意外と厄介でした。
参考文献も異様に少ないので今後ノウハウが蓄積されると良いですね。
