phoenix + vue(vuex + vue-router) + webpack
phoenix と vuejs を webpack を使って連携した雛形を作ったので公開したいと思います。
以下の目的で作成しました。
- 今後、phoenixでアプリケーションを構築する時に素早く始めたい
vue + phoenixの環境を手早く構築したい方の参考になればと思います。
注意事項
- webpack の watch と Docker が相性が悪かったので、Dockerは今回は置いておきます
- 今回の件に限らず、いろいろやっていて思ったのですが・・・localで開発する際はDockerはrdbやredisなどのプロセスをたてておくだけで、ソースいじる部分はdockerじゃない方が何かと効率が良いんじゃないかと思う今日この頃です。
以下に要点を記載すると共に、githubにソースコードを置いておきます。
構築手順
project の作成
今回はwebpackを使いたいので、標準でついてくるbrunchは外しておきます。
brunchの方がいんですかねーーここらへんはよく調査してないです。。
$ mix phoenix.new --no-brunch phoenix_vue_webpack_template
vue + webpack integration
次に、vue+webpackとphoenixの連携をしてみようと思います。
基本的にはvue-cliのtemplateの流用で作ります。
package.json作成
$ touch package.json
package.json
-
axios、momentは特段必須ではありません。(apiを呼び出す際に利用するため入れています。) -
phoenixは後々socketを使うために入れてあります。
{
  "name": "phoenix_vue_webpack_template",
  "version": "1.0.0",
  "description": "phoenix + vue(vuex/vue-router) + webpack integration sample.",
  "author": "kumanote,LLC.",
  "scripts": {
    "deps": "npm install && mix deps.get",
    "watch": "webpack --watch --color --config client/build/webpack.dev.js",
    "start": "mix phoenix.server",
    "build": "node client/build/build.js"
  },
  "dependencies": {
    "axios": "^0.16.1",
    "moment": "^2.18.1",
    "phoenix": "^1.2.1",
    "vue": "^2.2.6",
    "vue-material": "^0.7.1",
    "vue-router": "^2.3.1",
    "vuex": "^2.3.1"
  },
  "devDependencies": {
    "autoprefixer": "^6.7.2",
    "babel-core": "^6.22.1",
    "babel-eslint": "^7.1.1",
    "babel-loader": "^6.2.10",
    "babel-plugin-transform-runtime": "^6.22.0",
    "babel-preset-env": "^1.3.2",
    "babel-preset-stage-2": "^6.22.0",
    "babel-register": "^6.22.0",
    "chalk": "^1.1.3",
    "connect-history-api-fallback": "^1.3.0",
    "copy-webpack-plugin": "^4.0.1",
    "css-loader": "^0.28.0",
    "eslint": "^3.19.0",
    "eslint-config-standard": "^6.2.1",
    "eslint-friendly-formatter": "^2.0.7",
    "eslint-loader": "^1.7.1",
    "eslint-plugin-html": "^2.0.0",
    "eslint-plugin-promise": "^3.4.0",
    "eslint-plugin-standard": "^2.0.1",
    "eventsource-polyfill": "^0.9.6",
    "extract-text-webpack-plugin": "^2.0.0",
    "file-loader": "^0.11.1",
    "friendly-errors-webpack-plugin": "^1.1.3",
    "html-webpack-plugin": "^2.28.0",
    "opn": "^4.0.2",
    "optimize-css-assets-webpack-plugin": "^1.3.0",
    "ora": "^1.2.0",
    "rimraf": "^2.6.0",
    "semver": "^5.3.0",
    "shelljs": "^0.7.6",
    "url-loader": "^0.5.8",
    "vue-loader": "^11.3.4",
    "vue-style-loader": "^2.0.5",
    "vue-template-compiler": "^2.2.6",
    "webpack": "^2.3.3",
    "webpack-bundle-analyzer": "^2.2.1",
    "webpack-merge": "^4.1.0"
  },
  "engines": {
    "node": ">= 4.0.0",
    "npm": ">= 3.0.0"
  },
  "browserslist": [
    "> 1%",
    "last 2 versions",
    "not ie <= 8"
  ]
}
webpack系のファイルを作成
- client/build/build.js
- client/build/check-versions.js
- client/build/utils.js
- client/build/vue-loader.conf.js
- client/build/webpack.base.conf.js
- client/build/webpack.dev.conf.js
- client/build/webpack.prod.conf.js
- client/config/dev.env.js
- client/config/index.js
- client/config/prod.env.js
- .babelrc
- .editorconfig
- .eslintignore
- .eslintrc.js
- .postcssrc.js
ここでは開発時に必要なclient/build/webpack.dev.jsのみ説明します。
client/build/webpack.dev.js
依存しているファイルの説明は省きますが、hot module replace等を利用しています。
これをwebpack --watchで使用し、phoenixと連携します。
var utils = require('./utils')
var webpack = require('webpack')
var config = require('../config')
var merge = require('webpack-merge')
var baseWebpackConfig = require('./webpack.base.conf')
var HtmlWebpackPlugin = require('html-webpack-plugin')
var FriendlyErrorsPlugin = require('friendly-errors-webpack-plugin')

module.exports = merge(baseWebpackConfig, {
  module: {
    rules: utils.styleLoaders({ sourceMap: config.dev.cssSourceMap })
  },
  // cheap-module-eval-source-map is faster for development
  devtool: '#cheap-module-eval-source-map',
  plugins: [
    new webpack.DefinePlugin({
      'process.env': config.dev.env
    }),
    // https://github.com/glenjamin/webpack-hot-middleware#installation--usage
    new webpack.HotModuleReplacementPlugin(),
    new webpack.NoEmitOnErrorsPlugin(),
    // https://github.com/ampedandwired/html-webpack-plugin
    new HtmlWebpackPlugin({
      filename: config.build.index,
      template: 'web/static/index.html',
      inject: true
    }),
    new FriendlyErrorsPlugin()
  ]
})
これで、webpack系が揃ったので、
config/dev.exsにwatcherを設定します。
-  watchers: []
+  watchers: [node: ["node_modules/webpack/bin/webpack.js", "--watch", "--color", "--config", "client/build/webpack.dev.conf.js"]]
また、index.htmlの更新時にリロードしてほしいので、以下の変更も加えます。(あとweb/templatesは不要なため削除しておきます。)
   live_reload: [
     patterns: [
-      ~r{priv/static/.*(js|css|png|jpeg|jpg|gif|svg)$},
+      ~r{priv/static/.*(js|css|png|jpeg|jpg|gif|svg|html)$},
       ~r{priv/gettext/.*(po)$},
-      ~r{web/views/.*(ex)$},
-      ~r{web/templates/.*(eex)$}
+      ~r{web/views/.*(ex)$}
     ]
   ]
index.htmlを作成(レンダリングを確認)
client側
- まずは、不要なファイル群を削除します。
rm -rf priv/static/*  # <- webpackでビルドしたものをここに配置します。既存のものは削除します。
rm -rf web/templates  # <- server side の templateはもはや不要なので削除します。
- 次に
index.htmlとwebpackのエントリーとなるmain.jsを作成していきます。(web/staticの配下につくっていきます。)
以下が作成したファイル群になります。
- web/static/index.html
- web/static/js/App.vue
- web/static/js/components/Index.vue
- web/static/js/main.js
- web/static/js/router/index.js
- web/static/js/store/index.js
web/static/index.html
<!DOCTYPE html>
<html lang="ja">
  <head>
    <meta charset="utf-8">
    <meta http-equiv="X-UA-Compatible" content="IE=edge">
    <meta name="viewport" content="width=device-width, initial-scale=1">
    <meta name="description" content="phoenix + vue(vuex/vue-router) + webpack integration sample.">
    <meta name="author" content="kumanote,LLC">
    <title>phoenix_vue_webpack_template</title>
  </head>
  <body>
    <div id="app"></div>
    <!-- built files will be auto injected -->
  </body>
</html>
server側
web/controllers/page_controller.exを以下のように修正します。
   def index(conn, _params) do
-    render conn, "index.html"
+    html(conn, File.read!("priv/static/index.html"))
   end
また、ページリロード時にindex.htmlにfallbackするようにweb/router.exを以下のように修正します。
defmodule PhoenixVueWebpackTemplate.Router do
     pipe_through :browser # Use the default browser stack

     get "/", PageController, :index
+    get "/*path", PageController, :index
   end
動作確認
この段階で、index.htmlだけであれば、確認できるようになっています。
しかもhot deploy状態なので、web/static/main.jsに依存しているものは全て、ローカルで変更を加えたらブラウザにリロードが走るはずです。
$ npm install && mix deps.get
$ mix ecto.create && mix ecto.migrate
$ mix phoenix.server
ここまでの変更内容はcommit log @ githubをご覧ください。
apiの作成とvue側の対応
ここからは、phoenixでのapiの作成とvuejs側の利用部分の作り込みになります。
apiの実装
- User Modelの作成を行います。
$ mix phoenix.gen.json User users name:string age:integer
これだけで、modelのソースコードとjsonを返すcontrollerが自動生成されます。(便利だけど本気の製品には使えなそうな気がします。)
-
priv/repo/migrations/20170720144527_create_user.exs
-
test/controllers/user_controller_test.exs
-
test/models/user_test.exs
-
web/controllers/user_controller.ex
-
web/models/user.ex
-
web/views/changeset_view.ex
-
web/views/user_view.ex
-
次にtableの作成を行います。
$ mix ecto.migrate
ただ、これを行うと以下のようなエラーがでてしまいます。
== Compilation error on file web/controllers/user_controller.ex ==
** (CompileError) web/controllers/user_controller.ex:18: undefined function user_path/3
    (stdlib) lists.erl:1338: :lists.foreach/2
    (stdlib) erl_eval.erl:670: :erl_eval.do_apply/6
    (elixir) lib/kernel/parallel_compiler.ex:117: anonymous fn/4 in Kernel.ParallelCompiler.spawn_compilers/1
これは、web/router.exにてこのUserControllerを使う記述を追記してあげることで解消します。
今回は一覧表示と追加の2つだけ実装しようと思うので、以下の部分のみ追加しました。
+  scope "/api", PhoenixVueWebpackTemplate do
+    pipe_through :api
+
+    get "/users", UserController, :index
+    get "/users/:id", UserController, :show
+    post "/users", UserController, :create
+  end
再度気をとりなおして
$ mix ecto.migrate
Compiling 10 files (.ex)
Generated phoenix_vue_webpack_template app

23:52:38.829 [info]  == Running PhoenixVueWebpackTemplate.Repo.Migrations.CreateUser.change/0 forward

23:52:38.829 [info]  create table users

23:52:38.835 [info]  == Migrated in 0.0s
ちゃんとtableが作られました。
これで server 側の実装は終わりになります。
実際にcurlで確認できます。
$ curl -X GET http://localhost:4000/api/users
{"data":[]}$
client(vue)の実装
- web/static/js/api/user.js
- web/static/js/components/Index.vue
- web/static/js/components/user/Add.vue
- web/static/js/components/user/List.vue
- web/static/js/router/index.js
- web/static/js/store/index.js
- web/static/js/store/modules/user/add.js
- web/static/js/store/modules/user/list.js
web/static/js/api/user.js
api関連は全てapiフォルダに格納します。
axiosを使い、ajaxリクエストを飛ばします。
返却された値は呼び出し側(store)で処理するようにします。
import axios from 'axios'

export default {
  getUserList (callback) {
    const url = '/api/users'
    axios.get(url).then(function (response) {
      callback(response.data)
    }).catch(function (error) {
      console.log(error)
    })
  },
  addUser (name, age, callback) {
    const url = '/api/users'
    const data = {
      'user': {
        'name': name,
        'age': age
      }
    }
    axios.post(url, data).then(function (response) {
      callback(response.data)
    }).catch(function (error) {
      console.log(error)
    })
  }
}
web/static/js/store/modules/user/list.js
namespaced: trueを指定することで、store moduleの名前空間が使えるようになり便利です。
ここでは、必要に応じて api の呼び出しを行い、結果を格納しています。
import api from '@/api/user'

const state = {
  userList: []
}

const getters = {
  userList: state => state.userList
}

const actions = {
  getUserList ({ commit, state }) {
    api.getUserList(apiResponseData => {
      const userList = apiResponseData.data
      commit('receiveUserList', userList)
    })
  }
}

const mutations = {
  receiveUserList (state, userList) {
    state.userList = []
    for (let i = 0; i < userList.length; i++) {
      state.userList.push(userList[i])
    }
  }
}

export default {
  namespaced: true,
  state,
  getters,
  actions,
  mutations
}
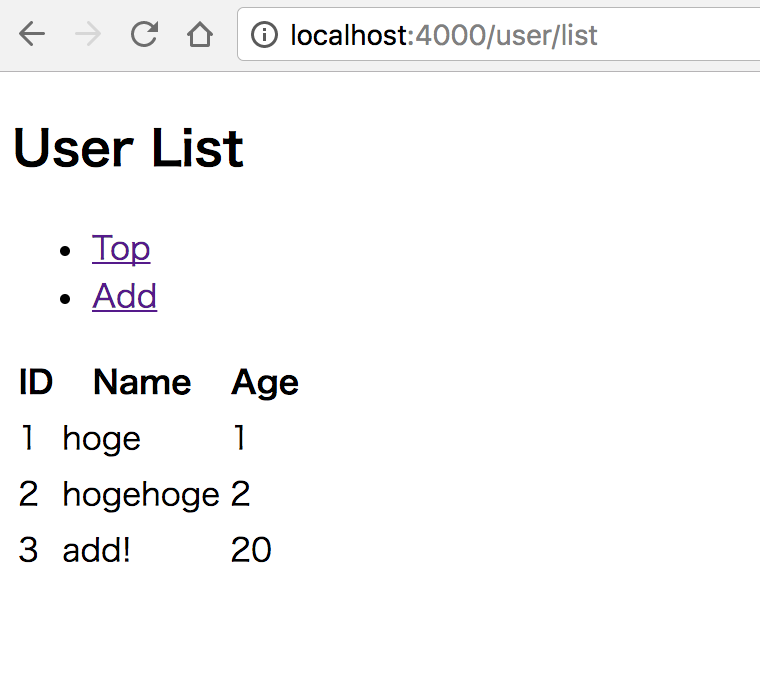
web/static/js/components/user/List.vue
view部分になります。
表示時に storeのgetUserList actionを呼び出します。
結果的にapiの呼び出し〜結果の格納が行われ、viewのtable部分にレコードが表示されるようになります。
<template>
  <div>
    <h2>User List</h2>
    <ul>
      <li><router-link to="/">Top</router-link></li>
      <li><router-link to="/user/add">Add</router-link></li>
    </ul>
    <table>
      <thead>
        <tr>
          <th>ID</th>
          <th>Name</th>
          <th>Age</th>
        </tr>
      </thead>
      <tbody>
        <tr v-for="(user, index) in userList" :key="index">
          <td>{{user.id}}</td>
          <td>{{user.name}}</td>
          <td>{{user.age}}</td>
        </tr>
      </tbody>
    </table>
  </div>
</template>

<script>
import { mapGetters } from 'vuex'
export default {
  name: 'userList',
  computed: mapGetters({
    userList: 'userList/userList'
  }),
  mounted () {
    this.$store.dispatch('userList/getUserList')
  }
}
</script>

<!-- Add "scoped" attribute to limit CSS to this component only -->
<style scoped>
</style>
web/static/js/router/index.js
localhost:4000/user/list で web/static/js/components/user/List.vue がレンダリングされるようにします。
/user/add も同様
またmode: 'history'を指定することで、アンカーではなく、URLのパスが変わるようにします。
(router.exでindex.htmlにfallbackするように記載する必要があるのはこのためです。)
import Vue from 'vue'
import Router from 'vue-router'
import Index from '@/components/Index'
import UserList from '@/components/user/List'
import UserAdd from '@/components/user/Add'

Vue.use(Router)

export default new Router({
  mode: 'history',
  routes: [
    {
      path: '/',
      name: 'index',
      component: Index
    },
    {
      path: '/user/list',
      name: 'user_list',
      component: UserList
    },
    {
      path: '/user/add',
      name: 'user_add',
      component: UserAdd
    }
  ]
})
ここまでやると vue -> api -> phoenix -> vue という一連の流れのサンプルが実装できました。
apiの部分の実装箇所はcommit log @ githubをご覧ください。
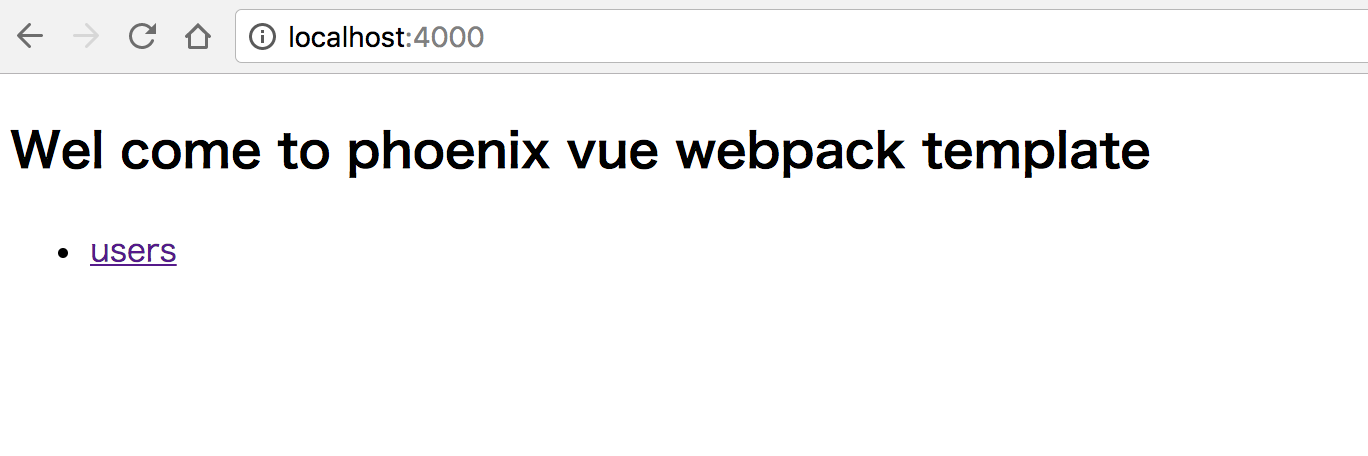
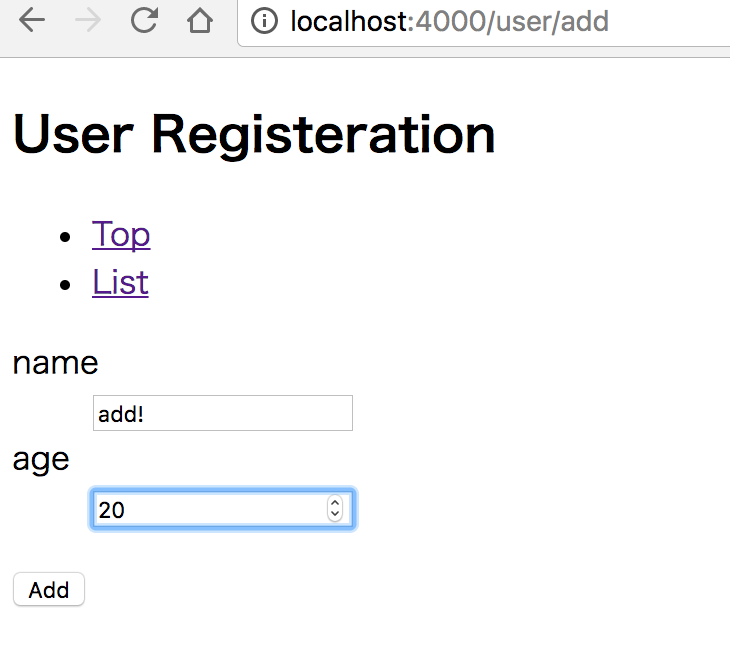
見た目しょぼいですが、以下が動作イメージになります。

以上になります。