どーもKsukeです。
写真から3Dモデルを作る方法を思いついたその05で、面の削減をやっていきます。
その4はこちらhttps://qiita.com/Ksuke/items/144c06f128b015b001dd
※注意※
この記事は思いついて試した事の末路を載せているだけなので、唐突なネタやBad Endで終わる可能性があります。
やってみる
手順
1.面の削減
・・・今回はこれだけです(調べて実装するのに苦労した割にやりたいことが1メソッドに収まったから記事の文字数がいつも以上に少ないのは秘密)。
~~ところどころにあるコードは、最後にまとめたものを載せてあります。~~2か所にしかソースがないですが、一応いつも通り最後にも載せてあります。
1.面の削減
面の削減は、blenderの機能を利用して行います。どのような機能かというと、Blenderのオブジェクトモードで利用できるmodifierのうちのDecimateという機能です。いくつかパラメータを指定して実行すると、面の数を減らしてくれます。おまけで、面を減らした結果使われなくなった頂点の削除も行っています。
# 面の数を減らす関数
def faceReduction(obj,modifierName="faceReductionDecimate"):

    # 変更オブジェクトをアクティブに変更する
    bpy.context.view_layer.objects.active = obj

    #オブジェクトモードに移行
    bpy.ops.object.mode_set(mode='OBJECT', toggle=False)

    #modifierの、面削減のやつを追加
    bpy.ops.object.modifier_add(type='DECIMATE')

    #名前を付けとく
    bpy.context.object.modifiers["Decimate"].name = modifierName

    #削減方法を指定
    bpy.context.object.modifiers[modifierName].decimate_type = "COLLAPSE"

    #削減率を指定
    bpy.context.object.modifiers[modifierName].ratio = 0.05

    #Decimateを実行する
    bpy.ops.object.modifier_apply(modifier = modifierName)

    # 編集モードに移行する
    bpy.ops.object.mode_set(mode='EDIT', toggle=False)

    #接続がない頂点を削除
    bpy.ops.mesh.delete_loose()

# オブジェクト追加(前回までは確認用でしかオブジェクトの追加をしていなかったので)
me,obj = addObj(coords=coords,faces=faces,name = "porigon",offset=[-50,-50,-50])

# 面の削減
faceReduction(obj)
動作確認
最後にコードが問題なく動くか、それと今回は面と頂点がどのくらい削減されたかも確認してみます。
1.オブジェクトの表示
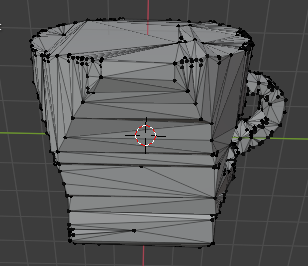
こんな感じにオブジェクトが表示されていれば成功。

見るからに面と頂点も減ってます。
2.面と頂点の削減数
表示・削減の後にこんな感じのコードを追加して、削減前と後の面と頂点の数を表示します。
# 面の削減前の確認用オブジェクト追加
originMe,originObj = addObj(coords=coords,faces=faces,name = "originPorigon",offset=[-50,-50,-50])

# 削減の後のオブジェクトを、各データを操作しやすい形式に変換
bm=bmesh.from_edit_mesh(obj.data)

# 再度編集モードに移行する
bpy.ops.object.mode_set(mode='EDIT', toggle=False)

# 削減の前のオブジェクトを、各データを操作しやすい形式に変換
originBm=bmesh.from_edit_mesh(originObj.data)

# 2つのオブジェクトの面と頂点の数を表示
print("originObj:")
print("  vertsLen:{}".format(len(originBm.verts)))
print("  facesLen:{}".format(len(originBm.faces)))
print()
print("faceReductedObj:")
print("  vertsLen:{}".format(len(bm.verts)))
print("  facesLen:{}".format(len(bm.faces)))
print()
出力結果はこんな感じに。
originObj:
  vertsLen:13279
  facesLen:26590

faceReductedObj:
  vertsLen:594
  facesLen:1328
大体1/20程度になってますね。元のオブジェクトのデータ量多すぎ。。。
次は?
やっとそれっぽくなりましたが、色がなくてさみしいので画像(モデルの生成に使ったやつ)をテクスチャとして張り付けてみようと思います。
コードまとめ
前回のコードの後ろに追加すれば動くはずです。
関数編
# 面の数を減らす関数
def faceReduction(obj,modifierName="faceReductionDecimate"):

    # 変更オブジェクトをアクティブに変更する
    bpy.context.view_layer.objects.active = obj

    #オブジェクトモードに移行
    bpy.ops.object.mode_set(mode='OBJECT', toggle=False)

    #modifierの、面削減のやつを追加
    bpy.ops.object.modifier_add(type='DECIMATE')

    #名前を付けとく
    bpy.context.object.modifiers["Decimate"].name = modifierName

    #削減方法を指定
    bpy.context.object.modifiers[modifierName].decimate_type = "COLLAPSE"

    #削減率を指定
    bpy.context.object.modifiers[modifierName].ratio = 0.05

    #Decimateを実行する
    bpy.ops.object.modifier_apply(modifier = modifierName)

    # 編集モードに移行する
    bpy.ops.object.mode_set(mode='EDIT', toggle=False)

    #接続がない頂点を削除
    bpy.ops.mesh.delete_loose()
実行コード編
# オブジェクト追加
me,obj = addObj(coords=coords,faces=faces,name = "porigon",offset=[-50,-50,-50])

# 面の削減
faceReduction(obj)

print("step05:face reduction success\n")


# 以下確認表示用(メインの流れと関係ないので、次の回では多分消えてる)

# 面の削減前の確認用オブジェクト追加
originMe,originObj = addObj(coords=coords,faces=faces,name = "originPorigon",offset=[-50,-50,-50])

# 削減の後のオブジェクトを、各データを操作しやすい形式に変換
bm=bmesh.from_edit_mesh(obj.data)

# 再度編集モードに移行する
bpy.ops.object.mode_set(mode='EDIT', toggle=False)

# 削減の前のオブジェクトを、各データを操作しやすい形式に変換
originBm=bmesh.from_edit_mesh(originObj.data)

# 2つのオブジェクトの面と頂点の数を表示
print("originObj:")
print("  vertsLen:{}".format(len(originBm.verts)))
print("  facesLen:{}".format(len(originBm.faces)))
print()
print("faceReductedObj:")
print("  vertsLen:{}".format(len(bm.verts)))
print("  facesLen:{}".format(len(bm.faces)))
print()