どーもKsukeです。
写真から3Dモデルを作る方法を思いついたその04で、ポリゴンの生成をやっていきます。
その3はこちらhttps://qiita.com/Ksuke/items/8b7f2dc840126753b4e9
※注意※
この記事は思いついて試した事の末路を載せているだけなので、唐突なネタやBad Endで終わる可能性があります。
やってみる
手順
1.点群の境界の点を取得
2.点群の境界の内側の点を取得
3.ポリゴン生成
ところどころにあるコードは、最後にまとめたものを載せてあります。
1.点群の境界の点を取得
今のところオブジェクトが点群で表されていますが、その点はオブジェクトの内側にも敷き詰められています。内側の点はいらないので、境界部分の点のみを取り出します。
各点が境界かを判定するために、各座標の隣接6方向(上下右左前後)にある点の数を数えます。隣接点の数が0でない点を境界の点として取り出しました。
# 境界部分の点群を返す関数
def genBorderPointSpace(imgProjectSpace):

    # 空間に6方向(上下左右前後)の加算フィルタに相当する処理をして、各地点の周囲の点の数のmapを作る
    locationPointMap = np.stack([
        imgProjectSpace[2:,1:-1,1:-1],
        imgProjectSpace[:-2,1:-1,1:-1],
        imgProjectSpace[1:-1,2:,1:-1],
        imgProjectSpace[1:-1,:-2,1:-1],
        imgProjectSpace[1:-1,1:-1,2:],
        imgProjectSpace[1:-1,1:-1,:-2],
    ]).sum(axis=0,dtype=np.int8)

    #空間の大きさをもとに戻しておく
    locationPointMap = np.insert(locationPointMap, (0,-1), 0, axis=0)
    locationPointMap = np.insert(locationPointMap, (0,-1), 0, axis=1)
    locationPointMap = np.insert(locationPointMap, (0,-1), 0, axis=2)

    #各地点ごとの周囲の点の数のmapから、周囲の点の数が0でも6でもない(周囲に点が存在し、かつ点に囲まれていない)点を残した空間を作る
    borderPointSpace = np.where((0<locationPointMap)&(locationPointMap<6)&(imgProjectSpace==1),1,0).astype(np.int8)

    #周りを点で囲まれていない点を残した空間を返す
    return borderPointSpace

# 重ねた空間の点群のうち、外部と接している境界部分の点を取り出す
borderPointSpace = genBorderPointSpace(imgProjectSpace)

# 空間から点の座標を取り出す
borderCoords = binary2coords(borderPointSpace)
2.点群の境界の内側の点を取得
ポリゴンの表示は境界部分の点だけで充分ですが、のちのポリゴンの自動生成の都合で、境界の点の内側の点も取得します。
# 境界部分のすぐ内側の点群を返す関数
def genInsidePointSpace(imgProjectSpace,borderPointSpace):

    #境界付近の点を残した空間を作成(境界部分は残さない)
    nearBorderPointSpace = np.stack([
        borderPointSpace[2:,1:-1,1:-1],
        borderPointSpace[:-2,1:-1,1:-1],
        borderPointSpace[1:-1,2:,1:-1],
        borderPointSpace[1:-1,:-2,1:-1],
        borderPointSpace[1:-1,1:-1,2:],
        borderPointSpace[1:-1,1:-1,:-2],
        borderPointSpace[1:-1,1:-1,1:-1]*-6
    ]).sum(axis=0,dtype=np.int8)

    #大きさを戻す
    nearBorderPointSpace = np.insert(nearBorderPointSpace, (0,-1), 0, axis=0)
    nearBorderPointSpace = np.insert(nearBorderPointSpace, (0,-1), 0, axis=1)
    nearBorderPointSpace = np.insert(nearBorderPointSpace, (0,-1), 0, axis=2)

    #境界付近で、元の点群の内側の点を残した空間を作成
    insidePointSpace = np.where(((0<nearBorderPointSpace)&(imgProjectSpace==1)),1,0)

    return insidePointSpace


# 重ねた空間の点群のうち、境界部分のすぐ内側の点を取り出す
insidePointSpace = genInsidePointSpace(imgProjectSpace,borderPointSpace)

# 空間から点の座標を取り出す
insideCoords = binary2coords(insidePointSpace)
3.ポリゴン生成
2種類の点を取得したら、いよいよポリゴンの生成をしていきます。この処理でやっていることは他の処理に比べ説明しずらいので、2次元の画像で説明します(ここだけめっちゃ時間かかった。。。)。
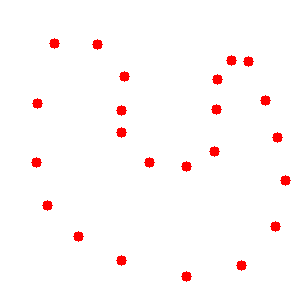
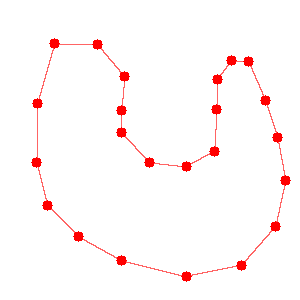
まずこの処理の目的を確認しなおすと、オブジェクトの境界部分の点から、オブジェクトを囲う面を決定することです。2次元の画像上でいうと、オブジェクトの境界部分の点(図1)から領域を囲う線(図2)を決定することになります。
 |
|---|
| 図1.境界部分の点 |
| ↓ |
 |
|---|
| 図2.最終的に欲しい境界線 |
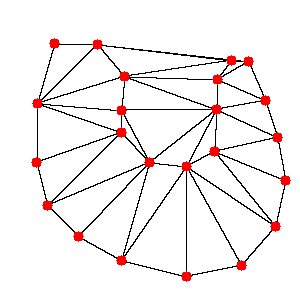
このような処理を行うために、Delaunayというメソッドを利用しました。これは、点で表された領域を三角形で分割する、というものです。画像の赤い点でDelaunayをそのままを試した結果が下の図3です。御覧の通りほしい境界部分に線を引けてはいますが、それ以外の部分にも線が引かれてしまっています。
 |
|---|
| 図3.境界部分の点の三角分割結果 |
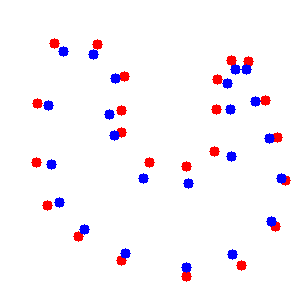
さーて困ったと悩んだ末に、境界部分の点とは別に、境界部分の内側の点を加えてDelaunayを行うことにしました。境界部分の内側の点とは、境界部分の点に近く、かつオブジェクトの領域の内側にある点のことです。下の図4でいうところの、追加された青い点です。
 |
|---|
| 図4.境界部分の点と境界部分の内側の点 |
この境界部分の内側の点を含めてDelaunayをするとどうなるかというと、下の図5のようになります。
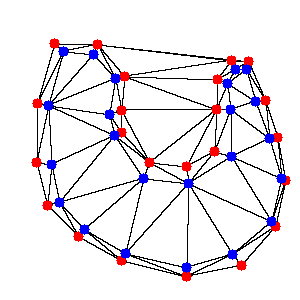 |
|---|
| 図5.境界部分の点と境界部分の内側の点の三角分割結果 |
一見赤い点だけでDelaunayした時より少し複雑になっただけに見えるかもしれませんが、実はこれなら分割した三角形を3種類に分類することができます。
どう分類するかというと、
・境界部分の点だけで構成された三角形(薄い赤で塗られているもの)
・境界部分の内側の点だけで構成された三角形(薄い青で塗られているもの)
・境界部分の点と境界部分の内側の点両方で構成された三角形(薄い紫で塗られているもの)
という具合です。実際に塗り分けてみると図6のようになります。
 |
|---|
| 図6.三角分割分類結果 |
3種類の三角形を見てみると、最終的に欲しい境界線はすべて薄い紫の三角形に含まれていることがわかります。そこで薄い紫の三角形以外を除くと図7のようになります。
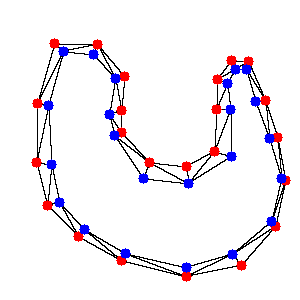 |
|---|
| 図7.境界線を含む三角形 |
ここまで三角形が減ったところで、次は線に注目してみていきます。線に注目すると、こちらも3種類に分類することができます。
どう分類するかというと、
・境界部分の点をつないだ線(薄い赤で塗られているもの)
・境界部分の内側の点をつないだ線(薄い青で塗られているもの)
・境界部分の点と境界部分の内側の点をつないだ線(薄い紫で塗られているもの)
という具合です。実際に塗り分けてみると図8のようになります。
 |
|---|
| 図8.線分類結果 |
ここまでくればあとは見た通りです。薄い赤で塗り分けた線が、まさに図2で書かれた最終的に欲しい境界線そのまんまですよね?てなわけで薄い赤の線以外を除くと図9のようになります。
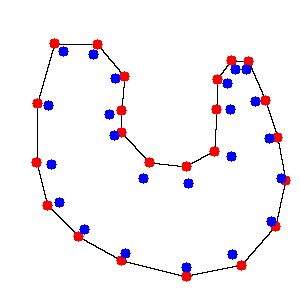 |
|---|
| 図9.取得できた境界線 |
このようにして、点群からそれを囲う線(3次元の点群対象であれば面)を取得することができます。この処理を、3次元の点群を対象として実装したのがこちらです。
# 座標群からポリゴンの面を決定する関数
def genPolygon(borderCoords,insideCoords):

    #2種類の頂点を結合(図4の処理に相当)
    coords = np.concatenate([borderCoords,insideCoords])

    #頂点ごとの種別を表すmapを生成(0はborderで、1はinside)
    coordStat = np.zeros((len(coords)),dtype=np.uint8)
    coordStat[len(borderCoords):len(borderCoords)+len(insideCoords)] = 1

    #頂点群から4点からなる三角錐群を生成(図5の処理に相当)
    triPyramids = Delaunay(coords).simplices

    #三角錐ごとに、insideの頂点がいくつ含まれているか確認(図6の処理に相当)
    triPyramidsStat = coordStat[triPyramids].sum(axis=1)

    #三角錐のうち、insideの頂点とborderの頂点を両方含んでいるものを取り出して、有効な三角錐とする(図7の処理に相当)
    #(ここでborderの頂点のみで構成されたオブジェクトの外部の余白の空間の三角錐と、insideの頂点のみで構成されたオブジェクトの内部の余白の空間の三角錐を取り除く)
    effectiveTriPyramids = triPyramids[np.where((triPyramidsStat!=0)&(triPyramidsStat!=4))[0]]

    #オブジェクトの面の候補(頂点のindex3つ)を入れるlist(余分なものは後々取り除く)
    faces = []

    #有効な三角錐の面を、オブジェクトの面の候補をして取り出す(記事の画像の説明でいう、線に注目している部分に該当)
    for coordIndexs in effectiveTriPyramids:
        faces.append([coordIndexs[0],coordIndexs[1],coordIndexs[2]])
        faces.append([coordIndexs[0],coordIndexs[1],coordIndexs[3]])
        faces.append([coordIndexs[0],coordIndexs[2],coordIndexs[3]])
        faces.append([coordIndexs[1],coordIndexs[2],coordIndexs[3]])

    #オブジェクトの面の候補の、頂点のindexを並び替え、重複を取り除く
    faces = np.array(faces)
    faces.sort(axis=1)
    faces = np.unique(faces,axis=0)

    #面ごとに、insideの頂点をいくつ含んでいるのか確認(図8の処理に相当)
    faceStat = coordStat[faces].sum(axis=1)

    #insideの頂点を1つも含んでいない面を取り出し(図9の処理に相当)
    faces = faces[np.where(faceStat==0)]

    #頂点と面を返す
    return borderCoords,faces


# 2種類の座標からポリゴン(正確にはポリゴンとなる頂点と頂点を結ぶ面の定義)を生成
coords,faces = genPolygon(borderCoords,insideCoords)

# facesをblenderに渡す形式に変更
faces = [[face[0],face[1],face[2],face[0]] for face in faces]
動作確認
最後にコードが問題なく動くか確認。
1.全部まとめて
ポリゴン生成のところで力尽きたので動確はまとめて。。。
下のコードをblenderで実行して、
# 頂点とポリゴンを描画
addObj(coords=coords,faces=faces,name = "porigon",offset=[-125,-50,-50])
addObj(coords=borderCoords,name = "borderCoords",offset=[-50,-85,-50])
addObj(coords=insideCoords,name = "insideCoords",offset=[-50,-15,-50])
こんな感じのオブジェクトが表示されれば成功。オブジェクトのうち下2つをよくよく見比べると、右のほうが少し小さい(境界の内側の点だから)。
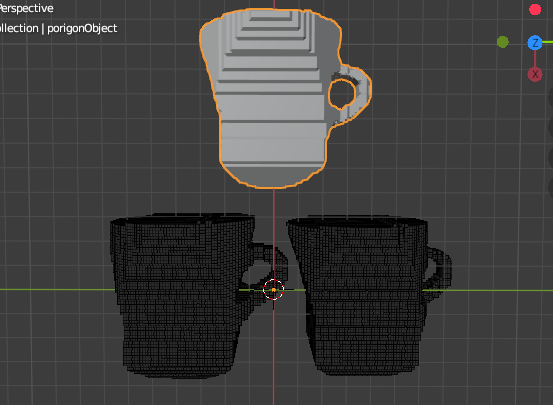
次は?
やっとポリゴンが表示されたけど、ポリゴン数がめちゃくちゃ多い・・・。ので、blenderの機能を使ってポリゴン数の削減を行っていきます。
2020/9/25追記
その5を公開しました。
https://qiita.com/Ksuke/items/6595323e79892acf9a7a
コードまとめ
前回のコードの後ろに追加すれば動くはずです。
関数編
# 境界部分の点群を返す関数
def genBorderPointSpace(imgProjectSpace):

    # 空間に6方向(上下左右前後)の加算フィルタに相当する処理をして、各地点の周囲の点の数のmapを作る
    locationPointMap = np.stack([
        imgProjectSpace[2:,1:-1,1:-1],
        imgProjectSpace[:-2,1:-1,1:-1],
        imgProjectSpace[1:-1,2:,1:-1],
        imgProjectSpace[1:-1,:-2,1:-1],
        imgProjectSpace[1:-1,1:-1,2:],
        imgProjectSpace[1:-1,1:-1,:-2],
    ]).sum(axis=0,dtype=np.int8)

    #空間の大きさをもとに戻しておく
    locationPointMap = np.insert(locationPointMap, (0,-1), 0, axis=0)
    locationPointMap = np.insert(locationPointMap, (0,-1), 0, axis=1)
    locationPointMap = np.insert(locationPointMap, (0,-1), 0, axis=2)

    #各地点ごとの周囲の点の数のmapから、周囲の点の数が0でも6でもない(周囲に点が存在し、かつ点に囲まれていない)点を残した空間を作る
    borderPointSpace = np.where((0<locationPointMap)&(locationPointMap<6)&(imgProjectSpace==1),1,0).astype(np.int8)

    #周りを点で囲まれていない点を残した空間を返す
    return borderPointSpace

# 境界部分のすぐ内側の点群を返す関数
def genInsidePointSpace(imgProjectSpace,borderPointSpace):

    #境界付近の点を残した空間を作成(境界部分は残さない)
    nearBorderPointSpace = np.stack([
        borderPointSpace[2:,1:-1,1:-1],
        borderPointSpace[:-2,1:-1,1:-1],
        borderPointSpace[1:-1,2:,1:-1],
        borderPointSpace[1:-1,:-2,1:-1],
        borderPointSpace[1:-1,1:-1,2:],
        borderPointSpace[1:-1,1:-1,:-2],
        borderPointSpace[1:-1,1:-1,1:-1]*-6
    ]).sum(axis=0,dtype=np.int8)

    #大きさを戻す
    nearBorderPointSpace = np.insert(nearBorderPointSpace, (0,-1), 0, axis=0)
    nearBorderPointSpace = np.insert(nearBorderPointSpace, (0,-1), 0, axis=1)
    nearBorderPointSpace = np.insert(nearBorderPointSpace, (0,-1), 0, axis=2)

    #境界付近で、元の点群の内側の点を残した空間を作成
    insidePointSpace = np.where(((0<nearBorderPointSpace)&(imgProjectSpace==1)),1,0)

    return insidePointSpace

    #座標群からポリゴンの面を決定する関数
def genPolygon(borderCoords,insideCoords):

    #2種類の頂点を結合(図4の処理に相当)
    coords = np.concatenate([borderCoords,insideCoords])

    #頂点ごとの種別を表すmapを生成(0はborderで、1はinside)
    coordStat = np.zeros((len(coords)),dtype=np.uint8)
    coordStat[len(borderCoords):len(borderCoords)+len(insideCoords)] = 1

    #頂点群から4点からなる三角錐群を生成(図5の処理に相当)
    triPyramids = Delaunay(coords).simplices

    #三角錐ごとに、insideの頂点がいくつ含まれているか確認(図6の処理に相当)
    triPyramidsStat = coordStat[triPyramids].sum(axis=1)

    #三角錐のうち、insideの頂点とborderの頂点を両方含んでいるものを取り出して、有効な三角錐とする(図7の処理に相当)
    #(ここでborderの頂点のみで構成されたオブジェクトの外部の余白の空間の三角錐と、insideの頂点のみで構成されたオブジェクトの内部の余白の空間の三角錐を取り除く)
    effectiveTriPyramids = triPyramids[np.where((triPyramidsStat!=0)&(triPyramidsStat!=4))[0]]

    #オブジェクトの面の候補(頂点のindex3つ)を入れるlist(余分なものは後々取り除く)
    faces = []

    #有効な三角錐の面を、オブジェクトの面の候補をして取り出す(記事の画像の説明でいう、線に注目している部分に該当)
    for coordIndexs in effectiveTriPyramids:
        faces.append([coordIndexs[0],coordIndexs[1],coordIndexs[2]])
        faces.append([coordIndexs[0],coordIndexs[1],coordIndexs[3]])
        faces.append([coordIndexs[0],coordIndexs[2],coordIndexs[3]])
        faces.append([coordIndexs[1],coordIndexs[2],coordIndexs[3]])

    #オブジェクトの面の候補の、頂点のindexを並び替え、重複を取り除く
    faces = np.array(faces)
    faces.sort(axis=1)
    faces = np.unique(faces,axis=0)

    #面ごとに、insideの頂点をいくつ含んでいるのか確認(図8の処理に相当)
    faceStat = coordStat[faces].sum(axis=1)

    #insideの頂点を1つも含んでいない面を取り出し(図9の処理に相当)
    faces = faces[np.where(faceStat==0)]

    #頂点と面を返す
    return borderCoords,faces
実行コード編
# 重ねた空間の点群のうち、外部と接している境界部分の点を取り出す
borderPointSpace = genBorderPointSpace(imgProjectSpace)

# 重ねた空間の点群のうち、境界部分のすぐ内側の点を取り出す
insidePointSpace = genInsidePointSpace(imgProjectSpace,borderPointSpace)

# 空間から点の座標を取り出す
borderCoords = binary2coords(borderPointSpace)
insideCoords = binary2coords(insidePointSpace)

# 2種類の座標からポリゴン(正確にはポリゴンとなる頂点と頂点を結ぶ面の定義)を生成
coords,faces = genPolygon(borderCoords,insideCoords)

# facesをblenderに渡す形式に変更
faces = [[face[0],face[1],face[2],face[0]] for face in faces]

print("step04:porigon generate success\n")

# 以下確認表示用(メインの流れと関係ないので、次の回では多分消えてる)


# 頂点を描画
addObj(coords=coords,faces=faces,name = "porigon",offset=[-125,-50,-50])
addObj(coords=borderCoords,name = "borderCoords",offset=[-50,-85,-50])
addObj(coords=insideCoords,name = "insideCoords",offset=[-50,-15,-50])