記事の概要
Nordic社製BLEチップ nRF52832を使用したBLEモジュールAdafruit_nRF52_ArduinoでオリジナルのBLEサービスを作成します。
資料
スケッチの修正と書き込み方法については前回の記事を参照してください。
BLEモジュール、Adafruit_nRF52_Arduino 最初の1歩
本記事は以下のガイドラインを参照して作成しています。
https://learn.adafruit.com/bluefruit-nrf52-feather-learning-guide
また以下のスケッチを参考にしました。
https://github.com/pat09313/testliff
本記事において、スレーブ側とはAdafruit_nRF52_Arduinoのことを指し、セントラル側とはiPhoneやスニッファーなどのことを指しています。
スケッチ
今回のプログラムは以下になります。
以降、各設定について解説します。
/*********************************************************************
 This is an example for our nRF52 based Bluefruit LE modules

 Pick one up today in the adafruit shop!

 Adafruit invests time and resources providing this open source code,
 please support Adafruit and open-source hardware by purchasing
 products from Adafruit!

 MIT license, check LICENSE for more information
 All text above, and the splash screen below must be included in
 any redistribution
*********************************************************************/

# include <Arduino.h>
# include <bluefruit.h>

// Define UUID
# define USER_SERVICE_UUID "5d65dfcc-996b-4376-868e-82196f0962e1"
# define WRITE_CHARACTERISTIC_UUID "0663577d-1837-4e14-853b-a3478d2c7778"
# define NOTIFY_CHARACTERISTIC_UUID "7d46750b-443f-4de5-95be-7e86311acc1b"

//Service & Characteristic
BLEService        testService;
BLECharacteristic testNotifyCharacteristic;
BLECharacteristic testWriteCharacteristic;

uint8_t  num = 0;

void setup()
{
  Serial.begin(115200);
  while ( !Serial ) delay(10);   // for nrf52840 with native usb

  Serial.println("Bluefruit52 Test");
  Serial.println("--------------------------\n");

  // Initialise the Bluefruit module
  Bluefruit.begin();
  Bluefruit.setTxPower(4);    // Check bluefruit.h for supported values

  // Set the advertised device name (keep it short!)
  Bluefruit.setName("MyTest");

  // Set the connect/disconnect callback handlers
  Bluefruit.Periph.setConnectCallback(connect_callback);
  Bluefruit.Periph.setDisconnectCallback(disconnect_callback);

  // Setup the Heart Rate Monitor service using
  // BLEService and BLECharacteristic classes
  Serial.println("Configuring the Heart Rate Monitor Service");
  setupTestService();

  // Set up and start advertising
  startAdv();

}

void startAdv(void)
{
  // Advertising packet
  Bluefruit.Advertising.addFlags(BLE_GAP_ADV_FLAGS_LE_ONLY_GENERAL_DISC_MODE);
  Bluefruit.Advertising.addTxPower();
  Bluefruit.Advertising.addName();

  // Include HRM Service UUID
  Bluefruit.Advertising.addService(testService);

  Bluefruit.Advertising.restartOnDisconnect(true);
  Bluefruit.Advertising.setInterval(32, 244);    // in unit of 0.625 ms
  Bluefruit.Advertising.setFastTimeout(30);      // number of seconds in fast mode
  Bluefruit.Advertising.start(0);                // 0 = Don't stop advertising after n seconds

  // Create loop2() using Scheduler to run in 'parallel' with loop()
  //Scheduler.startLoop(loop2);
}

void setupTestService(void)
{
  uint8_t userServiceUUID[16];
  uint8_t notifyCharacteristicUUID[16];
  uint8_t writeCharacteristicUUID[16];

  strUUID2Bytes(USER_SERVICE_UUID, userServiceUUID);
  strUUID2Bytes(NOTIFY_CHARACTERISTIC_UUID, notifyCharacteristicUUID);
  strUUID2Bytes(WRITE_CHARACTERISTIC_UUID, writeCharacteristicUUID);

  testService = BLEService(userServiceUUID);
  testService.begin();

  testNotifyCharacteristic = BLECharacteristic(notifyCharacteristicUUID);
  testNotifyCharacteristic.setProperties(CHR_PROPS_NOTIFY);
  testNotifyCharacteristic.setPermission(SECMODE_OPEN, SECMODE_NO_ACCESS);
  testNotifyCharacteristic.setMaxLen(5);
  testNotifyCharacteristic.setCccdWriteCallback(cccd_callback);  // Optionally capture CCCD updates
  testNotifyCharacteristic.begin();

  testWriteCharacteristic = BLECharacteristic(writeCharacteristicUUID);
  testWriteCharacteristic.setProperties(CHR_PROPS_WRITE);
  testWriteCharacteristic.setPermission(SECMODE_NO_ACCESS, SECMODE_OPEN);
  testWriteCharacteristic.setFixedLen(1);
  testWriteCharacteristic.setWriteCallback(write_callback);
  testWriteCharacteristic.begin();
}

void connect_callback(uint16_t conn_handle)
{
  // Get the reference to current connection
  BLEConnection* connection = Bluefruit.Connection(conn_handle);

  char central_name[32] = { 0 };
  connection->getPeerName(central_name, sizeof(central_name));

  Serial.print("Connected to ");
  Serial.println(central_name);
}

void disconnect_callback(uint16_t conn_handle, uint8_t reason)
{
  (void) conn_handle;
  (void) reason;

  Serial.print("Disconnected, reason = 0x"); Serial.println(reason, HEX);
  Serial.println("Advertising!");
}

void cccd_callback(uint16_t conn_hdl, BLECharacteristic* chr, uint16_t cccd_value)
{
    // Display the raw request packet
    Serial.print("CCCD Updated: ");
    //Serial.printBuffer(request->data, request->len);
    Serial.print(cccd_value);
    Serial.println("");

    // Check the characteristic this CCCD update is associated with in case
    // this handler is used for multiple CCCD records.
    if (chr->uuid == testNotifyCharacteristic.uuid) {
        if (chr->notifyEnabled(conn_hdl)) {
            Serial.println("'Notify' enabled");
        } else {
            Serial.println("'Notify' disabled");
        }
    }
}

void write_callback(uint16_t conn_hdl, BLECharacteristic* chr, uint8_t* data, uint16_t len)
{
  Serial.println(data[0]);
  digitalToggle(LED_RED); // Toggle LED
}

void loop()
{
  uint8_t testdata[5] = { 0x01, 0x02, 0x03, 0x04, 0x05 };

  if ( Bluefruit.connected() ) {

    // Note: We use .notify instead of .write!
    // If it is connected but CCCD is not enabled
    // The characteristic's value is still updated although notification is not sent
    if ( testNotifyCharacteristic.notify(testdata, num%5+1) ){
      ++num;
      Serial.print("SUCCESS");
    }else{
      Serial.println("ERROR: Notify not set in the CCCD or not connected!");
    }
  }

  vTaskDelay(1000);              // wait for a half second
}

void loop2(){ }

// UUID Converter
void strUUID2Bytes(String strUUID, uint8_t binUUID[]) {
  String hexString = String(strUUID);
  hexString.replace("-", "");

  for (int i = 16; i != 0 ; i--) {
    binUUID[i - 1] = hex2c(hexString[(16 - i) * 2], hexString[((16 - i) * 2) + 1]);
  }
}

char hex2c(char c1, char c2) {
  return (nibble2c(c1) << 4) + nibble2c(c2);
}

char nibble2c(char c) {
  if ((c >= '0') && (c <= '9'))
    return c - '0';
  if ((c >= 'A') && (c <= 'F'))
    return c + 10 - 'A';
  if ((c >= 'a') && (c <= 'f'))
    return c + 10 - 'a';
  return 0;
}
仕様
以下のBLEサービスを作成します。
- テストサービス
- Notify characteristic
- 周期的に1バイトから5バイトのデータをセントラルに通知する
- Write characteristic
- セントラルから1バイトのデータを受信してLEDを反転させる
- Notify characteristic
UUID設定
BLEサービスには個別のUUIDを割り当てます。
定番のBLEサービス(心拍計、温度計)には、あらかじめ4バイトのUUIDが公式に定められていますが、個人が独自で作成する場合には32バイトのUUIDを自分で決めて設定しないといけません。
まず以下のサイトなどで適当にUUIDを生成します。
それらを1つのサービスと2つのcharacteristicのUUIDとします
# define USER_SERVICE_UUID "5d65dfcc-996b-4376-868e-82196f0962e1"
# define WRITE_CHARACTERISTIC_UUID "0663577d-1837-4e14-853b-a3478d2c7778"
# define NOTIFY_CHARACTERISTIC_UUID "7d46750b-443f-4de5-95be-7e86311acc1b"
UUIDは以下の関数で16バイトの配列に変換しておきます。
// UUID Converter
void strUUID2Bytes(String strUUID, uint8_t binUUID[]) {
  String hexString = String(strUUID);
  hexString.replace("-", "");

  for (int i = 16; i != 0 ; i--) {
    binUUID[i - 1] = hex2c(hexString[(16 - i) * 2], hexString[((16 - i) * 2) + 1]);
  }
}

char hex2c(char c1, char c2) {
  return (nibble2c(c1) << 4) + nibble2c(c2);
}

char nibble2c(char c) {
  if ((c >= '0') && (c <= '9'))
    return c - '0';
  if ((c >= 'A') && (c <= 'F'))
    return c + 10 - 'A';
  if ((c >= 'a') && (c <= 'f'))
    return c + 10 - 'a';
  return 0;
}
  uint8_t userServiceUUID[16];
  uint8_t notifyCharacteristicUUID[16];
  uint8_t writeCharacteristicUUID[16];

  strUUID2Bytes(USER_SERVICE_UUID, userServiceUUID);
  strUUID2Bytes(NOTIFY_CHARACTERISTIC_UUID, notifyCharacteristicUUID);
  strUUID2Bytes(WRITE_CHARACTERISTIC_UUID, writeCharacteristicUUID);
サービスとcharacteristicの作成
サービスとcharacteristicのオブジェクト作成
スケッチ冒頭でサービスとcharacteristicのオブジェクトを作成しておきます。
BLEService        testService;
BLECharacteristic testNotifyCharacteristic;
BLECharacteristic testWriteCharacteristic;
サービスとcharacteristicの設定関数
今回のスケッチでは、関数setupTestService()においてサービスとcharacteristicを設定します。
サービスの開始
サービスをUUIDで初期化して、開始させます。
  testService = BLEService(userServiceUUID);
  testService.begin();
Notify characteristicの設定
UUIDの設定
UUIDを設定します。
testNotifyCharacteristic = BLECharacteristic(notifyCharacteristicUUID);
プロパティ
characteristicのプロパティをNotifyに設定します。
testNotifyCharacteristic.setProperties(CHR_PROPS_NOTIFY);
プロパティの設定には他に以下の項目があります。
- CHR_PROPS_BROADCAST = bit(0),
- CHR_PROPS_READ = bit(1),
- CHR_PROPS_WRITE_WO_RESP = bit(2),
- CHR_PROPS_WRITE = bit(3),
- CHR_PROPS_NOTIFY = bit(4),
- CHR_PROPS_INDICATE = bit(5)
余談:NotifyとIndicateの違い
NotifyもIndicateもスレーブ側からセントラル側へデータ送信します。
ただし、Indicateはデータ送信に成功すると、自動でセントラル側からの応答が返ってきます。
BLEはデータ送信の失敗が頻繁に起こりますが、データ送信が無事にできないと困る場合(命令実行コマンドを送信した場合など)は、Indicateを用いて応答を確認します。
そして応答がなければ、再送処理を行ったりします。
ただし応答の時間だけ通信速度が遅くなるので、短い周期でセンサデータを連続取得する場合は、多少の通信失敗を無視して、Notifyを選択したりします
許可
Characteristicのセキュリティレベルを設定します。
API関数setPermission()の第1引数は読み込みについての許可で、第2引数は書き込みについての許可です。
このCharacteristicはNotifyだけ行うので、読み込みのみ許可を与えておきます。
testNotifyCharacteristic.setPermission(SECMODE_OPEN, SECMODE_NO_ACCESS);
セキュリティレベルの設定には他に以下の項目があります。
- SECMODE_NO_ACCESS = 0x00,
- SECMODE_OPEN = 0x11,
- SECMODE_ENC_NO_MITM = 0x21,
- SECMODE_ENC_WITH_MITM = 0x31,
- SECMODE_SIGNED_NO_MITM = 0x12,
- SECMODE_SIGNED_WITH_MITM = 0x22
データの長さ
Notifyで送信するデータの長さを設定します。
1バイトから5バイトの可変データを送信するので、最大データ長さを5バイトに設定します。
testNotifyCharacteristic.setMaxLen(5);
もし送信データサイズを固定するなら以下のようにします。
testNotifyCharacteristic.setFixedLen(5);
CCCDコールバック関数の設定
CCCDコールバック関数は設定しなくても問題はありませんが、CCCDの結果を確認する為に今回は使用します。
testNotifyCharacteristic.setCccdWriteCallback(cccd_callback);
CCCDはClient Characteristic Configuration Descriptorの略です。
NotifyやIndicateを使用する時、スレーブ側からセントラル側にNotifyやIndicateが許可されていることを通知します。
先ほどAPI関数setPermission()で設定した読み込み側のセキュリティレベルがそれです。
この許可がないのにNotifyを送信しても、セントラル側で受け付けず無効になります。
スレーブとマスターのBLE接続後のNotify開始時に、スレーブ側は2バイトのCCCDをセントラル側へ送信して、セントラル側からの応答をCCCDコールバック関数で確認できます。
コールバック関数cccd_callback()においては、Notifyが無事に確立したかを確認できます。
if (chr->notifyEnabled(conn_hdl)) {
  Serial.println("'Notify' enabled");
} else {
  Serial.println("'Notify' disabled");
}
以上の例では、スレーブ側が許可/不許可を選択してセントラル側に通知するだけでした。
セキュリティでwriteを許可しておくと、セントラル側からスレーブ側の許可/不許可を書き換えることができます。
例えば、セントラル側で処理しきれない程の大量のデータがスレーブ側からNotifyで送信された時、セントラル側がスレーブ側のNotifyを許可から不許可に書き換えて受信を中止する、という使い方ができます。
Notify Characteristicの開始
begin()で設定を有効化します。
testNotifyCharacteristic.begin();
Write characteristicの設定
UUIDの設定
UUIDを設定します。
testWriteCharacteristic = BLECharacteristic(writeCharacteristicUUID);
プロパティ
characteristicのプロパティをWriteに設定します。
testWriteCharacteristic.setProperties(CHR_PROPS_WRITE);
許可
Characteristicのセキュリティレベルを設定します。
このCharacteristicはWriteだけ行うので、書き込みのみ許可を与えておきます。
testWriteCharacteristic.setPermission(SECMODE_NO_ACCESS, SECMODE_OPEN);
データの長さ
Writeで受信するデータの長さを設定します。
1バイトデータを受信する仕様なので1バイト長に固定します。
testWriteCharacteristic.setFixedLen(1);
Writeコールバック関数の設定
Writeデータ受信時に呼び出されるコールバック関数を指定します。
testWriteCharacteristic.setWriteCallback(write_callback);
本スケッチでは、コールバック関数においてLEDを反転させる処理をしています。
セントラル側からデータを受信するごとにLEDが反転します。
受信データは引数dataに格納されています。複数バイトを受信した場合はdata[i]からデータを読めます。
void write_callback(uint16_t conn_hdl, BLECharacteristic* chr, uint8_t* data, uint16_t len)
{
  Serial.println(data[0]);
  digitalToggle(LED_RED); // Toggle LED
}
Write Characteristicの開始
begin()で設定を有効化します。
testWriteCharacteristic.begin();
周期的Notify送信
本スケッチはRTOSのFreeRTOSを使用しており、main()関数からloopタスクが作成されています。
loopタスクは1秒周期でRunning状態になります。
vTaskDelay(1000); //1秒間Blocked状態へ遷移
Bluefruit.connected()でBLE接続を検知すると、関数notify()を実行します。
第1引数は送信データ、第2引数は送信データサイズを入力しています。
  if ( Bluefruit.connected() ) {

    if ( testNotifyCharacteristic.notify(testdata, num%5+1) ){
      ++num;
      Serial.print("SUCCESS");
    }else{
      Serial.println("ERROR: Notify not set in the CCCD or not connected!");
    }
  }
アドバタイジングパケット発信開始
関数setup()内で作成したサービスを有効化してから、アドバタイジングパケット発信開始を行います
  setupTestService();

  // Set up and start advertising
  startAdv();
他にも関数setup()においては、BLE接続時とBLE切断時に呼び出されるコールバック関数も設定しています。
  Bluefruit.Periph.setConnectCallback(connect_callback);
  Bluefruit.Periph.setDisconnectCallback(disconnect_callback);
動作確認
本スケッチを実行すると、以下のようなアドバタイジングパケットが検知されるのでBLE接続します。

すると設定したUUIDを持つBLEサービス、Notify characteristic、Write characteristic が確認できます。
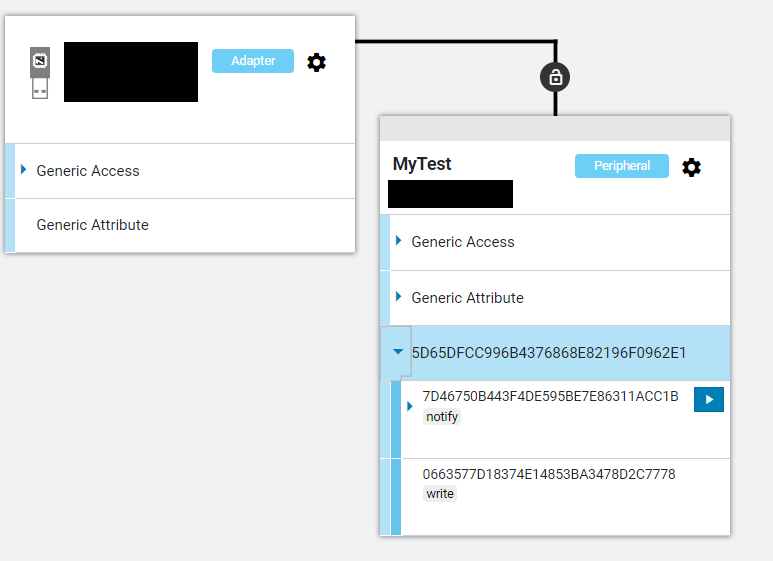
Notify characteristicの矢印をクリックしてNotifyを有効化します。
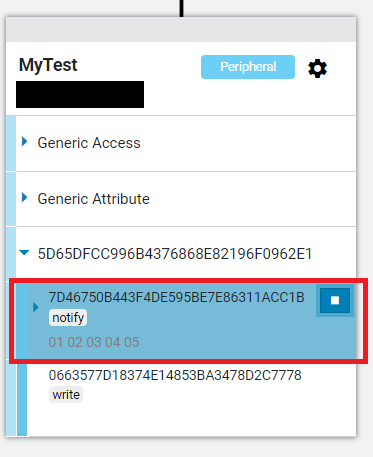
シリアル通信で確認すると、以下のようにCCCDコールバック関数がNotify有効化を通知してくれます。

loop()関数内でNotifyを送信するごとに、以下のように受信データが確認できます。
逆にセントラル側からWrite characteristicでデータ送信すると、Adafruit_nRF52_ArduinoのLEDが反転するのが確認できます。
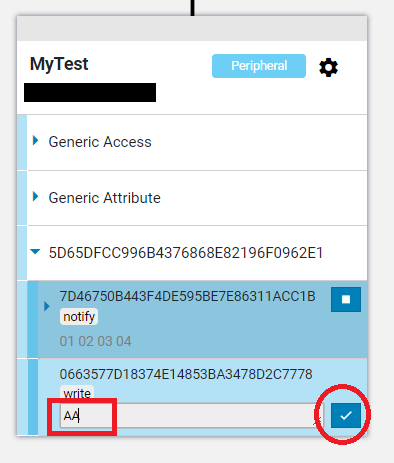
例えば0xAA(10進数では170)をwriteで受信した時、シリアル通信で確認すると、以下のように170という受信データが確認できます。
