■はじめに
今回は文字列の変換ツールを作りながら処理の共通化を学びます。
キーワード:デリゲート, ラムダ式, Base64エンコード, URLエンコード, 大文字変換, 小文字変換
[注意]
これまでの回で説明済みの操作方法等は、説明を省略したり簡略化している場合があります。
■開発環境
- Windows 10
- Visual Studio Community 2017
- .NET Framework 4.x
■作ってみる
◇画面作成
新しいプロジェクトで Visual C# - Windows デスクトップ - WPF アプリで任意の名前でプロジェクトを作成し、
以下のように画面を作成します。
<Grid>
    <Grid.ColumnDefinitions>
        <ColumnDefinition/>
        <ColumnDefinition Width="Auto"/>
        <ColumnDefinition/>
    </Grid.ColumnDefinitions>

    <TextBox Grid.Column="0" x:Name="txtIn"/>

    <StackPanel Grid.Column="1">
        <TextBlock Text="→" Margin="5" HorizontalAlignment="Center"/>
    </StackPanel>

    <TextBox Grid.Column="2" x:Name="txtOut" IsReadOnly="True" Background="WhiteSmoke"/>
</Grid>
次にStackPanelの中のTextBlockの下にボタンのタグを入力します。

Buttonタグのある行でCtrl + Cで現在行をコピーします。範囲選択しないでも大丈夫です。
そのままCtrl + Vを5回(Ctrlを押したままVを5回)実行します。
これでボタンが6つになりました。
ButtonのContentを入力します。
<Button Content="大文字"/>
<Button Content="小文字"/>
<Button Content="Base64エンコード"/>
<Button Content="Base64デコード"/>
<Button Content="URLエンコード"/>
<Button Content="URLデコード"/>
<Button Content="クリア" IsCancel="True" Margin="5,20,5,5"/>/>
画面の体裁を整えます。
画面のタイトル、テキストボックスとボタンの既定のスタイルを設定します。
<Window x:Class="ConvTool.MainWindow"
        xmlns="http://schemas.microsoft.com/winfx/2006/xaml/presentation"
        xmlns:x="http://schemas.microsoft.com/winfx/2006/xaml"
        xmlns:d="http://schemas.microsoft.com/expression/blend/2008"
        xmlns:mc="http://schemas.openxmlformats.org/markup-compatibility/2006"
        xmlns:local="clr-namespace:ConvTool"
        mc:Ignorable="d"
        Title="変換君" Height="450" Width="800" ResizeMode="CanResizeWithGrip">
    <Window.Resources>
        <!-- TextBoxの既定スタイル -->
        <Style TargetType="TextBox">
            <!-- 改行を受け付ける -->
            <Setter Property="AcceptsReturn" Value="True"/>
            <!-- フォント -->
            <Setter Property="FontFamily" Value="MS Gothic"/>
            <!-- 折り返しあり -->
            <Setter Property="TextWrapping" Value="Wrap"/>
        </Style>
        <!-- Buttonの既定スタイル -->
        <Style TargetType="Button">
            <Setter Property="Margin" Value="5"/>
        </Style>
    </Window.Resources>
    <Grid>
    :
    :
一度実行してみます。

左のテキストボックスに入力されたものがボタンを押すと変換され、右側に出力されるように作っていきます。
◇ロジック作成
クリアボタン
まずはクリアボタンの処理を作ります。
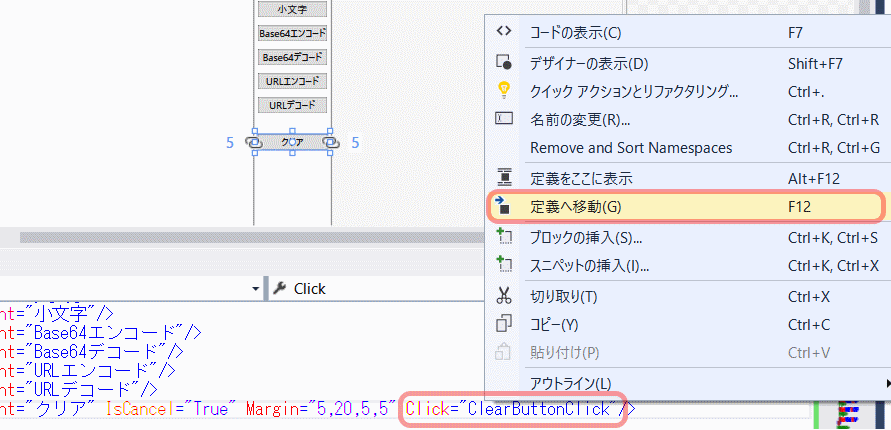
Click="ClearButtonClick"と入力し、

F12を押すか、右クリックから「定義へ移動」を選択します。
テキストボックスをクリアする処理を記述します。
/// <summary>
/// クリア処理
/// </summary>
/// <param name="sender"></param>
/// <param name="e"></param>
private void ClearButtonClick(object sender, RoutedEventArgs e)
{
    txtIn.Clear();
    txtOut.Clear();
}
イベントハンドラ
他のボタンもイベントハンドラを作成します。中の処理は後で書きます。
<Button Content="大文字" Click="UpperButtonClick"/>
<Button Content="小文字" Click="LowerButtonClick"/>
<Button Content="Base64エンコード" Click="Base64EncButtonClick"/>
<Button Content="Base64デコード" Click="Base64DecButtonClick"/>
<Button Content="URLエンコード" Click="UrlEncButtonClick"/>
<Button Content="URLデコード" Click="UrlDecButtonClick"/>
    /// <summary>
    /// 大文字変換
    /// </summary>
    /// <param name="sender"></param>
    /// <param name="e"></param>
    private void UpperButtonClick(object sender, RoutedEventArgs e)
    {
    }

    /// <summary>
    /// 小文字変換
    /// </summary>
    /// <param name="sender"></param>
    /// <param name="e"></param>
    private void LowerButtonClick(object sender, RoutedEventArgs e)
    {
    }

    /// <summary>
    /// Base64エンコード
    /// </summary>
    /// <param name="sender"></param>
    /// <param name="e"></param>
    private void Base64EncButtonClick(object sender, RoutedEventArgs e)
    {
    }

    /// <summary>
    /// Base64デコード
    /// </summary>
    /// <param name="sender"></param>
    /// <param name="e"></param>
    private void Base64DecButtonClick(object sender, RoutedEventArgs e)
    {
    }

    /// <summary>
    /// URLエンコード
    /// </summary>
    /// <param name="sender"></param>
    /// <param name="e"></param>
    private void UrlEncButtonClick(object sender, RoutedEventArgs e)
    {
    }

    /// <summary>
    /// URLデコード
    /// </summary>
    /// <param name="sender"></param>
    /// <param name="e"></param>
    private void UrlDecButtonClick(object sender, RoutedEventArgs e)
    {
    }
入力チェック
ボタンを押したときに変換元が入力されているかチェックする処理を作成します。
/// <summary>
/// 入力チェック
/// </summary>
/// <returns>チェックOKならtrueを、NGならfalseを返す。</returns>
private bool CheckInput()
{
    if (string.IsNullOrEmpty(txtIn.Text))
    {
        txtIn.Focus();
        MessageBox.Show("変換元データを入力してください。");
        return false;
    }
    else
    {
        // チェックOK
        return true;
    }
}
共通処理
各ボタンで呼び出す共通処理を作ります。
クリアボタン以外は
入力チェック → 左のテキストボックスを何らかの変換をかけて右のテキストボックスに設定
という流れは同じです。
この流れをメソッドにしてしまいましょう。
「何らかの変換をかける」部分は引数で受け取れるようにします。
/// <summary>
/// 変換共通処理
/// </summary>
/// <param name="conv">変換関数</param>
private void ConvertString(Func<string, string>conv)
{
    // 入力チェック
    if (CheckInput() == false)
    {
        return;
    }

    try
    {
        // 文字列を受け取り、変換後の文字列を返す
        txtOut.Text = conv(txtIn.Text);
    }
    catch (Exception ex)
    {
        // エラー
        MessageBox.Show(ex.Message);
    }
}
引数のFunc<string, string>convは、
1つ目のstringは引数の型、2つ目のstringは戻り値の型、convは関数名、
つまりConvertStringメソッドには、「引数string、戻り値stringの関数」を渡すことができ、
その関数はConvertStringメソッドの中でconvという名前で使用することができます。
Func<xxxxx>はデリゲートと言って関数(への参照)を入れておける変数の型です。
int i;のiには「整数値」を入れることができます。
Func<int, bool>hoge;のhogeには「整数値を受け取り、真偽値を返す関数」を入れることができます。
Func<int, string, bool>だと第1引数にint、第2引数にstring、戻り値にboolを返す関数です。最後の要素が戻り値の型です。
戻り値がない場合はActionを使います。
Action<double>はdoubleを引数にとる関数です。
共通処理の呼び出し
では先ほど作ったConvertStringメソッドを使ってみましょう。
大文字変換の処理を記述します。
ConvertString(「string型の引数を1つ受け取り、string型の値を返す処理」);
↓
ConvertString( (string型の引数) => { string型の値を返す処理 } );
↓
ConvertString( (string 引数名) => { return string型の戻り値; } );
↓
private void UpperButtonClick(object sender, RoutedEventArgs e)
{
    ConvertString((string inStr) => { return inStr.ToUpper(); });
}
(XXX) => { XXXXXX }みたいな書き方をラムダ式と言います。
次は小文字変換の処理です。
ConvertStringの定義 void ConvertString(Func<string, string>) から、string型を引数に取ることが導き出せるため、引数の型指定を省略することができます。
更に引数が1つだけの場合、括弧も省略可能です。
private void LowerButtonClick(object sender, RoutedEventArgs e)
{
    ConvertString(inStr => { return inStr.ToLower(); });
}
Base64エンコード処理です。
ラムダ式を使わない例です。
ラムダ式を使い慣れていない人にはこちらの方が分かりやすいのではないでしょうか。
引数string、戻り値stringのConvertBase64Encを定義し、ConvertStringに渡しています。
しかし、1回しか登場しないのに別の場所にわざわざ定義するのは、あちこち見に行かなくてはならず面倒です。行数も増えています。
private void Base64EncButtonClick(object sender, RoutedEventArgs e)
{
    ConvertString(ConvertBase64Enc);
}

private string ConvertBase64Enc(string str)
{
    return Convert.ToBase64String(Encoding.UTF8.GetBytes(str));
}
Base64デコード処理です。
ラムダ式の処理部分が複数行ある例です。
private void Base64DecButtonClick(object sender, RoutedEventArgs e)
{
    ConvertString(inStr =>
    {
        // inStrをBase64デコードして返す
        return Encoding.UTF8.GetString(
            Convert.FromBase64String(inStr));
    });
}
URLエンコード処理です。
private void UrlEncButtonClick(object sender, RoutedEventArgs e)
{
    ConvertString(inStr => { return Uri.EscapeDataString(inStr); });
}
URLデコード処理です。
{}とreturnを省略した例です。
private void UrlDecButtonClick(object sender, RoutedEventArgs e)
{
    ConvertString(inStr => Uri.UnescapeDataString(inStr));
}
完成!
■動かしてみる
こんな感じ。

おしまい