やりたいこと
rails+bootstrap4のアプリをherokuに上げて無料で独自ドメインとSSL対応させる。
railsアプリ作って
bootstrap4導入して、
GitHubに置いて、
herokuにデプロイ、オートデプロイ設定して、
SSLと独自ドメイン設定
という順番で解説。
railsアプリ作成、Herokuデプロイ
詳しくはこちらを参考にしてください
railsで作ったアプリをとりあえず公開する方法。rails+GitHub+heroku
・rails newでローカルにアプリを作成
・初期画面、ルートを設定
初期画面を作り、そこへのリンクを貼っておかないと、
本番環境では表示画面が見つかりませんというエラーになります。
class ApplicationController < ActionController::Base

  def root
    render html: "rails_appへようこそ!"
  end

end
Rails.application.routes.draw do
  # For details on the DSL available within this file, see http://guides.rubyonrails.org/routing.html
    root 'application#root'
end
gemfileをちょっといじる
herokuはmysqlに対応していないため、本番環境にsqliteをインストールしないように改修
# この2行を削除
# Use sqlite3 as the database for Active Record
gem 'sqlite3'

group :development, :test do
  # Call 'byebug' anywhere in the code to stop execution and get a debugger console
  gem 'byebug', platforms: [:mri, :mingw, :x64_mingw]
  #ここ1行追加
  gem 'sqlite3', '1.3.13'
end

# この3行を一番下に追加
group :production do
  gem 'pg', '0.18.4'
end
$ bundle install --without production
$ bundle update
GitHub Desktopのアプリを利用してGitHubにあげる
herokuでnew appでアプリを作成、
そのDeployタブにてGitHubと接続、
オートデプロイを設定、マニュアルデプロイボタンを押す。
herokuスリープモード阻止
herokuのadd-onでスケジューラを追加後、
そこに10分毎の設定で以下を追加。
// 自分の作成したアプリのアドレスを設定
$ curl https://narou-osusume.herokuapp.com/
bootstrap4の導入
gem 'bootstrap', '~> 4.1.1'
gem 'jquery-rails'
$ bundle install
css > scssにリネーム
$ mv app/assets/stylesheets/application.css app/assets/stylesheets/application.scss
scssの一番下に書く
@import "bootstrap";
//= require jquery3
//= require popper
//= require bootstrap-sprockets
application.html.hamlのhead内にmetaタグを追加
%meta{:content => "width=device-width, initial-scale=1, shrink-to-fit=no", :name => "viewport"}/
// Read Sprockets README (https://github.com/rails/sprockets#sprockets-directives) for details
// about supported directives.
//
//= require jquery3
//= require popper
//= require bootstrap-sprockets
//= require rails-ujs
//= require activestorage
//= require turbolinks
//= require_tree .
SSL + 独自ドメイン対応
参考:【完全無料】Herokuで独自ドメイン + HTTPSに対応する【Rails】
お名前.comでドメイン購入。
heroku設定
herokuのアプリの[Settings]タブの中にある
Domains and certificatesの欄に行く。
Add domainボタンでドメイン追加。
narou-osusume.comというドメインを購入した場合は
・narou-osusume.com
・www.narou-osusume.com
の2つを追加する。
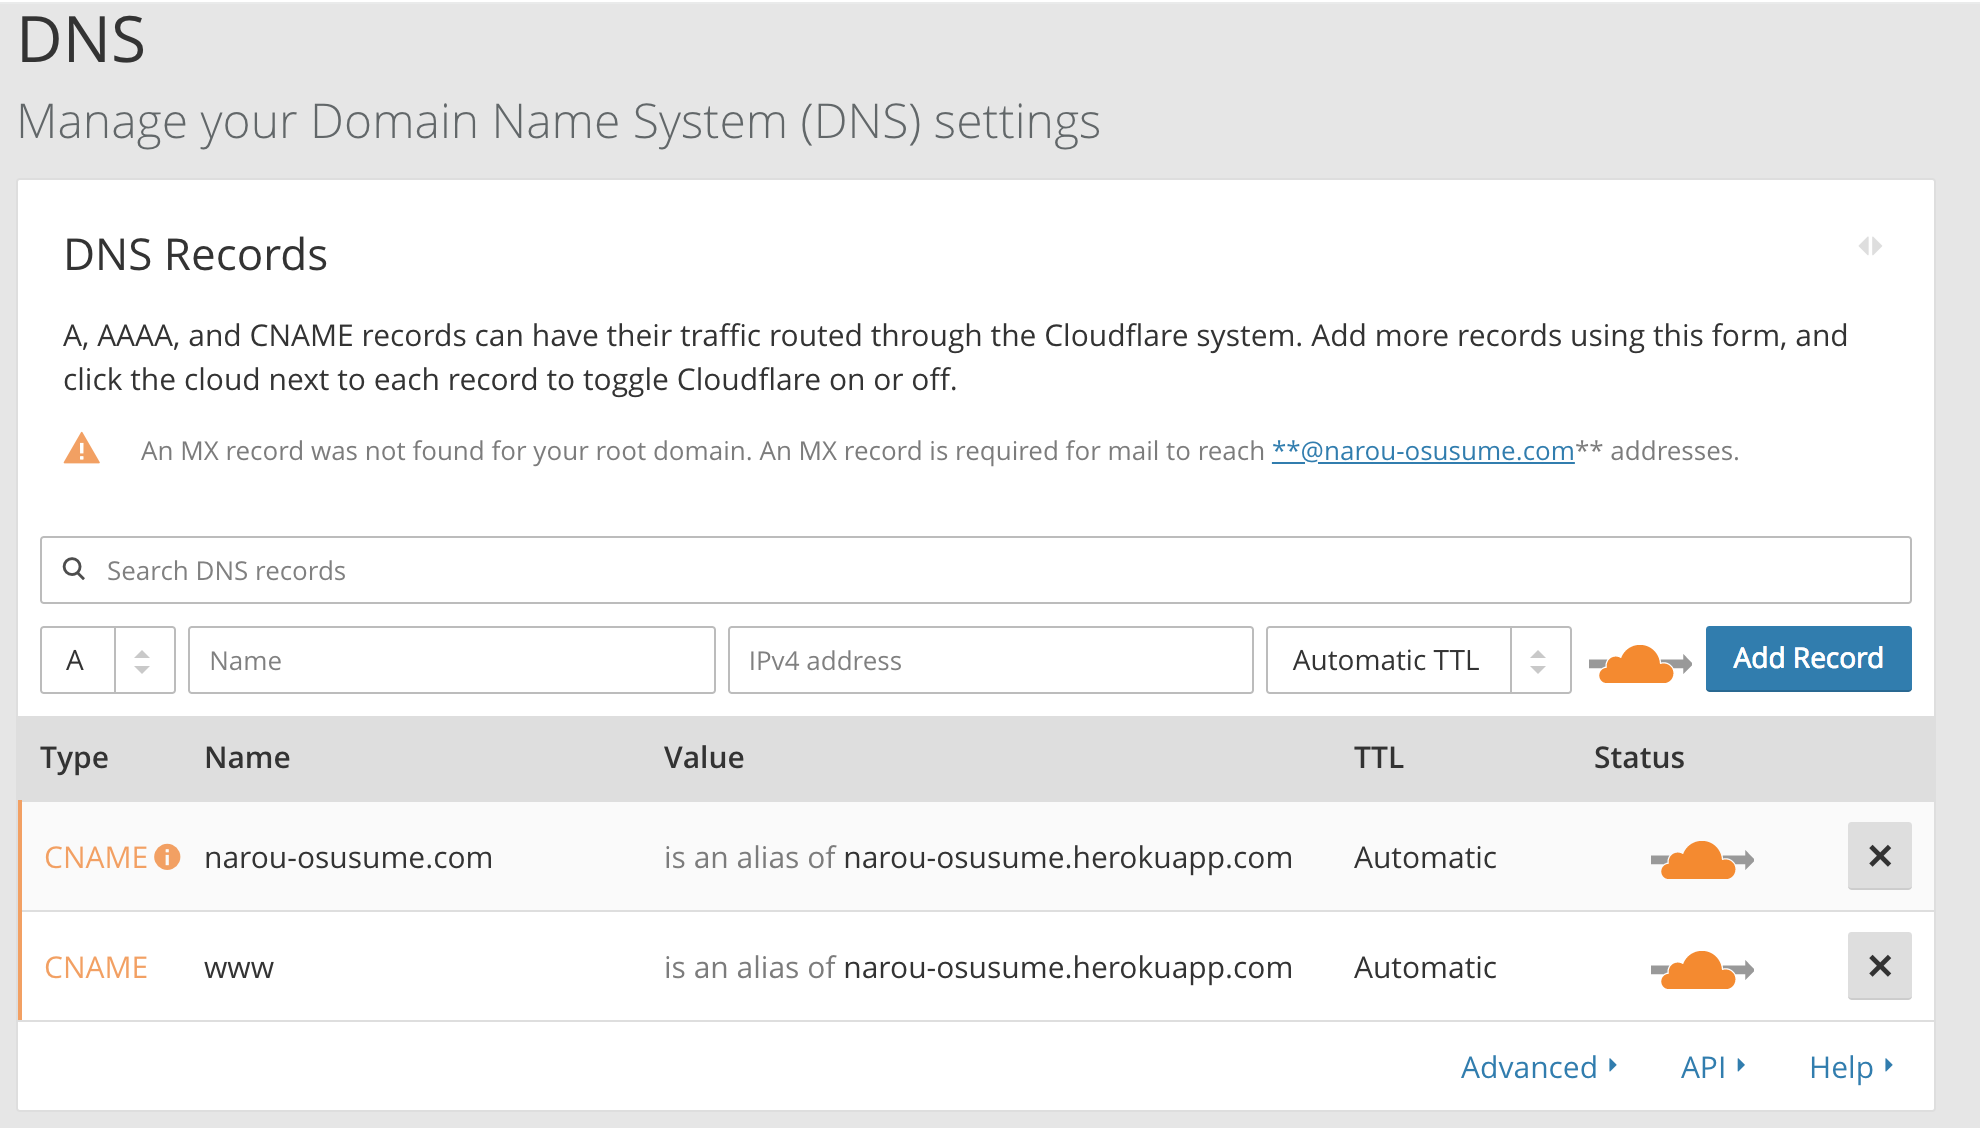
cloudflare設定
DNS設定
cloudflareに登録して、
以下のような感じに設定する。
Type CNAMEということに注意。
上のAdd Recordボタンあたりから追加できる。
SSL設定
Cryptoタブの中のSSLをFullに設定する。
お名前ドットコムのDNS名を変更する
参考:【完全無料】Herokuで独自ドメイン + HTTPSに対応する【Rails】
以上で、
railsアプリ作ってbootstrap4導入して、
GitHubに置いて、
herokuにデプロイ、オートデプロイ設定して、
SSLと独自ドメイン設定
するまでいける。
追記
Hamlの導入
gem 'haml-rails'
gem 'erb2haml'
$ bundle install
$ rake haml:replace_erbs
deviseの導入
gem 'devise'
$ bundle install

$ rails g devise:install

$ rails g devise User
class DeviseCreateUsers < ActiveRecord::Migration[5.2]
  def change
    create_table :users do |t|
      ## Database authenticatable
      ## nameを追加。
      t.string :name,               null:false
      t.string :email,              null: false, default: ""
      t.string :encrypted_password, null: false, default: ""
$ rails db:migrate

$ rails g devise:views

$ rails g devise:controllers users
deviseにストロングパラメータを追加
class ApplicationController < ActionController::Base
  protect_from_forgery with: :exception
  before_action :configure_permitted_parameters, if: :devise_controller?

  protected

  def configure_permitted_parameters
    #nameパラメータを追加
    added_attrs = [ :name, :email, :password, :password_confirmation]
    devise_parameter_sanitizer.permit :sign_up, keys: added_attrs
    devise_parameter_sanitizer.permit :account_update, keys: added_attrs
    devise_parameter_sanitizer.permit :sign_in, keys: added_attrs
  end
end
herokuにdeployするときにプレコンパイルでエラーするときは以下。
rakeがDevise.secret_key was not setと出て失敗するときの対処法
bootstrap4用のusers#editテンプレ
Devise+bootstrap4のusers#editのコピペ用テンプレ
better_errors導入
group :development do
  # エラー画面をわかりやすく整形してくれる
  gem 'better_errors'

  # better_errorsの画面上にirb/pry(PERL)を表示する
  gem 'binding_of_caller'
end
scafolld commandの例
$ rails g scaffold Matome title:string discription:text like:integer user:references


使えるのはアンダーバー
rails g scaffold Osusume title:string short_title:string
rails g scaffold Novel title:text description:text url:text like:integer osusume:references
rails g scaffold Comment name:string comment:text up:integer down:integer novel:references
binding.pryの導入
group :development, :test do
  gem 'pry-rails'
  gem 'pry-byebug'
  gem 'pry-doc'
end
- binding.pry
font-awesomeの導入
gem 'font-awesome-rails'
$ bundle install
//これを追加
*= require font-awesome
//例
.fa.fa-reply
ajax保存
//form_forへ, :remote => trueを追加
= form_for @novel , :remote => true do |f|
# createアクションの中
# respond_toの中にformat.jsを追加
    respond_to do |format|
      if @novel.save
        format.html { redirect_to @novel, notice: 'Novel was successfully created.' }
        format.json { render :show, status: :created, location: @novel }
        format.js
partialの書き方
= render partial: "novel-card", locals: { novel: novel }
jqueryがリロードするまで動かない時
$(function() {

// ↓↓↓以下のように直す

$(document).on('turbolinks:load',function(){
SEO
メタタグを導入
参考:【Rails】『meta-tags』gemを使ってSEO対策をおこなう方法
gem 'meta-tags'
$bundle install

//これでメタタグの設定ファイルが生成される
$bundle exec rails generate meta_tags:install
headタグ内に以下を記載して読み込み。
= display_meta_tags(default_meta_tags)
application_helper内にメタタグを書く。
※ここ、何を設定すれば良いかがまだよくわかっていないです。
参考になりそう:SEO対策・meta-tagsのマイベスト設定
module ApplicationHelper
  #titleを動的に生成
  def title
    title = @matome.title if @matome
  end

  #descriptionを動的に生成
  def description
    description = @matome.description if @matome
  end

  def default_meta_tags
    {
      site: 'なろうまとめ',
      title: title,
      reverse: true,
      charset: 'utf-8',
      description: description,
      keywords: '小説家になろう, なろう, なろう小説, おすすめ, オススメ, まとめ, なま, キュレーション, 共有',
      canonical: request.original_url,
      separator: ':',
      icon: [
        # { href: image_url('favicon.ico') },
        # { href: image_url('icon.jpg'), rel: 'apple-touch-icon', sizes: '180x180', type: 'image/jpg' },
      ]
      # ,
      # og: {
      #   site_name: 'なろうまとめ',
      #   title: title,
      #   description: description,
      #   type: 'website',
      #   url: request.original_url,
      #   # image: image_url('ogp.png'),
      #   locale: 'ja_JP',
      # },
      # twitter: {
      #   card: 'summary',
      #   site: '@ツイッターのアカウント名',
      # }
    }
  end
end
google analyticsの導入
1,トラッキングIDの取得
google analyticsの左下の歯車「管理」から中に入り、新しいプロパティを作成
2,gemの導入とapplication.htmlへ埋め込み
gem 'google-analytics-rails'
# トラッキングIDを記載
GA.tracker = "UA-xxxxxx-x"
# headタグ内に書く
= analytics_init if Rails.env.production?
その他
ローカルをスマホでみる
railsのローカル開発中にスマホで確認する方法(Mac限定)(テザリングでもOK)
ローカルのRailsにスマホで接続する(同じWi-fiに接続する)
form_for + ajax + partial
rails5でform_forしたものをajax+partialで非同期に表示する