この記事の続きです。
https://qiita.com/Kirika/items/c035d57cef84043ac3e1
ディスプレイ表示ができるようになったので、入力センサーを用意して、画面に出力するところを試してみます。
DHT11の入手先
この中のモジュールの一つとして用意されていました。
特にDHT11である必要はありません。なんか妙に安い上に、説明書は別のサイトから入手するところなども、ちょっと気になるところですが、動作に問題はありませんでした。
DHT11とNodeMCUの接続
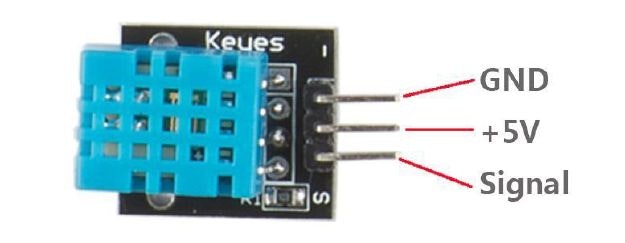
モジュールの説明書によると以下のようなピン配置になっているようです。
GNDはGNDに接続すればよいとして、5Vの電源をどこからとるかですがVinのピンが、USBから来た5Vをそのまま分岐しているらしいので、そこを使います。Signalは空きピンを使います。今回はD1を使用しました。ちなみに今回使用したのはモジュール基盤なので、抵抗はモジュールに内蔵されていたのですが、素のDHT11を刺す場合はSignalに10kΩ抵抗を挟む必要があるみたいです。
| DHT11 | NodeMCU |
|---|---|
| GND | GND |
| +5V | Vin |
| Signal | D1 |
ライブラリの選定
DHT用のライブラリが用意されているらしく、色々探して試してみたのですが、選択肢が多すぎる上に、こちらの使い方がまずいのか、回路の作成をミスったか、うまく動かないものも多数ありました。最終的にAdafruitのライブラリを使うことで動作までたどり着くことができました。platformioにて以下のコマンドでライブラリをインストールします。
platformio lib install 18
platformio lib install 19
platformio lib install 31
ソースコード
ソースコードはSSD1331のexamplesにあった、basicSetupを参考に、AdafruitのExamplesを見ながら作ってます。(こんなんばっか)
# include <SPI.h>
# include <SSD_13XX.h>
# include <Adafruit_Sensor.h>
# include <DHT.h>

/*
Teensy3.x and Arduino's
You are using 4 wire SPI here, so:
MOSI:  11//Teensy3.x/Arduino UNO (for MEGA/DUE refere to arduino site)
MISO:  12//Teensy3.x/Arduino UNO (for MEGA/DUE refere to arduino site)
SCK:   13//Teensy3.x/Arduino UNO (for MEGA/DUE refere to arduino site)
ESP8266-----------------------------------
Use:
# define __CS  16  //(D0)
# define __DC  5   //(D1)
# define __RST 4   //(D2)

SCLK:D5
MOSI:D7
*/
# define __CS1 0
# define __DC 2

# define DHTPIN D1
# define DHTTYPE DHT11

/*
Teensy 3.x can use: 2,6,10,15,20,21,22,23
Arduino's 8 bit: any
DUE: check arduino site
If you do not use reset, tie it to +3V3
*/

uint8_t errorCode = 0;

SSD_13XX tft = SSD_13XX(__CS1, __DC);
DHT dht(DHTPIN, DHTTYPE);

void setup()
{
    Serial.begin(38400);

    long unsigned debug_start = millis();
    while (!Serial && ((millis() - debug_start) <= 5000))
        ;
    Serial.println("serial ok, testing lib...");
    tft.begin();
    //the following it's mainly for Teensy
    //it will help you to understand if you have choosed the
    //wrong combination of pins!
    errorCode = tft.getErrorCode();
    if (errorCode != 0)
    {
        Serial.print("Init error! ");
        if (bitRead(errorCode, 0))
            Serial.print("MOSI or SCLK pin mismach!\n");
        if (bitRead(errorCode, 1))
            Serial.print("CS or DC pin mismach!\n");
    }
    else
    {
        tft.print("Ready!");
    }
}

void loop(void)
{
    float h = dht.readHumidity();
    float t = dht.readTemperature();
    float hic = dht.computeHeatIndex(t, h, false);

    tft.clearScreen();
    if (isnan(h) || isnan(t))
    {
        tft.printf("Failed to read from DHT sensor!");
        Serial.println("Failed to read from DHT sensor!");
        return;
    }
    else
    {
        tft.printf("Humidity: %0.2f%%\n", h);
        tft.printf("Temperature: %0.2f%%\n", t);
        tft.printf("Heat index: %0.2fC\n", hic);
    }
    delay(2000);
}
動作イメージ
今日の進捗。湿度温度センサーのDHT11を繋いで、温度と湿度を取って、SSD1331に表示するところまでできた。 pic.twitter.com/agpGE5LrOp
— Toshio Maki (@Kirika_K2) 2018年7月11日
