はじめに
UITableViewControllerで利用できるStatic Cellsというセルがあり、
表示させる中身に変更が無いシーン(アプリの設定画面など)で便利なようです。
セクションのラベルや背景色などはInspectorで設定できなくて、実装に少し困ったのでメモとして書いてみたいと思います。至らぬ点はコメントなど頂けたら幸いです。
サンプル
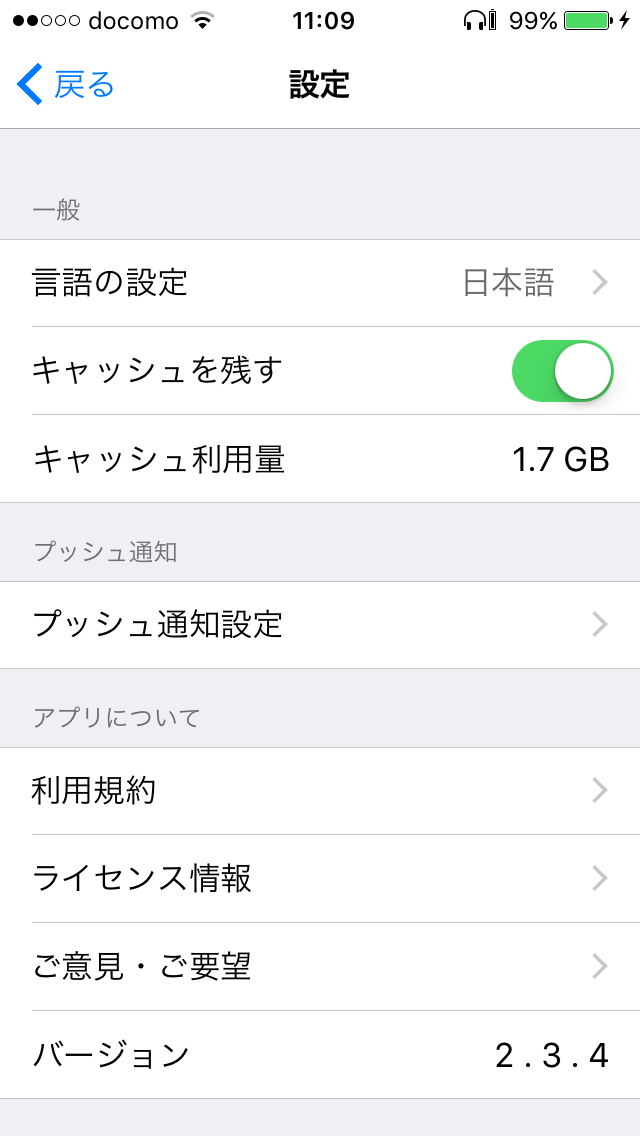
![]() Storyboardを利用してアプリのデザインに合わせて色を変えたり、比較的簡単に設定画面を作成できます。
Storyboardを利用してアプリのデザインに合わせて色を変えたり、比較的簡単に設定画面を作成できます。
UITableViewControllerの準備
StoryboardにUITableViewControllerを置き、TableViewのContentをStatic Cellsに変更します。
UITableViewCellStyleで既存のデザインを利用したり、StoryboardでセルのContent Viewに部品を追加してセルを作っていくことが基本になります。
また、世間に出ているアプリの設定画面は、UITableViewStyleのGloupedで作成されているものが多い気がします。
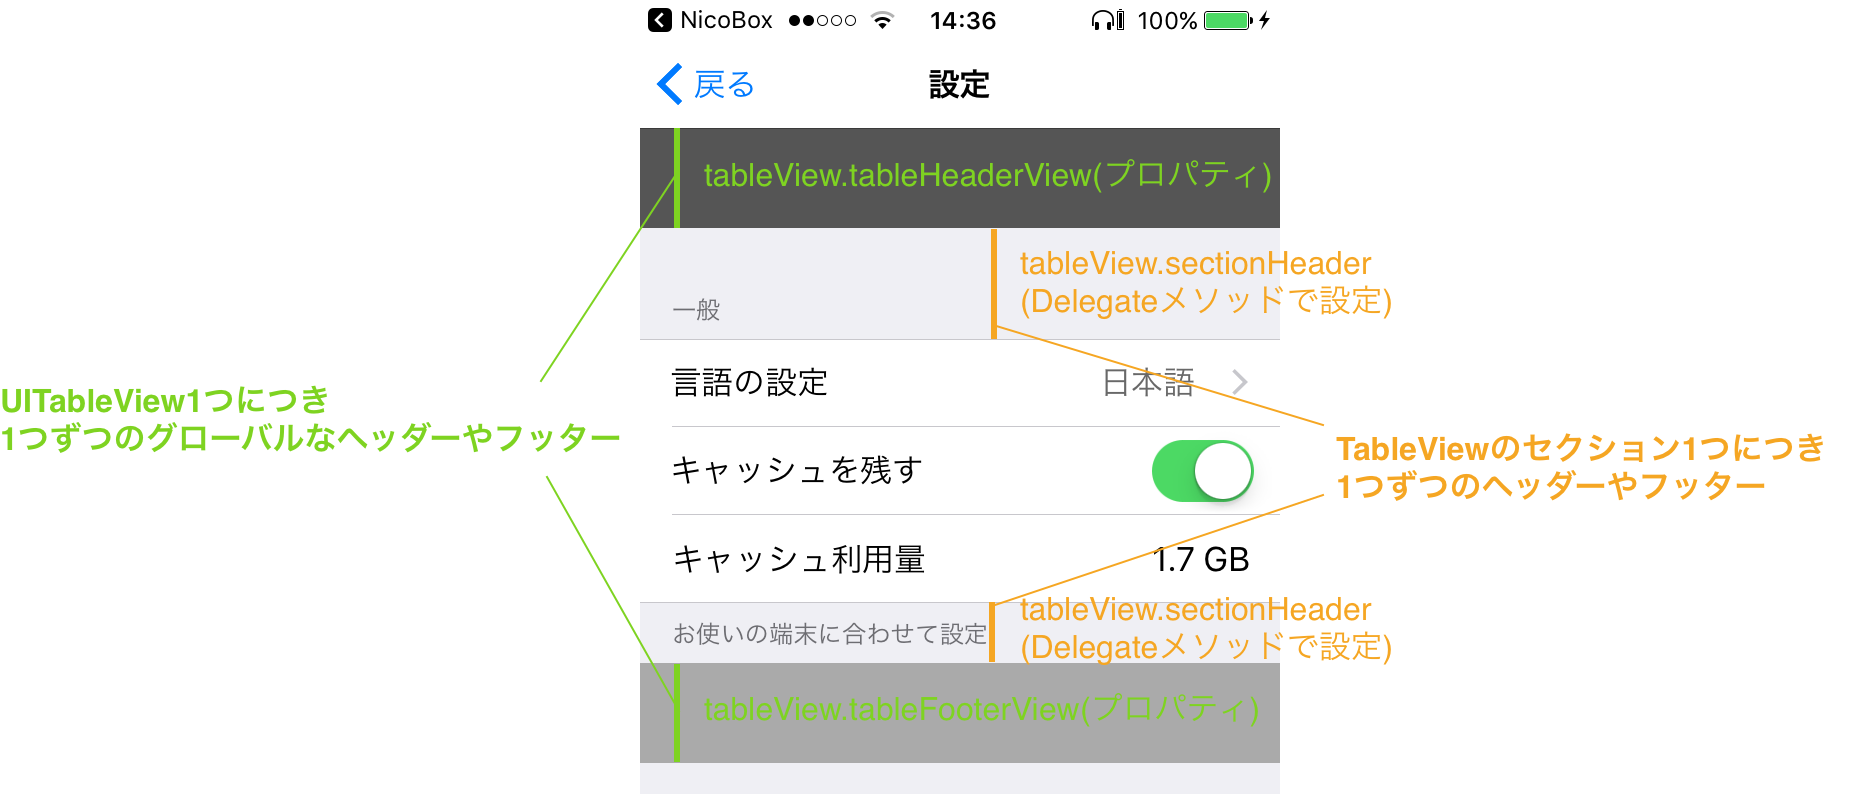
グローバルなHeaderとFooterにカスタムViewを設定
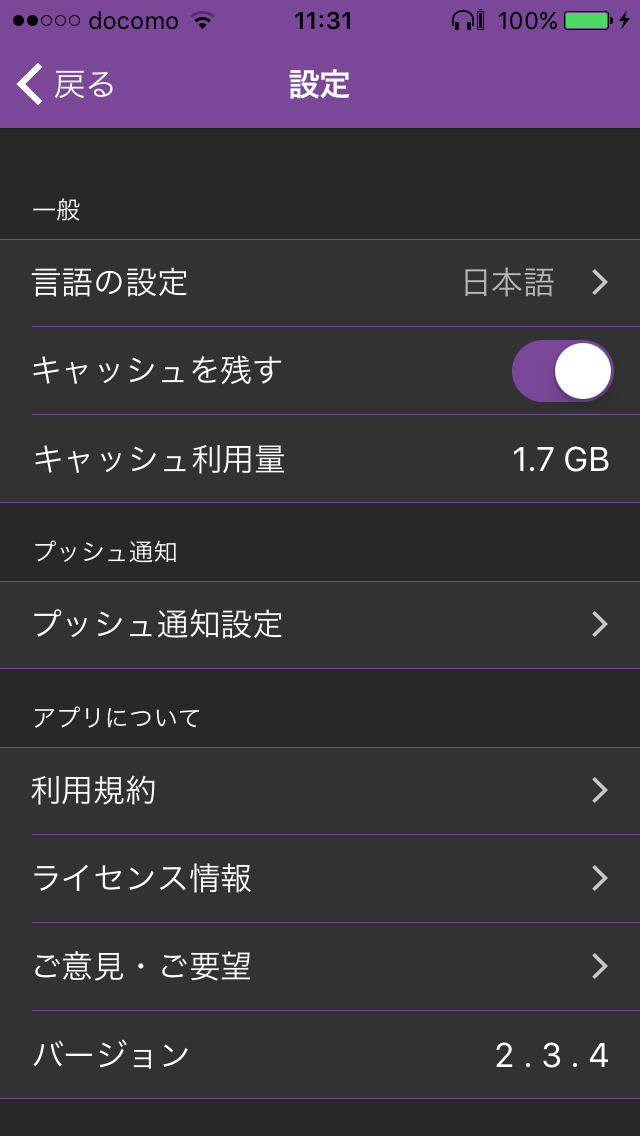
![]() UITableViewの
UITableViewのプロパティで設定することができます。
override func viewDidLoad() {
    super.viewDidLoad()
    //グローバルなTableViewのheaderやfooterにカスタムViewを設定
    tableView.tableHeaderView = CustomGlobalHeaderView()
    tableView.tableFooterView = CustomGlobalFooterView()
}
セクションのカスタマイズ
「セルの数」と「Header Footerのラベル」の設定
![]() Storyboardで設定ができます。
Storyboardで設定ができます。

| 名前 | 説明 |
|---|---|
| Rows | そのセクションの中のセルの数 |
| Header | ヘッダーのラベル 入力するとStoryboardでヘッダーが作成される |
| Footer | フッターのラベル 入力するとStoryboardでヘッダーが作成される |
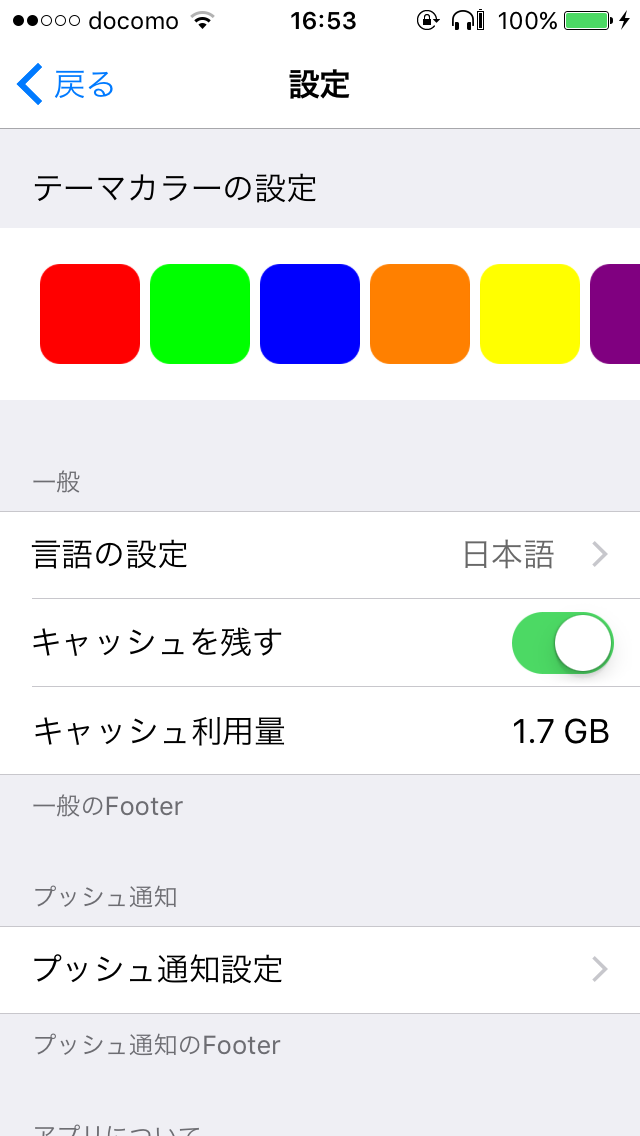
「ラベル」や「背景色」の設定
![]() Storyboardで設定ができないので
Storyboardで設定ができないのでUITableViewDelegateのメソッドを利用します。
//Headerが表示される時の処理
override func tableView(_ tableView: UITableView, willDisplayHeaderView view: UIView, forSection section: Int) {
    guard let header = view as? UITableViewHeaderFooterView else { return }
    //Headerのラベルの文字色を設定
    header.textLabel?.textColor = UIColor.white
    //Headerの背景色を設定
    header.contentView.backgroundColor = UIColor(hex: 0x282828)
}
//Footerが表示される時の処理
override func tableView(_ tableView: UITableView, willDisplayFooterView view: UIView, forSection section: Int) {
    guard let footer = view as? UITableViewHeaderFooterView else { return }
    //Footerのラベルの文字色を設定
    footer.textLabel?.textColor = UIColor.white
    //Footerの背景色を設定
    footer.contentView.backgroundColor = UIColor(hex: 0x282828)
}
HeaderとFooterの高さの設定
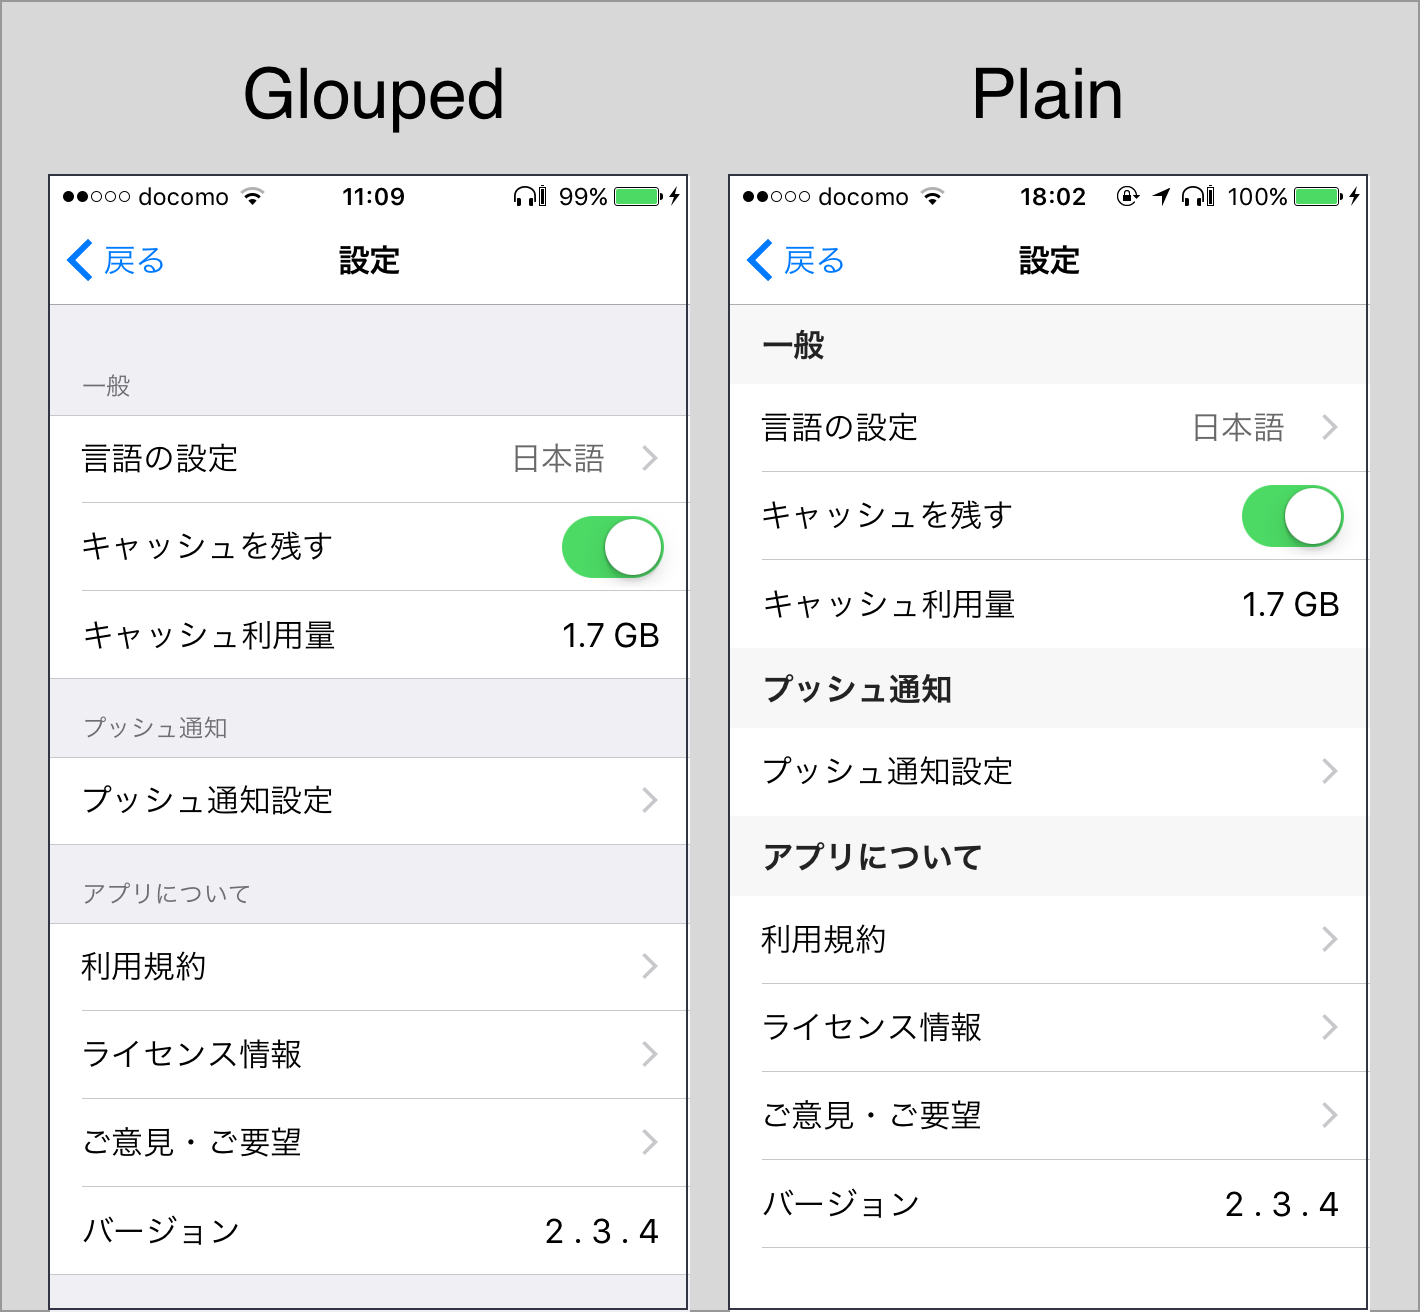
![]() UITableViewのスタイルをStyle Groupedに設定している場合、
UITableViewのスタイルをStyle Groupedに設定している場合、
Storyboardでのセクションの高さ設定は効かないようです。
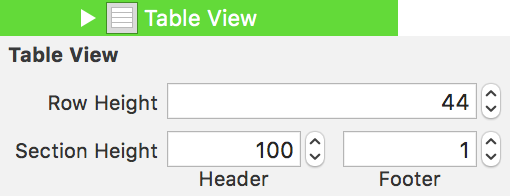
![]() Style Groupedに設定した時のデフォルトの高さは以下になっています。変更する場合は
Style Groupedに設定した時のデフォルトの高さは以下になっています。変更する場合はUITableViewDelegateメソッドを利用します。
| 行 | Header高さ | Footerの高さ |
|---|---|---|
| 1行目 | 55 | 30 |
| 2行目 | 38 | 30 |
| ... | ... | ... |
//Headerの高さ
override func tableView(_ tableView: UITableView, heightForHeaderInSection section: Int) -> CGFloat {
    return 60
}
//Footerの高さ
override func tableView(_ tableView: UITableView, heightForFooterInSection section: Int) -> CGFloat {
    return 50
}
HeaderとFooterにカスタムViewを設定する
![]() より詳細なレイアウトを行いたい場合は、独自のViewを設定してしまうのも1つの方法です。
より詳細なレイアウトを行いたい場合は、独自のViewを設定してしまうのも1つの方法です。UITableViewDelegateメソッドを利用します。
//HeaderViewを返却
override func tableView(_ tableView: UITableView, viewForHeaderInSection section: Int) -> UIView? {
    return CustomHeaderView()
}
//FooterViewを返却
override func tableView(_ tableView: UITableView, viewForFooterInSection section: Int) -> UIView? {
    return CustomFooterView()
}
参考にさせていただいた記事
見て頂いてありがとうございます。