アプリの設定などでTableView を使うときにセルごとに設定を変えたり、コントロールを載せるなどの必要があります。Storyboard で設定をすることもでき、セクションを複数にしたりすることもできますが、それにはstatic cell に設定する必要があり、このためにはTableViewController を使う必要があります。しかし、ほかのUIView 部品を使うためには(たとえばToolBar やADBannerViewなど)UIViewController を使う必要があり、その場合はDynamic Prototype にしてコードで設定するひつようがあります。
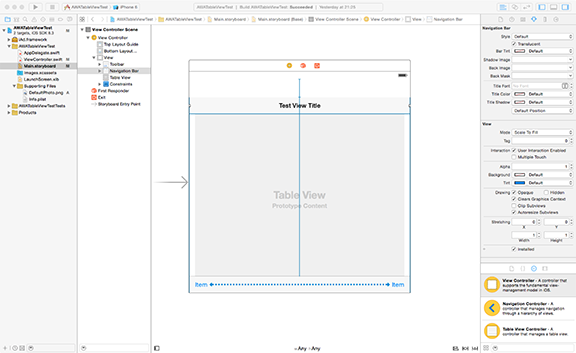
そこで、ViewController にTableView を貼り付けてそこで各種のCell の設定をしてみました。
ここではTableView をStoryboard で貼り付けておいて、コードでセルやセクションの設定をしていますが、コードでTableView を貼り付けてももちろんOKです。ポイントは以下の通りです。
1. セクションヘッダタイトル
セクションのヘッダタイトルを設定するためにTableViewDataSourceに次のメソッドが用意されています。
func tableView(tableView: UITableView, titleForHeaderInSection section: Int) -> String? {
    return titleOfSections[section]
}
これを使うと簡単にセクションヘッダにタイトルを設定できます。しかしこれで設定したタイトルはフォントサイズなどを変えることができません。今回は、デリゲートメソッドとして用意されている次のメソッドを使います。
func tableView(tableView: UITableView, viewForHeaderInSection section: Int) -> UIView? {
    let header = UILabel(frame: CGRectMake(0, 0, 200, 22))
    header.text = titleOfSections[section]
    header.font = UIFont.boldSystemFontOfSize(12)
    return header
}
このメソッドでタイトルをUILabel で用意して、このUILabel を返します。このメソッで UIImage を返せば画像を表示することができます。
上記の例では各セクションのタイトルを配列で用意して、このメソッド内でセクションに対応したタイトルを設定しています。
2. セルの高さ
セルにイメージを表示するときに少し大きな画像を表示したいときには、セルの高さを高く設定するとよいです。セルの高さは次のデリゲートメソッドを使います。
func tableView(tableView: UITableView, heightForRowAtIndexPath indexPath: NSIndexPath) -> CGFloat {
	return hight
}
ここで、イメージを表示するセルにはデバイスの横幅の1/3 の高さを設定しています。ここで、他のセルはデフォルトのままでよい場合、-1 を返すとデフォルトのままになるようです。
セクションヘッダは高さを低くする設定をしており、そのためにセクションヘッダ用に同様のメソッドが用意されています。ただしここでは
func tableView(tableView: UITableView, estimatedHeightForHeaderInSection section: Int) -> CGFloat {
    return 22   // セルの半分の高さ
}
というestimateが着くメソッドを使ってみました。セルに対しても同様のメソッドが用意されていますが、今回の例のような場合にはうまく設定できませんでした。セクションヘッダについてはestimated でうまくいきました。
3. セルのイメージとセルのテキストの設定
セルの設定は、DagaSource に用意されている
func tableView(tableView: UITableView, cellForRowAtIndexPath indexPath: NSIndexPath) -> UITableViewCell {
    return cell
}
をつかいます。
ここで、TableViewCell クラスのセルを返すわけですが、TabelViewCellクラスには textLabel と imageView というプロパティが用意されています。
このtextLabelのtext にセルのテキストを設定し、imageView のimage にUIImageタイプの画像を設定すると画像が左にその右にテキストが表示されます。このときイメージの大きさはセルの高さで決まりますからセルの高さを高くすると画像も大きくなります。
このtextLabel とimageViewを使うと標準的な画像とテキストの表示は非常に簡単に勝手に整列してくれます。しかし、この例の3番目のセクションのようにここにボタンを配置するなどしようとすると、textLabel と imageView は制御できないので使用できません。contentViewに直接サブビューを載せるときにはテキストやイメージも位置を決めてサブビューに載せることが必要です。
4. アクセサリビューへのコントロールの配置
セルの右端はaccessoryView として別のView になっていて、TableViewCell の accessoryType プロパティに UITableViewAccessoryType を設定することで、Detail ボタンやインジケータを表示することができます。しかし、ここはaccessoyView という独立したビューになっているので、このビューを初期化してサブビューを載せることでいろいろなコントロールを載せることができます。
以下の例では、storyboard でTableView を配置してOutletでViewController クラスに接続しています。
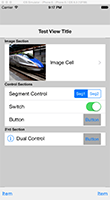
実行した結果は、
テーブルビューに3つのセクションを設定し、最初のセクションではセルの高さを変えて画像表示しています。表示の手法はアクセサリビューを含めて標準的です。第2のセクションはセルごとにアクセサリビューに異なるコントロールを配置しました。第3セクションは、contentViewにもボタンを配置してみました。
import UIKit
class ViewController: UIViewController,
UITableViewDelegate, UITableViewDataSource {
// Storyboard Outlet
@IBOutlet weak var testTableView: UITableView!
// 定数
// ビュー定数
let baseColor = UIColor(red: 204/255, green: 204/255, blue: 204/255, alpha: 1.0)
// テーブル用定数
let titleOfSections = ["Image Section", "Control Sections", "3'rd Section"]
let numberOfRows = [1, 3, 1]
let textOfRowsInImage = ["Image Cell"]
let textOfRowsInControl = ["Segment Control", "Switch", "Button"]
let textOfRowsInThird = ["Dual Control"]
// 変数
override func viewDidLoad() {
    super.viewDidLoad()

    self.view.backgroundColor = baseColor

    // テーブルビュー設定
    testTableView.backgroundColor = baseColor

}

override func viewDidAppear(animated: Bool) {

}

override func didReceiveMemoryWarning() {
    super.didReceiveMemoryWarning()
    // Dispose of any resources that can be recreated.
}
// コントロール
func onSegment(sender: UISegmentedControl) {
    let segStatus = sender.selectedSegmentIndex
    println("Segment \(segStatus)")
}

func onSwitch(sender: UISwitch) {
    let swStatus = sender.on
}
// TableView Delegate Method
// テーブルビューセルの高さ取得
func tableView(tableView: UITableView, heightForRowAtIndexPath indexPath: NSIndexPath) -> CGFloat {
    if indexPath.section == 0 {
        let widthOfScreen = UIScreen.mainScreen().bounds.width
        return widthOfScreen / 3
    } else {
        return -1
    }
}


// アクセサリビューボタンタップ時に呼び出される
func tableView(tableView: UITableView, accessoryButtonTappedForRowWithIndexPath indexPath: NSIndexPath) {
    println("Line \(indexPath.row) tapped")
}


// セクションヘッダのビュー取得
func tableView(tableView: UITableView, viewForHeaderInSection section: Int) -> UIView? {
    let header = UILabel(frame: CGRectMake(0, 0, 200, 22))
    header.text = titleOfSections[section]
    header.font = UIFont.boldSystemFontOfSize(12)

    return header
}


// セクションヘッダの高さ取得
func tableView(tableView: UITableView, estimatedHeightForHeaderInSection section: Int) -> CGFloat {
    return 22   // セルの半分の高さ
}
// TableView Data Source Method
// テーブルビューセルの設定
func tableView(tableView: UITableView, cellForRowAtIndexPath indexPath: NSIndexPath) -> UITableViewCell {
    let cell = UITableViewCell(style: UITableViewCellStyle.Default, reuseIdentifier: "testCell")
    switch indexPath.section {
    case 0 :
        cell.textLabel?.text = textOfRowsInImage[indexPath.row]
        let testImage = UIImage(named: "DefaultPhoto.png")
        cell.imageView?.image = testImage
        cell.accessoryType = UITableViewCellAccessoryType.DisclosureIndicator
    case 1 :
        cell.textLabel?.text = textOfRowsInControl[indexPath.row]
        switch indexPath.row {
        case 0 :
            let segment = UISegmentedControl(items: ["Seg1", "Seg2"])
            segment.selectedSegmentIndex = 0
            segment.addTarget(self, action: "onSegment:", forControlEvents: UIControlEvents.ValueChanged)
            cell.accessoryView = UIView(frame: segment.frame)
            cell.accessoryView?.addSubview(segment)

        case 1 :
            let onOffControl = UISwitch()
            onOffControl.on = true
            onOffControl.addTarget(self, action: "onSwitch:", forControlEvents: UIControlEvents.ValueChanged)
            cell.accessoryView = UIView(frame: onOffControl.frame)
            cell.accessoryView?.addSubview(onOffControl)

        case 2 :
            let buttonOnAccessory = UIButton.buttonWithType(UIButtonType.System) as! UIButton
            buttonOnAccessory.setTitle("Button", forState: UIControlState.Normal)
            buttonOnAccessory.addTarget(self, action: "onButton:", forControlEvents: UIControlEvents.TouchUpInside)
            buttonOnAccessory.backgroundColor = UIColor.lightGrayColor()
            buttonOnAccessory.frame = CGRectMake(0, 0, 60, 40)
            buttonOnAccessory.tag = 0
            cell.accessoryView = UIView(frame: buttonOnAccessory.frame)
            cell.accessoryView?.addSubview(buttonOnAccessory)

        default :
            break
        }
    case 2 :
        let buttonOnContent = UIButton.buttonWithType(UIButtonType.InfoLight) as! UIButton
        buttonOnContent.addTarget(self, action: "onButton:", forControlEvents: UIControlEvents.TouchUpInside)
        buttonOnContent.tag = 0
        buttonOnContent.frame = CGRectMake(0, 0, 40, 40)
        cell.contentView.addSubview(buttonOnContent)
        let label = UILabel(frame: CGRectMake(40, 0, 100, 40))
        label.text = textOfRowsInThird[indexPath.row]
        cell.contentView.addSubview(label)

        let buttonAcc2 = UIButton.buttonWithType(UIButtonType.System) as! UIButton
        buttonAcc2.setTitle("Button", forState: UIControlState.Normal)
        buttonAcc2.addTarget(self, action: "onButton:", forControlEvents: UIControlEvents.TouchUpInside)
        buttonAcc2.backgroundColor = UIColor.lightGrayColor()
        buttonAcc2.frame = CGRectMake(0, 0, 60, 40)
        buttonAcc2.tag = 1
        cell.accessoryView = UIView(frame: buttonAcc2.frame)
        cell.accessoryView?.addSubview(buttonAcc2)
    default :
        break
    }
    return cell
}

// セクション数の設定
func numberOfSectionsInTableView(tableView: UITableView) -> Int {
    return titleOfSections.count

}

// セクション内の行数
func tableView(tableView: UITableView, numberOfRowsInSection section: Int) -> Int {
    return numberOfRows[section]

}
}

