先日こんなtweetを見かけました。
作った / “awscli-allを作った - くりにっき” https://t.co/7t1YIK9GX2
— sue445 (@sue445) 2019年6月13日
「AWSの公式イメージは無いし、野良イメージはメンテされてないことが多いので自作した」というような内容です。
そしてブログ本文余談2に、以下のようなことが書いてありました。
この手の野良イメージは全然メンテされずに古くなっていくのが常ですが、awscli-allを含めて僕がメンテしてるDockerイメージは全部CircleCIで定期ビルドして新しいバージョンが出たらtagをpushして全自動で新しいイメージをリリースしているので、CircleCIが死なない限りは勝手にイメージがリリースされていくので安心してください。
CircleCIで定期的に最新バージョンを確認して、新しくなっていたらそのバージョンでDockerfileを書き換え、tagを付けてDocker Hubでビルドしているようです。
ちょっと興味があったのでaws-allのリポジトリを参考に、自作イメージをDocker Hubにアップしてみました。

事前準備
- 以下サービスのアカウントを取得
Dockerfile作成
まずDockerfileを作ります。
なんでもいいのですが、最近ちょくちょく名前を見かけるElmをインストールしたイメージにしたいと思います。
FROM node:lts-alpine

ENV ELM_VERSION 0.19.0

RUN apk --update --no-cache add bash \
  && wget https://github.com/elm/compiler/releases/download/${ELM_VERSION}/binaries-for-linux.tar.gz \
  && tar -xzf binaries-for-linux.tar.gz \
  && rm binaries-for-linux.tar.gz \
  && mv elm /usr/local/bin/
何の変哲もないDockerfileです。
ベースイメージはDocker公式のAlpine LinuxなNode.js(LTS)
Elmはnpmで入れても良かったのですが、うまくインストールできなかったりするケースがあるようなので、バイナリをインストールします。
とりあえず動くか検証
$ docker build --rm -t elm .
$ docker run -it --rm elm bash -c "elm"
# bashをインストールしない場合は以下
# docker run -it --rm elm ash -c "elm"

^@^@Hi, thank you for trying out Elm 0.19.0. I hope you like it!

-------------------------------------------------------------------------------
I highly recommend working through <https://guide.elm-lang.org> to get started.
It teaches many important concepts, including how to use `elm` in the terminal.
-------------------------------------------------------------------------------

The most common commands are:

    elm repl
        Open up an interactive programming session. Type in Elm expressions like
        (2 + 2) or (String.length "test") and see if they equal four!

    elm init
        Start an Elm project. It creates a starter elm.json file and provides a
        link explaining what to do from there.

    elm reactor
        Compile code with a click. It opens a file viewer in your browser, and
        when you click on an Elm file, it compiles and you see the result.

There are a bunch of other commands as well though. Here is a full list:

    elm repl    --help
    elm init    --help
    elm reactor --help
    elm make    --help
    elm install --help
    elm bump    --help
    elm diff    --help
    elm publish --help

Adding the --help flag gives a bunch of additional details about each one.

Be sure to ask on the Elm slack if you run into trouble! Folks are friendly and
happy to help out. They hang out there because it is fun, so be kind to get the
best results!
つらつらとヘルプが表示されればOKです。
確認が終わったら、GitHubに新規リポジトリを作成し、上記のDockerfileをpushしてください。
今回はdocker-elmというリポジトリを作成しました。
Docker Hub
Docker Hubにリポジトリを作成します。
アカウントを持っていない場合は簡単に登録できるので以下からどうぞ
https://hub.docker.com/signup
GitHubと連携する
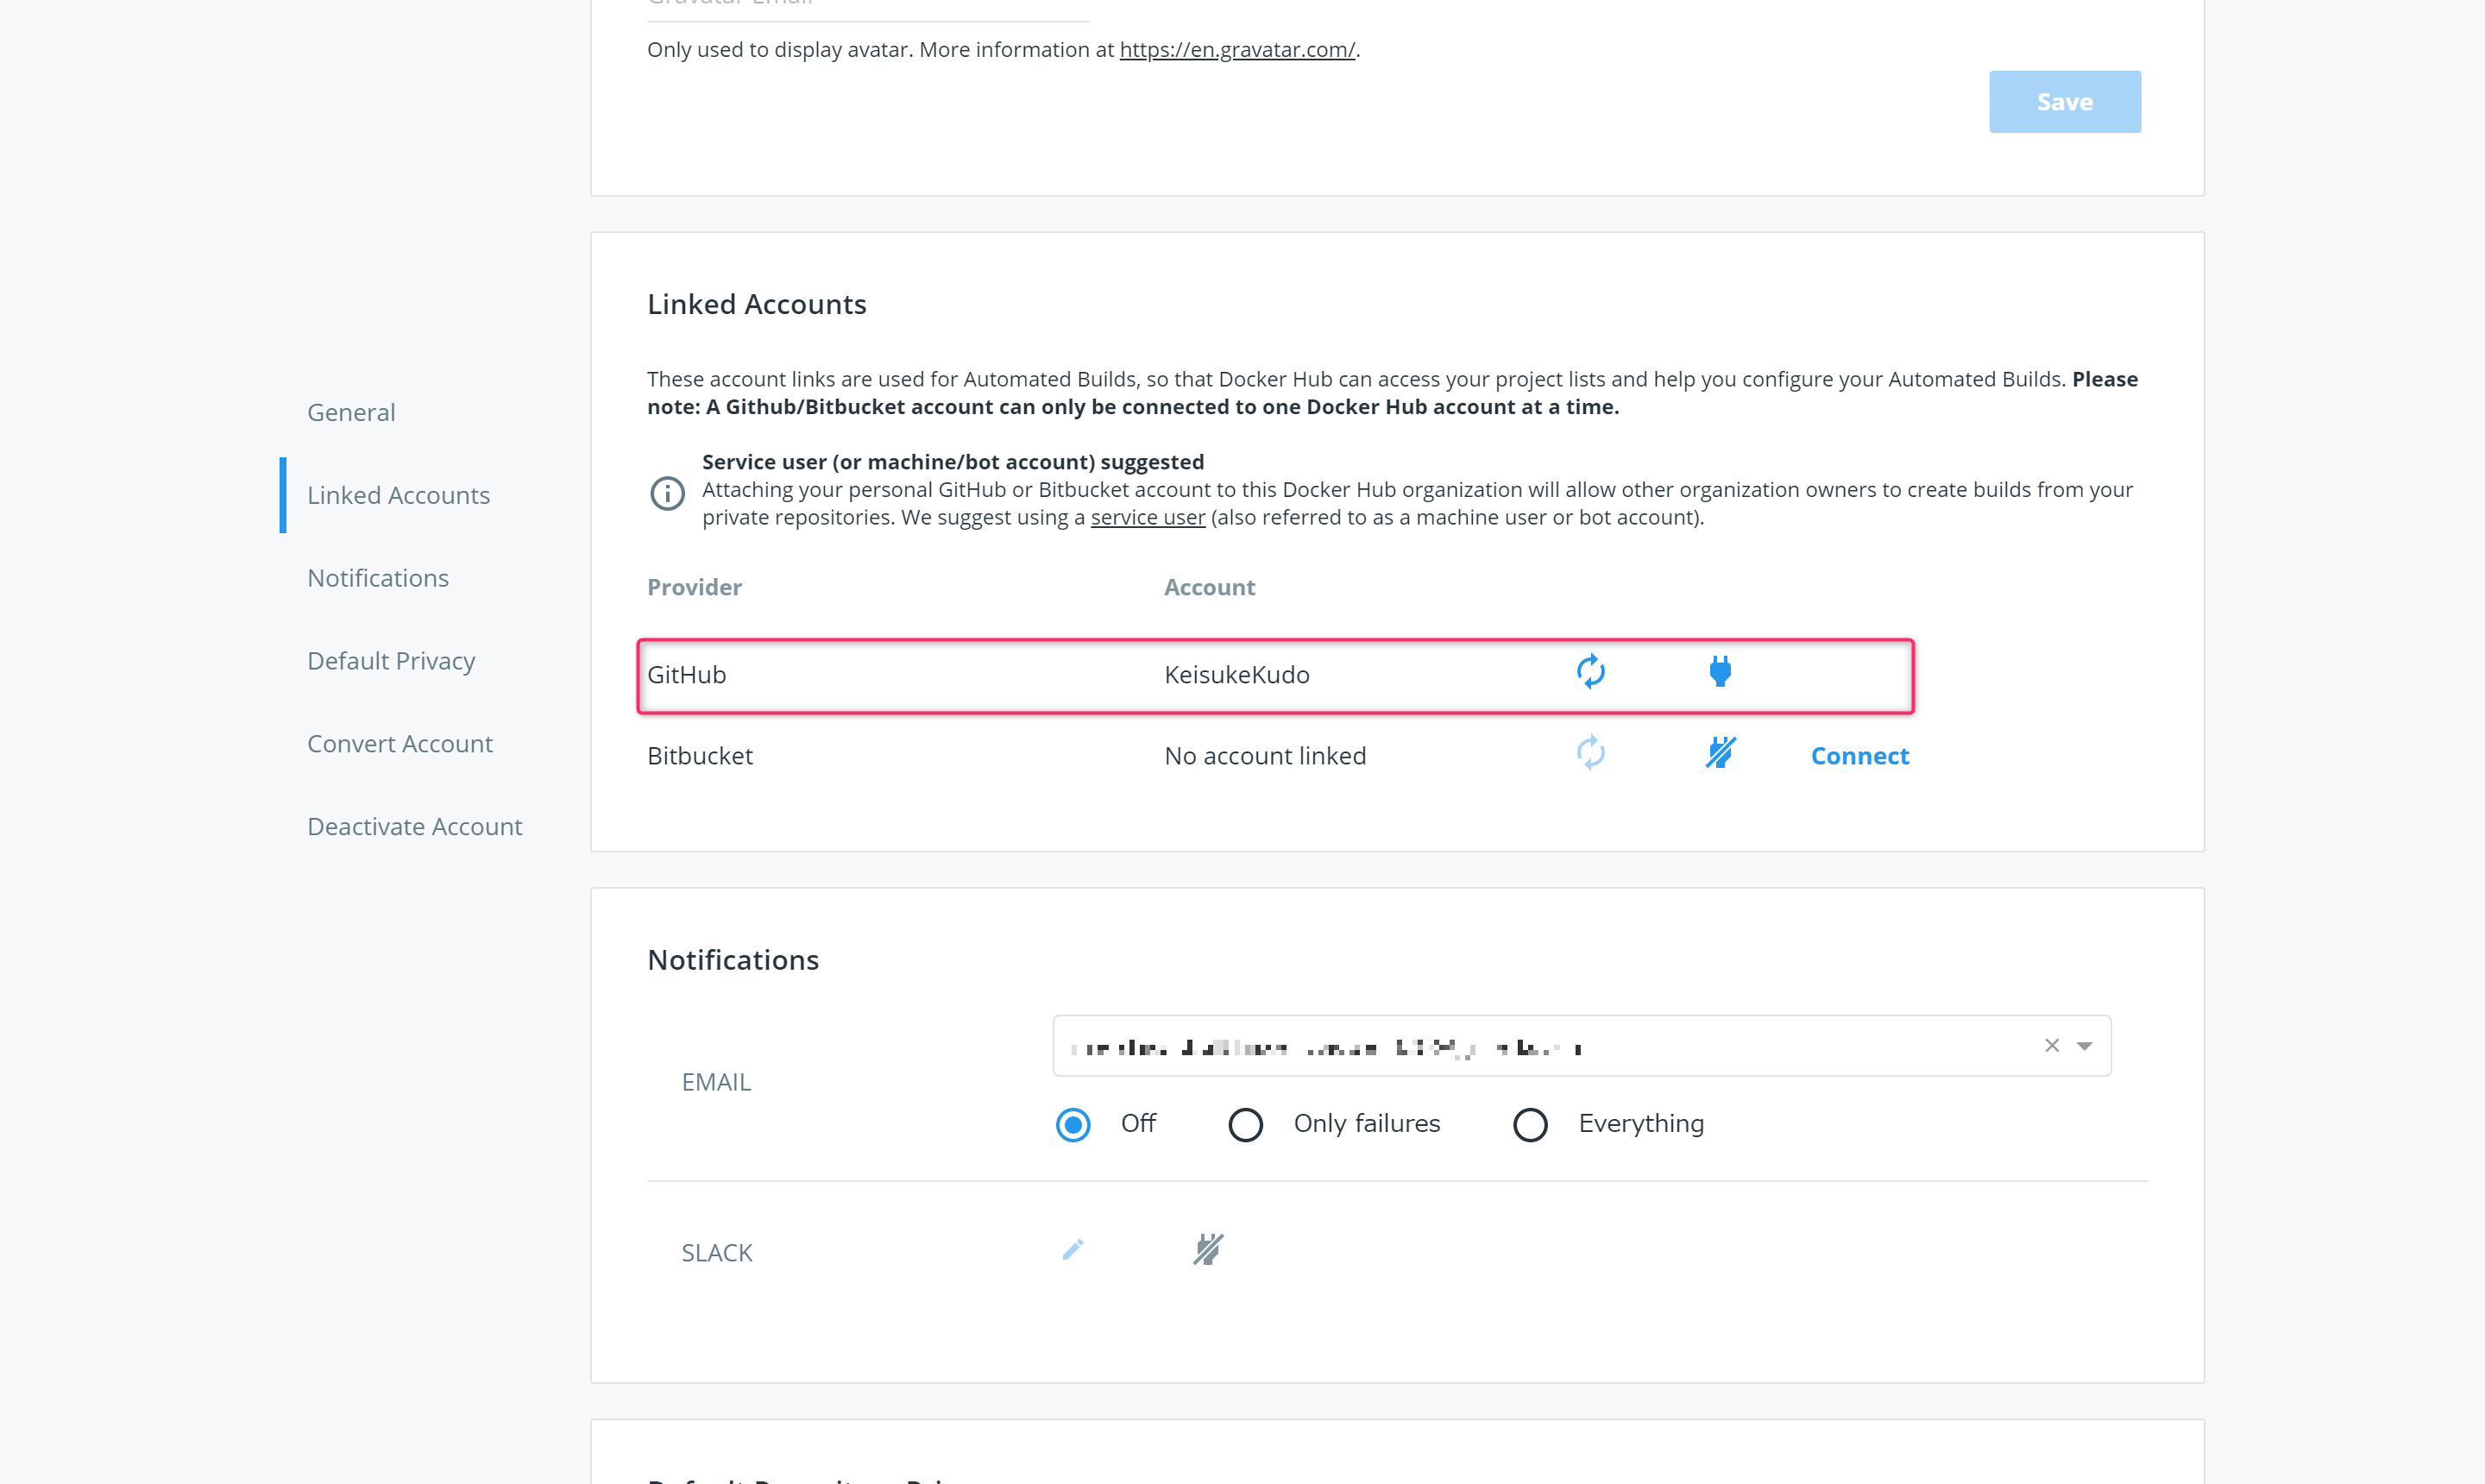
Docker Hubにログインし、マイページ > Account Settingsへアクセスします。
ページ中程にあるLinked Accounts > GitHub > ConnectをクリックしてDocker HubとGitHubを連携させます。
Docker HubのリポジトリとGitHubのリモートリポジトリを連携する
次に、Repositoriesにアクセス
Create Repositoryをクリック
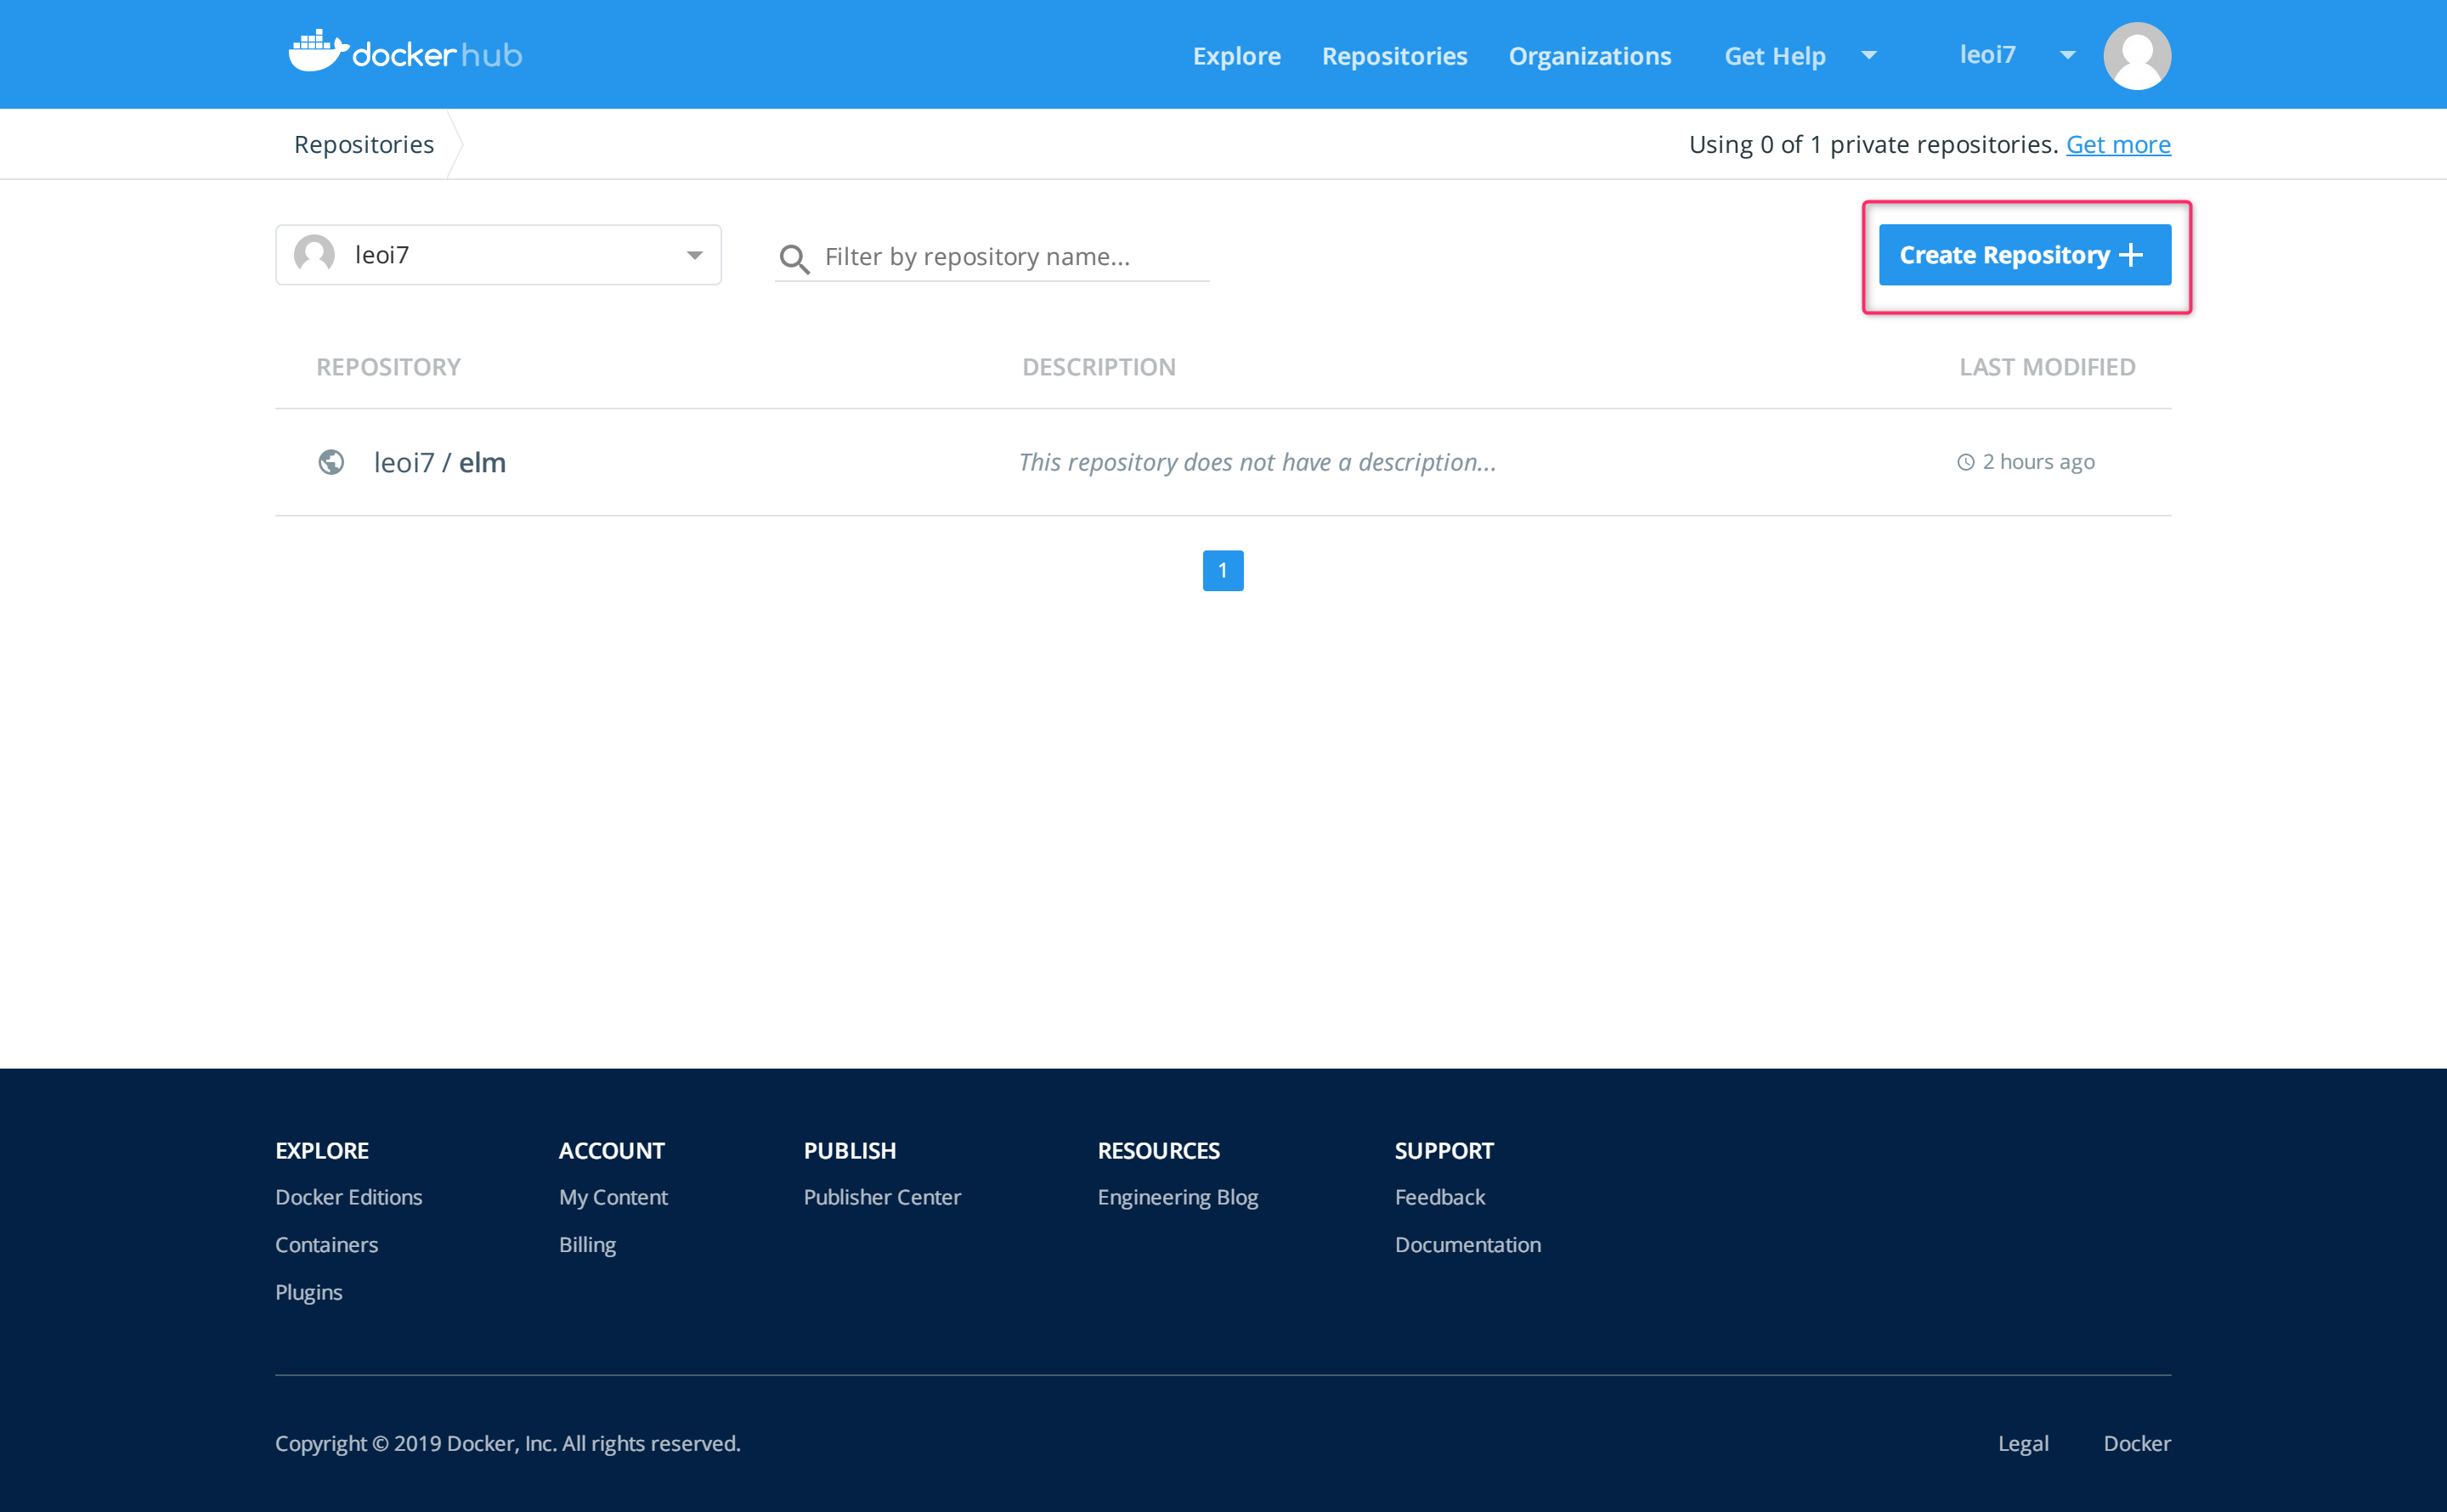
リポジトリ名はアカウント名/elmとします。

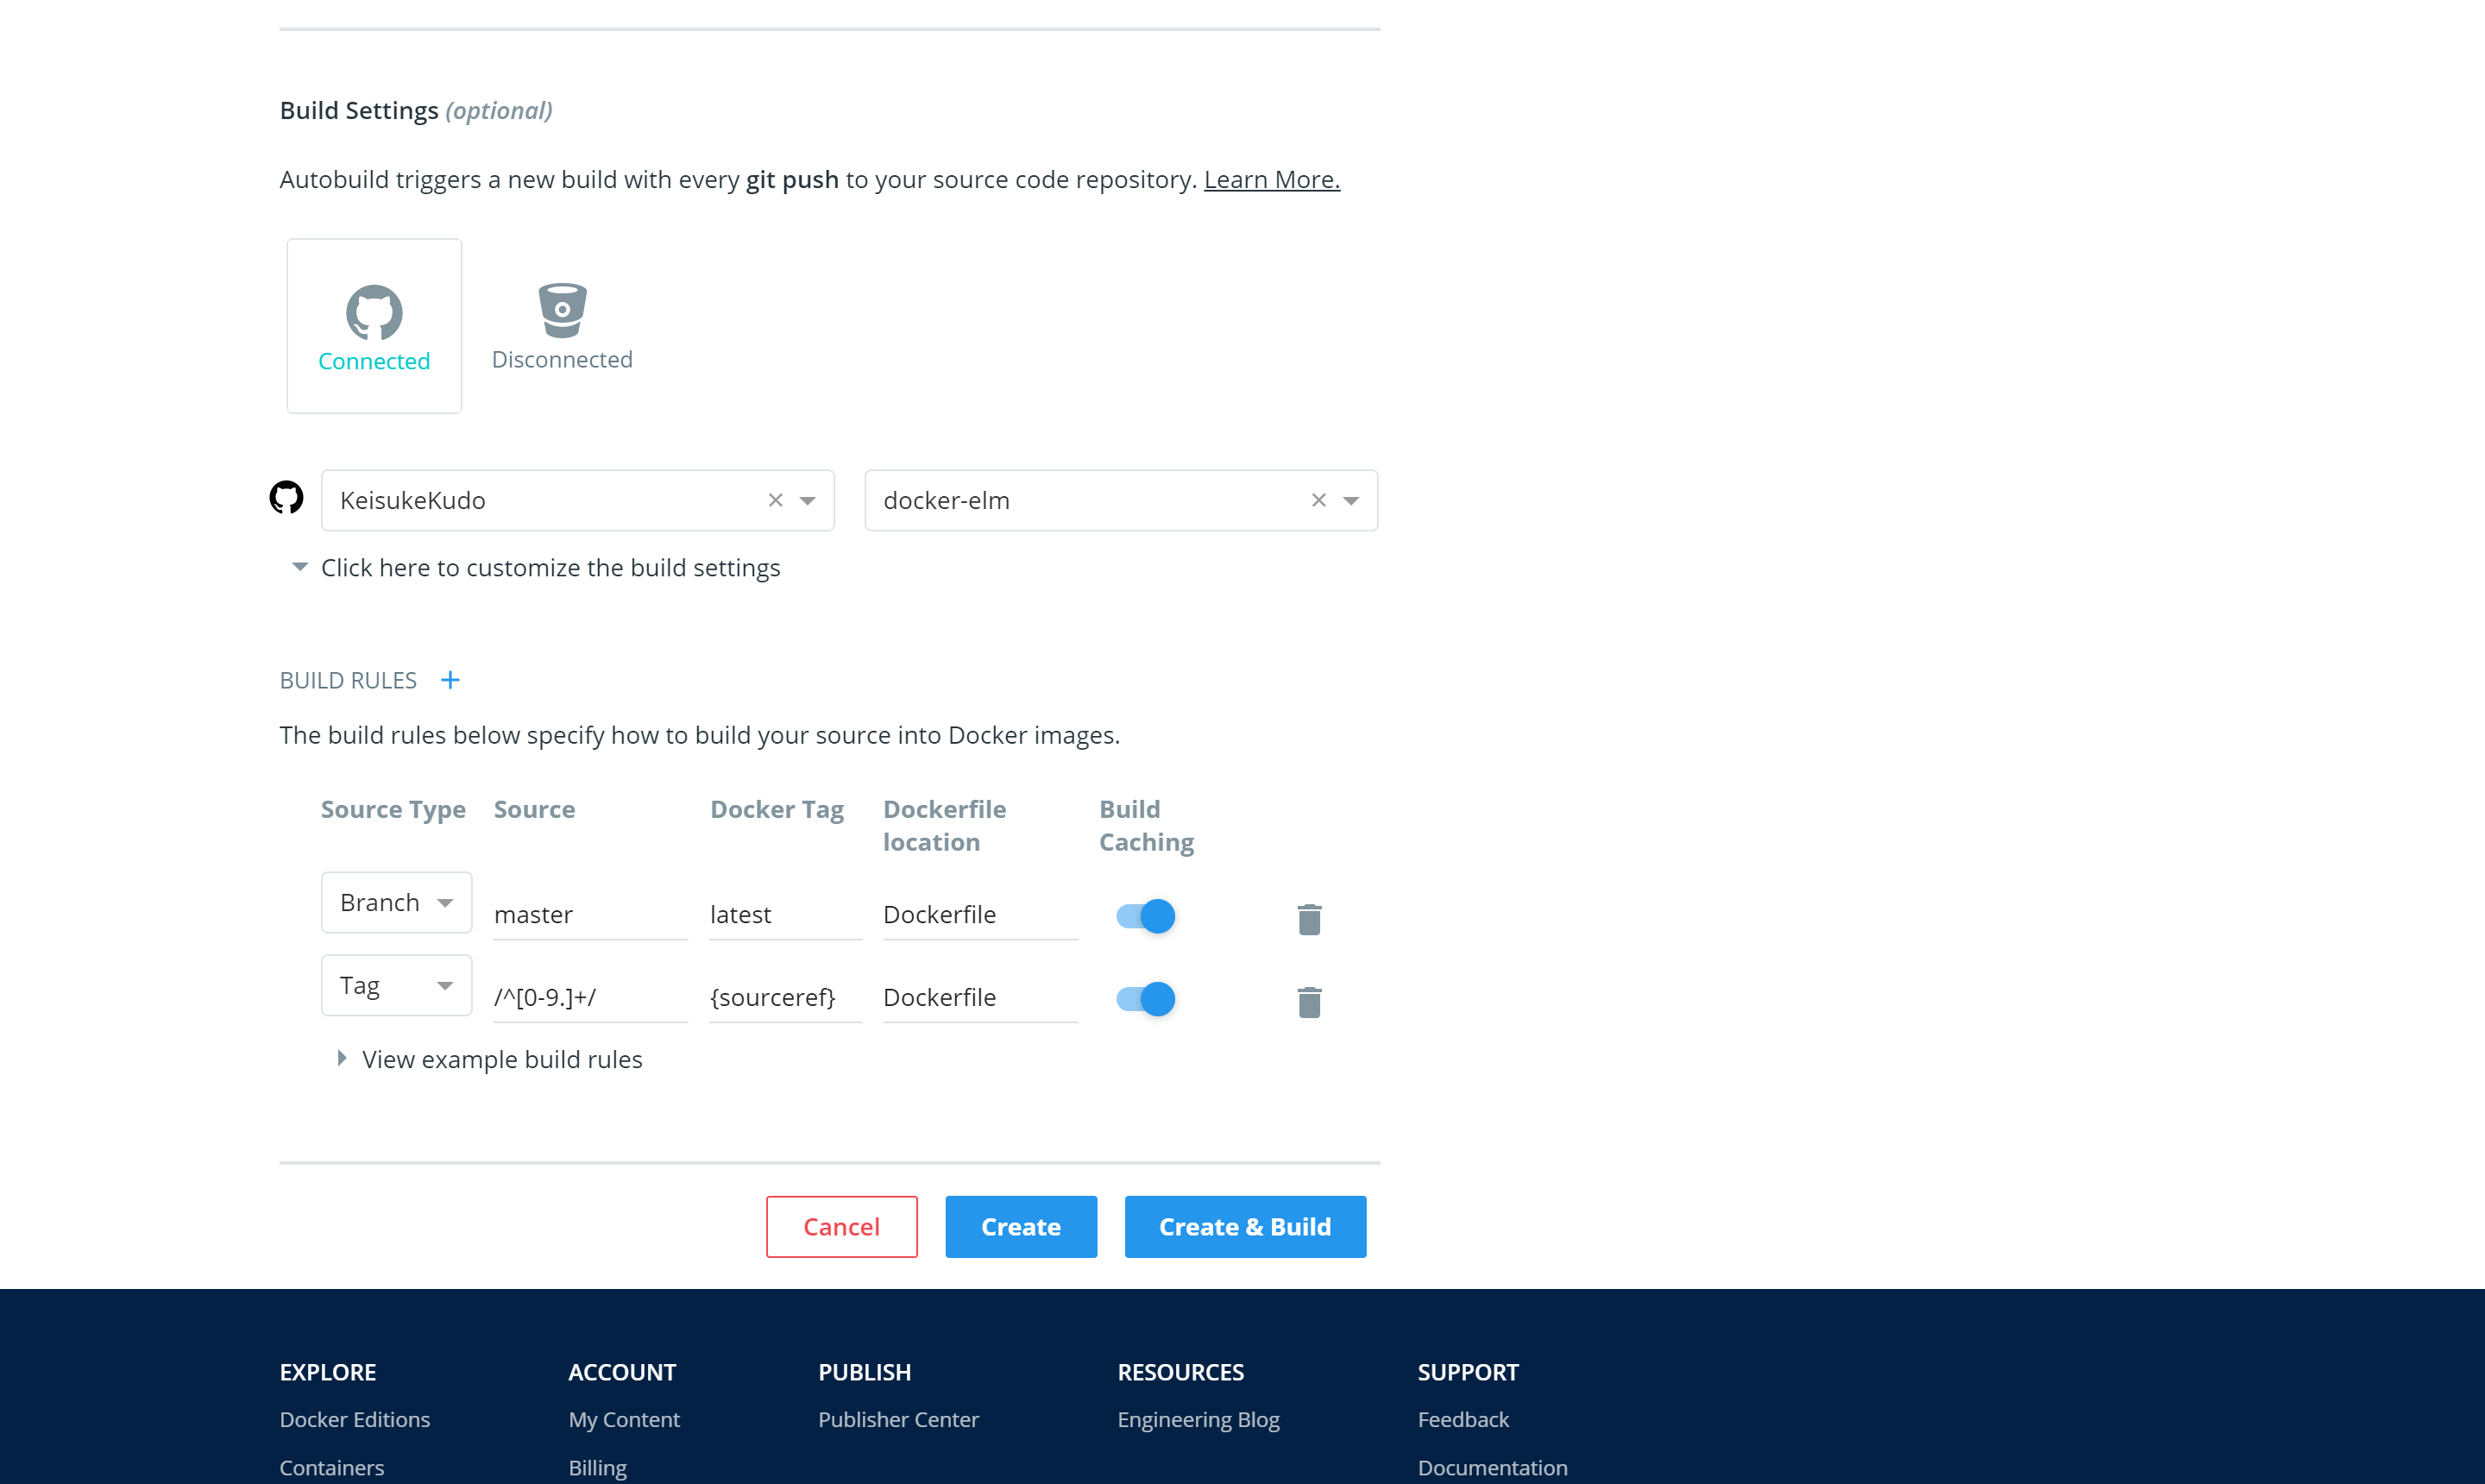
次にGitHubのリモートリポジトリを設定します。
GitHubのConnectedをクリック
アカウント名と対象リモートリポジトリを選択
BUILD RULESの+ボタンをクリックして以下を追加してください。
| Source Type | Source | Docker Tag |
|---|---|---|
| Tag | /^[0-9.]+/ | {sourceref} |
-
git tag v1.0.0などにしたい場合は/^v[0-9.]+/に変更してください。 - Docker Hubに表示されるタグ名にプレフィックスを付けたい場合は、
prefix-{sourceref}などに変更してください。
イメージをビルドする
上記の入力が完了したらCreate & Build
少しするとRepositories > user_name/repository_name > Buildsにビルド結果が表示されます。
https://cloud.docker.com/repository/docker/user_name/repository_name/builds
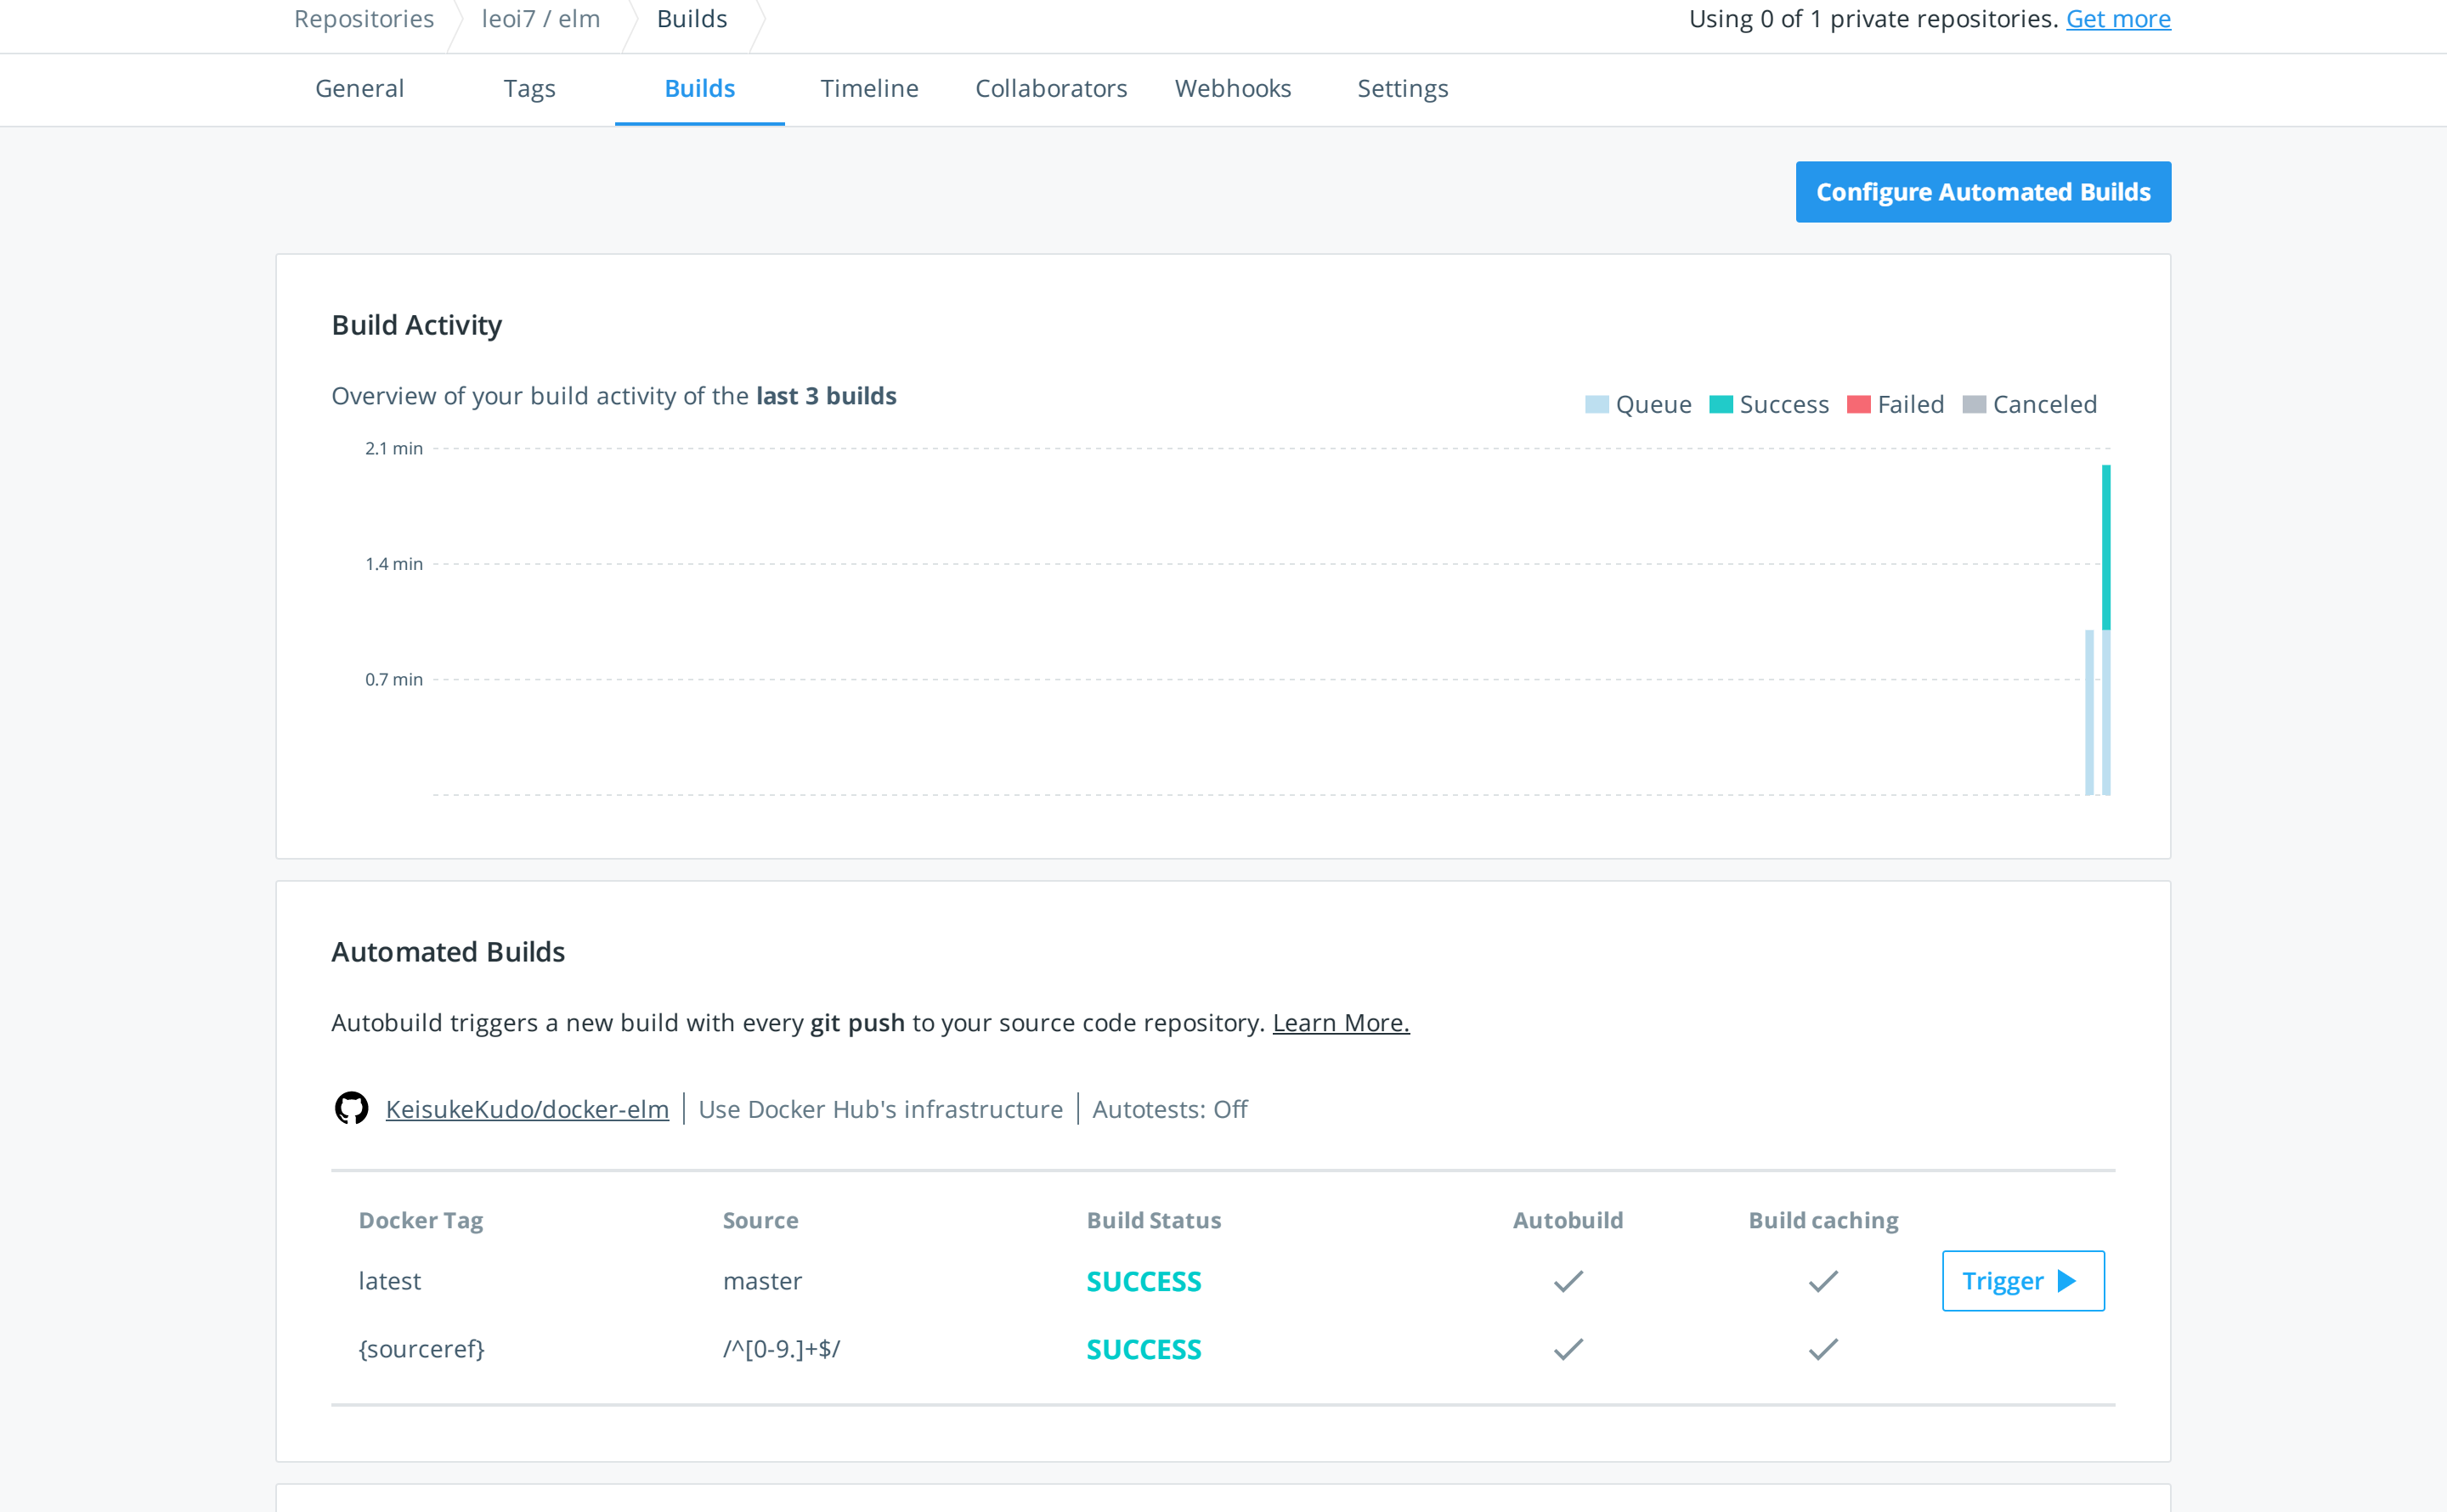
上記スクショでは{sourceref}のビルドステータスがSUCCESSになっていますが、現時点ではビルドは実行されないはずなので、latestのみがSUCCESSになっていればOKです。
Repositories > user_name/repository_name > Tagsも見てみましょう。
https://cloud.docker.com/repository/docker/user_name/repository_name/tags
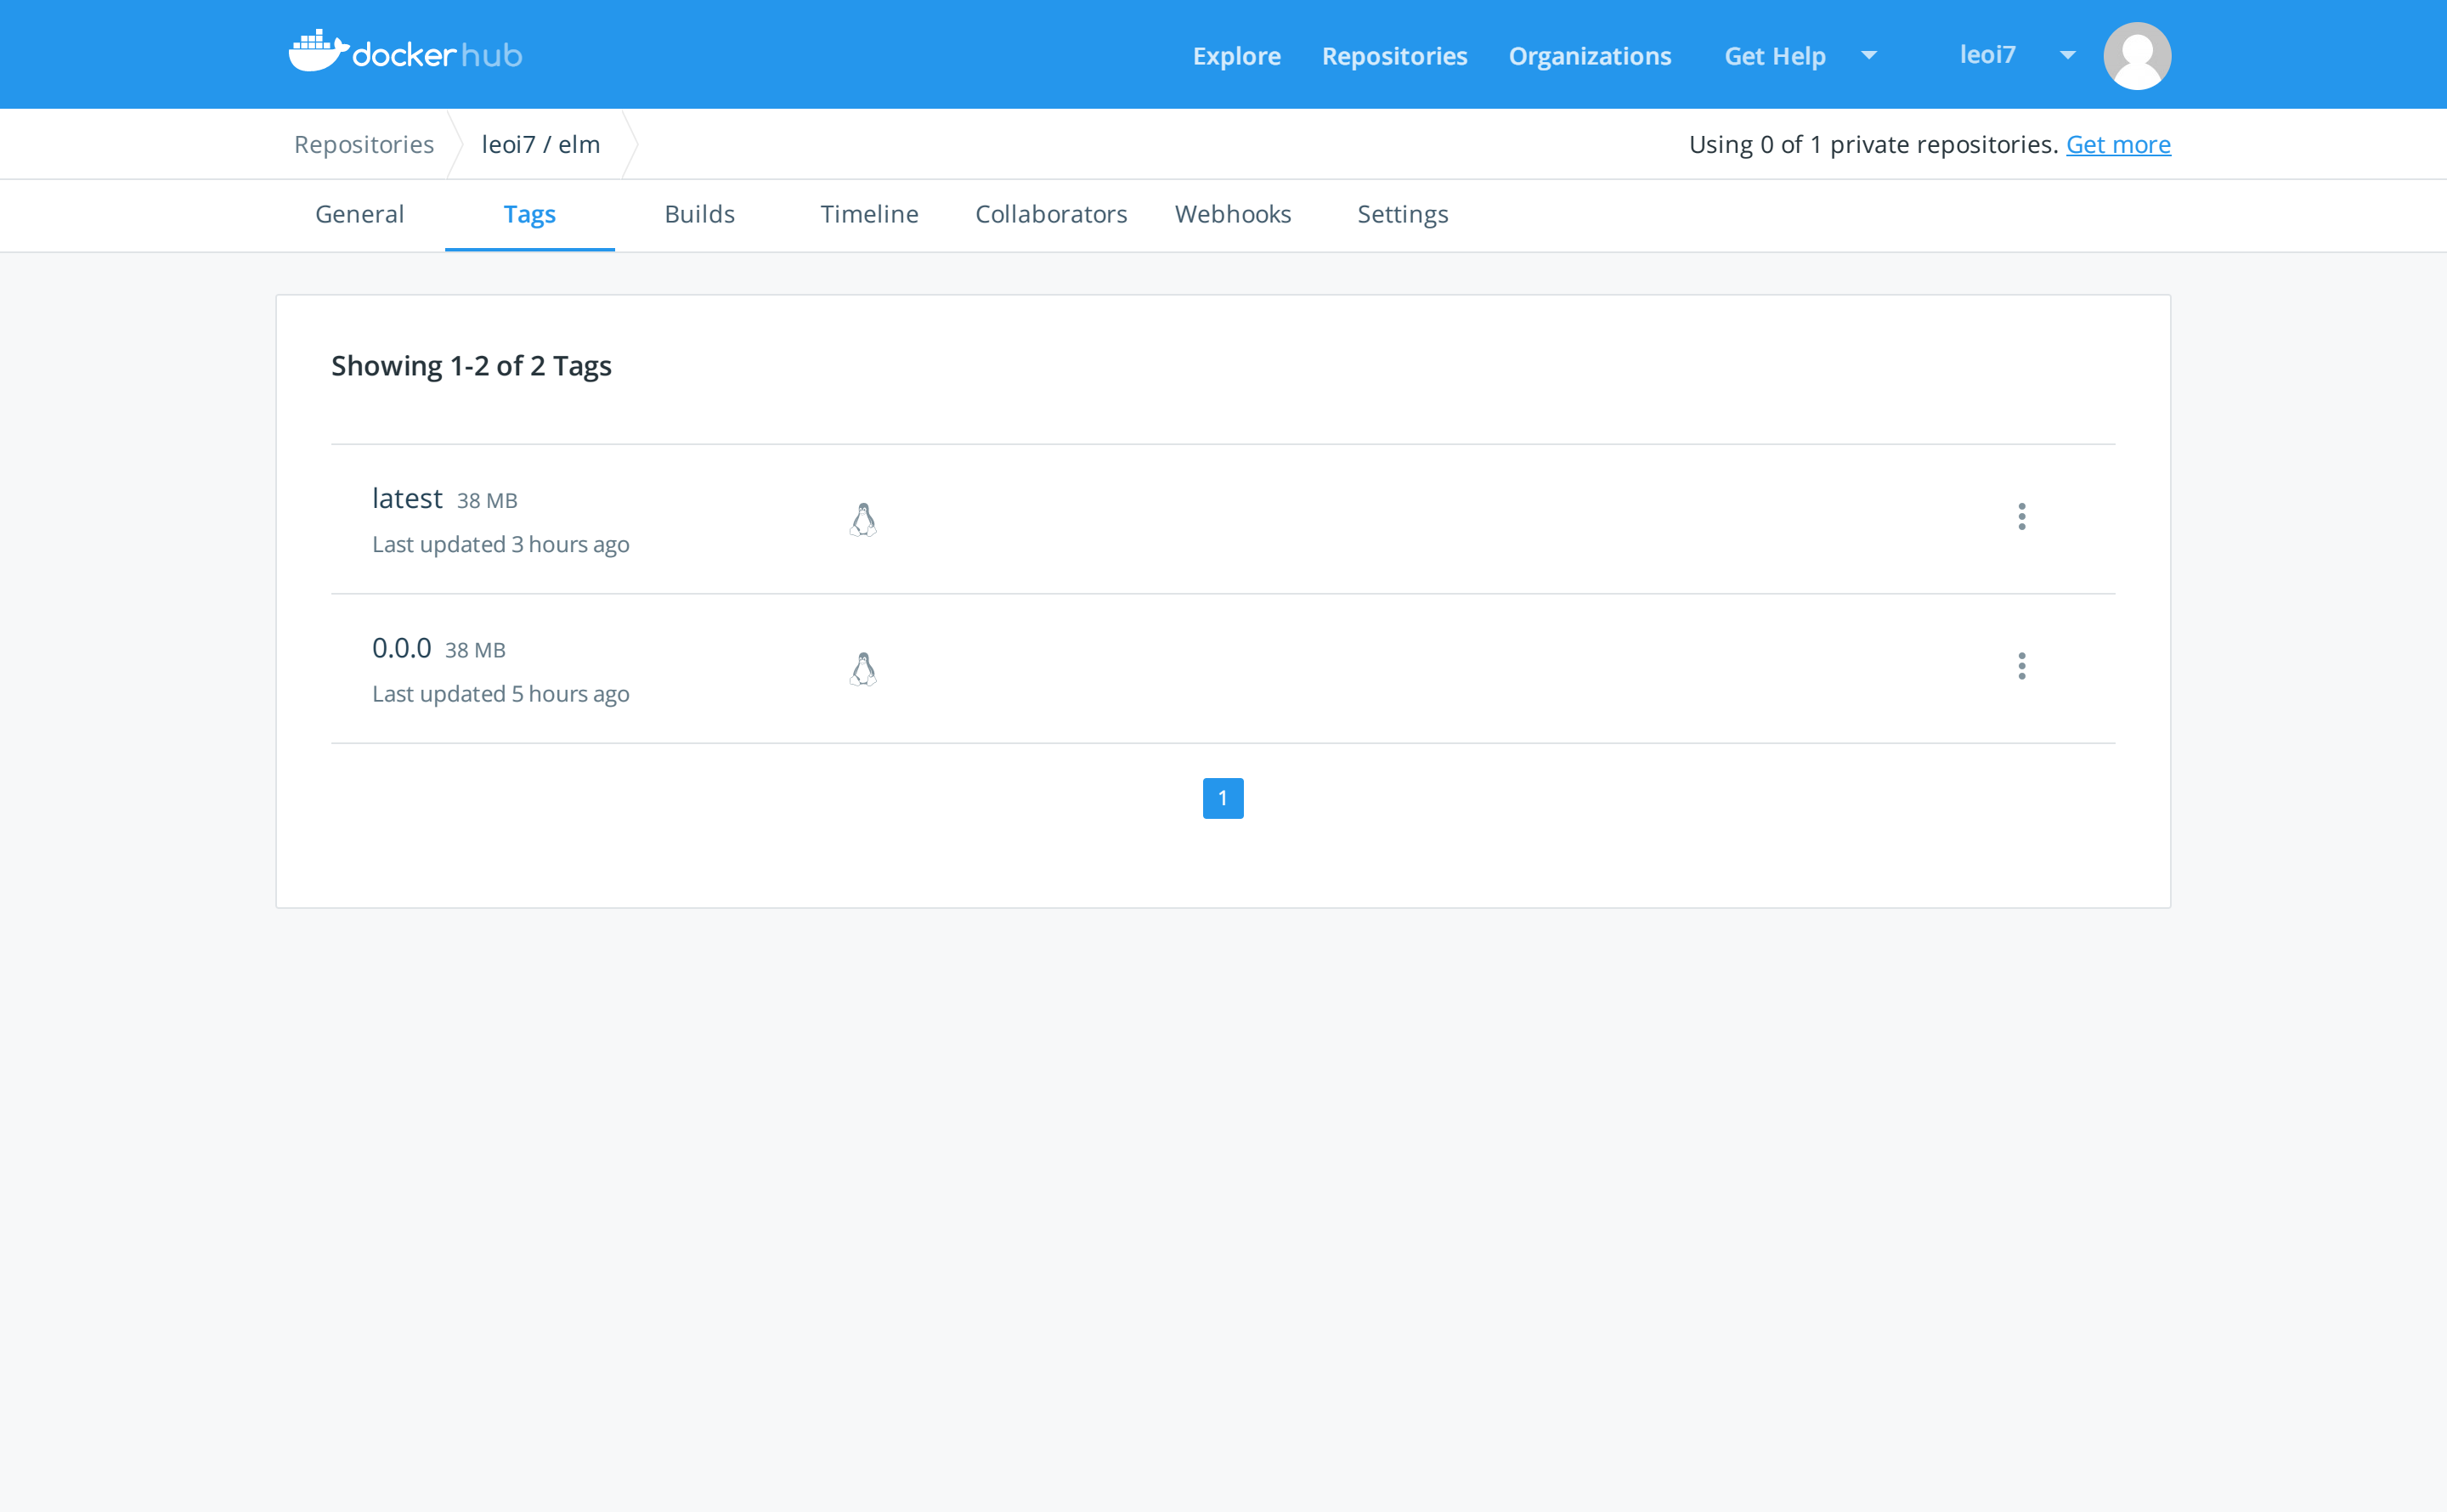
こちらもlatestのみが表示されていると思います。
Tagを付けてビルドする
適当にタグを付けてpushします。
$ git tag -a "0.0.0" -m "Elm 0.0.0"
$ git push origin --tags
Repositories > user_name/repository_name > Buildsの{sourceref}のビルドステータスがSUCCESSに、
Repositories > user_name/repository_name > Tagsに0.0.0が追加されているはずです。
Circle CI
Circle CIを設定します。
アカウントを持っていない場合はGitHubアカウントでログインしてください。
https://circleci.com/vcs-authorize/
.circleci/config.ymlを作成
Dockerfileと同じ階層に.circleci/config.ymlを作成します。
内容はsue445/dockerfile-awscli-allを大いに参考にさせていただきました、ありがとうございます。
version: 2.1

commands:
  build_with_cache:
    parameters:
      image_name:
        type: string

      cache_key_prefix:
        type: string
        default: "v1"

    steps:
      - restore_cache:
          keys:
            - << parameters.cache_key_prefix >>-{{ .Branch }}-
            - << parameters.cache_key_prefix >>-
          paths:
            - /caches/image.tar
      - run:
          name: Load Docker image layer cache
          command: |
            set +o pipefail
            docker load -i /caches/image.tar | true
      - run:
          name: Build Docker image
          command: docker build --cache-from=image -t << parameters.image_name >> .
      - run:
          name: Save Docker image layer cache
          command: |
            mkdir -p /caches
            docker save -o /caches/image.tar << parameters.image_name >>
      - save_cache:
          key: << parameters.cache_key_prefix >>-{{ .Branch }}-{{ epoch }}
          paths:
            - /caches/image.tar
      - run:
          name: Show docker image size
          command: |
            docker images
            ls -l /caches/image.tar
jobs:
  build:
    working_directory: /app
    docker:
      - image: docker:stable
    steps:
      - checkout
      - setup_remote_docker
      - build_with_cache:
          image_name: elm
          cache_key_prefix: v1
      - run:
          name: Run tests
          command: docker run -it --rm elm bash -c "elm"
  update_version:
    working_directory: /app
    docker:
      - image: alpine
    steps:
      - run:
          name: Install package
          command: apk --update --no-cache add bash git openssh-client jq curl

      - checkout

      - run:
          name: Setup git
          command: |
            git config push.default current
            git config user.name "CircleCI"
            git config user.email ${EMAIL}
      - run:
          name: Elm version up
          command: |
            VERSION=`curl -s https://api.github.com/repos/elm/compiler/tags | jq --raw-output .[0].name`
            echo "Elm version => ${VERSION}"
            count=`curl https://github.com/elm/compiler/releases/download/${VERSION}/binary-for-linux-64-bit.gz -o /dev/null -w '%{http_code}\n' -s | grep -i '302' | wc -l`
            if [ ${count} == "0" ]; then
              echo "${VERSION} is not released yet"
              exit 0
            fi
            # Edit Dockerfile
            sed -ie "s/ENV ELM_VERSION .*$/ENV ELM_VERSION ${VERSION}/g" Dockerfile
            git add Dockerfile
            set +o pipefail
            git commit -m "update: circleci has updated elm version to ${VERSION}" | true
            git tag -a ${VERSION} -m "Elm ${VERSION}" | true
            set -o pipefail
            git push origin --tags
            git push origin
workflows:
  version: 2

  build:
    jobs:
      - build

  daily_update:
    triggers:
      - schedule:
          # START UTC 21:00(JST 6:00)
          cron: "0 21 * * *"
          filters:
            branches:
              only: master
    jobs:
      - update_version
順番に見ていきたいと思います。
Config version: 2.1
version: 2.1を設定します。
2.1ではcommandsやwordflowsなどの便利な記述方法を使えるようになります。
詳細は以下
CircleCI-Public
CircleCI 2.1 の新機能を使って冗長な config.yml をすっきりさせよう!
workflows
workflows:
  version: 2

  build:
    jobs:
      - build

  daily_update:
    triggers:
      - schedule:
          # START UTC 21:00(JST 6:00)
          cron: "0 21 * * *"
          filters:
            branches:
              only: master
    jobs:
      - update_version
buildキー
-
git pushされた際に実行するjob設定です。 -
jobsには任意の関数名を指定します。- 今回は
buildとします(後述)。
- 今回は
daily_updateキー
-
daily_updateは固定ではなく、任意のキーを設定できます。 -
triggersにはscheduleを設定します。- cronで実行時間を指定します。
- Circle CIのタイムゾーンは
UTCなので日本時間 - 9hした値を設定
-
filters > branchesにはビルドしたいGitブランチを指定します(今回はmasterをビルドしたいのでonly: master)。 -
jobsには任意の関数名を指定します。- 今回は
update_versionとします(後述)。
- 今回は
jobs
build(関数名)
workflows > build > jobsに指定した値です。
jobs:
  build:
    working_directory: /app
    docker:
      - image: docker:stable
    steps:
      - checkout
      - setup_remote_docker
      - build_with_cache:
          image_name: elm
          cache_key_prefix: v1
      - run:
          name: Run tests
          command: docker run -it --rm elm bash -c "elm"
- ベースイメージを指定します。
- dockerを実行したいのでdockerが含まれるイメージを使います。
- ソースをチェックアウト
- dockerを実行できるように
setup_remote_dockerを指定します。 - 実行したい処理を書きます。
-
commandsで関数化した関数名を指定しています(後述)。
-
-
Elmが正しくインストールされているか確認します。
update_version(関数名)
workflows > update_versionです。
jobs:
  # 省略
  update_version:
    working_directory: /app
    docker:
      - image: alpine
    steps:
      - run:
          name: Install package
          command: apk --update --no-cache add bash git openssh-client jq curl

      - checkout

      - run:
          name: Setup git
          command: |
            git config push.default current
            git config user.name "CircleCI"
            git config user.email ${EMAIL}
      - run:
          name: Elm version up
          command: |
            VERSION=`curl -s https://api.github.com/repos/elm/compiler/tags | jq --raw-output .[0].name`
            echo "Elm version => ${VERSION}"
            count=`curl -sI https://github.com/elm/compiler/releases/download/${VERSION}/binaries-for-linux.tar.gz | grep -i 'status: 302' | wc -l`
            if [ ${count} == "0" ]; then
              echo "${VERSION} is not released yet"
              exit 0
            fi
            # Edit Dockerfile
            sed -ie "s/ENV ELM_VERSION .*$/ENV ELM_VERSION ${VERSION}/g" Dockerfile
            git add Dockerfile
            set +o pipefail
            git commit -m "update: circleci has updated elm version to ${VERSION}" | true
            git tag -a ${VERSION} -m "Elm ${VERSION}" | true
            set -o pipefail
            git push origin --tags
            git push origin
- ベースイメージを指定します。
- 処理に必要なパッケージをインストールします。
- ソースをチェックアウト
- Gitを設定します。
-
Elmをインストールします。- GitHub APIを叩いてリリースされているタグ一覧を取得、末尾(最新)のタグ名を変数に代入
- 上記タグ名を元に、リモートリポジトリのバイナリダウンロードURLを作成、疎通を確認
- Dockerfileの
ENV ELM_VERSION XXXをENV ELM_VERSION ${VERSION}で上書き git commitgit taggit push
もしnpm install -g elmでDockerfileを書いている場合は、npm info elm versions --jsonで取得したほうがいいかもしれません。
※ 2019/06/17 現在、最新版は0.19.0なのに1.2.0~2.0.0が取得できる......なんでや......
commands
build_with_cache
workflows > daily_update > jobsに指定した値です。
commands:
  build_with_cache:
    parameters:
      image_name:
        type: string

      cache_key_prefix:
        type: string
        default: "v1"

    steps:
      - restore_cache:
          keys:
            - << parameters.cache_key_prefix >>-{{ .Branch }}-
            - << parameters.cache_key_prefix >>-
          paths:
            - /caches/image.tar
      - run:
          name: Load Docker image layer cache
          command: |
            set +o pipefail
            docker load -i /caches/image.tar | true
      - run:
          name: Build Docker image
          command: docker build --cache-from=image -t << parameters.image_name >> .
      - run:
          name: Save Docker image layer cache
          command: |
            mkdir -p /caches
            docker save -o /caches/image.tar << parameters.image_name >>
      - save_cache:
          key: << parameters.cache_key_prefix >>-{{ .Branch }}-{{ epoch }}
          paths:
            - /caches/image.tar
      - run:
          name: Show docker image size
          command: |
            docker images
            ls -l /caches/image.tar
parametersキー
- 引数を設定しています。
-
image_name,cache_key_prefixは任意の名前に変更できます。
-
stepsキー
- キャッシュをリストアします。
-
keysはキャッシュのキーです。 - 複数指定する理由は、他のブランチやcommitのキャッシュを探すためです。
-
{{ .Branch }}の意味や他のテンプレートは公式ドキュメントを参照してください。
-
-
docker saveしたイメージキャッシュを使ってビルドします。 - ビルド完了後、作成したイメージをキャッシュします。
-
save_cache > keyは一意にするために{{ epoch }}を付与
-
- イメージのサイズを表示
上記を作成したら、commitしてリモートリポジトリへpushしてください。
Circle CIを設定
Circle CIのダッシュボードへアクセスし、GitHubのリモートリポジトリを設定します。
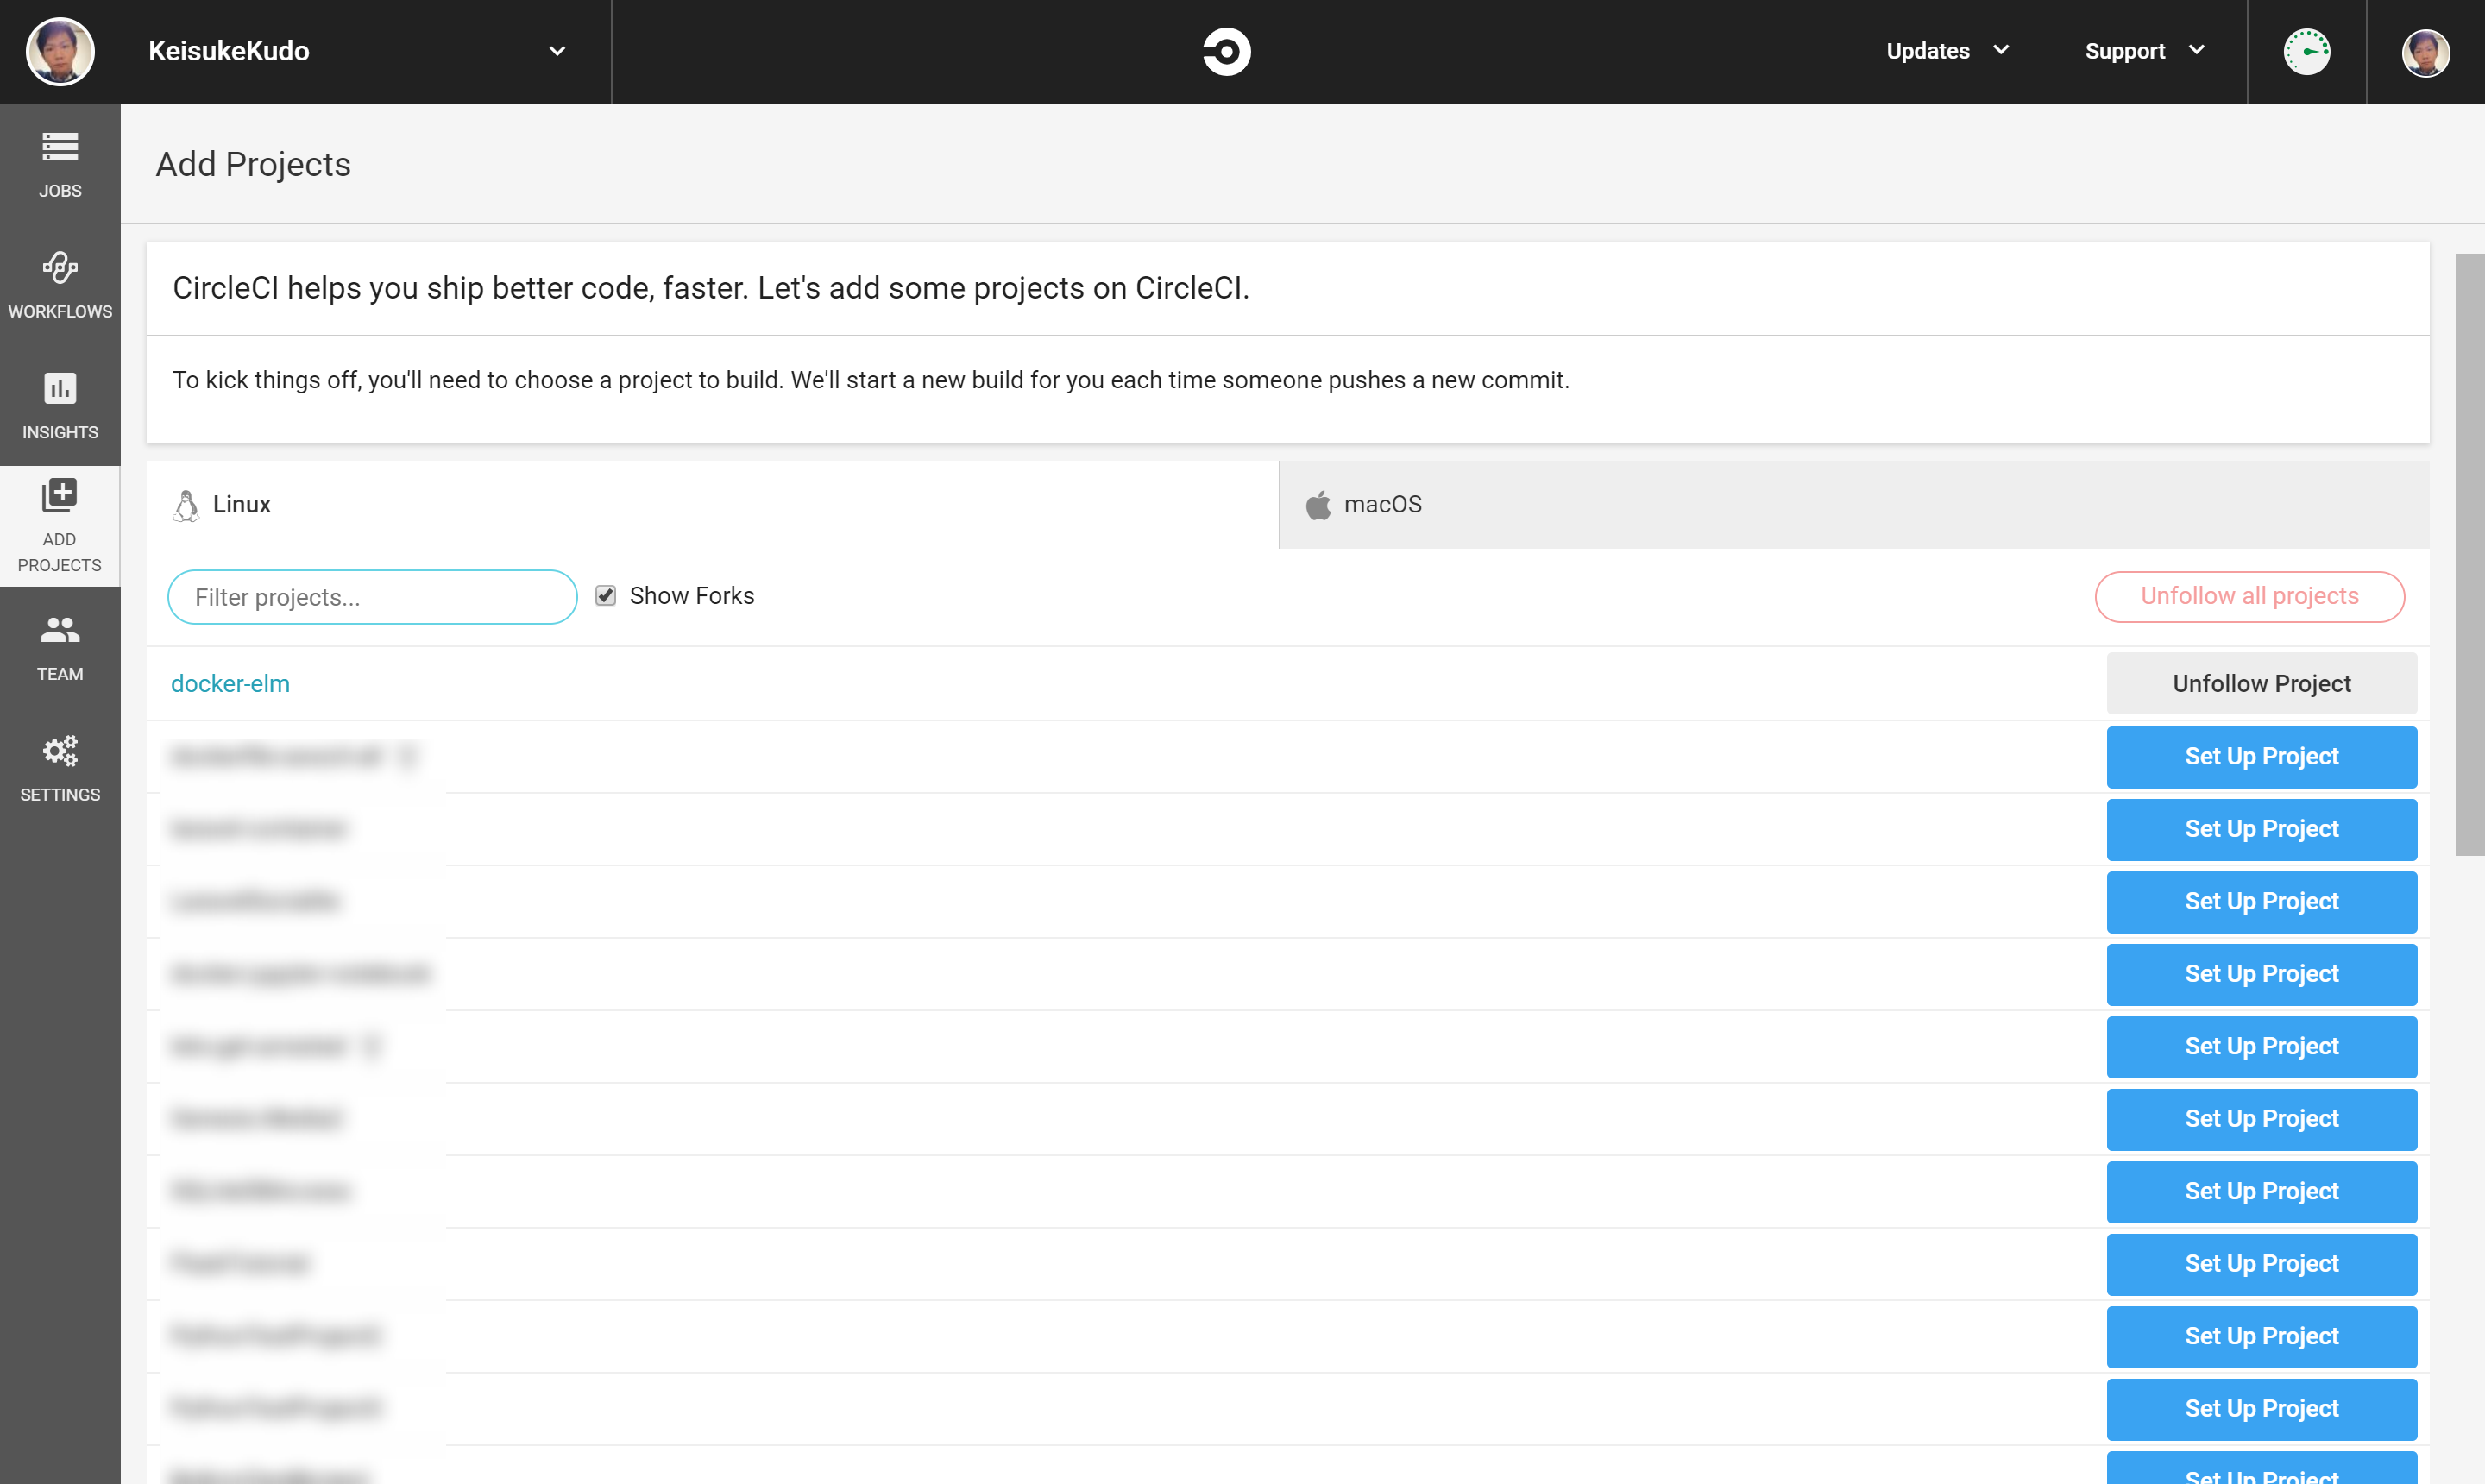
ADD PROJECTSをクリックし、対象リモートリポジトリのSet Up Projectをクリック
最下部にあるStart Buildingをクリック

Jobsページを確認すると、ビルドが開始されているはずです。
https://circleci.com/gh/user_name/repository_name
ですが、初回ビルドは失敗すると思います。
続けて以下の設定をします。
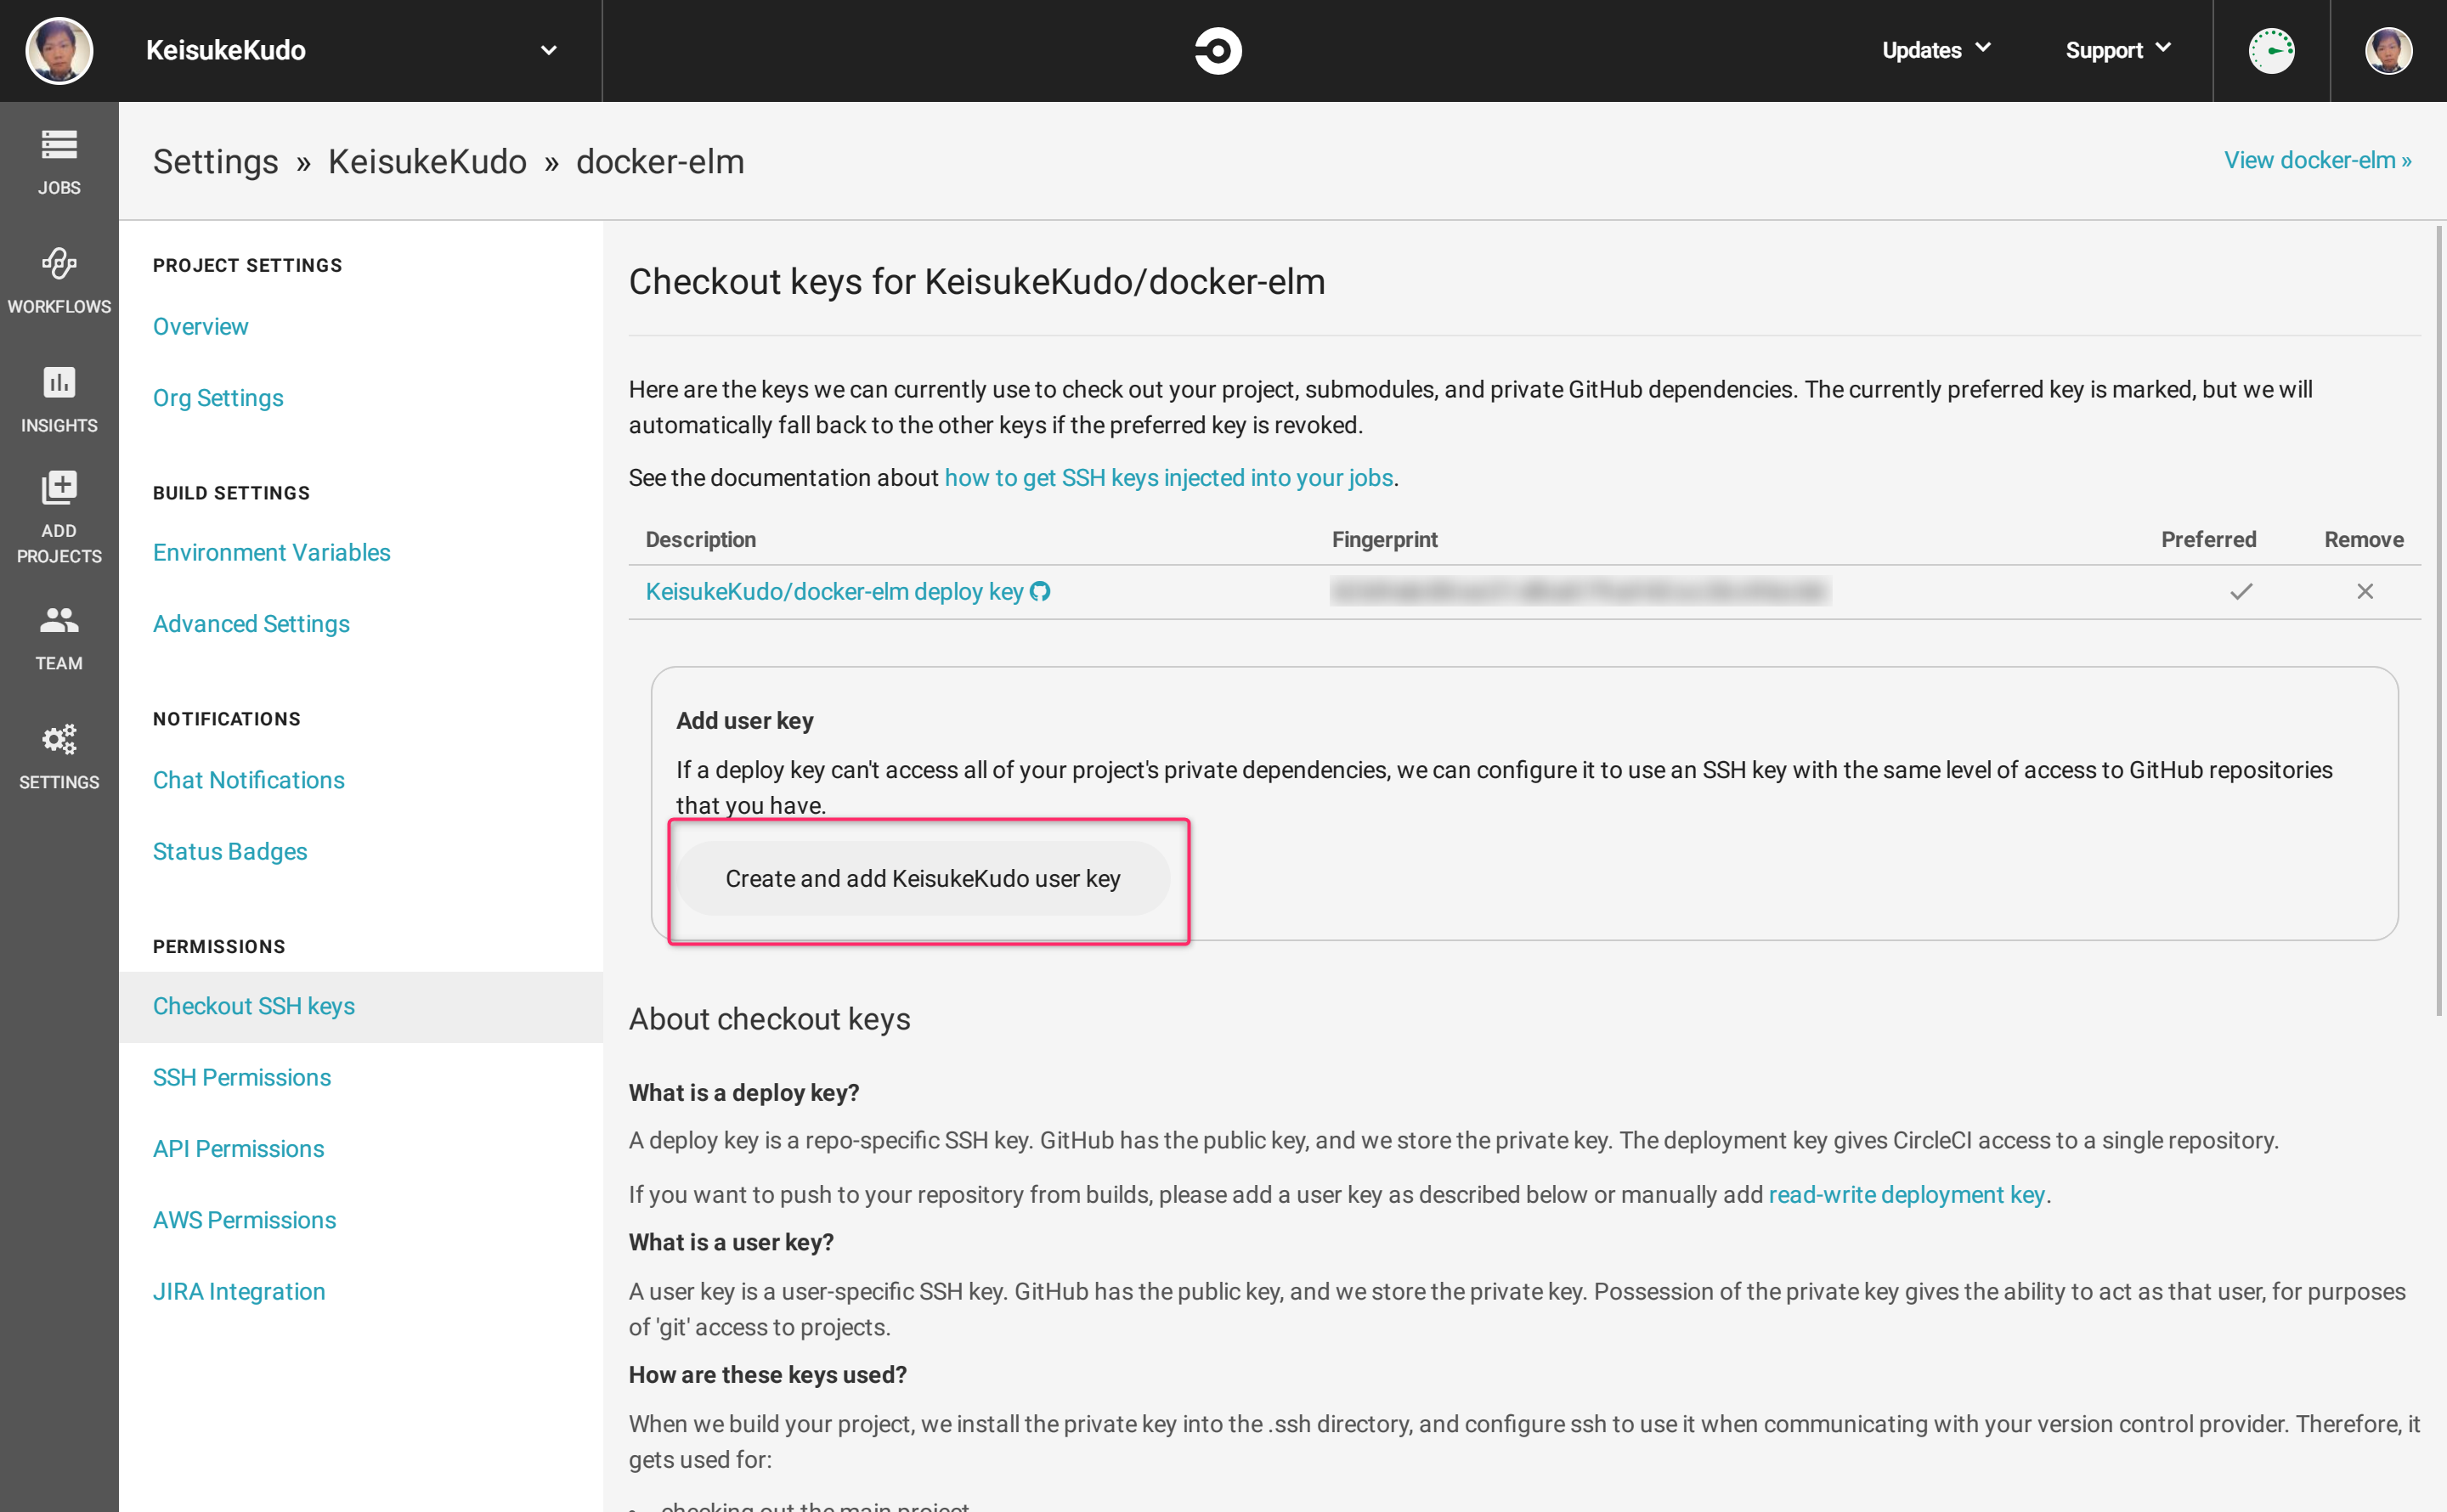
SSH Keyを設定する
update_versionの処理の中で、git pushしていますが、SSH Keyが無いためpushできません。
git pushを実行するために、SSH Keyを設定します。
Settings > PERMISSONS > Checkout SSH KeysのCreate and user_name user keyをクリック
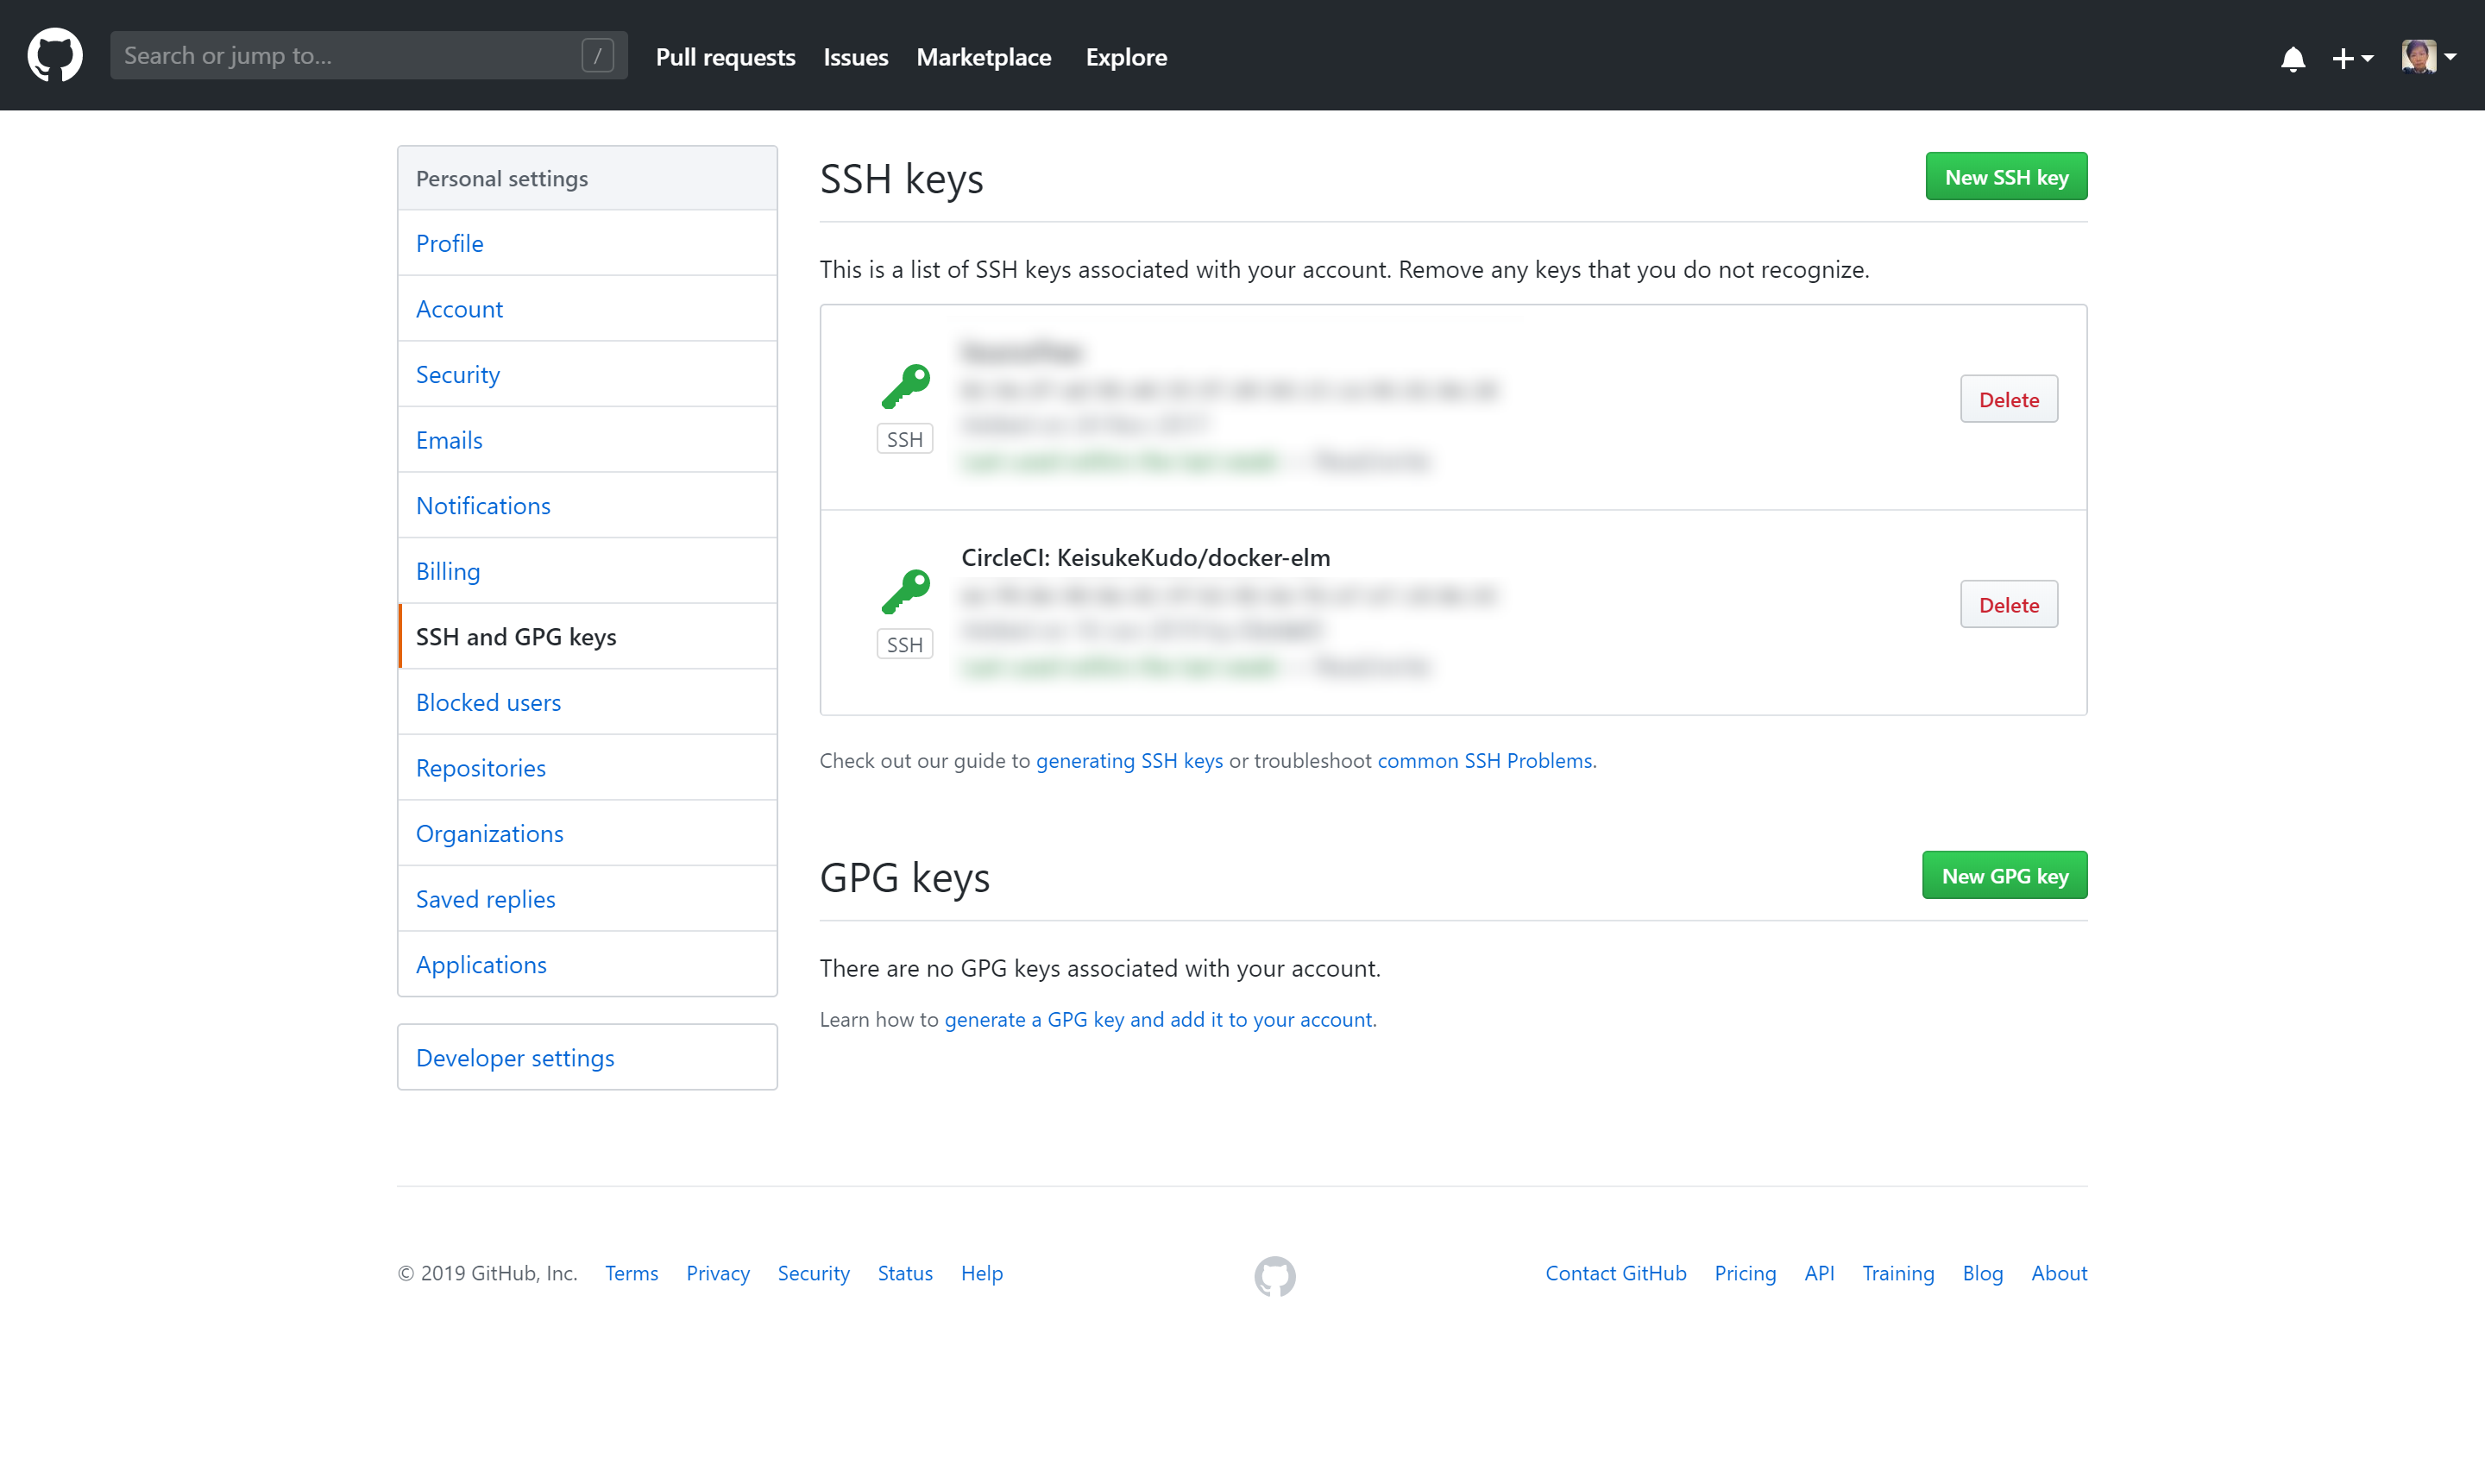
SSH Keyが生成、設定されます。
https://circleci.com/gh/user_name/repository_name/edit#checkout
環境変数を設定する
update_versionの処理の中で、git configを設定していますが、emailは環境変数から取得しているため、環境変数を設定します。
Settings > BUILD SETTINGS > Environment VariablesのAdd Variableをクリック
NameにEMAIL、Valueに任意のメールアドレスを設定してAdd Variable
再度ビルドする
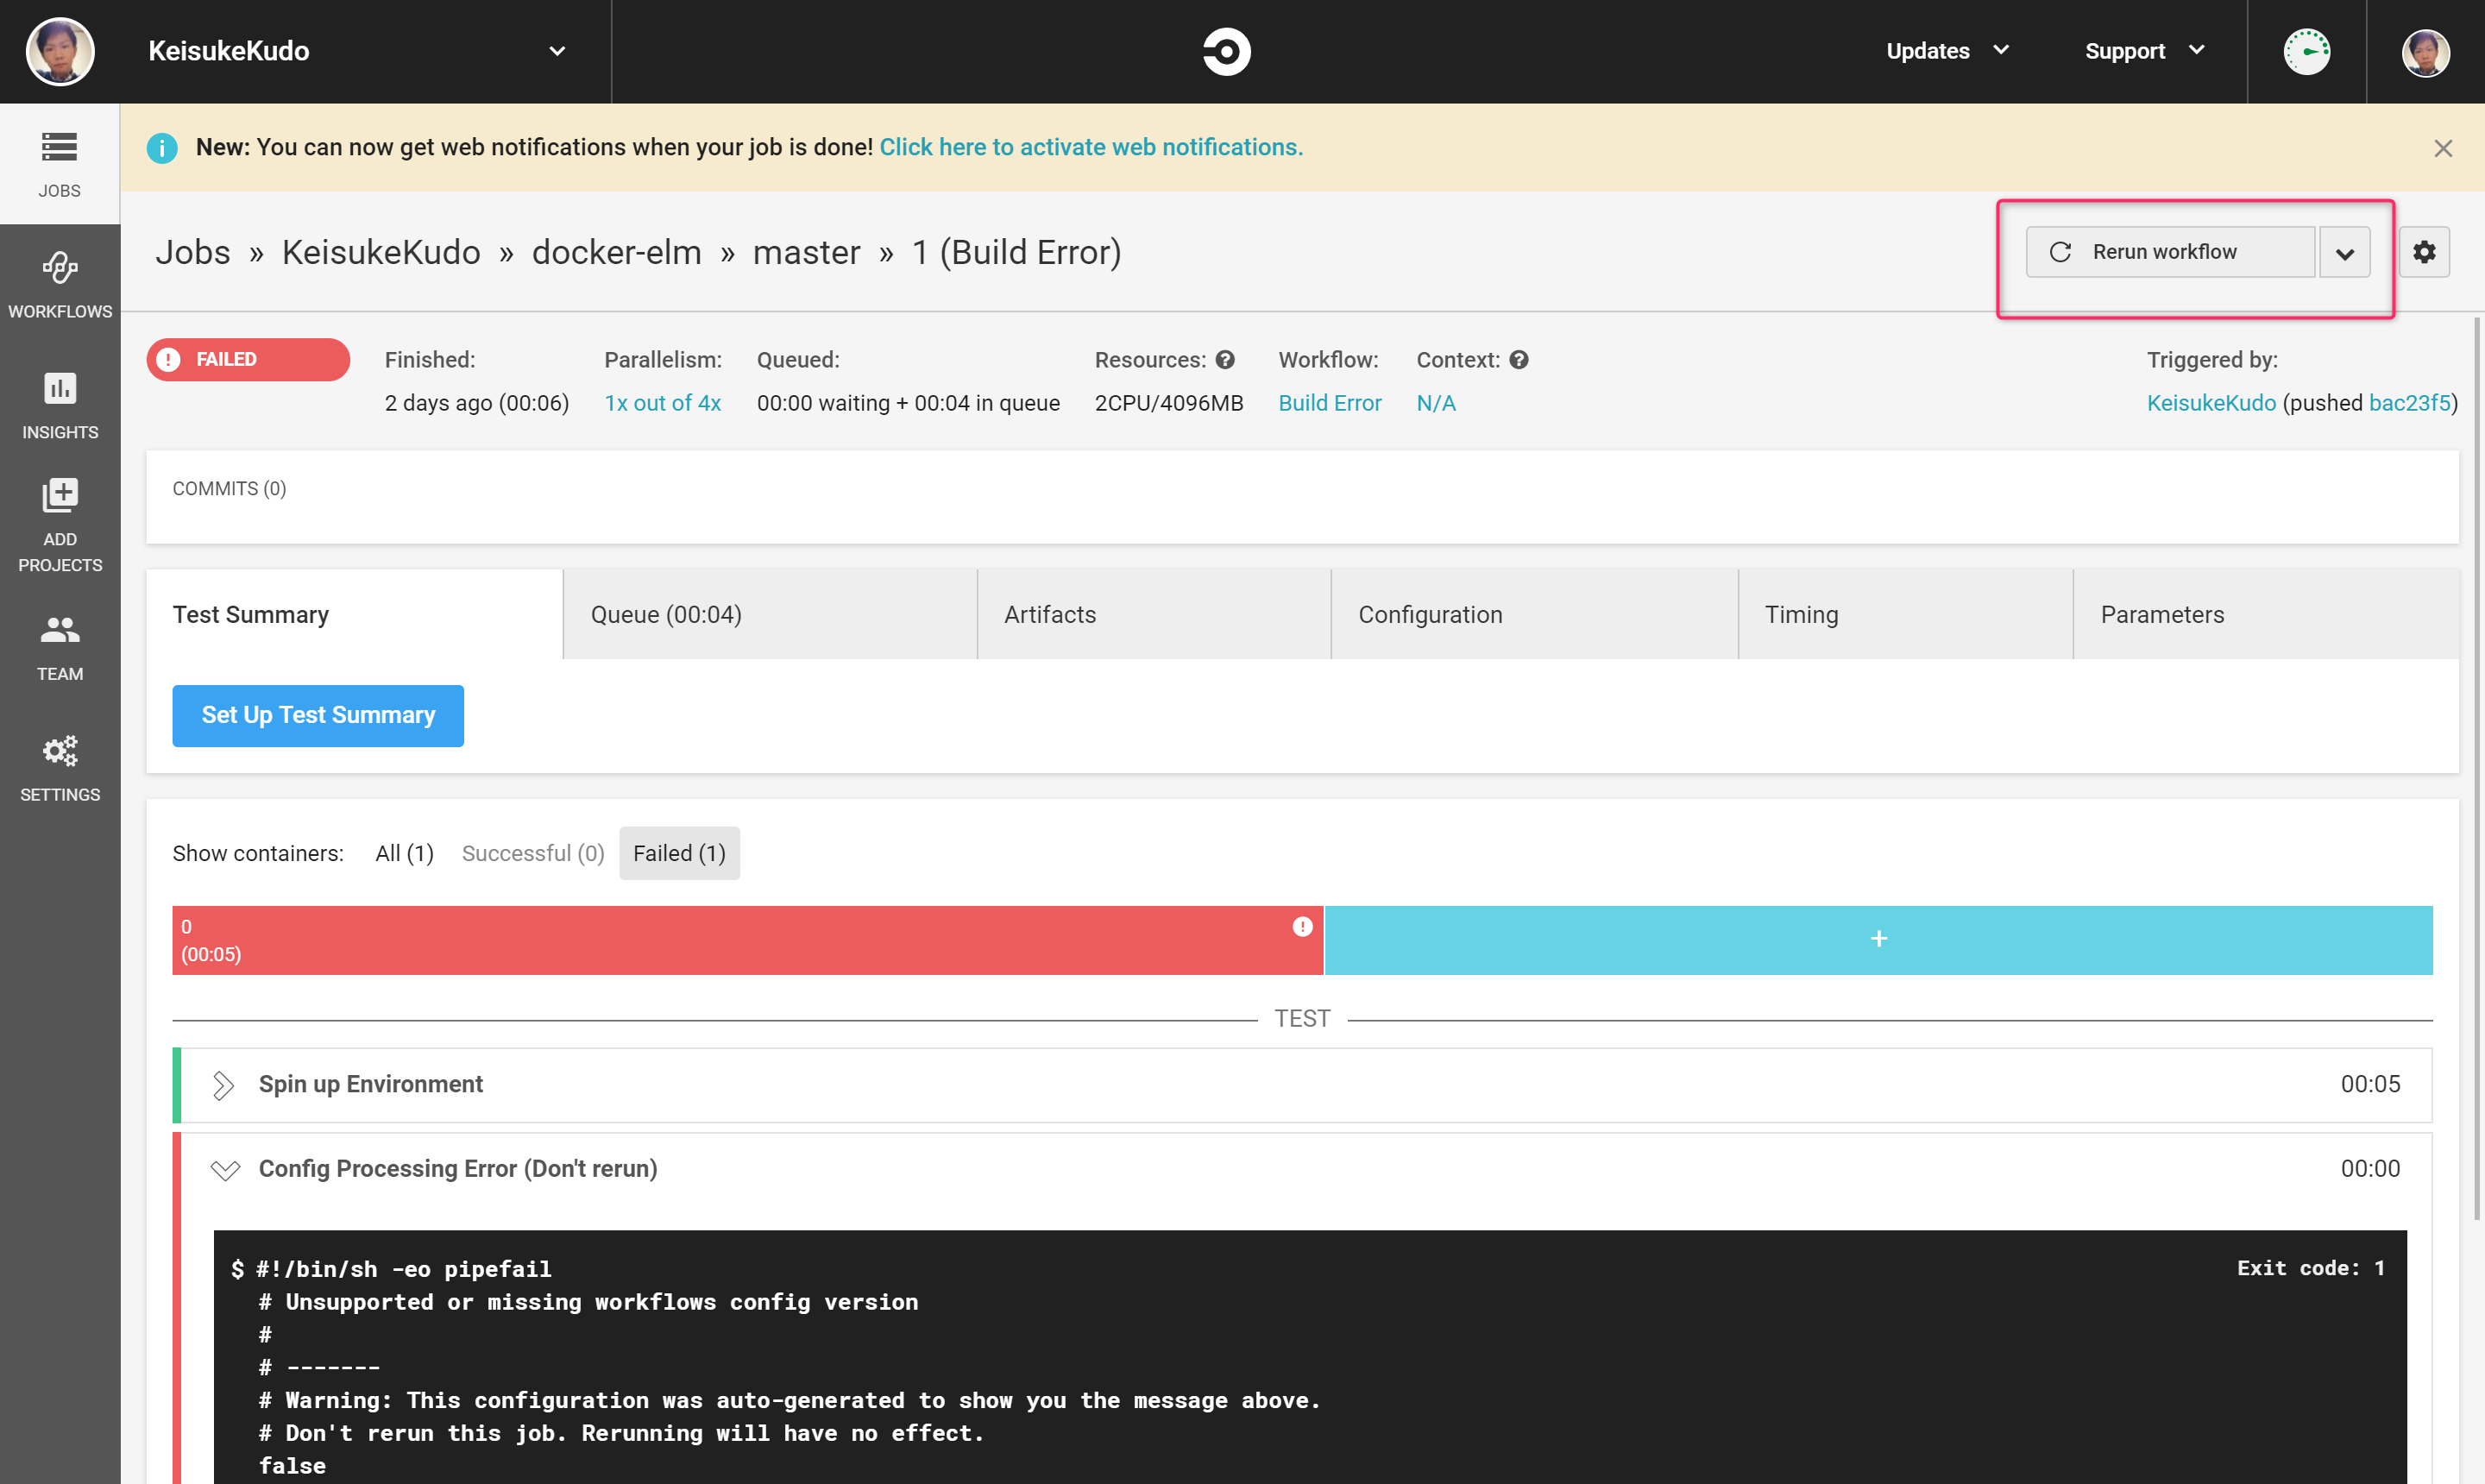
失敗したビルドをクリックして、右上のRerun workflowをクリック
再度ビルドが走ります。
※下記スクショはエラー内容が違いますが気にしないでください。
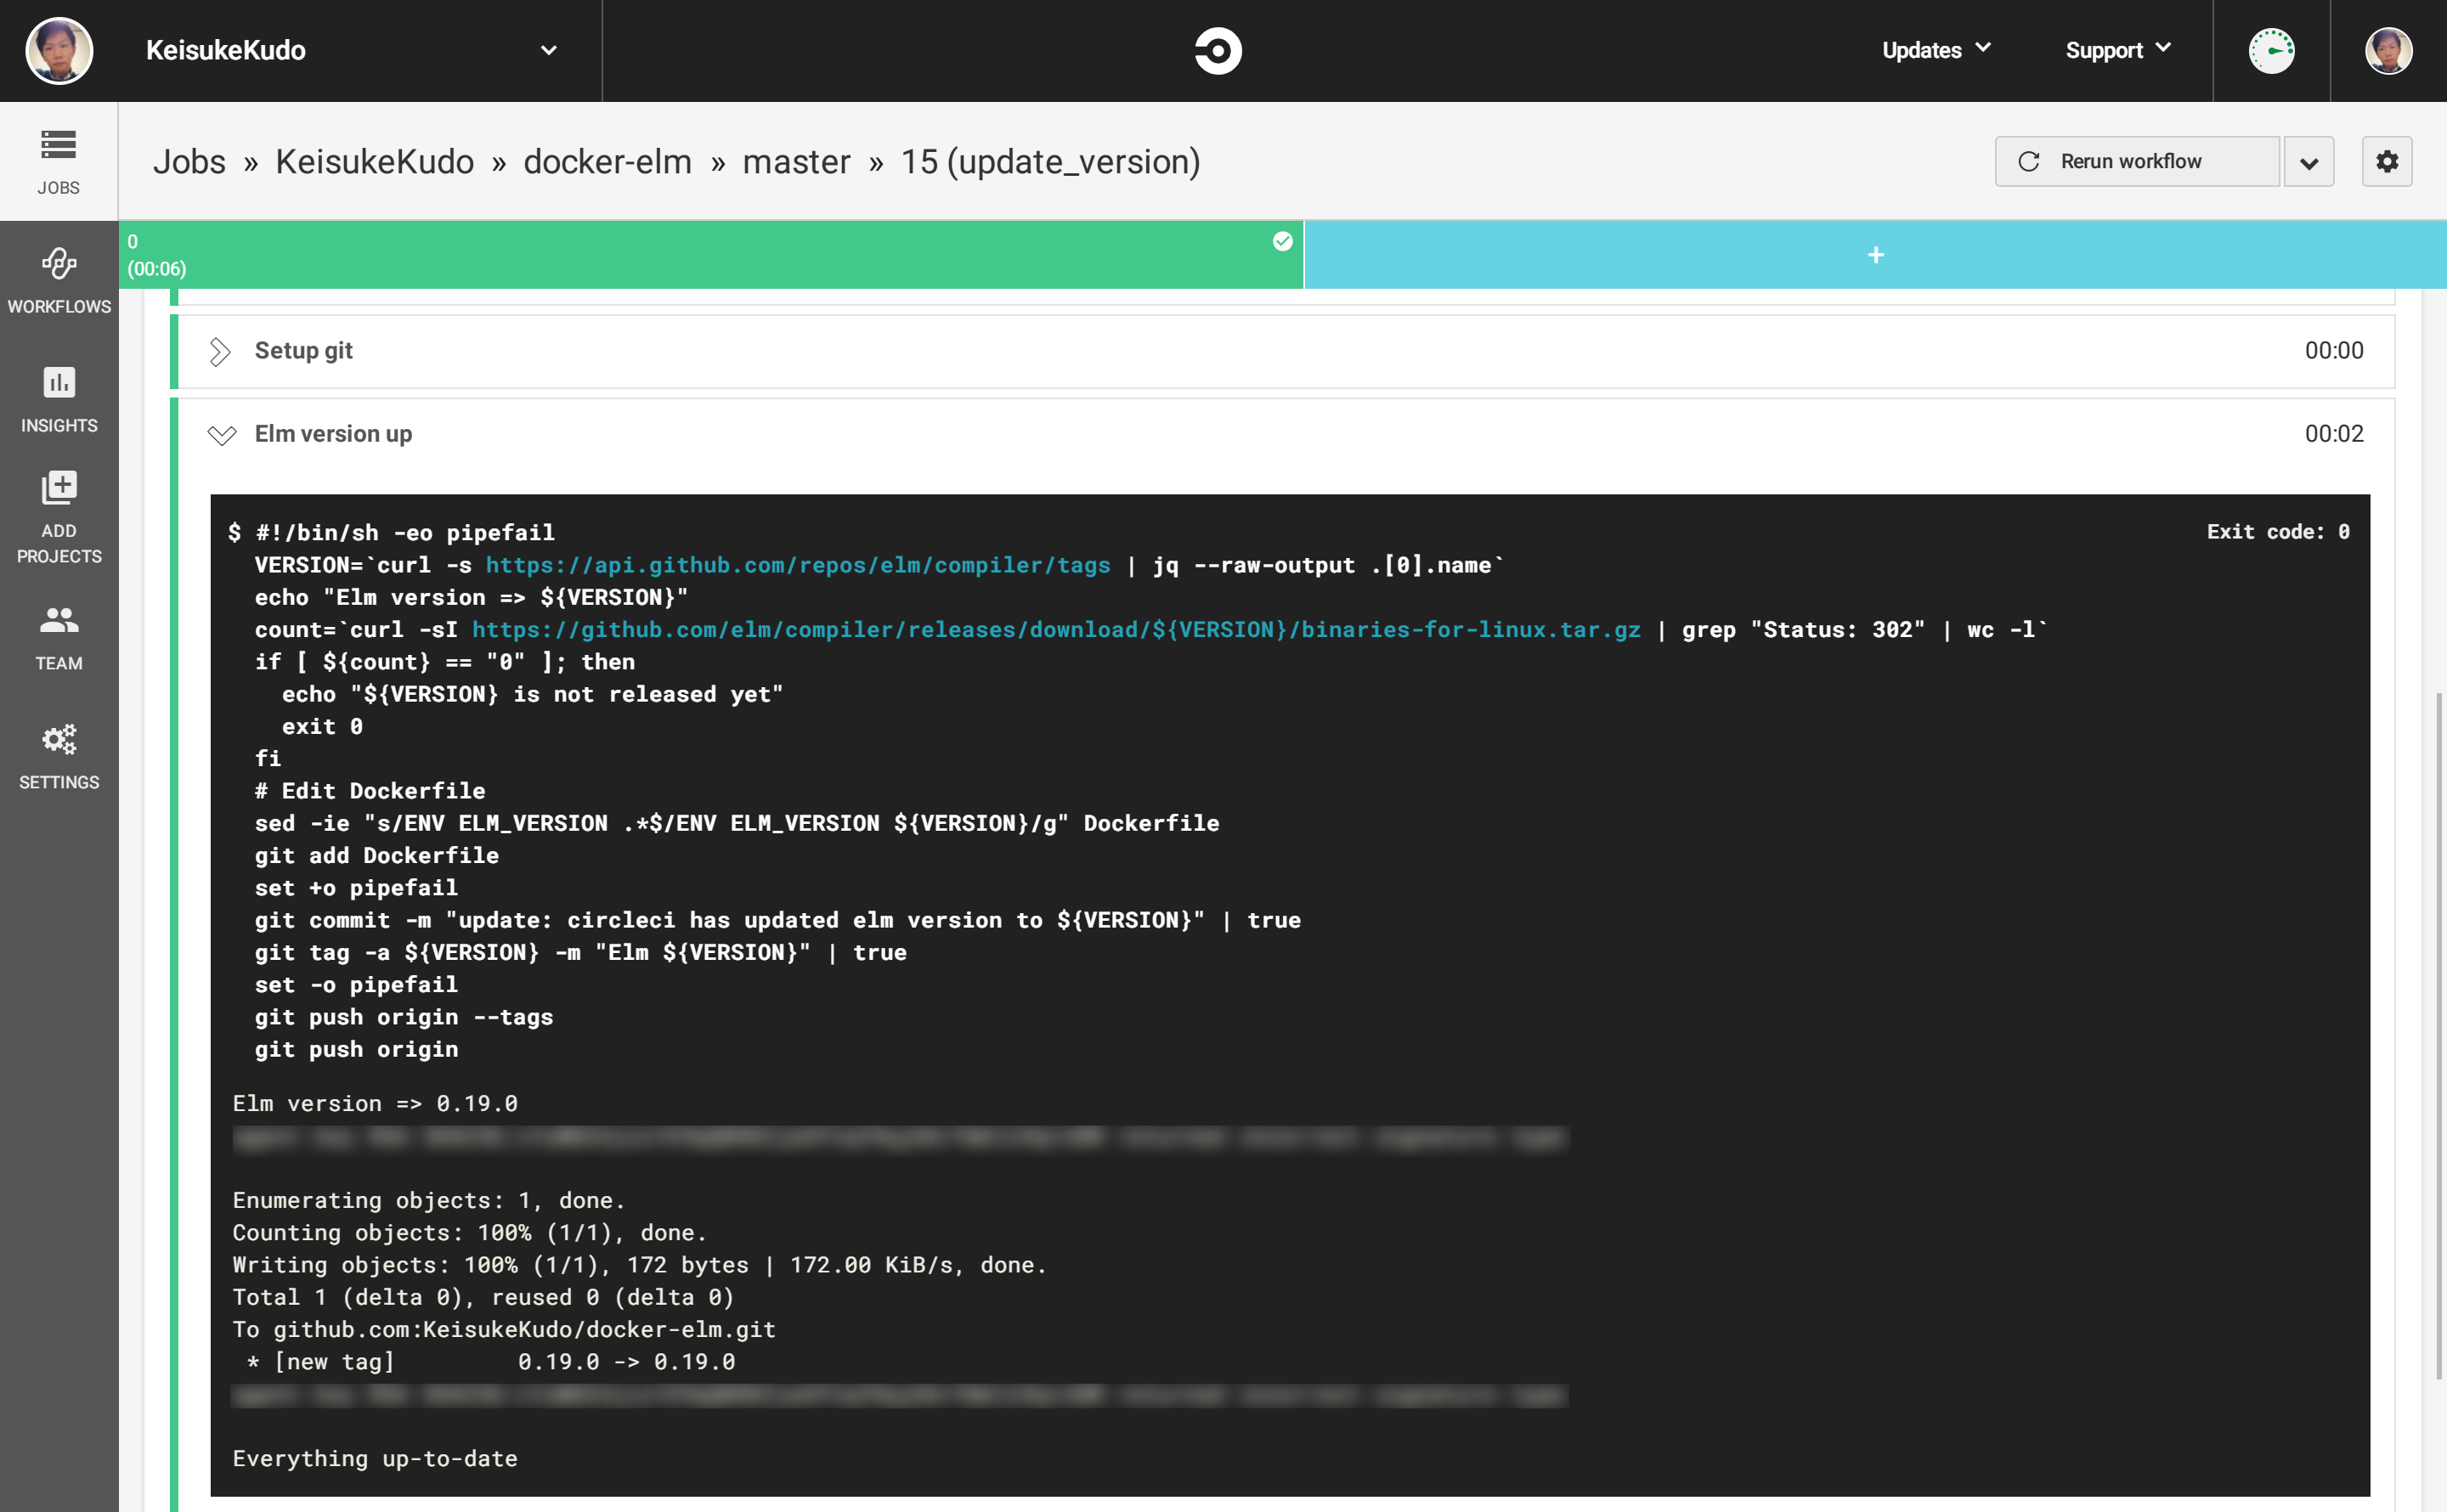
今度は成功しているはずです。
以下のように表示されればOK

日時処理
daily_updateのスケージュールで設定した時間になるとupdate_versionが開始されます。
Docker Hubも確認してみましょう。
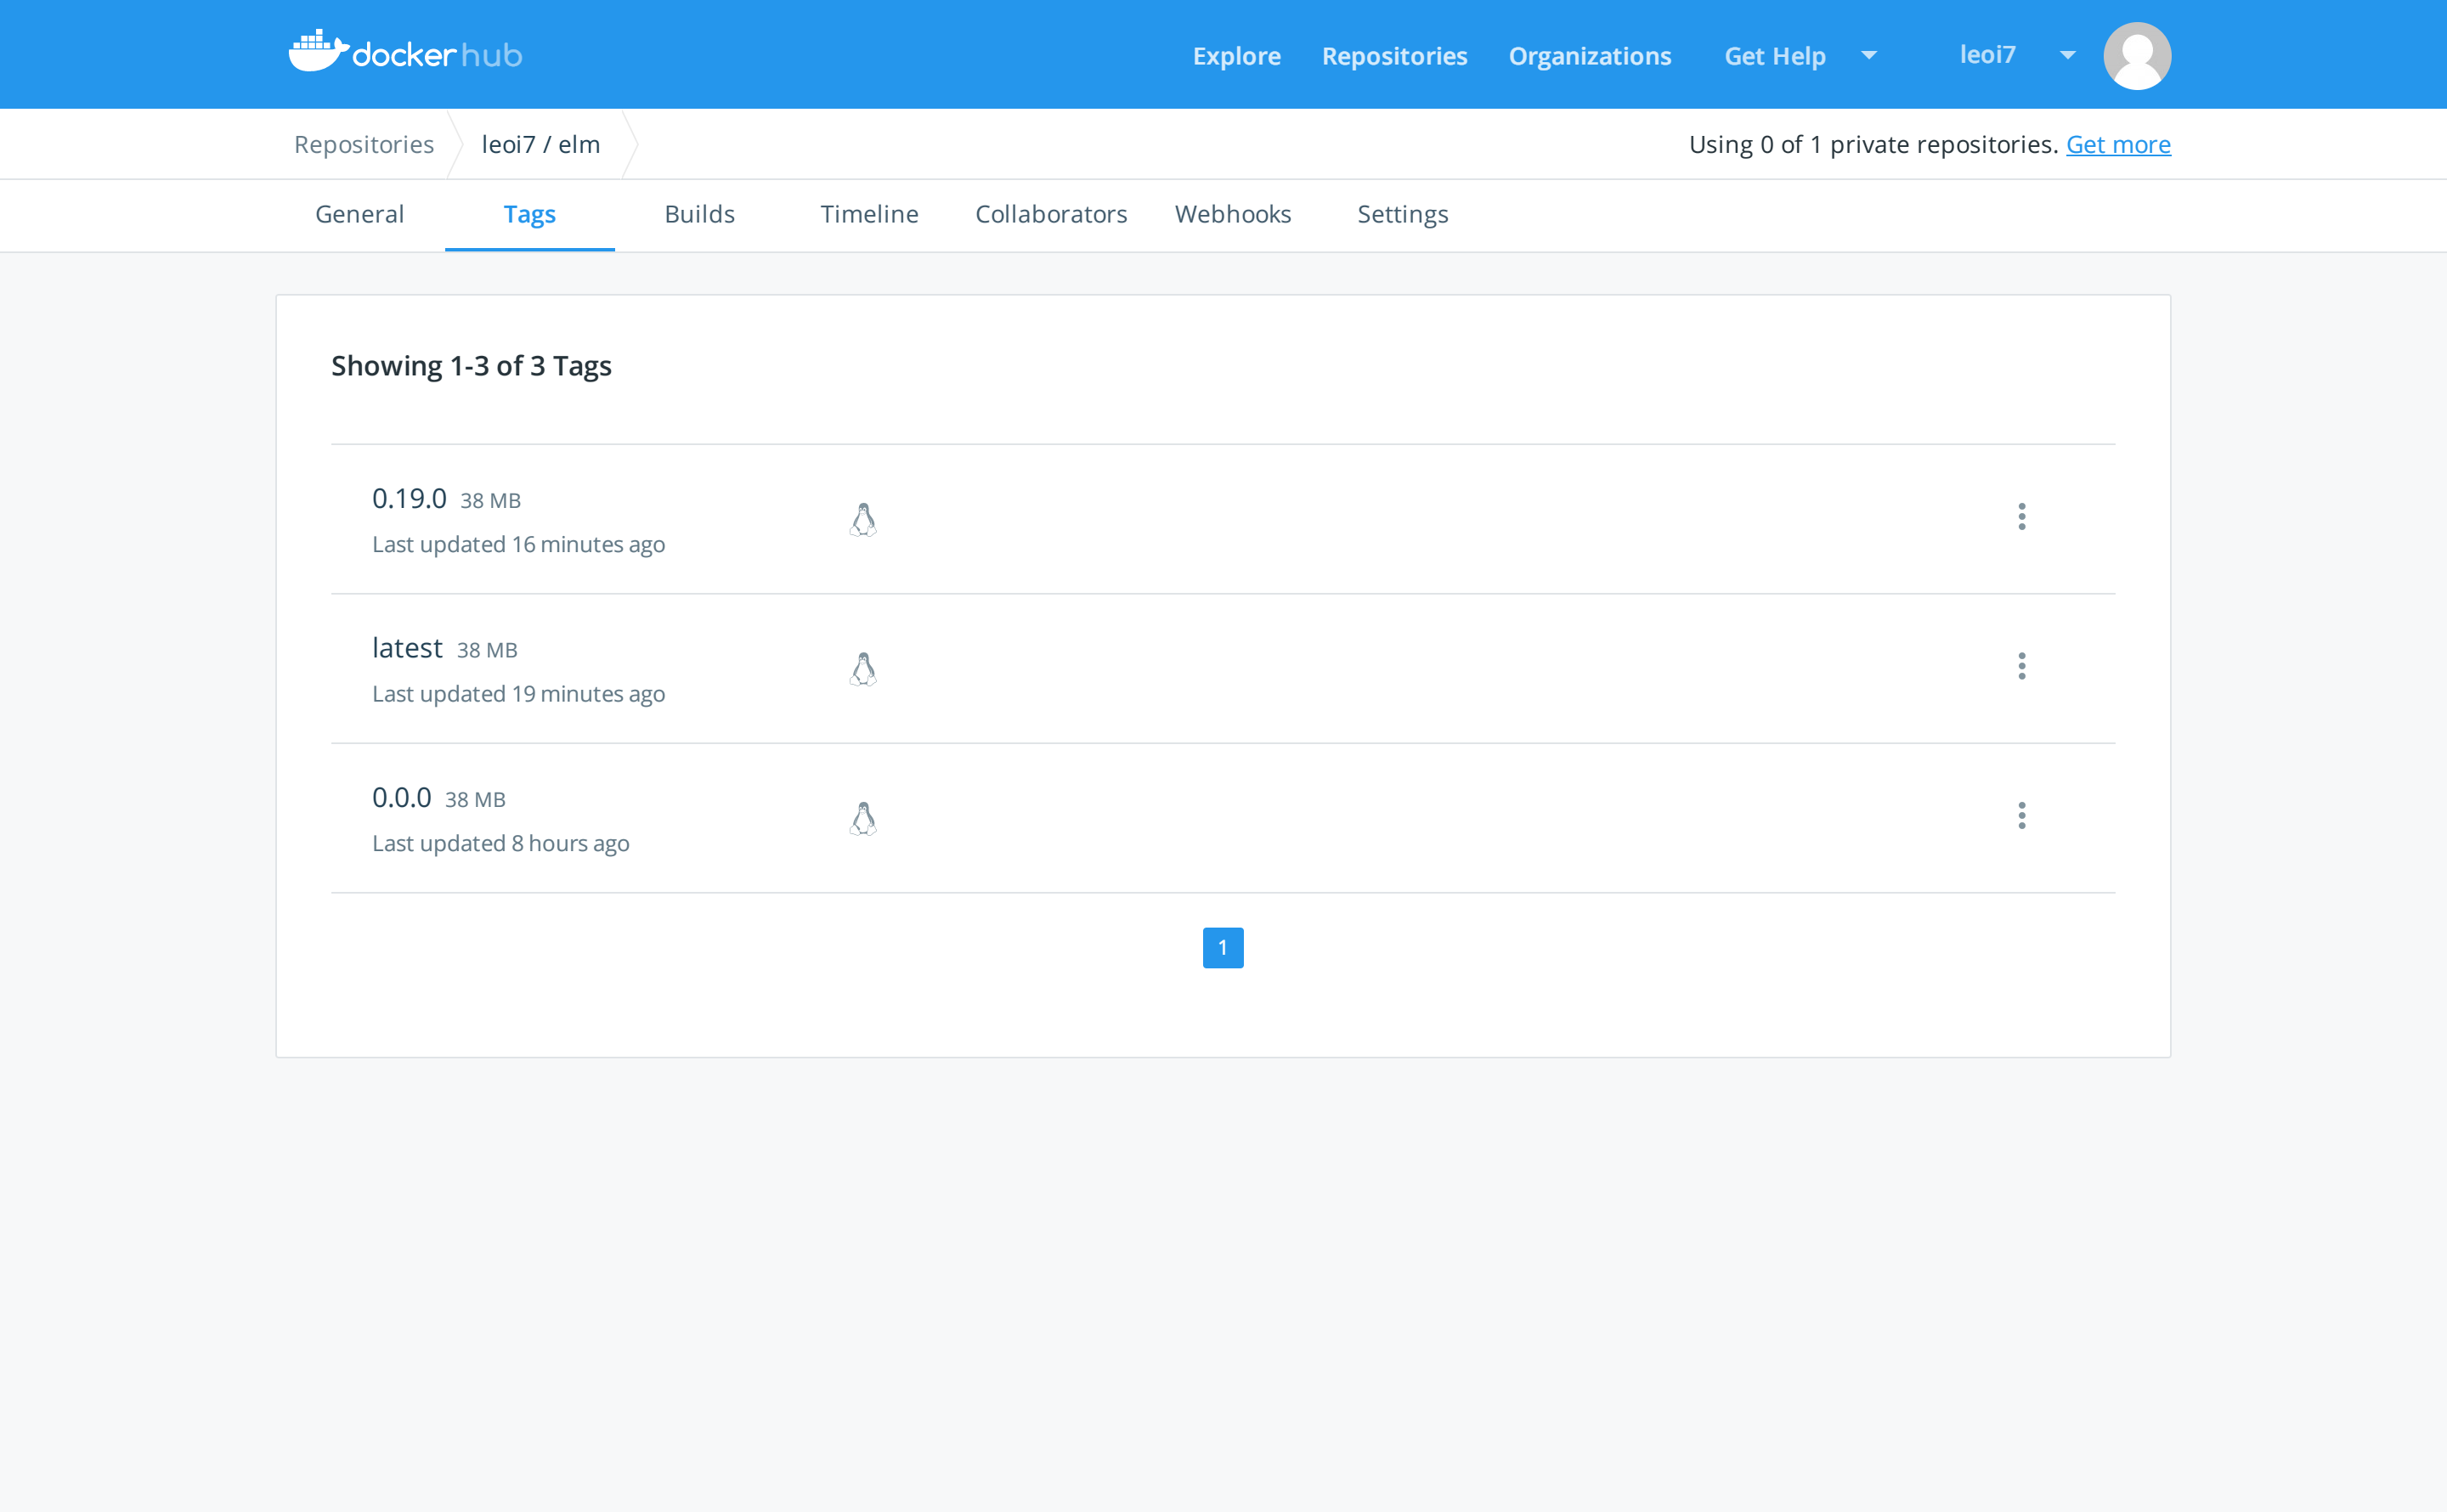
0.19.0のタグが増えているはずです。
今後毎日指定した時間にupdate_versionが走り、Elmのリモートリポジトリに新規バージョンがプッシュされていれば自動でバージョンを書き換え、タグ付けして自身のリモートリポジトリにpush、Docker Hubでビルドされることになります。
これで少なくとも自分都合でDockerfileのバージョンアップがされない、という状況にはならないですね!
参考
くりにっき: awscli-allを作った
https://github.com/sue445/dockerfile-awscli-all
CircleCI Documentation
CircleCI-Public
CircleCI 2.1 の新機能を使って冗長な config.yml をすっきりさせよう!