この演習では、リゾート体験に関するソーシャルメディア投稿を生成するFlexテンプレートを作成します。テンプレートに投稿内容をJSON形式で出力するよう指示し、Apexクラスからそのテンプレートを呼び出します。最後に、作成したApexクラスとFlexテンプレートを使用してユーザーがソーシャルメディア投稿を生成できるようにするLightning Webコンポーネントを作成します。
ステップ1: 高度なプロンプトテンプレートを作成する
このステップでは、Coral Cloud Resorts の体験に関するソーシャル メディア投稿を作成するプロンプト テンプレートを作成します。
-
セットアップメニューを開き、セットアップをクリックします。
-
クイック検索で「プロンプト ビルダー」を検索し、「プロンプト ビルダー」をクリックします。
-
新しいプロンプトテンプレートをクリックします。
-
プロンプトテンプレートを次のように設定します
| 項目 | 値 |
|---|---|
| プロンプトテンプレートの種類 | フレックス |
| プロンプトテンプレート名 | Generate Social Media Posts |
| API名 | デフォルトのままにする (おそらくGenerate_Social_Media_Postsになっているはず) |
| テンプレートの説明 | This template is used to generate social media posts that promote an experience session for Twitter, LinkedIn and Slack |
5. 新しいリソースを追加し、次のように設定します。
| 項目 | 値 |
|---|---|
| 名前 | Experience Session |
| API名 | experienceSession |
| オブジェクト | 体験セッション |
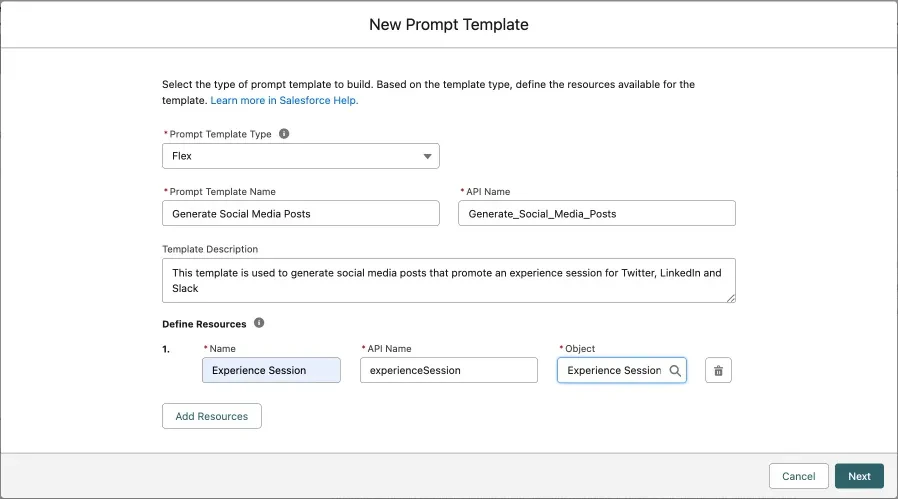
6.「次へ」をクリックします。
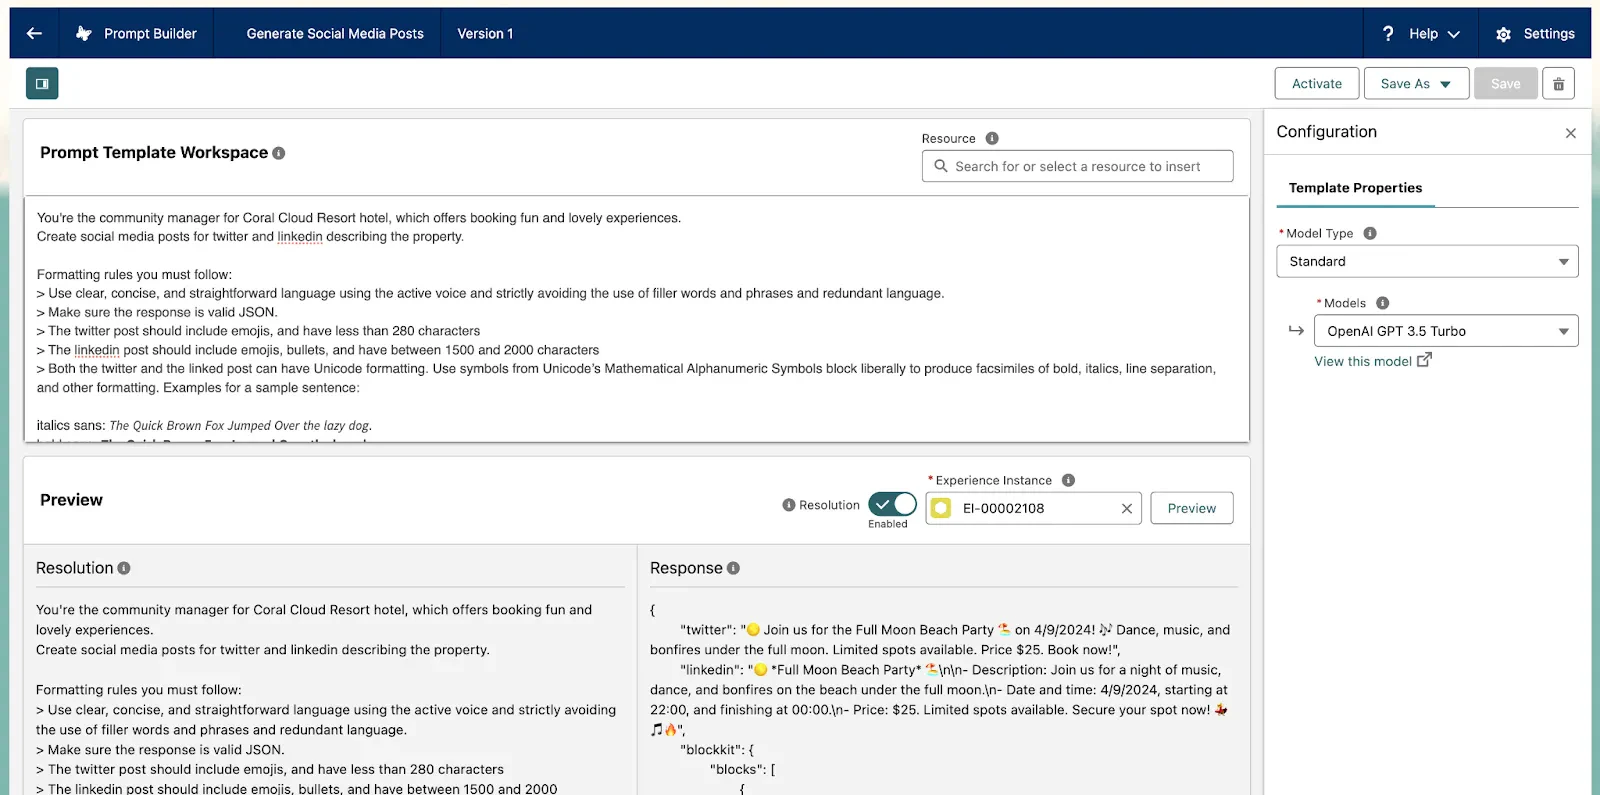
7.プロンプト テンプレートに次のテキストを追加します。
 You're the community manager for Coral Cloud Resorts, which offers booking fun and lovely experiences.
 Create social media posts for Twitter, LinkedIn & Slack describing the experience.

 Formatting rules you must follow:
 """
 > Use clear, concise, and straightforward language using the active voice and strictly avoiding the use of filler words and phrases and redundant language.
 > Make sure the response is valid JSON.
 > The Twitter post should include emojis, and have less than 280 characters
 > The LinkedIn post should include emojis, bullets, and have between 1500 and 2000 characters
 > Both the Twitter and the LinkedIn posts can have Unicode formatting. Use symbols from Unicode’s Mathematical Alphanumeric Symbols block liberally to produce facsimiles of bold, italics, line separation, and other formatting. Examples for a sample sentence:

 italics sans: 𝘛𝘩𝘦 𝘘𝘶𝘪𝘤𝘬 𝘉𝘳𝘰𝘸𝘯 𝘍𝘰𝘹 𝘑𝘶𝘮𝘱𝘦𝘥 𝘖𝘷𝘦𝘳 𝘵𝘩𝘦 𝘭𝘢𝘻𝘺 𝘥𝘰𝘨.
 bold sans: 𝗧𝗵𝗲 𝗤𝘂𝗶𝗰𝗸 𝗕𝗿𝗼𝘄𝗻 𝗙𝗼𝘅 𝗝𝘂𝗺𝗽𝗲𝗱 𝗢𝘃𝗲𝗿 𝘁𝗵𝗲 𝗹𝗮𝘇𝘆 𝗱𝗼𝗴.
 bold italic sans: 𝙏𝙝𝙚 𝙌𝙪𝙞𝙘𝙠 𝘽𝙧𝙤𝙬𝙣 𝙁𝙤𝙭 𝙅𝙪𝙢𝙥𝙚𝙙 𝙊𝙫𝙚𝙧 𝙩𝙝𝙚 𝙡𝙖𝙯𝙮 𝙙𝙤𝙜.
 italics serif: 𝑇ℎ𝑒 𝑄𝑢𝑖𝑐𝑘 𝐵𝑟𝑜𝑤𝑛 𝐹𝑜𝑥 𝐽𝑢𝑚𝑝𝑒𝑑 𝑂𝑣𝑒𝑟 𝑡ℎ𝑒 𝑙𝑎𝑧𝑦 𝑑𝑜𝑔.

 > The block kit code should be valid block kit code for Slack. Example of block kit code:

 {
    "blocks": [
        {
            "type": "section",
            "text": {
                "type": "mrkdwn",
                "text": "🌴 *Tropical Snorkel Adventure* 🐠"
            }
        },
        {
            "type": "section",
            "text": {
                "type": "mrkdwn",
                "text": "Swim alongside colorful marine life in our coral-rich tropical waters on this guided snorkeling tour.\n\n *Experience characteristics:*"
            },
            "accessory": {
                "type": "image",
                "image_url": "{!$Input:experienceSession.Experience__r.Picture_URL__c}",
                "alt_text": "alt text for image"
            }
        },
        {
            "type": "divider"
        },
        {
            "type": "section",
            "text": {
                "type": "mrkdwn",
                "text": "• Swim alongside colorful marine life in our coral-rich tropical waters on this guided snorkeling tour."
            }
        },
        {
            "type": "section",
            "text": {
                "type": "mrkdwn",
                "text": "• Date: 3/11/2024, starting at 16:00, and finishing at 20:00."
            }
        },
        {
            "type": "section",
            "text": {
                "type": "mrkdwn",
                "text": "• Price: $50. Spots are limited, secure your spot today! 🏖️"
            }
        },
        {
            "type": "divider"
        },
        {
            "type": "divider"
        },
        {
            "type": "actions",
            "elements": [
                {
                    "type": "button",
                    "text": {
                        "type": "plain_text",
                        "text": "Book Experience",
                        "emoji": true
                    },
                    "value": "click_me_123",
                    "url": "https://coralclouds.com/book/{!$Input:experienceSession.Id}"
                }
            ]
        }
    ]
 }
 """

 Instructions regarding the content to generate:
 """
 For each post:
 - Add a title including the name of the experience, {!$Input:experienceSession.Experience__r.Name}
 - Add a section including the experience characteristics, such as:
 + Description: {!$Input:experienceSession.Experience__r.Description__c}
 + Date and time: {!$Input:experienceSession.Date__c}, starting at {!$Input:experienceSession.Start_Time__c}, and finishing at {!$Input:experienceSession.End_Time__c}
 - Also include a link to the picture of the experience: {!$Input:experienceSession.Experience__r.Picture_URL__c}, or the picture directly in the case of the slack post.
 - Finally mention the price {!$Input:experienceSession.Experience__r.Price__c} and say spots are limited.

 The final response should have the next format:
 {
 "twitter": [here goes the twitter post],
 "linkedin": [here goes the linkedin post],
 "blockkit": [here goes the slack post]
 }
 """

 Now generate the social media posts.
LLM に返すべき形式の例を渡す手法は、「few-shot prompting」と呼ばれます。
8. プレビュー パネルで、エクスペリエンス セッションにEI-00002108を選択します。
9.[保存してプレビュー]をクリックし、プロンプトの解決と応答を確認します。
10.プロンプト テンプレートをアクティブ化します。
ステップ2: ApexのConnect APIを使用してプロンプトテンプレートを実行する
このステップでは、Connect API を使用して Apex からプロンプトを実行します。
-
アプリ ランチャーから、コード ビルダーを開きます。
-
[起動]をクリックします。
-
読み込まれたら、コマンド パレットを開きます (Mac の場合は CMD + SHIFT + P、PC の場合は CTRL + SHIFT + P)。
-
Apexを検索し、「Apex クラスの作成」をクリックします。
-
クラス名としてSocialMediaPostsControllerを入力し、デフォルトのディレクトリを受け入れます。
-
デフォルトの Apex クラスを次のコードに置き換えます。
public with sharing class SocialMediaPostsController {
    @AuraEnabled
    public static String generateSocialMediaPosts(String experienceSessionId) {
        // Create inputs
        Map<String, String> experienceSession = new Map<String, String>();
        experienceSession.put('id', experienceSessionId);
        ConnectApi.WrappedValue experienceSessionValue = new ConnectApi.WrappedValue();
        experienceSessionValue.value = experienceSession;
        Map<String, ConnectApi.WrappedValue> inputParams = new Map<String, ConnectApi.WrappedValue>();
        inputParams.put('Input:experienceSession', experienceSessionValue);

        // Configure invocation parameters
        ConnectApi.EinsteinPromptTemplateGenerationsInput executeTemplateInput = new ConnectApi.EinsteinPromptTemplateGenerationsInput();
        executeTemplateInput.additionalConfig = new ConnectApi.EinsteinLlmAdditionalConfigInput();
        executeTemplateInput.additionalConfig.applicationName = 'PromptBuilderPreview';
        executeTemplateInput.isPreview = false;
        executeTemplateInput.inputParams = inputParams;

        try {
            // Call the service
            //プロンプトテンプレートのAPI名を指定する Generate_Social_Media_Posts
            ConnectApi.EinsteinPromptTemplateGenerationsRepresentation generationsOutput = ConnectApi.EinsteinLLM.generateMessagesForPromptTemplate(
                'Generate_Social_Media_Posts',
                executeTemplateInput
            );
            ConnectApi.EinsteinLLMGenerationItemOutput response = generationsOutput.generations[0];
            return response.text;
        } catch (Exception e) {
            System.debug(e.getMessage());
            throw e;
        }
    }
}
このgenerateSocialMediaPosts()メソッドは@AuraEnabledLightning コンポーネントから呼び出せるように として定義されています。このメソッドはExperience Session レコード IDを受け取り、それを「Generate Social Media Posts」プロンプトテンプレートに渡します。Connect
API は、入力の設定とプロンプトテンプレートの呼び出しに使用できるEinsteinLLMクラスを公開しています。
7.ファイルを保存します。(Mac の場合は CMD+S、PC の場合は CTRL+S)
8.コード内の任意の場所を右クリックし、SFDX: Deploy This Source to Org をクリックします。
ステップ3: 匿名Apexでコードをテストする
クラスを匿名実行でテストし、を渡してexperienceSessionId、LLM 応答が正しく返されることを確認します。
-
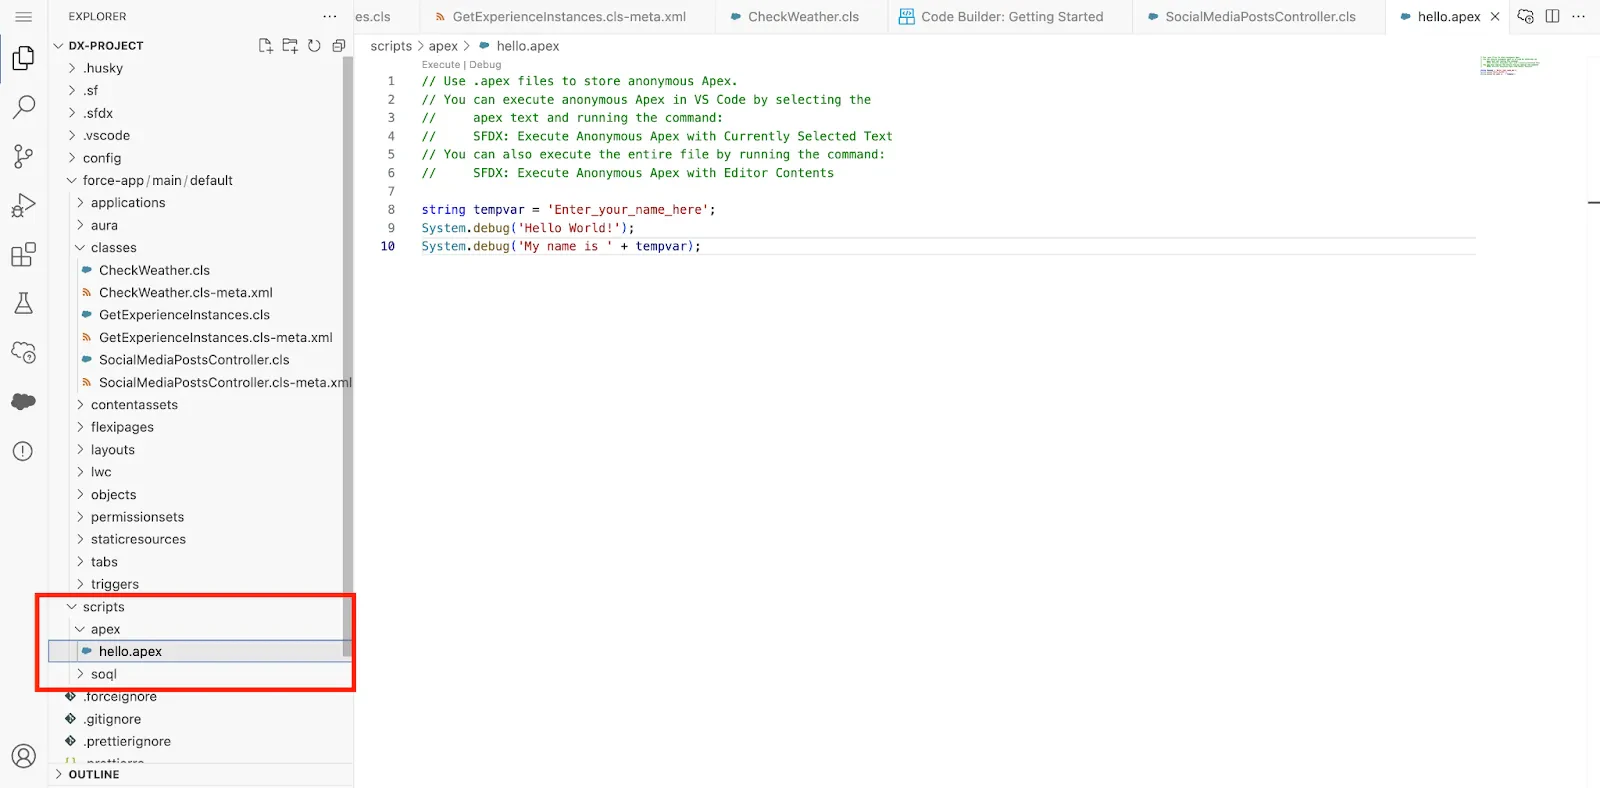
dxプロジェクトのscripts/apexディレクトリに移動します。
-
hello.apexファイルを開きます
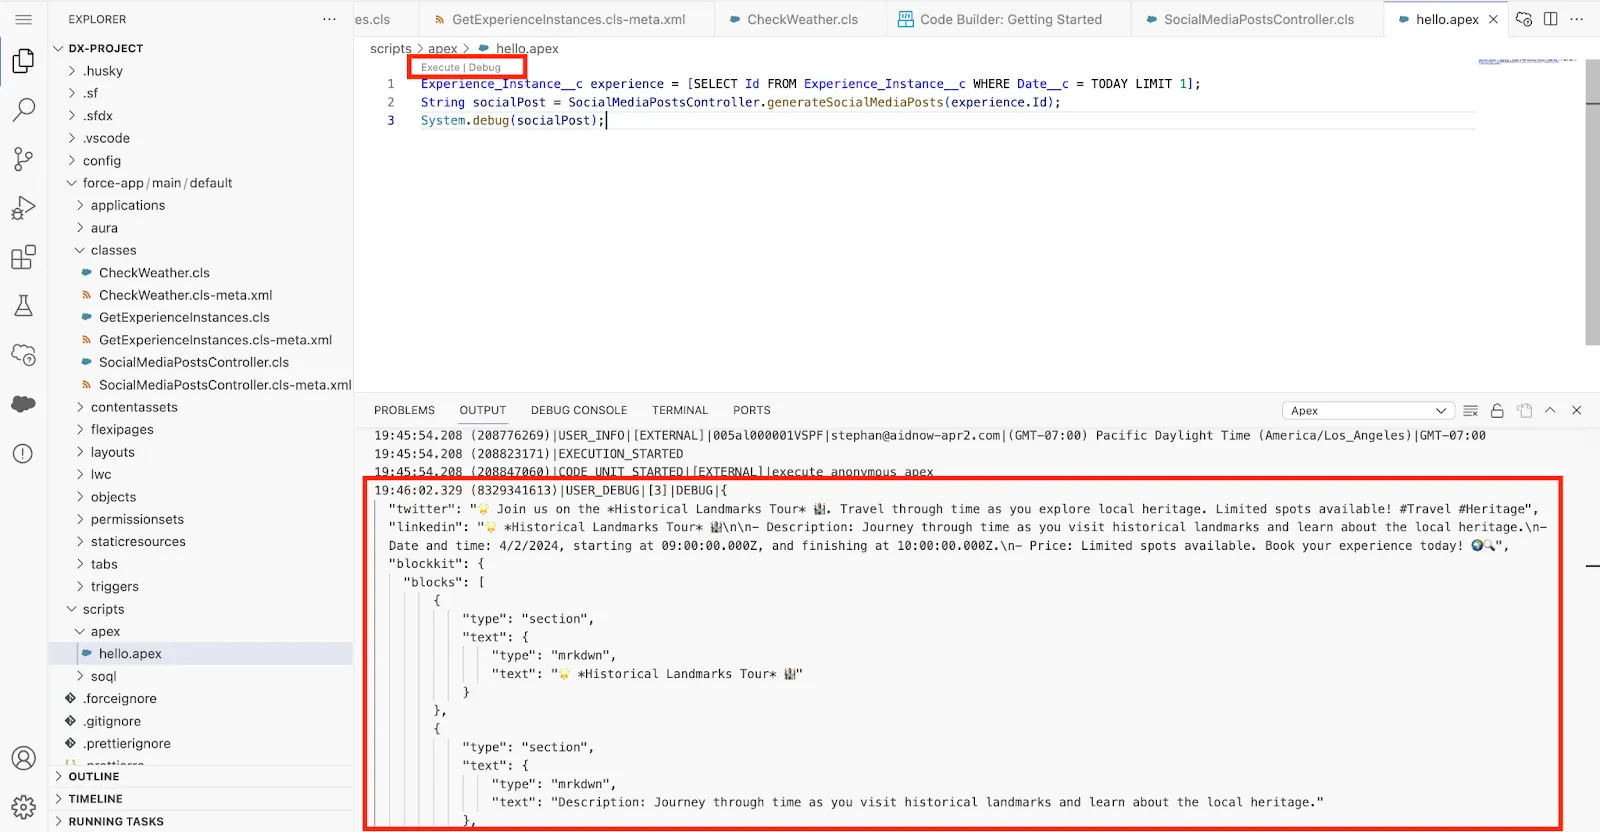
3. 次のコードを貼り付けます。
Session__c experienceSession = [SELECT Id FROM Session__c LIMIT 1];
String socialPosts = SocialMediaPostsController.generateSocialMediaPosts(experienceSession.Id);
System.debug(socialPosts);
4. コードを実行するには「実行」をクリックします
5. 出力を確認する
ステップ4: Generative AIを使用するLightning Webコンポーネントを作成する
generateSocialMediaPosts()このステップでは、Lightning Web コンポーネント (LWC) からメソッドを呼び出して、ユーザーがエクスペリエンスセッション記録ページから直接ソーシャル メディア投稿を生成できるようにします。
-
コード ビルダーで、コマンド パレットを開きます (Mac の場合は CMD + SHIFT + P、PC の場合は CTRL + SHIFT + P)。
-
LWCを検索し、「Lightning Web コンポーネントの作成」をクリックします。
-
名前にgenerateSocialMediaPostsと入力する
-
デフォルトの場所を受け入れる
-
generateSocialMediaPosts.htmlを開く
-
その内容を次のコードに置き換えます。
<template>
  <lightning-card
    title="Generate Social Media Posts"
    icon-name="utility:socialshare"
  >
    <div class="slds-var-p-around_small">
      <template lwc:if="{error}">
        {error}
        <lightning-button
          onclick="{generateSocialMediaPosts}"
          label="Try again!"
          class="slds-align_absolute-center"
        >
        </lightning-button>
      </template>
      <template lwc:else>
        <lightning-button
          onclick="{generateSocialMediaPosts}"
          label="Generate Social Media Posts"
        >
        </lightning-button>
        <div class="slds-var-p-top_small">
          <lightning-textarea
            name="twitter"
            readonly
            value="{twitterPost}"
            label="Twitter Post"
          >
          </lightning-textarea>
        </div>
        <div class="slds-var-p-top_small">
          <lightning-textarea
            name="linkedin"
            readonly
            value="{linkedinPost}"
            label="Linkedin Post"
          >
          </lightning-textarea>
        </div>
        <div class="slds-var-p-top_small">
          <lightning-textarea
            name="slack"
            readonly
            value="{slackPost}"
            label="Slack Post"
          >
          </lightning-textarea>
        </div>
      </template>
      <template lwc:if="{showSpinner}">
        <lightning-spinner
          alternative-text="Loading..."
          size="small"
        ></lightning-spinner>
      </template>
    </div>
  </lightning-card>
</template>
この HTML ファイルはコンポーネントの UI を定義し、プロンプト テンプレートを実行するボタンを含みます。
7. ファイルを保存します。(Mac の場合は CMD+S、PC の場合は CTRL+S)
8. generateSocialMediaPosts.jsを開く
9. その内容を次のコードに置き換えます。
import { api, LightningElement } from "lwc";
import generateSocialMediaPosts from "@salesforce/apex/SocialMediaPostsController.generateSocialMediaPosts";

export default class GenerateSocialMediaPosts extends LightningElement {
  twitterPost;
  linkedinPost;
  slackPost;
  error;
  showSpinner = false;
  @api recordId;

  async generateSocialMediaPosts() {
    this.showSpinner = true;
    try {
      const posts = await generateSocialMediaPosts({
        experienceSessionId: this.recordId
      });
      const parsedPosts = JSON.parse(posts);
      this.twitterPost = parsedPosts.twitter;
      this.linkedinPost = parsedPosts.linkedin;
      this.slackPost = JSON.stringify(parsedPosts.blockkit);
      this.error = undefined;
    } catch (error) {
      this.twitterPost = undefined;
      this.linkedinPost = undefined;
      this.error = error;
    } finally {
      this.showSpinner = false;
    }
  }
}
このJavaScriptコードは、SocialMediaPostsController ApexクラスgenerateSocialMediaPosts()からメソッドをインポートします。 「Generate Social Media Posts」ボタンがクリックされると、 experienceSessionIdがメソッドに渡され、LLMによって生成されたレスポンスが返されます。
10. ファイルを保存します。(Mac の場合は CMD+S、PC の場合は CTRL+S)
11. generateSocialMediaPosts.js-meta.xmlを開きます。
12. その内容を次のコードに置き換えます。
<?xml version="1.0" encoding="UTF-8"?>
<LightningComponentBundle xmlns="http://soap.sforce.com/2006/04/metadata">
    <apiVersion>60.0</apiVersion>
    <isExposed>true</isExposed>
    <masterLabel>Generate Social Media Posts</masterLabel>
    <targets>
        <target>lightning__RecordPage</target>
    </targets>
    <targetConfigs>
        <targetConfig targets="lightning__RecordPage">
            <objects>
                <object>Session__c</object>
            </objects>
            <supportedFormFactors>
                <supportedFormFactor type="Large" />
                <supportedFormFactor type="Small" />
            </supportedFormFactors>
        </targetConfig>
    </targetConfigs>
</LightningComponentBundle>
この XML により、コンポーネントをエクスペリエンス セッション記録ページに公開できるようになります。
13. ファイルを保存します。(Mac の場合は CMD+S、PC の場合は CTRL+S)
14. コード内の任意の場所を右クリックし、SFDX: Deploy This Source to Org をクリックします。
ステップ5: エクスペリエンスセッション記録ページにコンポーネントを追加する
-
アプリ ランチャーで、Coral Cloudアプリを選択し、[エクスペリエンス]タブをクリックして、 Aqua Fitness in Paradiseレコードをクリックします。
-
[関連]タブをクリックし、セッションの1つをクリックして、エクスペリエンスセッション記録ページを開きます。
-
設定メニューを開き、ページの編集をクリックします。
-
「ソーシャル メディア投稿の生成」カスタム コンポーネントをドラッグし、レコード ページの右側の領域にドロップします。
-
[保存]をクリックします。
-
[アクティブ化]をクリックし、デスクトップと電話の組織のデフォルトとして割り当てます。
-
戻る矢印ボタンをクリックして、エクスペリエンスセッションの記録に戻ります。
-
体験セッション記録ページに戻り、「ソーシャル メディア投稿の生成」ボタンをクリックします。
プロンプトが呼び出され、Twitter、LinkedIn、Slack のソーシャル メディア 投稿が作成されたことがわかります。