夏にやるのかAdventCalendar第10回目です
はじめに
今回はタイトルの通シンプルなじゃんけんゲームを作りたいと思います。
私が以前投稿させていただいた、JavaFX導入の記事の続きくらいの認識で読んでいただけると幸いです。
-はじめてのJavaFX ~簡単な導入Hello world的なGUI作成まで~
環境
-macOS Sierra 10.12.6
-Eclipse Oxygen 4.7.3a(プラグインでe(fx)clipse導入済み)
-Scene Builder2.0
実際の作成過程
今回は、前回の記事と違う部分として、application以外のパッケージを作る、画像を使う要素が含まれます。
作りたいモノのイメージ
今回作成するゲームの中の流れは以下のようなものを想定しています。
- 待機画面
- ゲーム開始(「さいしょはグー、じゃんけん...」で入力待機)
- プレイヤーの入力を受けてじゃんけんのリザルト画面へ
- 1の待機画面へ
じゃんけんで用意する画像
今回はフリーの素材サイトから拝借しました。
-じゃんけん・グーのイラスト
-じゃんけん・チョキ・ピースのイラスト
-じゃんけん・パーのイラスト
プロジェクト内のパッケージ構成
- application: FXのGUI関係のソースがここに入る
- game: 今回のじゃんけんの処理がここに入る
- pic: じゃんけんの手の画像を入れておく。グー:Rock.png, チョキ:Scissors.png, パー:Papaer.png
SceneBuilder内の操作
SceneBuilder内で操作をします。
前準備として, 前回と同じ手順でeclipseでJavaFXプロジェクトの作成をしてください。
プロジェクト名は「JankenFX」にします。(任意のものでも構いません)
プロジェクトが生成されたら、applicationパッケージのMain.javaを一部書き換えます。
Scene scene = new Scene(root,400,400);
となっている行を
Scene scene = new Scene(root, 500 ,400);
に書き換えます。前準備は以上です。
前準備が終わりましたら、Form.fxmlをSceneBuilderにて開いてください。
最初は中央には何もない状態ですので、画面左下のBorderPaneをクリック、画面右のLayoutでPref widthを500、Pref Heightを400に設定します。ここまでで、画面中央に白いパネルが出てくると思います。
今回のScene Builderでの作業が終わった段階の状態の画像を先に貼ります。
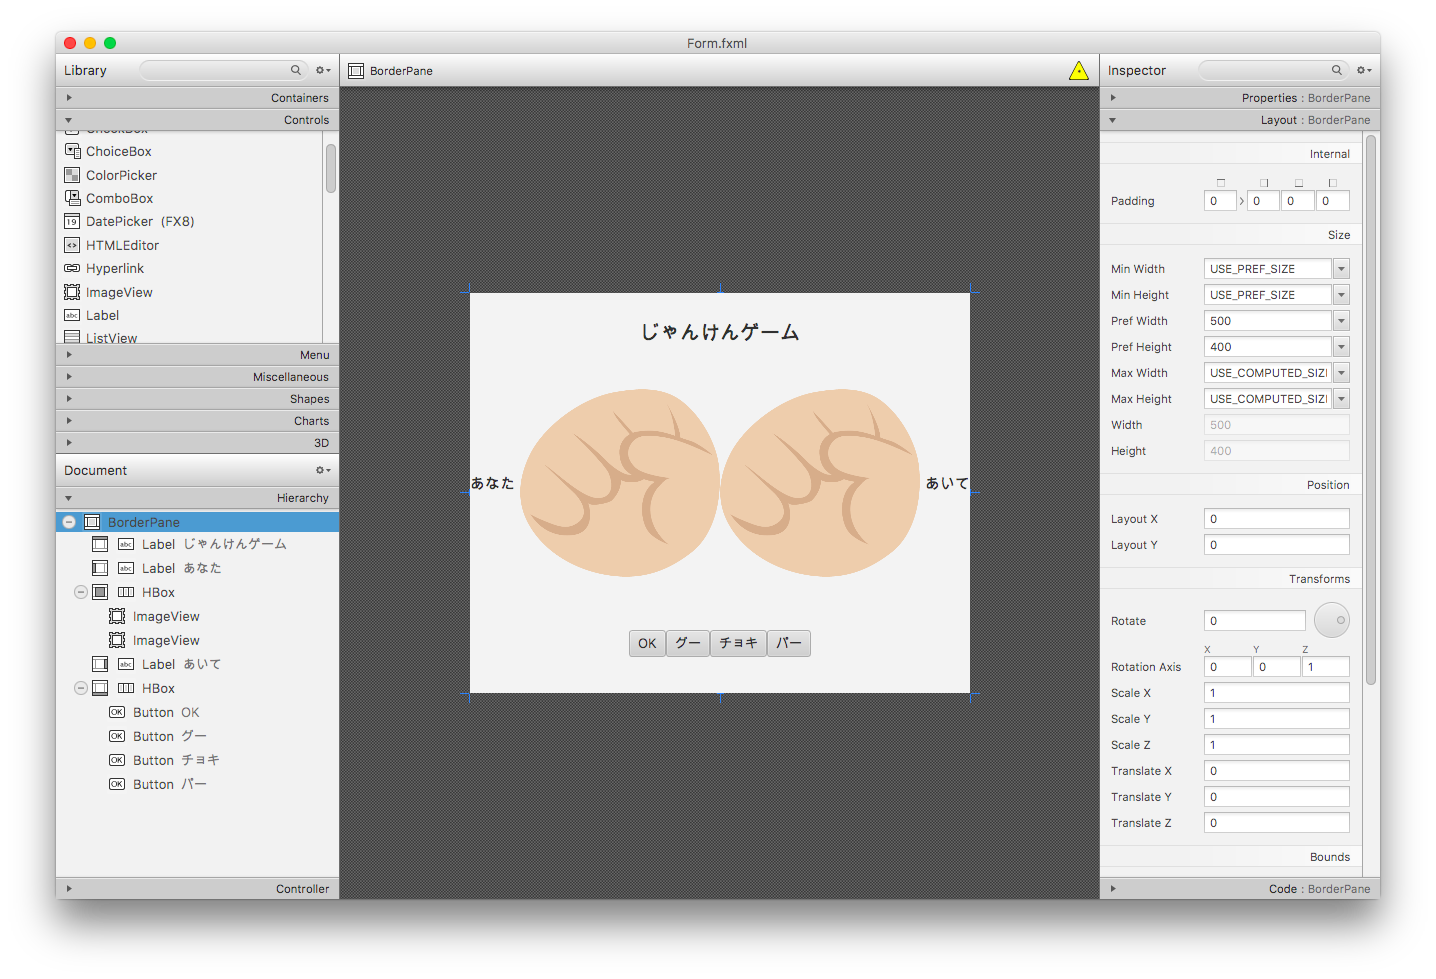
BorderPaneの場所ごとに行っている操作は下記の通りです
- Top
- Label: タイトルや進行状況に応じた文を表記する。fxidに"label_text"を書いています。
- Center
-HBox: HBox内に入ってるパーツは水平に等しく並べられる。propaties内のAlignmentをCENTERにしています。
HBox内
- ImageView(左): 自分のじゃんけんの手を描写します。fxidに"image_player"を書いています。
- ImageView(右): 相手のじゃんけんの手を描写します。fxidに"image_enemy"を書いています。
- Left
- Label: 自分の手だとわかるように、"あなた"と propatiesのtextに書いています。
- Right
- Label: 相手の手だとわかるように、"あいて"と propatiesのtextに書いています。
- Bottom
- HBox:説明省略
HBox内 - Button (OK): ゲーム画面を進めるためのボタンです。fxidは"button_OK"で、On Actionは"onOKClicked"を書いています。
- Button (グー): じゃんけんで自分の手を出すためのボタンです。fxidは"button_Rock"で、On Actionは"onRockClicked"を書いています。
- Button (チョキ): じゃんけんで自分の手を出すためのボタンです。fxidは"button_Scissors"で、On Actionは"onScissorsClicked"を書いています。
- Button (パー): じゃんけんで自分の手を出すためのボタンです。fxidは"button_Paper"で、On Actionは"onPaperClicked"を書いています。
ここまでの操作、記入を終えたForm.fxmlは下記のとおりです。
<?xml version="1.0" encoding="UTF-8"?>

<?import javafx.scene.image.*?>
<?import javafx.scene.text.*?>
<?import javafx.geometry.*?>
<?import javafx.scene.control.*?>
<?import java.lang.*?>
<?import javafx.scene.layout.*?>
<?import javafx.scene.layout.BorderPane?>

<BorderPane minHeight="-Infinity" minWidth="-Infinity" prefHeight="400.0" prefWidth="500.0"
xmlns:fx="http://javafx.com/fxml/1" xmlns="http://javafx.com/javafx/8" fx:controller="application.FormController">
   <bottom>
      <HBox alignment="CENTER" prefHeight="100.0" prefWidth="200.0" BorderPane.alignment="CENTER">
         <children>
            <Button fx:id="button_OK" mnemonicParsing="false" onAction="#onOKClicked" text="OK" />
            <Button fx:id="button_Rock" mnemonicParsing="false" onAction="#onRockClicked" text="グー" />
            <Button fx:id="button_Scissors" mnemonicParsing="false" onAction="#onScissorsClicked" text="チョキ" />
            <Button fx:id="button_Paper" mnemonicParsing="false" onAction="#onPaperClicked" text="パー" />
         </children>
      </HBox>
   </bottom>
   <top>
      <Label fx:id="label_text" alignment="CENTER" prefHeight="80.0" prefWidth="400.0" text="じゃんけんゲーム" BorderPane.alignment="CENTER">
         <font>
            <Font size="20.0" />
         </font>
      </Label>
   </top>
   <center>
      <HBox alignment="CENTER" prefHeight="100.0" prefWidth="200.0" BorderPane.alignment="CENTER">
         <children>
            <ImageView fx:id="image_player" fitHeight="188.0" fitWidth="200.0">
               <image>
                  <Image url="@../pic/Rock.png" />
               </image>
            </ImageView>
            <ImageView fx:id="image_enemy" fitHeight="188.0" fitWidth="200.0">
               <image>
                  <Image url="@../pic/Rock.png" />
               </image>
            </ImageView>
         </children>
      </HBox>
   </center>
   <right>
      <Label text="あいて" BorderPane.alignment="CENTER">
         <font>
            <Font size="15.0" />
         </font>
      </Label>
   </right>
   <left>
      <Label text="あなた" BorderPane.alignment="CENTER">
         <font>
            <Font size="15.0" />
         </font>
      </Label>
   </left>
</BorderPane>
Eclipseでのソース作成
作成するプログラムは、FormController.javaの追記とgameパッケージにBattle.javaを作成する2つになります。
今回作成したソースは、筆者の経験量の浅さもあり、無駄のあるソースとなっていると思います。ご了承ください。
FormController.java
書き換えたものが下記になります。
package application;

import java.util.Random;
import game.Battle;
import javafx.fxml.FXML;
import javafx.scene.control.Button;
import javafx.scene.control.Label;
import javafx.scene.image.Image;
import javafx.scene.image.ImageView;

public class FormController {
	@FXML private Button button_OK;
	@FXML private Button button_Rock;
	@FXML private Button button_Scissors;
	@FXML private Button button_Paper;
	@FXML private Label label_text;
	@FXML private ImageView image_player;
	@FXML private ImageView image_enemy;

	private Battle battle= new Battle();
	private final Image ROCK= new Image("pic/Rock.png");
	private final Image SCISSORS= new Image("pic/Scissors.png");
	private final Image PAPER= new Image("pic/Paper.png");

	private int hand_player;
	private int hand_enemy;
	private int result; //じゃんけんの結果をintで保有

	private Random rand= new Random(); //相手の出す手をランダムに生成


//	進行状況1(じゃんけんの入力待機)以外のときに、進行状況を進める
	@FXML
	public void onOKClicked() {
		if(battle.getPhase() != 1){
		battle.nextPhase();
		draw();
		}
	}
	@FXML
	public void onRockClicked() {
		if(battle.getPhase() == 1) {
		hand_player= 1;
		hand_enemy= rand.nextInt(3)+ 1;
		result= battle.battle(hand_player, hand_enemy, battle.getPhase());
		battle.nextPhase();
		draw();
		}
	}
	@FXML
	public void onScissorsClicked() {
		if(battle.getPhase() == 1) {
		hand_player= 2;
		hand_enemy= rand.nextInt(3)+ 1;
		result= battle.battle(hand_player, hand_enemy, battle.getPhase());
		battle.nextPhase();
		draw();
		}
	}
	@FXML
	public void onPaperClicked() {
		if(battle.getPhase() == 1) {
		hand_player= 3;
		hand_enemy= rand.nextInt(3)+ 1;
		result= battle.battle(hand_player, hand_enemy, battle.getPhase());
		battle.nextPhase();
		draw();
		}
	}

//	進行状況に応じて描画の更新をする
	public void draw() {
		switch (battle.getPhase()) {
		case 0:
			label_text.setText("じゃけんゲーム");
			image_player.setImage(ROCK);
			image_enemy.setImage(ROCK);
			break;
		case 1:
			label_text.setText("さいしょはグー、じゃんけん...");
			break;
		case 2:
			image_player.setImage(changeImage(hand_player));
			image_enemy.setImage(changeImage(hand_enemy));
			switch (result) {
			case 1:
				label_text.setText("あなたの勝ちです!!");
				break;
			case 2:
				label_text.setText("あなたの負けです...");
				break;
			case 3:
				label_text.setText("あいこです!");
			default:
				break;
			}
			break;

		default:
			break;
		}
	}

//	じゃんけんの手の画像の更新をする
	private Image changeImage(int hand) {
		switch (hand) {
		case 1:
			return ROCK;
		case 2:
			return SCISSORS;
		case 3:
			return PAPER;
		default:
			return ROCK; //例外
		}
	}
}
続いて、じゃんけんの処理をするBattle.javaです。
package game;

// じゃんけんの処理を行うクラス
public class Battle {

	private int phase; //ゲームの進行状況を保有する

//	オブジェクトの生成時に進行状況0:最初の待機画面で初期化する
	public Battle() {
		this.phase= 0;
	}

//	じゃんけんの処理を行う。自分の勝ちなら1, 負けなら2, あいこなら3をかえす
	public int battle(int p, int e, int phase) { //p:自分の手, e,相手の手
		if(phase==1) {  //進行状況1: 入力待ちのときのみ作動
//			じゃんけんの手は、グー:1, チョキ:2, パー:3
			if(p==1) {
				if(e==1) return 3;
				else if(e==2) return 1;
				else if(e==3) return 2;
			}

			else if(p==2) {
				if(e==1) return 2;
				else if(e==2) return 3;
				else if(e==3) return 1;
			}

			else if(p==3) {
				if(e==1) return 1;
				else if(e==2) return 2;
				else if(e==3) return 3;
			}
		}
		return -1; //例外
	}

	//進行状況を次の段階へ進める。phaseが3になったら、0へ更新
	public void nextPhase() {
		phase++;
		if(phase>2)phase= 0;
	}

	//進行状況のゲッター
	public int getPhase() {
		return phase;
	}
}
以上ふたつのクラスの作成と、じゃんけんの手の画像をpicパッケージにコピーアンドペーストが完了すれば、完成になります。お疲れ様です。
実際に動かす
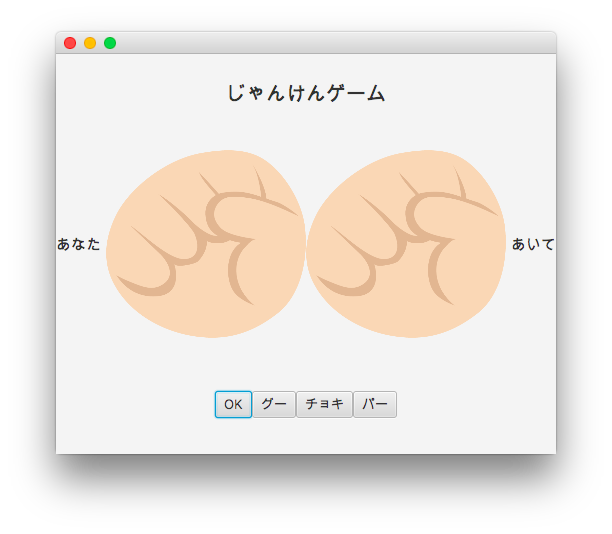
-
初期画面
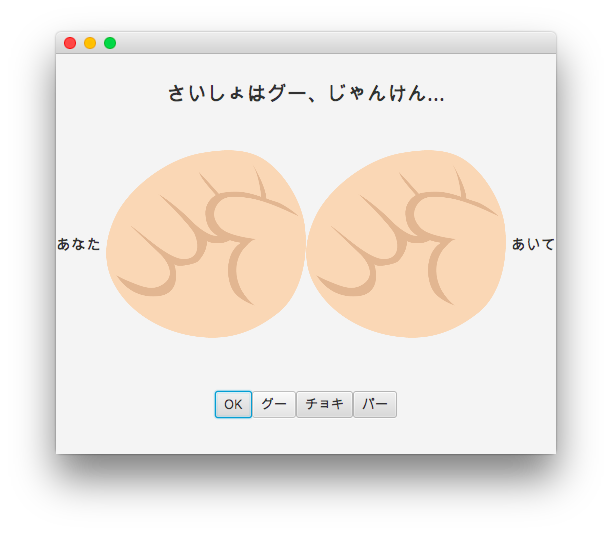
-
入力待ち画面
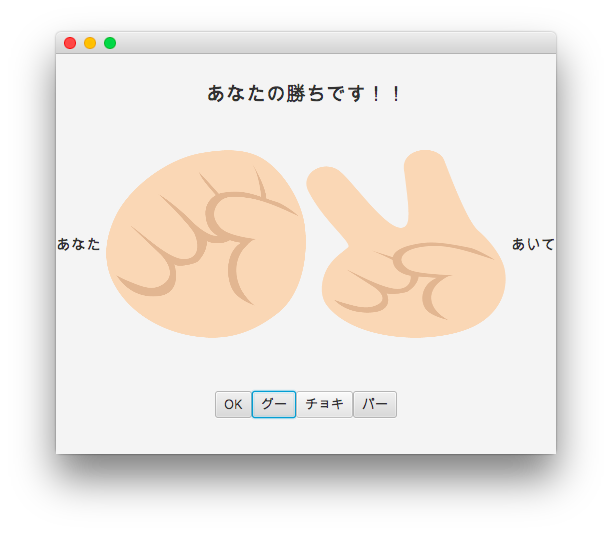
-
結果 OKボタンを押すと1に戻る
おわりに
今回は、前回のハローワールドからの延長線というポジションで、別パッケージのクラスを利用したり、画像読み込みをしてじゃんけんのゲームを作成しました。
利用する画像を変えたり、SceneBuilderでレイアウトをいじったりして、練習材料にしていただけたら幸いです。
ここまで読んでいただきありがとうございました。