(2019/04/09)discord.pyが正式リリースされたので一部内容を変更しました。
(※rewrite版と呼ばれていたものがdiscord.pyになりました)
対象
PythonもDiscord Botも初めての方が対象です。
今回作るもの
Discordで 「!眠たい」 と入力すると 「"ユーザー名"さん 寝ましょう」 と返事をする簡単なBotを作ります
※このページではrewrite版(async版を新しく書き換えたもの)でBotを作ります。
従来のasync版でBotを作りたい場合は、Pythonで簡単なDiscord Botの作り方 を参考にしてください。
この記事を書いた時の環境
(2019/03/06)
- Windows 10
- Pycharm (Pythonコードを書く環境)
- Python 3.7.2
- discord.py 1.0.0a (rewrite版)
Discordとは
Discordとは、無料のゲーマー向けチャット・音声通話ツールです
あらかじめやっておくこと
- Pythonを書くテキストエディタを入れておく
PythonをWindowsにインストールする
PythonをWindowsにインストールする を参考にして導入してください。
discord.pyのインストール
discord.pyをインストールします。
$ python3 -m pip install -U https://github.com/Rapptz/discord.py/archive/rewrite.zip
↓(2019/04/09)discord.pyが正式リリースされたので記述が変わりました。
(下記の方法でインストールしてください)
$ python3 -m pip install -U discord.py
Bot用のトークンを手に入れる
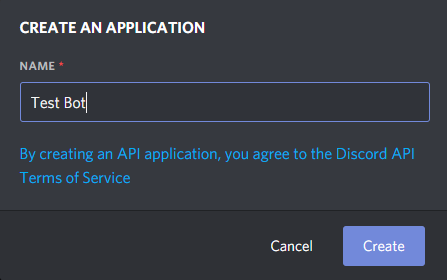
DiscordのDeveloperのサイトに行って新しいBotを登録します

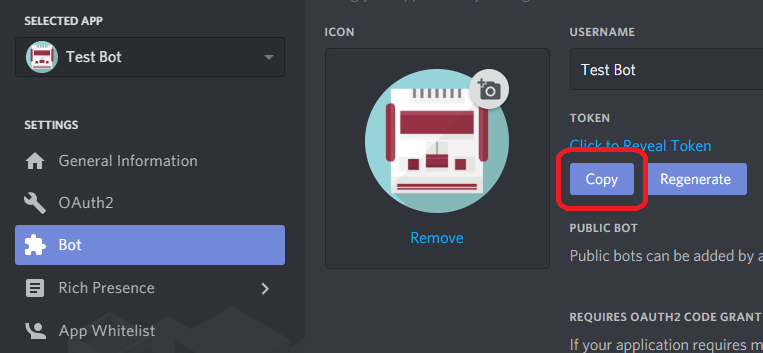
左側のBot欄を選択しCreateを押します。

次にTOKEN欄に行ってCopyをクリックします。
(これを後で使いますのでメモ帳あたりにペーストしておいてください)

最後にOAuth2欄に行きます。
botを選択し、Copyを押します。

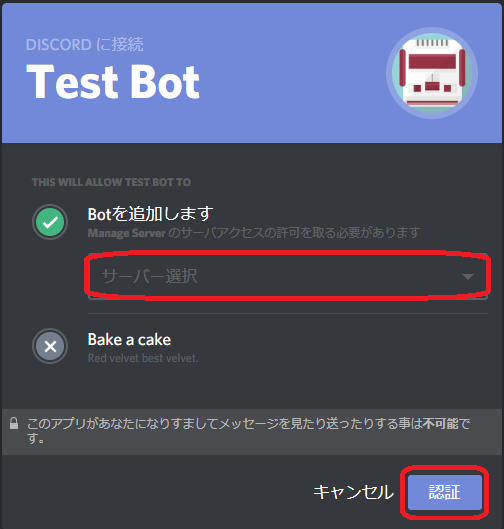
WWWブラウザのアドレス欄にペーストすると以下の画面が表示されます。

導入したいサーバーを選択します。
コードを書く
1.以下のコード部分を全てコピペしてください。
2.一番下の行の”アクセストークン”にBotのトークンを貼り付けてください
3.![]() UTF-8という形式で保存してください
UTF-8という形式で保存してください![]()
4.保存してください
import discord
import random  # おみくじで使用

client = discord.Client()  # 接続に使用するオブジェクト


@client.event
async def on_ready():
    """起動時に通知してくれる処理"""
    print('ログインしました')
    print(client.user.name)  # ボットの名前
    print(client.user.id)  # ボットのID
    print(discord.__version__)  # discord.pyのバージョン
    print('------')


@client.event
async def on_message(message):
    """メッセージを処理"""
    if message.author.bot:  # ボットのメッセージをハネる
        return

    if message.content == "!眠たい":
        # チャンネルへメッセージを送信
        await message.channel.send(f"{message.author.mention}さん 寝ましょう")  # f文字列(フォーマット済み文字列リテラル)

    elif message.content == "!投票":
        # リアクションアイコンを付けたい
        q = await message.channel.send("あなたは右利きですか?")
        [await q.add_reaction(i) for i in ('⭕', '❌')]  # for文の内包表記

    elif message.content == "!おみくじ":
        # Embedを使ったメッセージ送信 と ランダムで要素を選択
        embed = discord.Embed(title="おみくじ", description=f"{message.author.mention}さんの今日の運勢は!",
                              color=0x2ECC69)
        embed.set_thumbnail(url=message.author.avatar_url)
        embed.add_field(name="[運勢] ", value=random.choice(('大吉', '吉', '凶', '大凶')), inline=False)
        await message.channel.send(embed=embed)

    elif message.content == "!ダイレクトメッセージ":
        # ダイレクトメッセージ送信
        dm = await message.author.create_dm()
        await dm.send(f"{message.author.mention}さんにダイレクトメッセージ")


# botの接続と起動
# (botアカウントのアクセストークンを入れてください)
client.run("アクセストークン")
実行してみよう
保存したファイルをコマンドプロンプトで実行してみましょう
$ python main.py
ログインしました
ボットの名前
ボットのID
discord.pyのバージョン
------
これが表示されていると起動・ログインに成功しています。
最後にDiscordのBotのいるサーバーのテキストチャンネルで「!眠たい」と打つと返事が返ってきます。
関連
PythonでDiscordボットを作る時のFAQ
https://qiita.com/Karaf/items/7d52c95c94268627b618
参考
Pythonで簡単なDiscord Botの作り方
(私が初めてBotを導入した時に大変参考にさせていただきました)
https://qiita.com/PinappleHunter/items/af4ccdbb04727437477f
PythonをWindowsにインストールする
https://qiita.com/psychoroid/items/9930e871fb8169a91f9a