0.初めに
Oracle Cloud Infrastructure(OCI)には、マネージドな Kubernets サービス (OKE) があります。
Kubernets クラスタを作成するときに、Quick create というオプションを選択すると、仮想ネットワーク・ゲートウェイ(インターネット、NAT、サービス)・Kubernetes クラスタ・worker node pool が自動的に作成され、すぐにコンテナを起動することができます。しかし、どのようなネットワーク環境で稼働しているのかの理解ができませんでした。
そこで、Custom create オプションを選択し、ネットワーク環境から Kubernets クラスタまで手動で構築することによって、どのような環境で稼働しているか理解を深めることにしました。
手動で構築するまでの手順を記したいと思います。
1. この記事でやること(スコープ)
ゴール
- VCN 上に OKE(カスタム構築)を構築する
- クラスタ+ノードプールを作成する
- kubectl で Deployment/Service を作り、Web コンテナを起動して疎通する
- VCN や OKE の作成は、Webブラウザで操作する
- kubectl は CloudShell で操作する
やらないこと(今回の範囲外)
- Ingress(LB/Ingress Controller)構築
- 証明書(TLS)、DNS、WAF
- CI/CD(GitHub Actions など)
- 監視(Logging/Monitoring)、オートスケール最適化
2. 前提条件
スクリーンショットやコマンドは、2026年1月1日 時点のものです。
必要なもの
- OCI アカウント(権限:VCN/OKE/LB など作れること)
- OCI CLI(任意)(今回の手順は Cloud shell を使用します)
- kubectl
- ローカル PC から OCI への通信経路(インターネット経由 or VPN)
想定リージョン
- リージョン:
ap-tokyo-1
3. 全体構成(ざっくり図)
※ アイコンが AWS なのは・・・
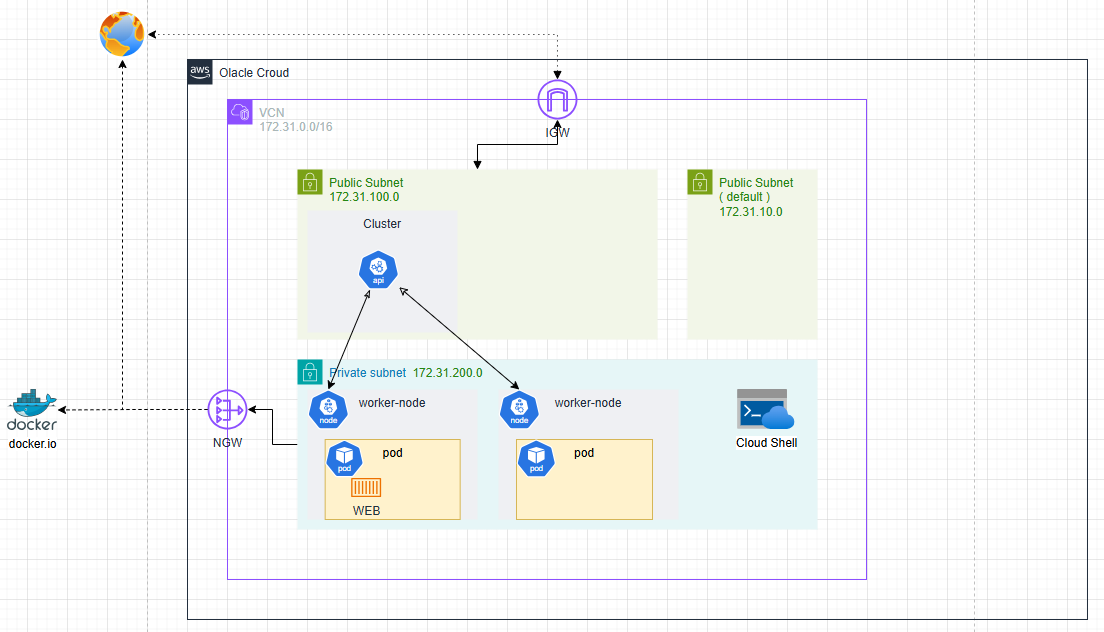
- VCN
- Public Subnet
- Master Node
- Private Subnet
- Worker Node
- nginx Container
- Cloud Shell
- Worker Node
- Internet Gateway
- NAT Gateway
- Public Subnet
4. VCN 設計:Kubernetes を置くネットワーク設定
4.1 CIDR 設計
- VCN CIDR:172.31.0.0/16
- Public Subnet:172.31.100.0/24
- Private Subnet:172.31.200.0/24
- (任意)Pod 用サブネット :172.31.200.0/24
Node と別のレンジに設定可能だけれど、今回はNodeと同じに設定
4.2 ゲートウェイ
- Internet Gateway(IGW):Public Subnet 用
- NAT Gateway (NAT):Private Subnet から外向き通信(イメージPull)
4.3 ルートテーブル
- Public Subnet:0.0.0.0/0 → IGW
- Private Subnet:0.0.0.0/0 → NAT
4.4 セキュリティ
NSG (Network Security Group)
なし
Security Lists
要件
- Control Plane Node(Master Node) と Node (Worker Node) が通信できること
- 正しく通信できるようにポートを許可する
- Node から インターネットにアクセスできること
- NAT 経由で許可する
- 作業環境 から Kubernets API にアクセスできること
- Cloud shell からのアクセスを許可する
Public Subnet
Ingress Rules
| Source | IP Protocol | Destination Port Range | Description |
|---|---|---|---|
| 172.31.200.0/24 | TCP | 6443 | Kubernetes worker to Kubernetes API endpoint communication |
| 172.31.200.0/24 | TCP | 12250 | Kubernetes worker to control plane communication |
| 0.0.0.0/0 | TCP | 6443 | External access to Kubernetes API endpoint |
上記リストの 0.0.0.0/0 6443 は、どの環境からでも kubectl を許可する設定になっています。この設定は大変危険です。kubectl を実行する環境の IP アドレスを指定するようにしてください。Cloud Shell からのアクセスのみを許可する場合は、Cloud shell で以下のコマンドを実行した結果として表示される IP アドレスを指定してください。
curl -s checkip.dyndns.org | sed -e 's/.*Current IP Address: //' -e 's/<.*$//'
Egress Rules
| Destination | IP Protocol | Destination Port Range | Description |
|---|---|---|---|
| All NRT Services In Oracle Services Network | TCP | 443 | Allow Kubernetes Control Plane to communicate with OKE |
| 172.31.200.0/24 | TCP | All | All traffic to worker nodes |
Private Subnet
Ingress Rules
| Source | IP Protocol | Destination Port Range | Description |
|---|---|---|---|
| 172.31.200.0/24 | All Protocols | -- | Allow pods on one worker node to communicate with pods on other worker nodes |
| 172.31.100.0/24 | TCP | ALL | TCP access from Kubernetes Control Plane |
Egress Rules
| Destination | IP Protocol | Destination Port Range | Description |
|---|---|---|---|
| 172.31.200.0/24 | All Protocols | All | Allow pods on one worker node to communicate with pods on other worker nodes |
| 172.31.100.0/24 | TCP | 6443 | TCP access from Kubernetes Control Plane |
| 172.31.100.0/24 | TCP | 12250 | Kubernetes worker to control plane communication |
| All NRT Services In Oracle Services Network | TCP | 443 | Allow nodes to communicate with OKE to ensure correct start-up and continued functioning |
| 0.0.0.0/0 | All Protocols | Worker Nodes access to Internet |
5. OKE:クラスタをカスタム構築する
- [Custom create] を選択して、Proceed をクリックしてウィザードに進む
5.1 Create cluster
-
Name
- 任意のクラスタ名を入力
-
Compartment
- 任意のコンパートメントを選択
-
Kubernetes version
- 最新バージョンを選択
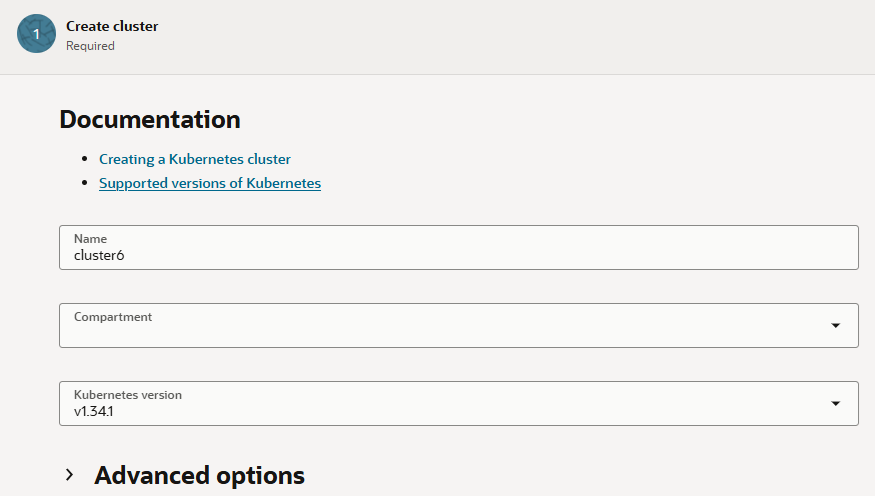
- 最新バージョンを選択
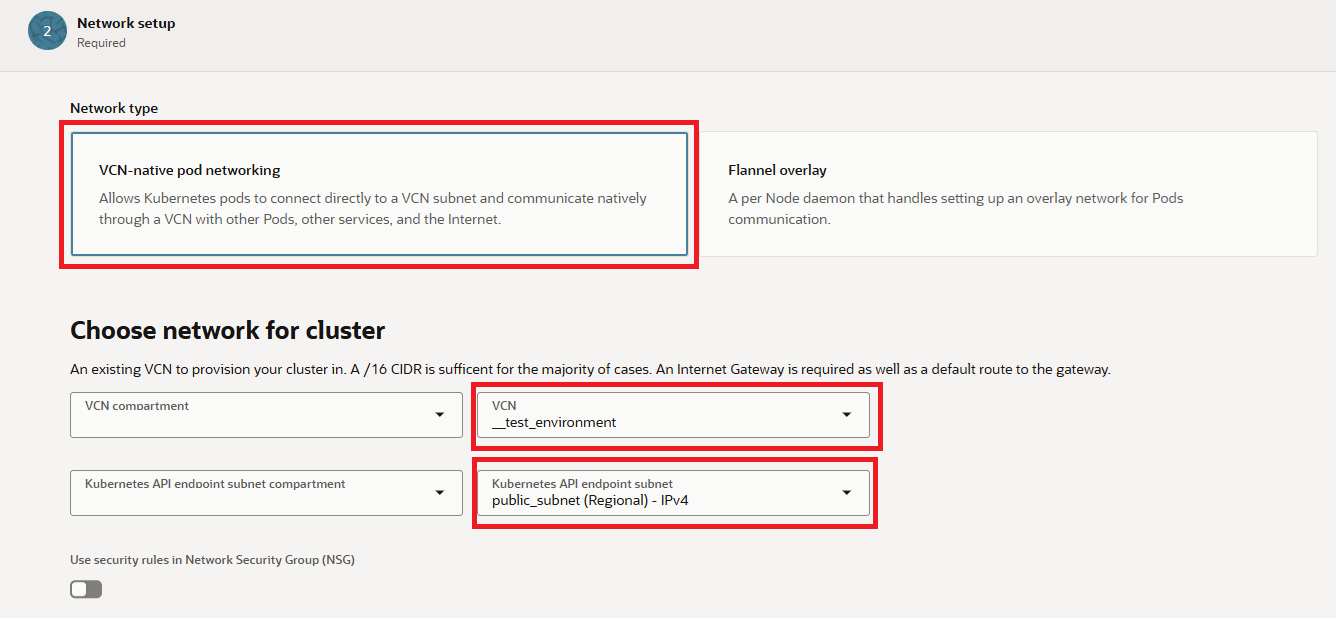
5.2 Network setup
-
Network type
- VCN-native pod networking
-
Choose network for cluster
- [# 4. VCN 設計:Kubernetes を置くネットワーク設定] で作成した VCN を選択
-
Kubernetes API endpoint subnet
- [# 4. VCN 設計:Kubernetes を置くネットワーク設定] で作成した Public Subnet を選択
-
Public IPv4 address assignment for Kubernetes API endpoint
- True にする
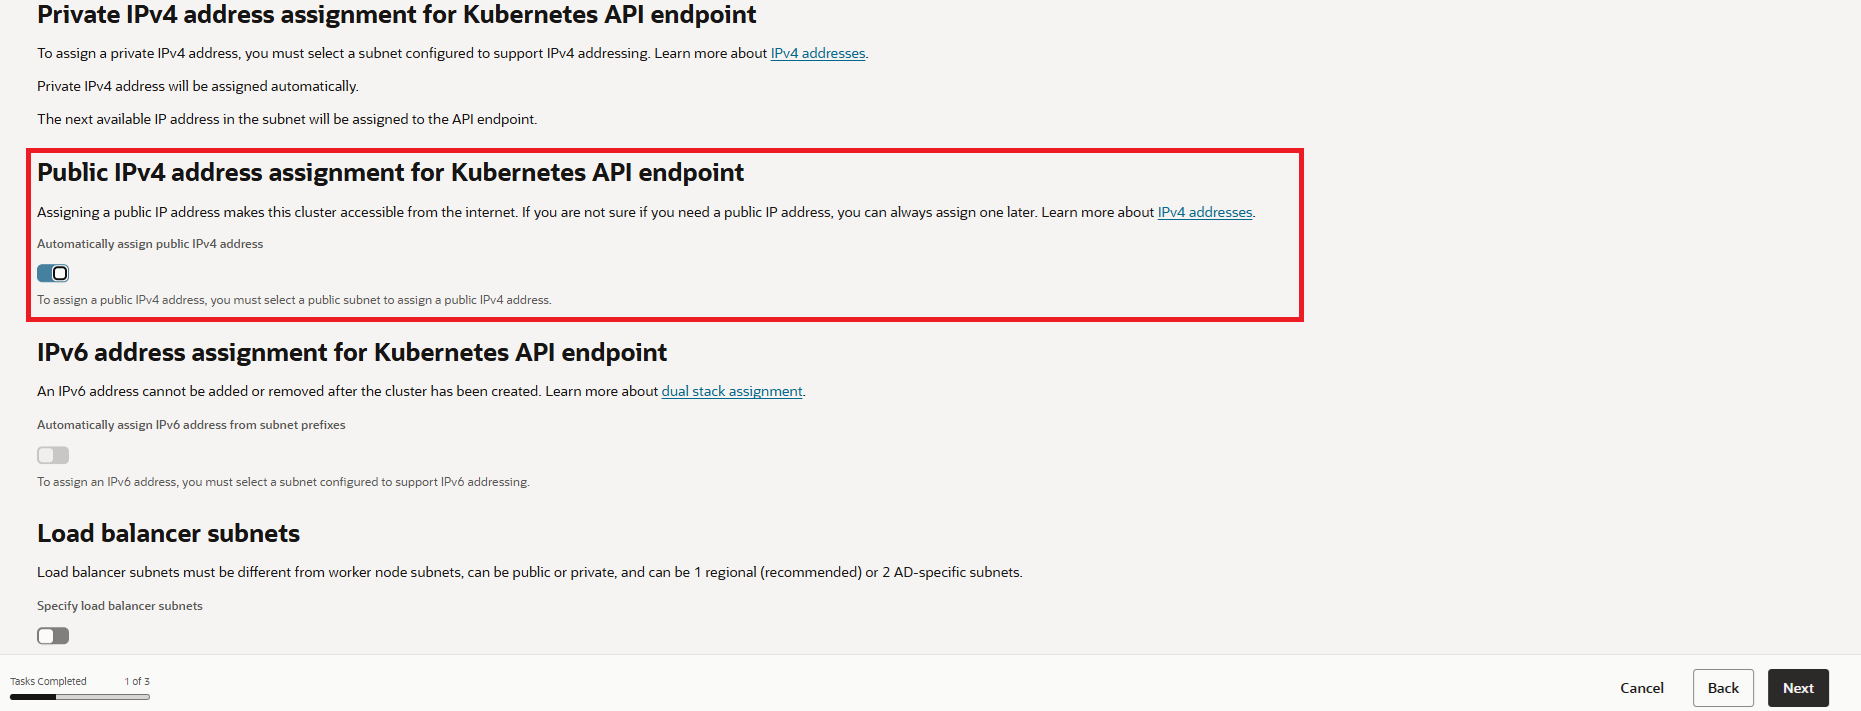
- True にする
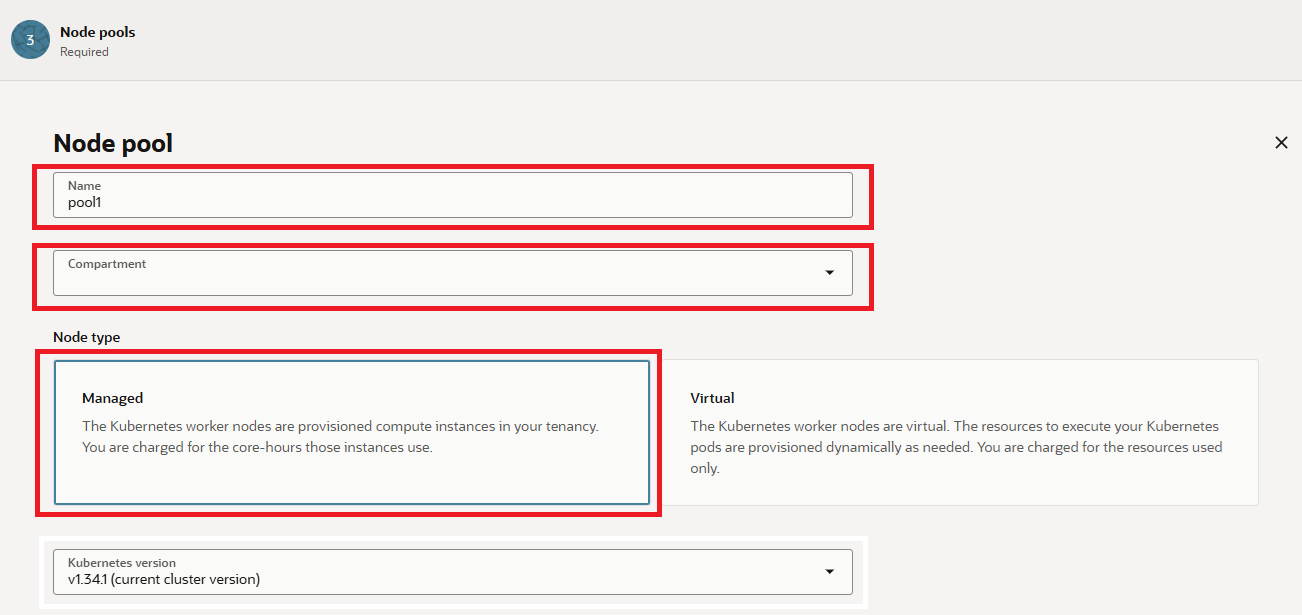
6. Node pool 設定
6.1 Node Pool
-
Name
- 任意のノードプール名を入力
-
Compartment
- 任意のコンパートメントを選択
-
Node Type
- Managed
-
Kubernetes version
- 最新バージョンを選択
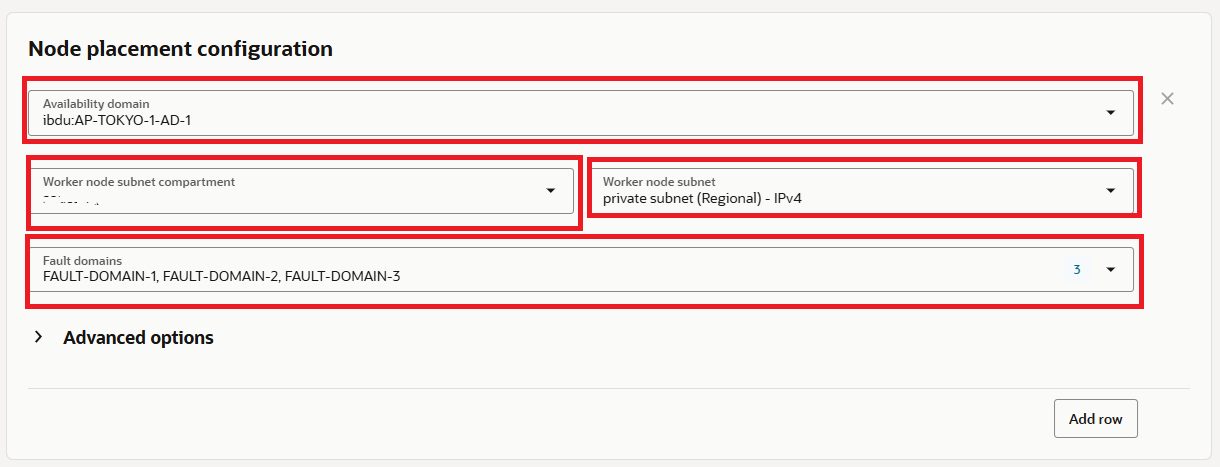
-
Node placement configuration
-
Availability domain
- AP-TOKYO-1-AD-1
-
Worker node subnet compartment
- 任意のコンパートメントを選択
-
Worker node subnet
- [# 4. VCN 設計:Kubernetes を置くネットワーク設定] で作成した Private Subnet を選択
-
Fault domains
- 3つ選択
-
Availability domain
-
Shape and image セクション
- 特に変更なし
-
Node pool options セクション
- 特に変更なし
-
Boot volume セクション
- 特に変更なし
- 特に変更なし
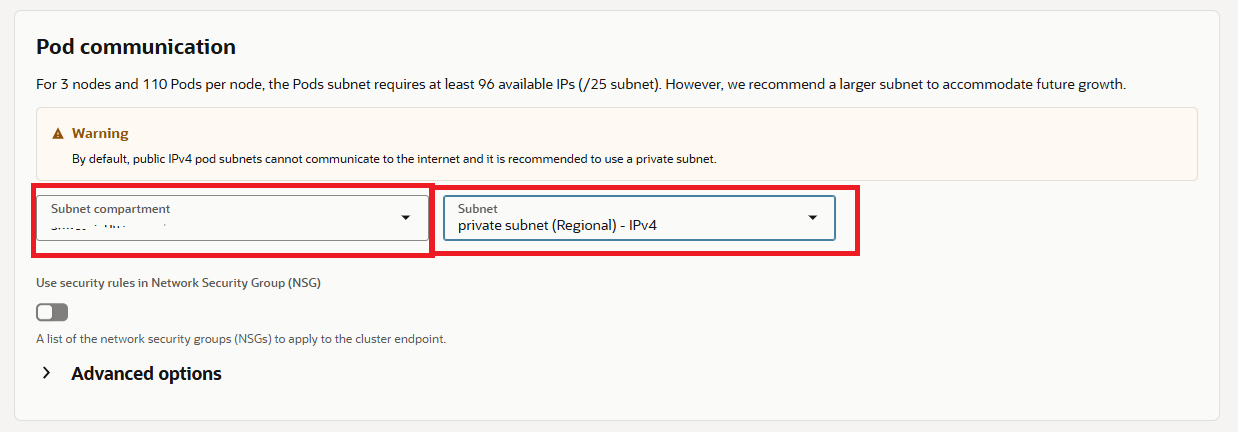
6.2 Pod
-
Pod communication セクション
-
Subnet compartment
- 任意のコンパートメントを選択
-
subnet
- [# 4. VCN 設計:Kubernetes を置くネットワーク設定] で作成した Private Subnet を選択
- [# 4. VCN 設計:Kubernetes を置くネットワーク設定] で作成した Private Subnet を選択
-
Subnet compartment
6.3 Create cluster
- Review and create 画面 まで遷移し、設定内容を確認後に、Create cluster ボタン をクリック
- 確認ダイアログが表示されるので [Create a Basic cluster]をチェックして Continue ボタンをクリック
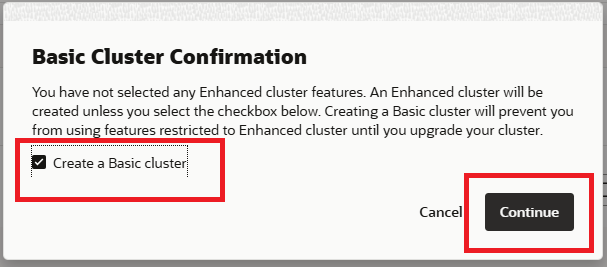
- クラスタ作成が完了するまで10分ほど待つ
7. kubectl 接続確認
7.1 kubeconfig の取得
Cloud Shell で kubectl を実行するための準備をします。
-
OCI で 作成したクラスタ情報を開き、画面上部の [Actions] メニュー から、[Access cluster] を選択します。
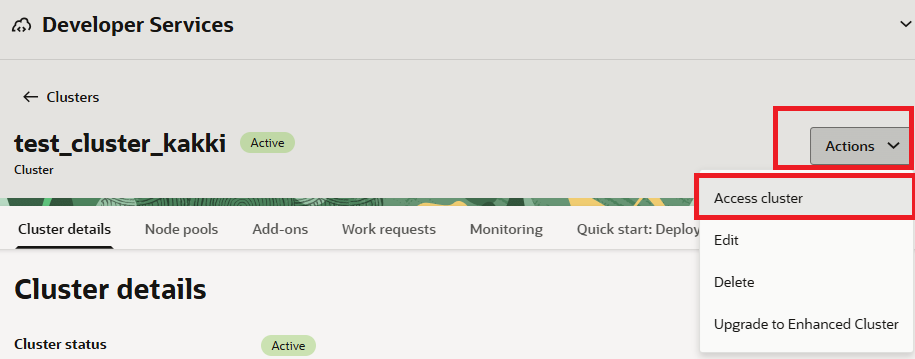
-
Access cluster 画面 で、[Cloud Shell Access] を選択し、[Copy and run the access command]セクション の三点リーダーをクリック後、 [Copy] をクリックします。
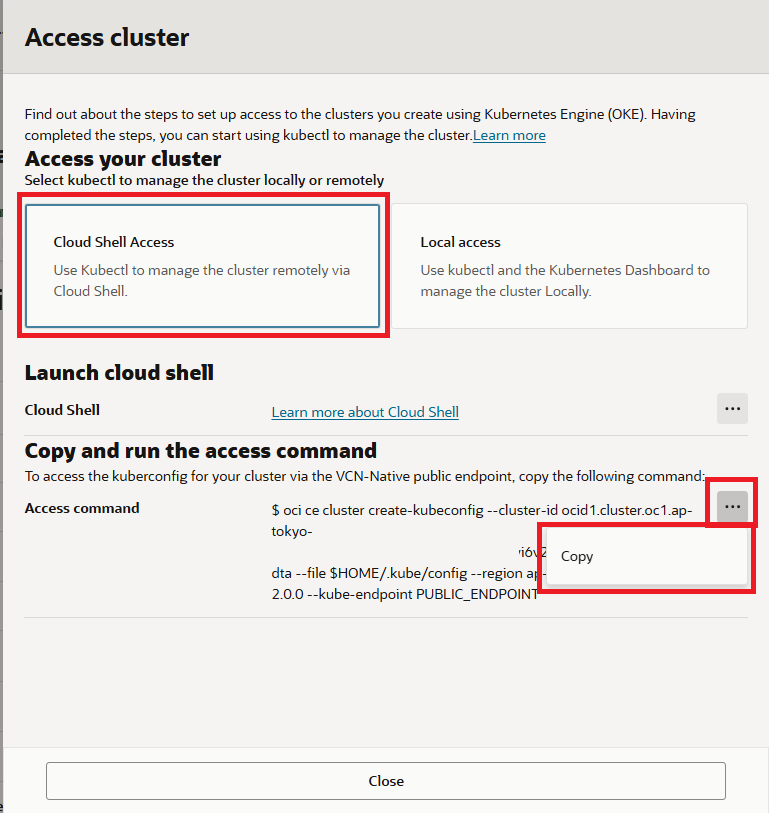
-
Cloud Shell を起動して、コピーしたコマンドを張り付け、実行します。
7.2 動作確認
7.2.1 Nodes 確認
kubectl get nodes
期待する結果:
- nodes が Ready になっていることを確認
NAME             STATUS                     ROLES   AGE     VERSION
172.31.200.112   Ready,SchedulingDisabled   node    3m23s   v1.34.1
172.31.200.197   Ready,SchedulingDisabled   node    3m34s   v1.34.1
172.31.200.56    Ready,SchedulingDisabled   node    3m22s   v1.34.1
7.2.2 Pods 確認
kubectl get pods -A
期待する結果:
- kube-system が正常稼働していることを確認
NAMESPACE     NAME                                  READY   STATUS    RESTARTS   AGE
kube-system   coredns-bc6645466-cqbnm               1/1     Running   0          2m59s
kube-system   coredns-bc6645466-hc6m6               1/1     Running   0          64s
kube-system   coredns-bc6645466-m8jr2               1/1     Running   0          64s
kube-system   csi-oci-node-2fp9g                    1/1     Running   0          100s
kube-system   csi-oci-node-gswjd                    1/1     Running   0          2m10s
kube-system   csi-oci-node-z48fd                    1/1     Running   0          2m21s
kube-system   kube-dns-autoscaler-796dbf7b5-lqh9x   1/1     Running   0          2m59s
kube-system   kube-proxy-b6fmk                      1/1     Running   0          2m21s
kube-system   kube-proxy-nk49d                      1/1     Running   0          100s
kube-system   kube-proxy-sfjqs                      1/1     Running   0          2m10s
kube-system   proxymux-client-d46lk                 1/1     Running   0          2m10s
kube-system   proxymux-client-nkbl7                 1/1     Running   0          2m21s
kube-system   proxymux-client-szkzw                 1/1     Running   0          100s
kube-system   vcn-native-ip-cni-gpxvs               2/2     Running   0          2m21s
kube-system   vcn-native-ip-cni-vk7tj               2/2     Running   0          2m10s
kube-system   vcn-native-ip-cni-zsv89               2/2     Running   0          100s
8. 単純な Web コンテナを起動する(Deployment + Service)
8.1 Namespace 設定
kubectl create namespace demo
8.2 Deployment
- nginx コンテナを起動する
8.2.1 Deploy用 yaml 作成
コンテナイメージを指定するときは、フルパスで指定します。コンテナイメージ名だけだと、pull に失敗することがあります。
apiVersion: apps/v1
kind: Deployment
metadata:
  name: web
  namespace: demo
spec:
  replicas: 1
  selector:
    matchLabels:
      app: web
  template:
    metadata:
      labels:
        app: web
    spec:
      containers:
      - name: nginx
        image: docker.io/nginx:1.27
        ports:
        - containerPort: 80
8.2.2 Deploy を反映
kubectl apply -f deploy.yaml
kubectl -n demo get pods -o wide
期待する結果
NAME                   READY   STATUS    RESTARTS   AGE   IP               NODE            NOMINATED NODE   READINESS GATES
web-5bf7966bbb-xxxxx   1/1     Running   0          25m   172.31.200.119   172.31.200.76   <none>           <none>
8.3 Service (NodePort)
8.3.1 Service用 yaml 作成
apiVersion: v1
kind: Service
metadata:
  name: web
  namespace: demo
spec:
  type: NodePort
  selector:
    app: web
  ports:
  - port: 80
    targetPort: 80
8.3.2 Service を反映
kubectl apply -f service.yaml
kubectl -n demo get svc
期待する結果
NAME   TYPE       CLUSTER-IP      EXTERNAL-IP   PORT(S)        AGE
web    NodePort   10.96.127.186   <none>        80:31557/TCP   24m
8.4 コンテナと疎通確認
8.4.1 Cloud Shell を Private Subnet に接続
- Cloud Shell 画面上部のメニューで Ephemeral private network setup を選択

- Worker Node が配置されている Subnet を選択

- Cloud Shell 画面上部メニューが Network : Ephemeralになることを確認する

8.4.2 サービスにポートフォワード設定する
kubectl -n demo port-forward svc/web 8080:80 &
8.4.3 nginx に curl 疎通確認
curl -I http://127.0.0.1:8080
期待する結果
Handling connection for 8080
HTTP/1.1 200 OK
Server: nginx/1.27.5
Date: Fri, 02 Jan 2026 18:23:30 GMT
Content-Type: text/html
Content-Length: 615
Last-Modified: Wed, 16 Apr 2025 12:01:11 GMT
Connection: keep-alive
ETag: "67ff9c07-267"
Accept-Ranges: bytes
9. お片付け
9.1 ポートフォワード終了
- ポートフォワードしているプロセスを確認
ps -ax
結果
    PID TTY      STAT   TIME COMMAND
      1 pts/0    Ss+    0:00 /bin/bash
    148 pts/1    Ss+    0:00 /bin/bash
    624 pts/2    Ss+    0:00 /bin/bash
   2758 pts/3    Ss     0:00 /bin/bash
   5267 pts/3    Sl     0:00 kubectl -n demo port-forward svc/web 8080:80
   7439 pts/3    R+     0:00 ps -ax
- プロセスを kill
kill 5267
9.2 Service 削除
kubectl delete -f service.yaml
結果
service "web" deleted
9.3 Deployment 削除
kubectl delete -f deploy.yaml
結果
deployment.apps "web" deleted
10. つまずきポイント
特に Security List が間違いやすい
-
kubectl がクラスタへ繋がらない
- Endpoint(Public/Private)、許可IP、セキュリティ設定
-
ノードが Ready にならない
- Node Subnet のルート、NSG、DNS、必要なアウトバウンドを確認
11. まとめ
VNCを構築して、その上に OKE をカスタム構築してコンテナ起動までを確認することができました。
Quick create は便利ですが、既存のVNCにOKEを構築できないのが難点です。今回の手順で、任意のVNCにOKEを構築することができるので、この手順を基礎にして、少しずつ拡張してWebサービスを構築できるようになりたいです。
次回予告 (できたらいいな)
- LoadBalancer を使って Internet から コンテナにアクセス
- Olacle Identity Domain を使ったアクセス制限