
はじめに
この記事では、FlutterからPyTorchの学習済みモデルを利用して、クラシフィケーション (画像分類) を行うiOS向けサンプルアプリを紹介します。
実装は、PyTorch公式で紹介されているiOS向けサンプルプロジェクトを参考に、一部コードをFlutterアプリに移植する形で行います。Pub DevにいくつかPyTorch向けパッケージが公開されていますが、今回こちらは利用しません。
アプリからPyTorchの利用は「Dart > Swift > C++ > LibTorch(PyTorch C++ライブラリ) 」というフローで行うため、今回はDartだけでなくPythonやSwift、Objective-Cのコーディングも行います。
今回は各言語やライブラリ、実装についての詳解はせず、実装例を手短に紹介していきます。
事前に、FlutterとPythonの開発環境構築と、iOSアプリの実機ビルドのための設定が必要です。
今回はクラシフィケーションの学習済みモデルを利用しますが、自前で学習したPモデルなども正しく推論できることを確認しています。
ソースコードはこちら。
完成イメージ
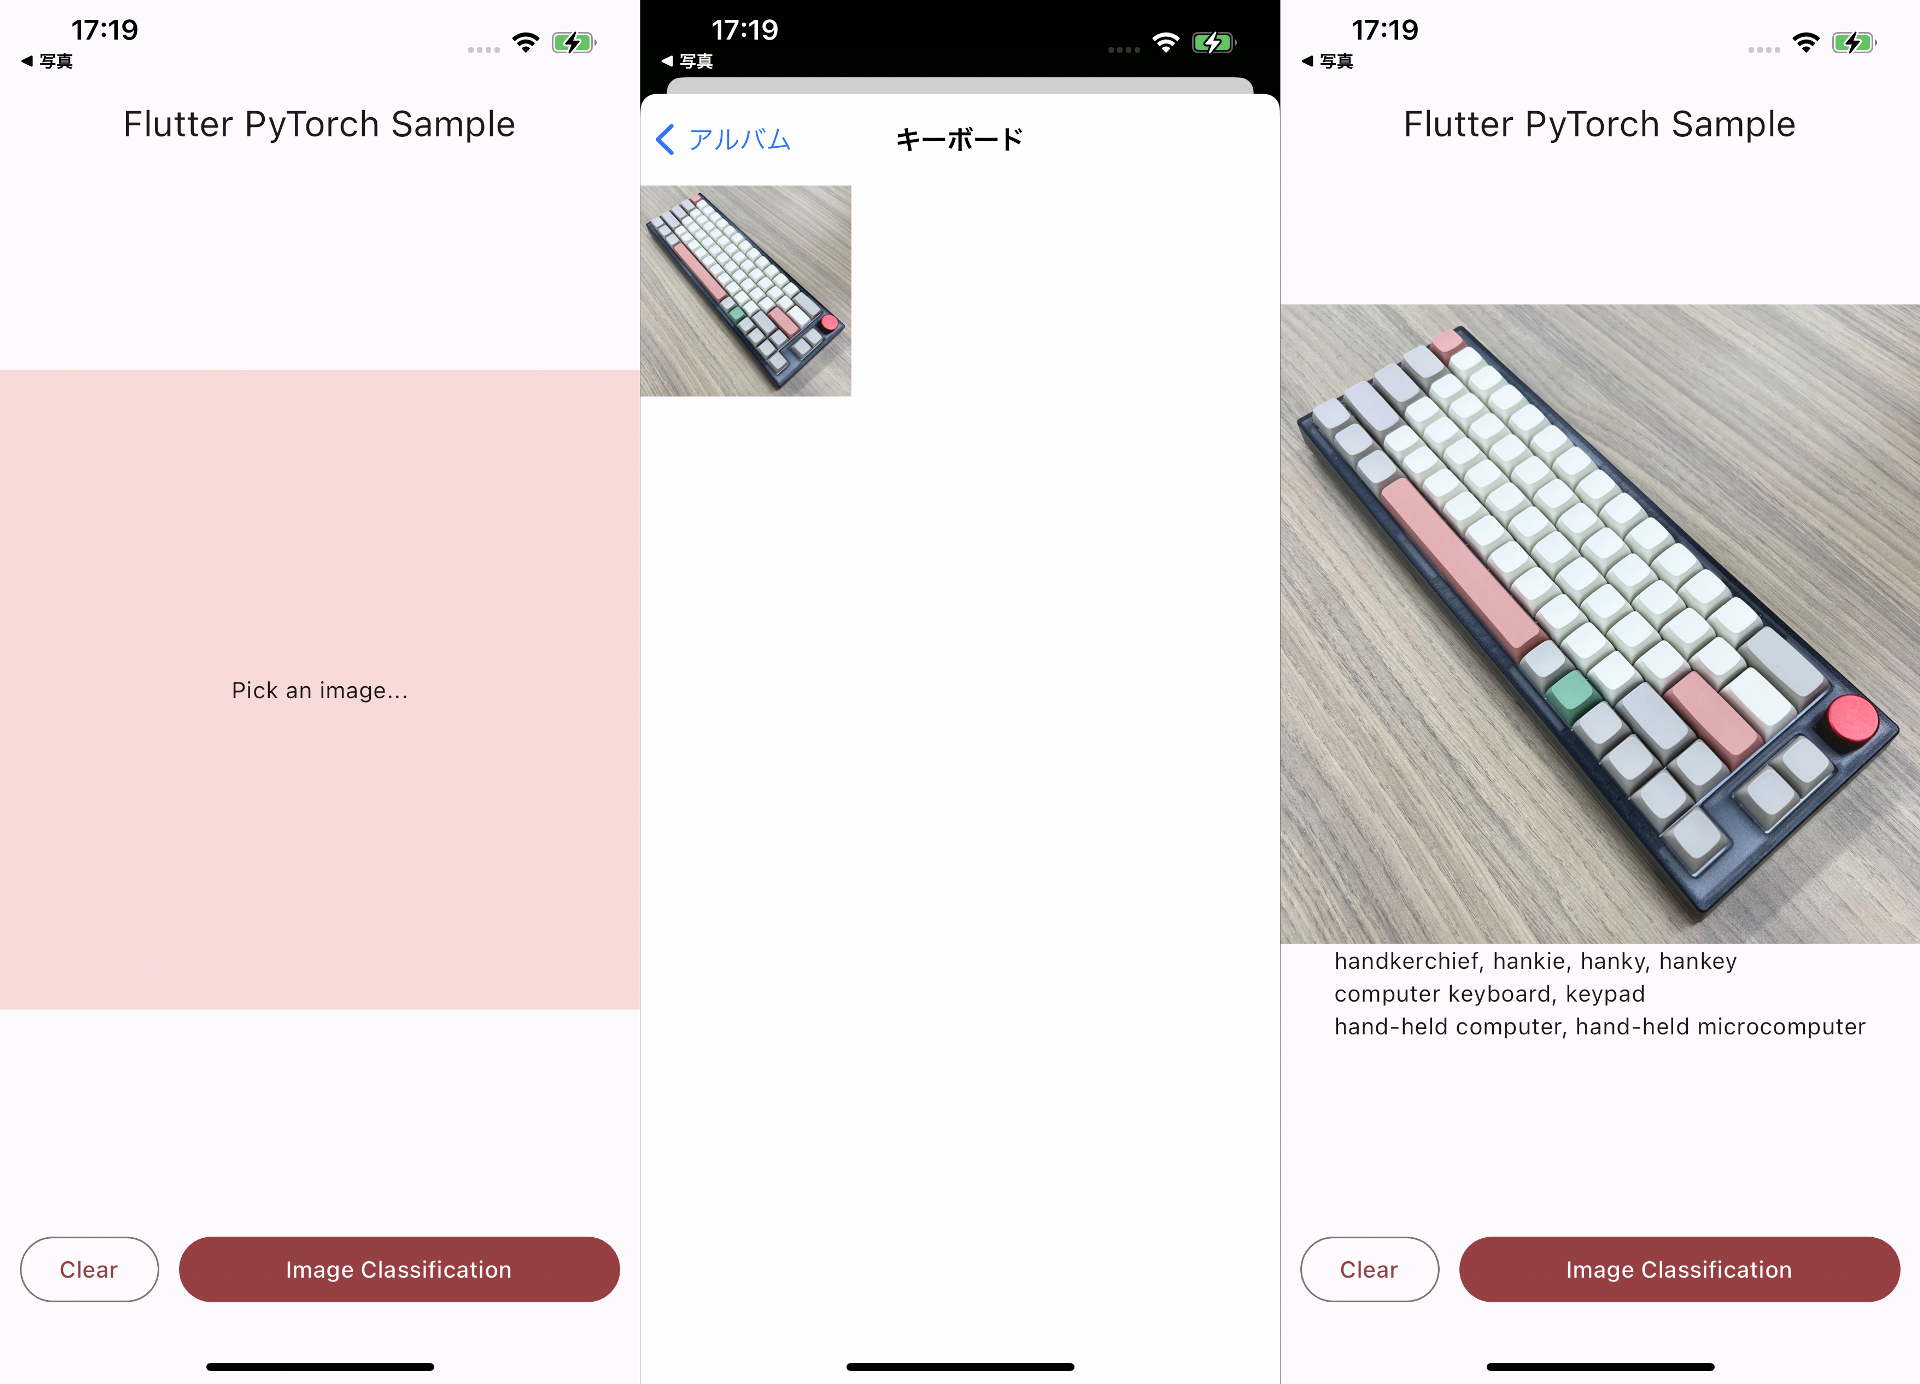
画面も機能も非常にシンプルで、画像を選択したらクラシフィケーションの推論結果 (その画像が何を写しているか) がテキストで表示されます。
開発環境
- macOS: 13.3.1
- Python: 3.7.16 <- 注意
- PyTorch: 1.9.1 <- 注意
- Flutter: 3.13.0
- Xcode 14.3.1
私の環境でPyTorch 1.9 より上では、ここで作成したモデルファイルが正常に推論できないことを確認しました。PyTorchの以前のバージョンを使う場合、合わせてPythonも対応するバージョンを利用する必要がある点にも注意してください。
0. Flutterプロジェクトの作成
今回はPythonコードを含め、すべてのコードやファイルはFlutterプロジェクト下に配置するため、最初にFlutterプロジェクトを作成します。
- Flutterは
3.13.0を利用- 3系であれば変わらず利用できると思います
- Flutterバージョン管理にはFVMを利用
- 必須ではないが、利用推奨
- 利用しない場合は、
fvm flutterコマンドをすべてflutterに置き換えてください
- 対応プラットフォームはiOSのみ
- こちらを参考にしてAndroid対応もできると思いますが、未検証です
- アプリ名は
flutter-pytorch-sampleとします
fvm use 3.13.0
fvm flutter create --platforms ios flutter-pytorch-sample
1. 学習済みモデルの作成
アプリ内で利用するPyTorchの学習済みモデルの.ptファイルを作成します。モデル自体は学習済みで配信されているものをTorchVisionから利用します。
ここではモデルをモバイル用に最適化し.ptファイルを生成する処理の実装と、実際のファイル生成を行います。
1-1. Python, PyTorch環境構築
- Python
3.7をインストール※ M1など新しいmacを利用の場合はこちらなどを参考にして、brew install python@3.73.7をインストールしてください。これより新しいPythonや対応のPyTorchバージョンでは、今回のサンプルコードや公式のHelloWorldの実装で正しくモデルファイルを生成することができないようなので注意してください。 -
lib/python/を作成 -
lib/python/下にPython仮想環境の作成&有効化cd lib/python python3.7 -m venv venv source venv/bin/activatelib/python/venv/が生成される - 仮想環境にpipパッケージのインストール
-
lib/python/requiremants.txtを作成requirements.txttorch==1.9.1 torchvision==0.10.1 - インストール
pip install -r requirements.txt
-
1-2. モデルファイルを作成
-
こちらを参考に
lib/python/python/trace_mode.pyを作成lib/python/python/trace_mode.pyimport torch import torchvision from torch.utils.mobile_optimizer import optimize_for_mobile if __name__ == '__main__': model = torchvision.models.mobilenet_v2(pretrained=True) model.eval() example = torch.rand(1, 3, 224, 224) traced_script_module = torch.jit.trace(model, example) torchscript_model_optimized = optimize_for_mobile(traced_script_module) torchscript_model_optimized._save_for_lite_interpreter('model.pt')入力画像のサイズは224x224 pxで固定し、
optimize_for_mobile()でPyTorch Mobile化しています。 -
モデルの生成
lib/python/から実行する場合の例python python/trace_mode.py-
model.ptが生成されたら一度、デスクトップなどのプロジェクト外に移動 -
ios/をXcodeで開いてから、Runner/Runner/Model/グループを作成 - 作成したグループに、先に生成した
model.ptをXcode経由で取り込む
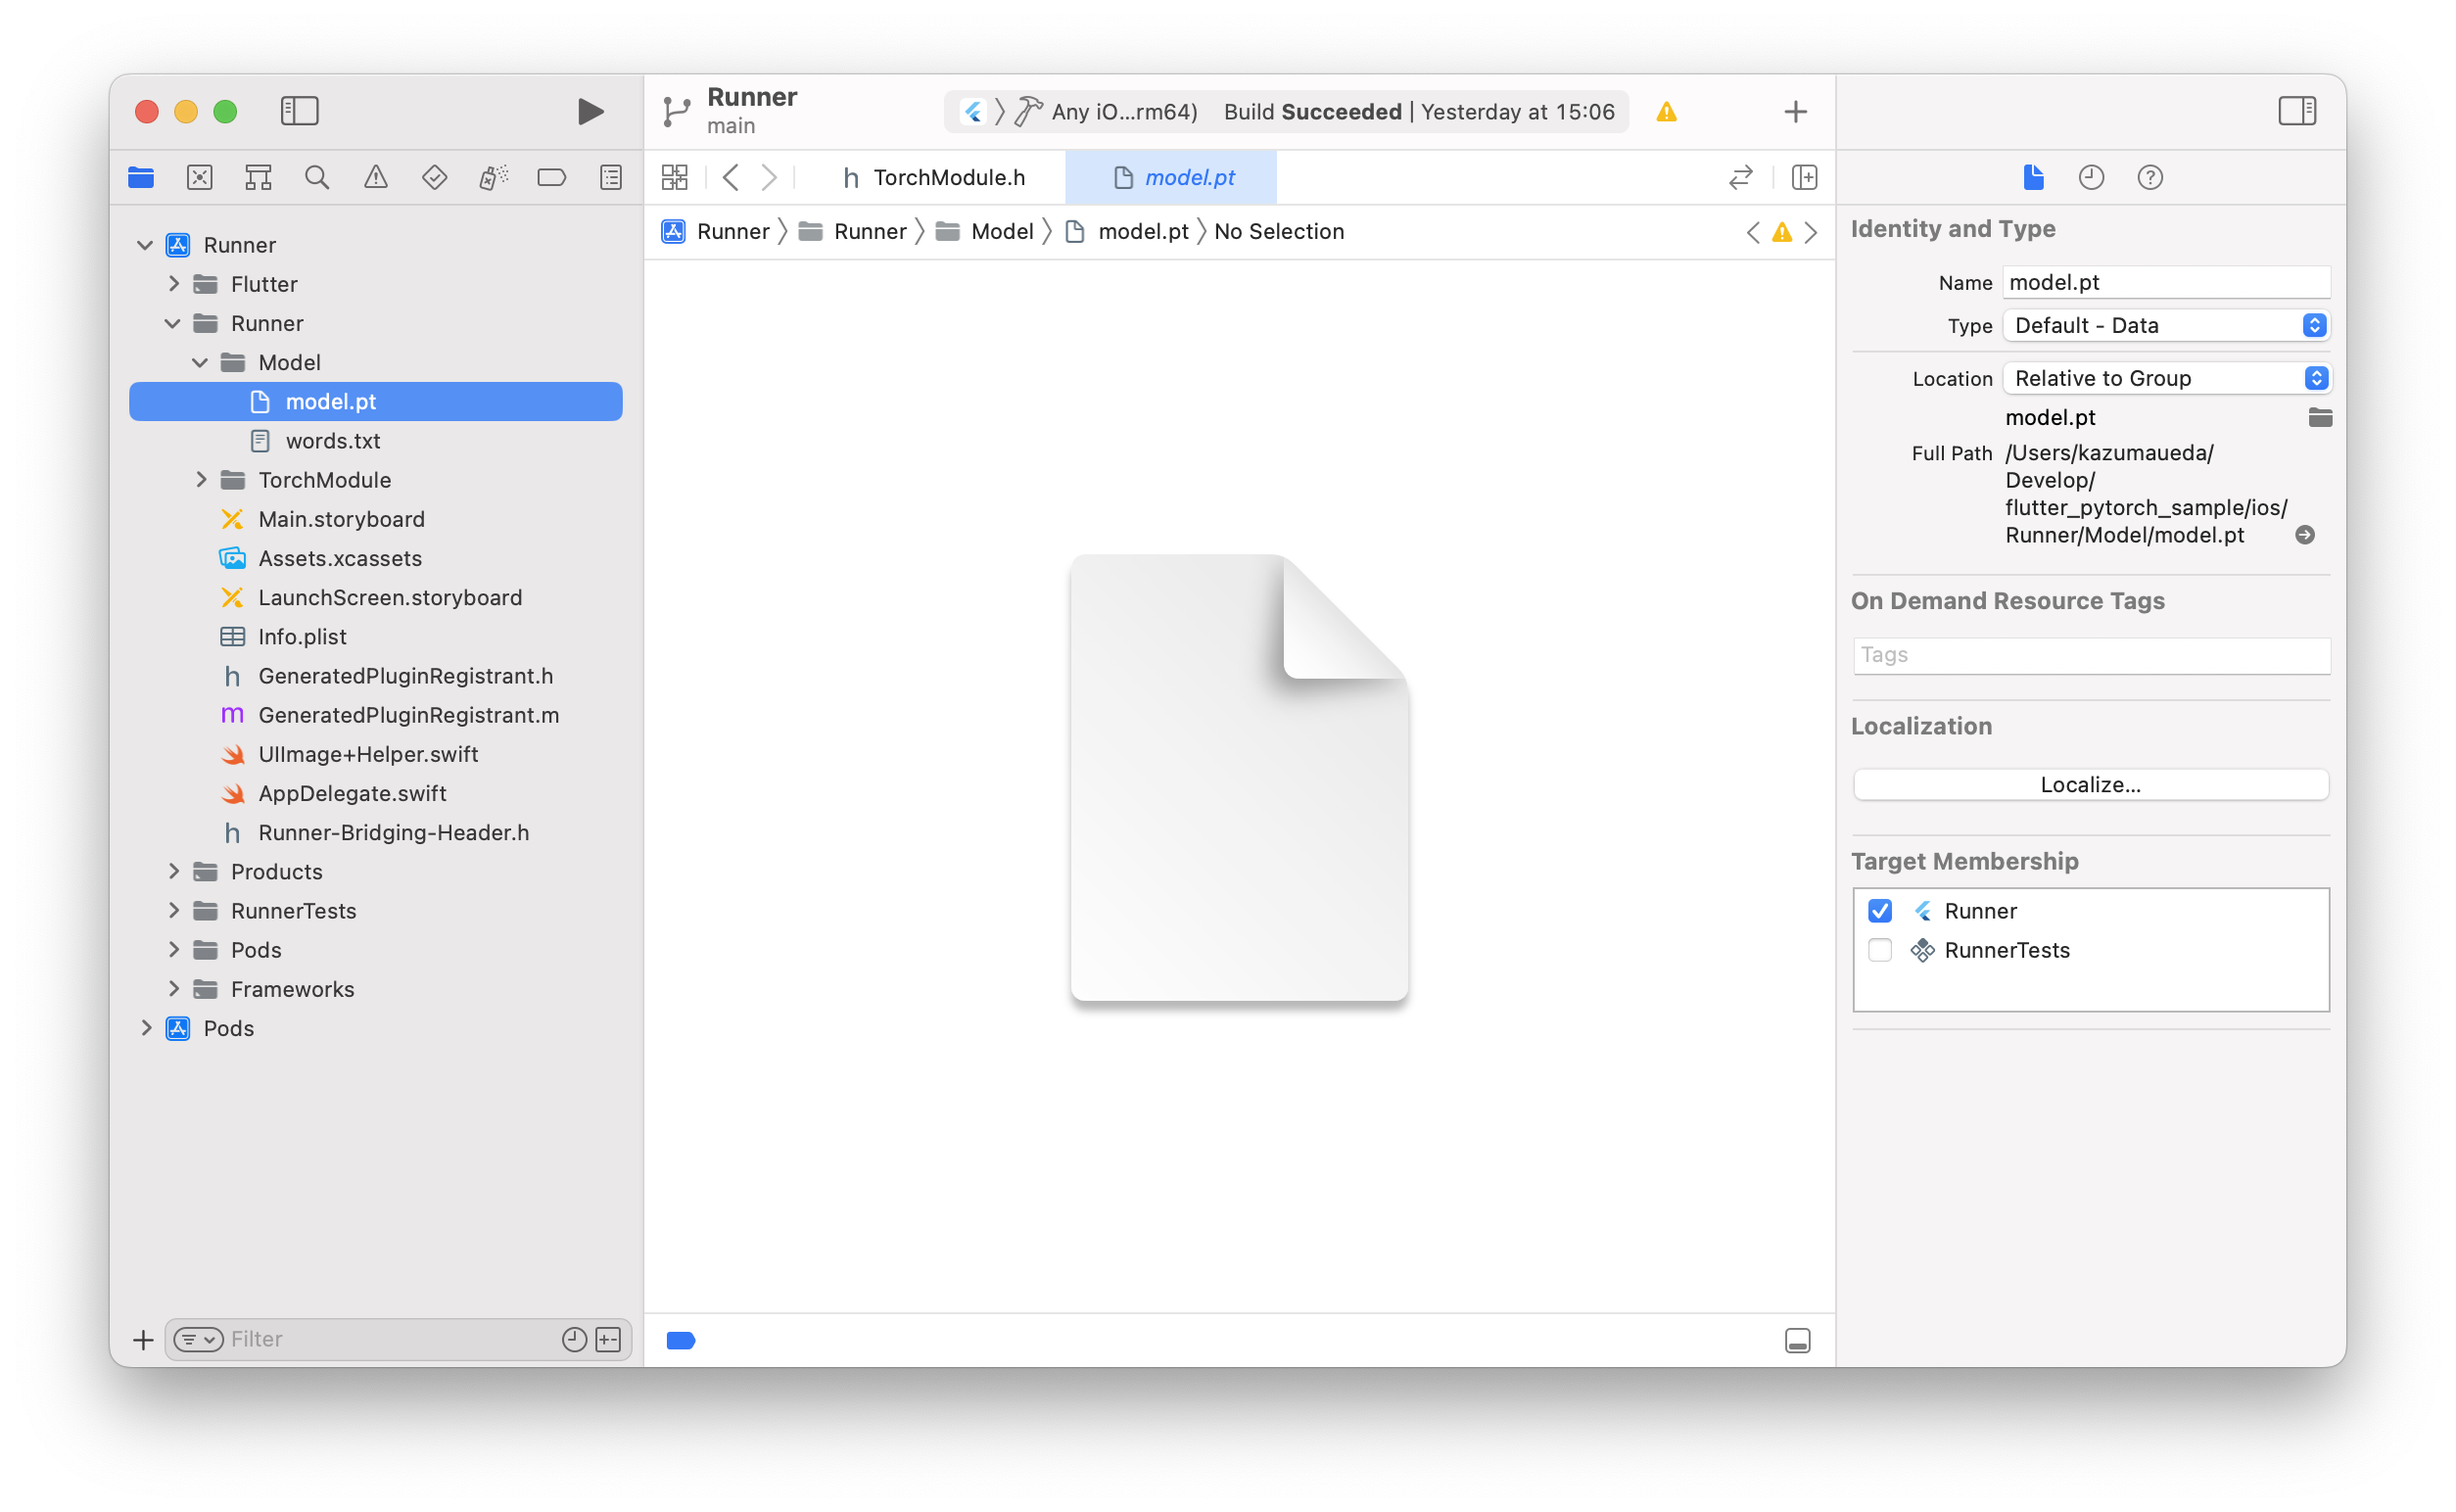
Target MembershipのRunnerにチェックが入っていることを確認してください。
これでSwiftから
.ptファイルが利用できるようになりました。
Pythonの実装はここまでです。 -
-
ラベルファイルの用意
今回作成したモデルは推論結果として
torch.Size([1, 1000])でdtype=torch.float32のTensor (つまり小数1,000個の配列) を返します。この出力が「犬」か「猫」か、またはそれ以外の何を表しているのかは、このラベルファイルと照らし合わせて初めてわかります。
この「照らし合わせる」部分の実装はのちにSwiftで行いますが、ここではラベルファイルの準備をしておきます。-
words.txtをこちらからダウンロードする -
Xcodeで
ios/を開いてRunner/Runner/Model/にwords.txtを配置する
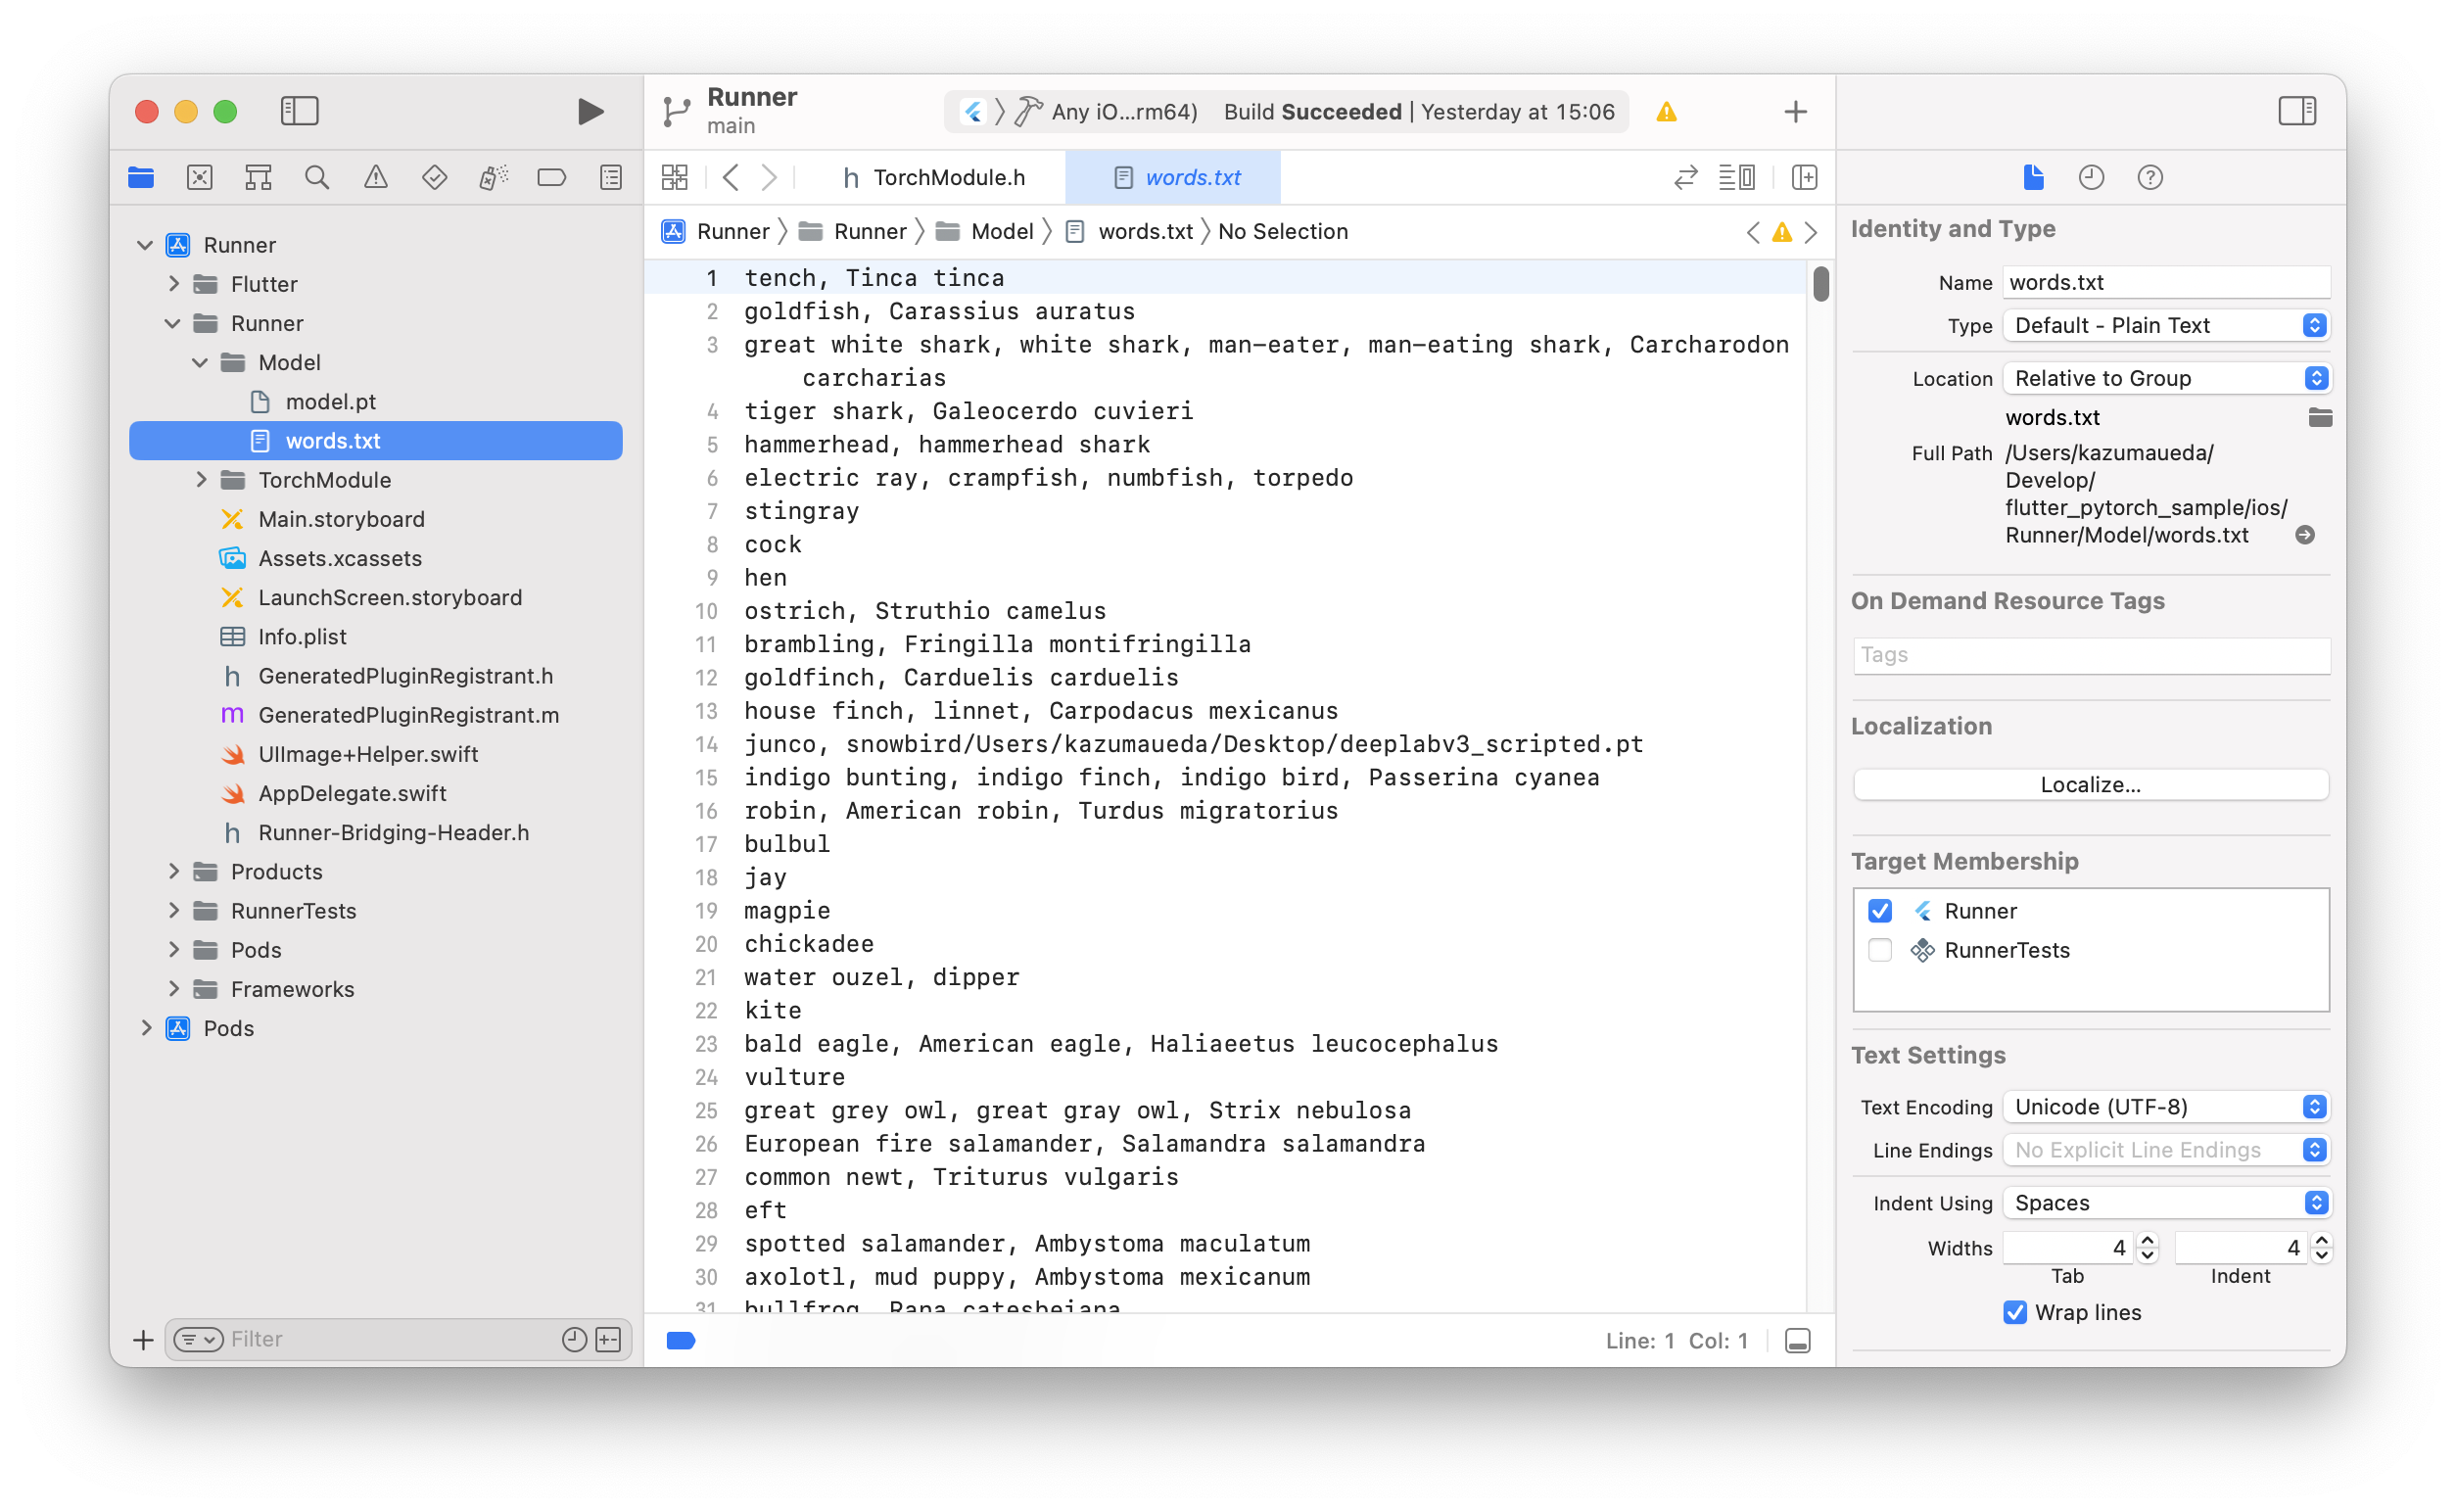
Target MembershipのRunnerにチェックを入っていることを確認してください。
-
2. Swift - C++ブリッジの作成
モバイルからPyTorchで推論を実行するために、LibTorchというC++のライブラリが公式に用意されています。ここではLibTorchをSwift (そしてDart) から利用するためのブリッジを作成します。
2-1. LibTorchインストール
-
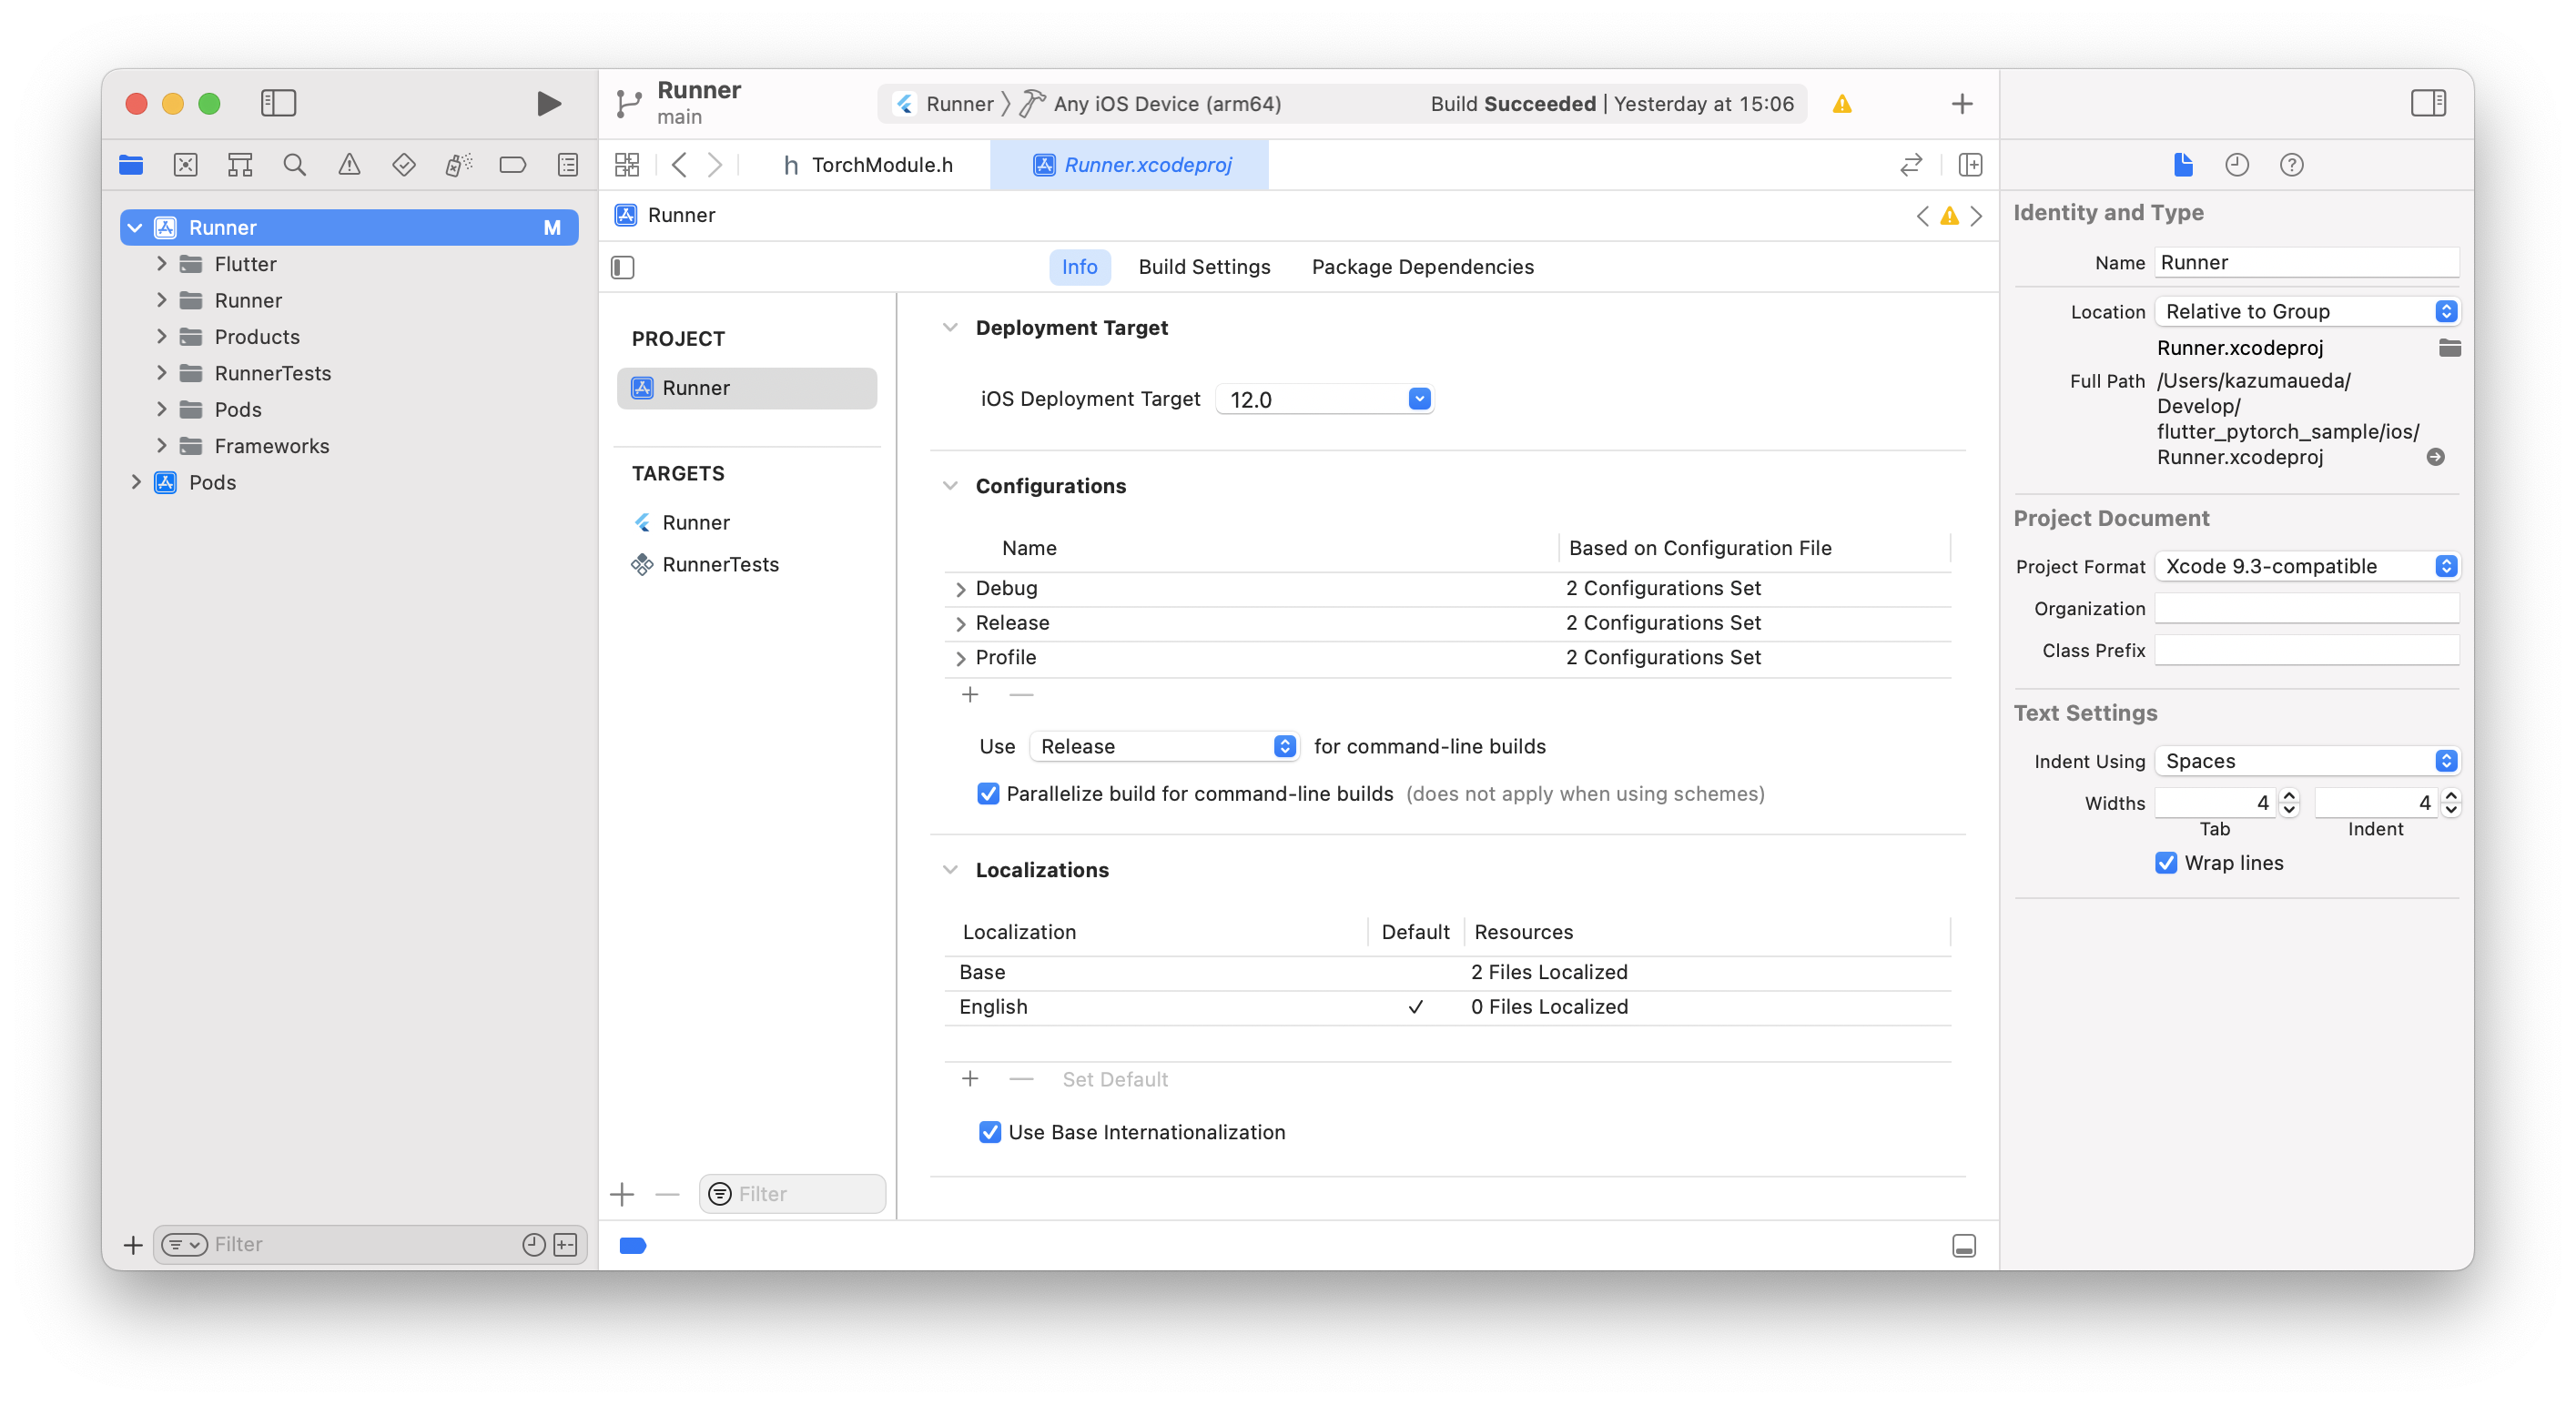
iOS Deployment Targetを12.0以上に変更
-
ios/Podfileを作成
PodfileをFlutterのテンプレートから作成するために、一度flutter runします。fvm flutter run // <- fvmを使用している場合40行ほどの
ios/Podfileが生成されます。 -
LibTorchのインストール
作成されたPodfileにLibTorchを追加し、pod installします。./ios/Podfile# Uncomment this line to define a global platform for your project # platform :ios, '11.0' # ...中略... target 'Runner' do use_frameworks! use_modular_headers! pod 'LibTorch', '~>1.10.0' # <- 追加 flutter_install_all_ios_pods File.dirname(File.realpath(__FILE__)) target 'RunnerTests' do inherit! :search_paths end end # ...以下略...cd ios pod install
2-2. 推論処理の実装とBridge Headerへの追加
- 以下のファイルはすべてXcode上から作成、編集してください
-
AppDelegate.swiftと同階層にグループTorchModule/を作成 -
こちらを参考に、
TorchModule/下にTorchModule.hとTorchModule.mmを作成ios/Runner/TorchModule/TorchModule.h#import <Foundation/Foundation.h> NS_ASSUME_NONNULL_BEGIN @interface TorchModule : NSObject - (nullable instancetype)initWithFileAtPath:(NSString *)filePath NS_SWIFT_NAME(init(fileAtPath:))NS_DESIGNATED_INITIALIZER; + (instancetype)new NS_UNAVAILABLE; - (instancetype)init NS_UNAVAILABLE; - (nullable NSArray<NSNumber *> *)predictImage:(void *)imageBuffer NS_SWIFT_NAME(predict(image:)); @end NS_ASSUME_NONNULL_END入力された画像をTensorに変換して、推論を実行し、その結果を少数の配列で返します。入力としてResize & Normalize済みの画像を受けとる想定になっています。ios/Runner/TorchModule/TorchModule.mm#import "TorchModule.h" #import <LibTorch/LibTorch.h> @implementation TorchModule { @protected torch::jit::script::Module _impl; } - (nullable instancetype)initWithFileAtPath:(NSString*)filePath { self = [super init]; if (self) { try { _impl = torch::jit::load(filePath.UTF8String); _impl.eval(); } catch (const std::exception& exception) { NSLog(@"%s", exception.what()); return nil; } } return self; } - (NSArray<NSNumber*>*)predictImage:(void*)imageBuffer { try { at::Tensor tensor = torch::from_blob(imageBuffer, {1, 3, 224, 224}, at::kFloat); torch::autograd::AutoGradMode guard(false); at::AutoNonVariableTypeMode non_var_type_mode(true); auto outputTensor = _impl.forward({tensor}).toTensor(); float* floatBuffer = outputTensor.data_ptr<float>(); if (!floatBuffer) { return nil; } NSMutableArray* results = [[NSMutableArray alloc] init]; for (int i = 0; i < 1000; i++) { [results addObject:@(floatBuffer[i])]; } return [results copy]; } catch (const std::exception& exception) { NSLog(@"%s", exception.what()); } return nil; } @end
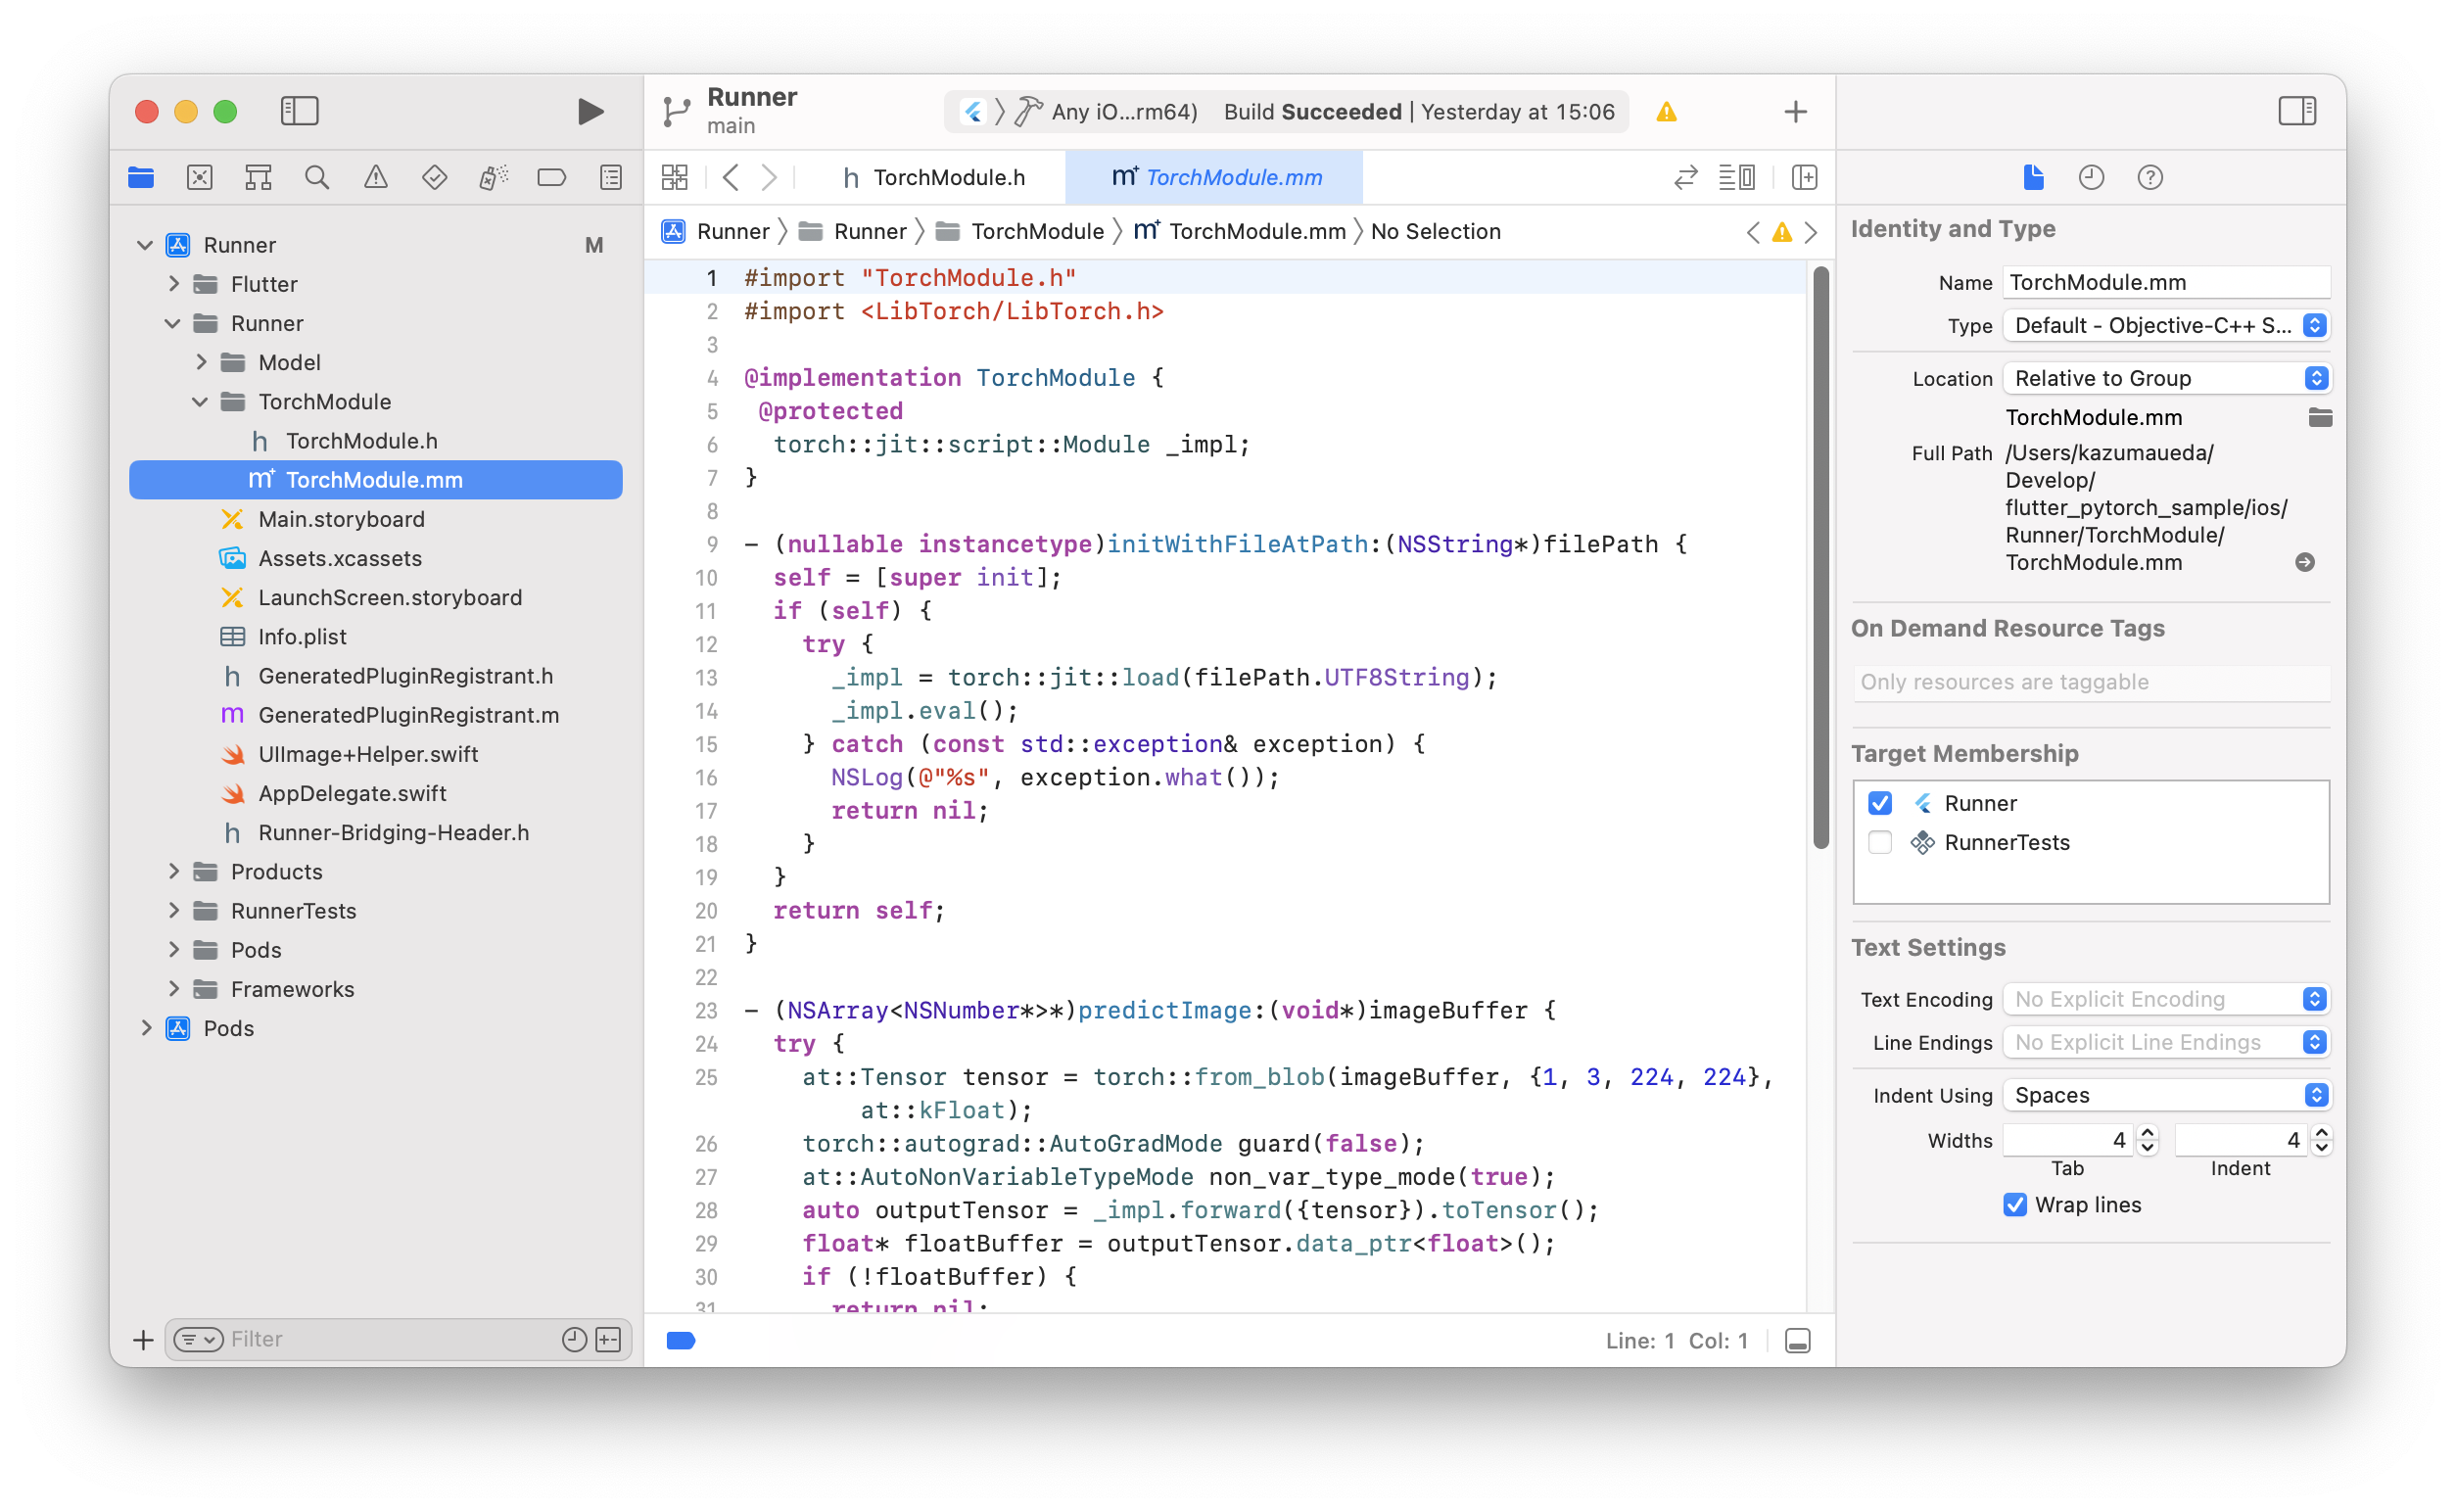
TorchModule.mmのTarget MembershipのRunnerにチェックを入っていることを確認してください。 - Bridging Headerに
TorchModuleの追加VSCodeでC++関係のエラー文が出て消えない場合は、Runner/Runner/Runner-Bridging-Header.h#import "GeneratedPluginRegistrant.h" #import "TorchModule.h".vscode/settings.jsonに"C_Cpp.errorSquiggles": "disabled"を追記しましょう。
C++の実装はここまでです。
3. Swiftの実装
上記で実装した推論処理にSwiftから画像を送り、またSwiftで推論結果を受け取る実装をします。
3-1. 画像のResize & Normalizeメソッドの実装
- 以下のファイルはXcode上から作成、編集してください
-
こちらを参考に、モデルに合わせて入力画像をResize & Normalizeするメソッドを実装します
Runner/Runner/UIImage+Helper.swift
import UIKit

extension UIImage {
    func resized(to newSize: CGSize, scale: CGFloat = 1) -> UIImage {
        let format = UIGraphicsImageRendererFormat.default()
        format.scale = scale
        let renderer = UIGraphicsImageRenderer(size: newSize, format: format)
        let image = renderer.image { _ in
            draw(in: CGRect(origin: .zero, size: newSize))
        }
        return image
    }

    func normalized() -> [Float32]? {
        guard let cgImage = self.cgImage else {
            return nil
        }
        let w = cgImage.width
        let h = cgImage.height
        let bytesPerPixel = 4
        let bytesPerRow = bytesPerPixel * w
        let bitsPerComponent = 8
        var rawBytes: [UInt8] = [UInt8](repeating: 0, count: w * h * 4)
        rawBytes.withUnsafeMutableBytes { ptr in
            if let cgImage = self.cgImage,
                let context = CGContext(data: ptr.baseAddress,
                                        width: w,
                                        height: h,
                                        bitsPerComponent: bitsPerComponent,
                                        bytesPerRow: bytesPerRow,
                                        space: CGColorSpaceCreateDeviceRGB(),
                                        bitmapInfo: CGImageAlphaInfo.premultipliedLast.rawValue) {
                let rect = CGRect(x: 0, y: 0, width: w, height: h)
                context.draw(cgImage, in: rect)
            }
        }
        var normalizedBuffer: [Float32] = [Float32](repeating: 0, count: w * h * 3)
        // normalize the pixel buffer
        // see https://pytorch.org/hub/pytorch_vision_resnet/ for more detail
        for i in 0 ..< w * h {
            normalizedBuffer[i] = (Float32(rawBytes[i * 4 + 0]) / 255.0 - 0.485) / 0.229 // R
            normalizedBuffer[w * h + i] = (Float32(rawBytes[i * 4 + 1]) / 255.0 - 0.456) / 0.224 // G
            normalizedBuffer[w * h * 2 + i] = (Float32(rawBytes[i * 4 + 2]) / 255.0 - 0.406) / 0.225 // B
        }
        return normalizedBuffer
    }
}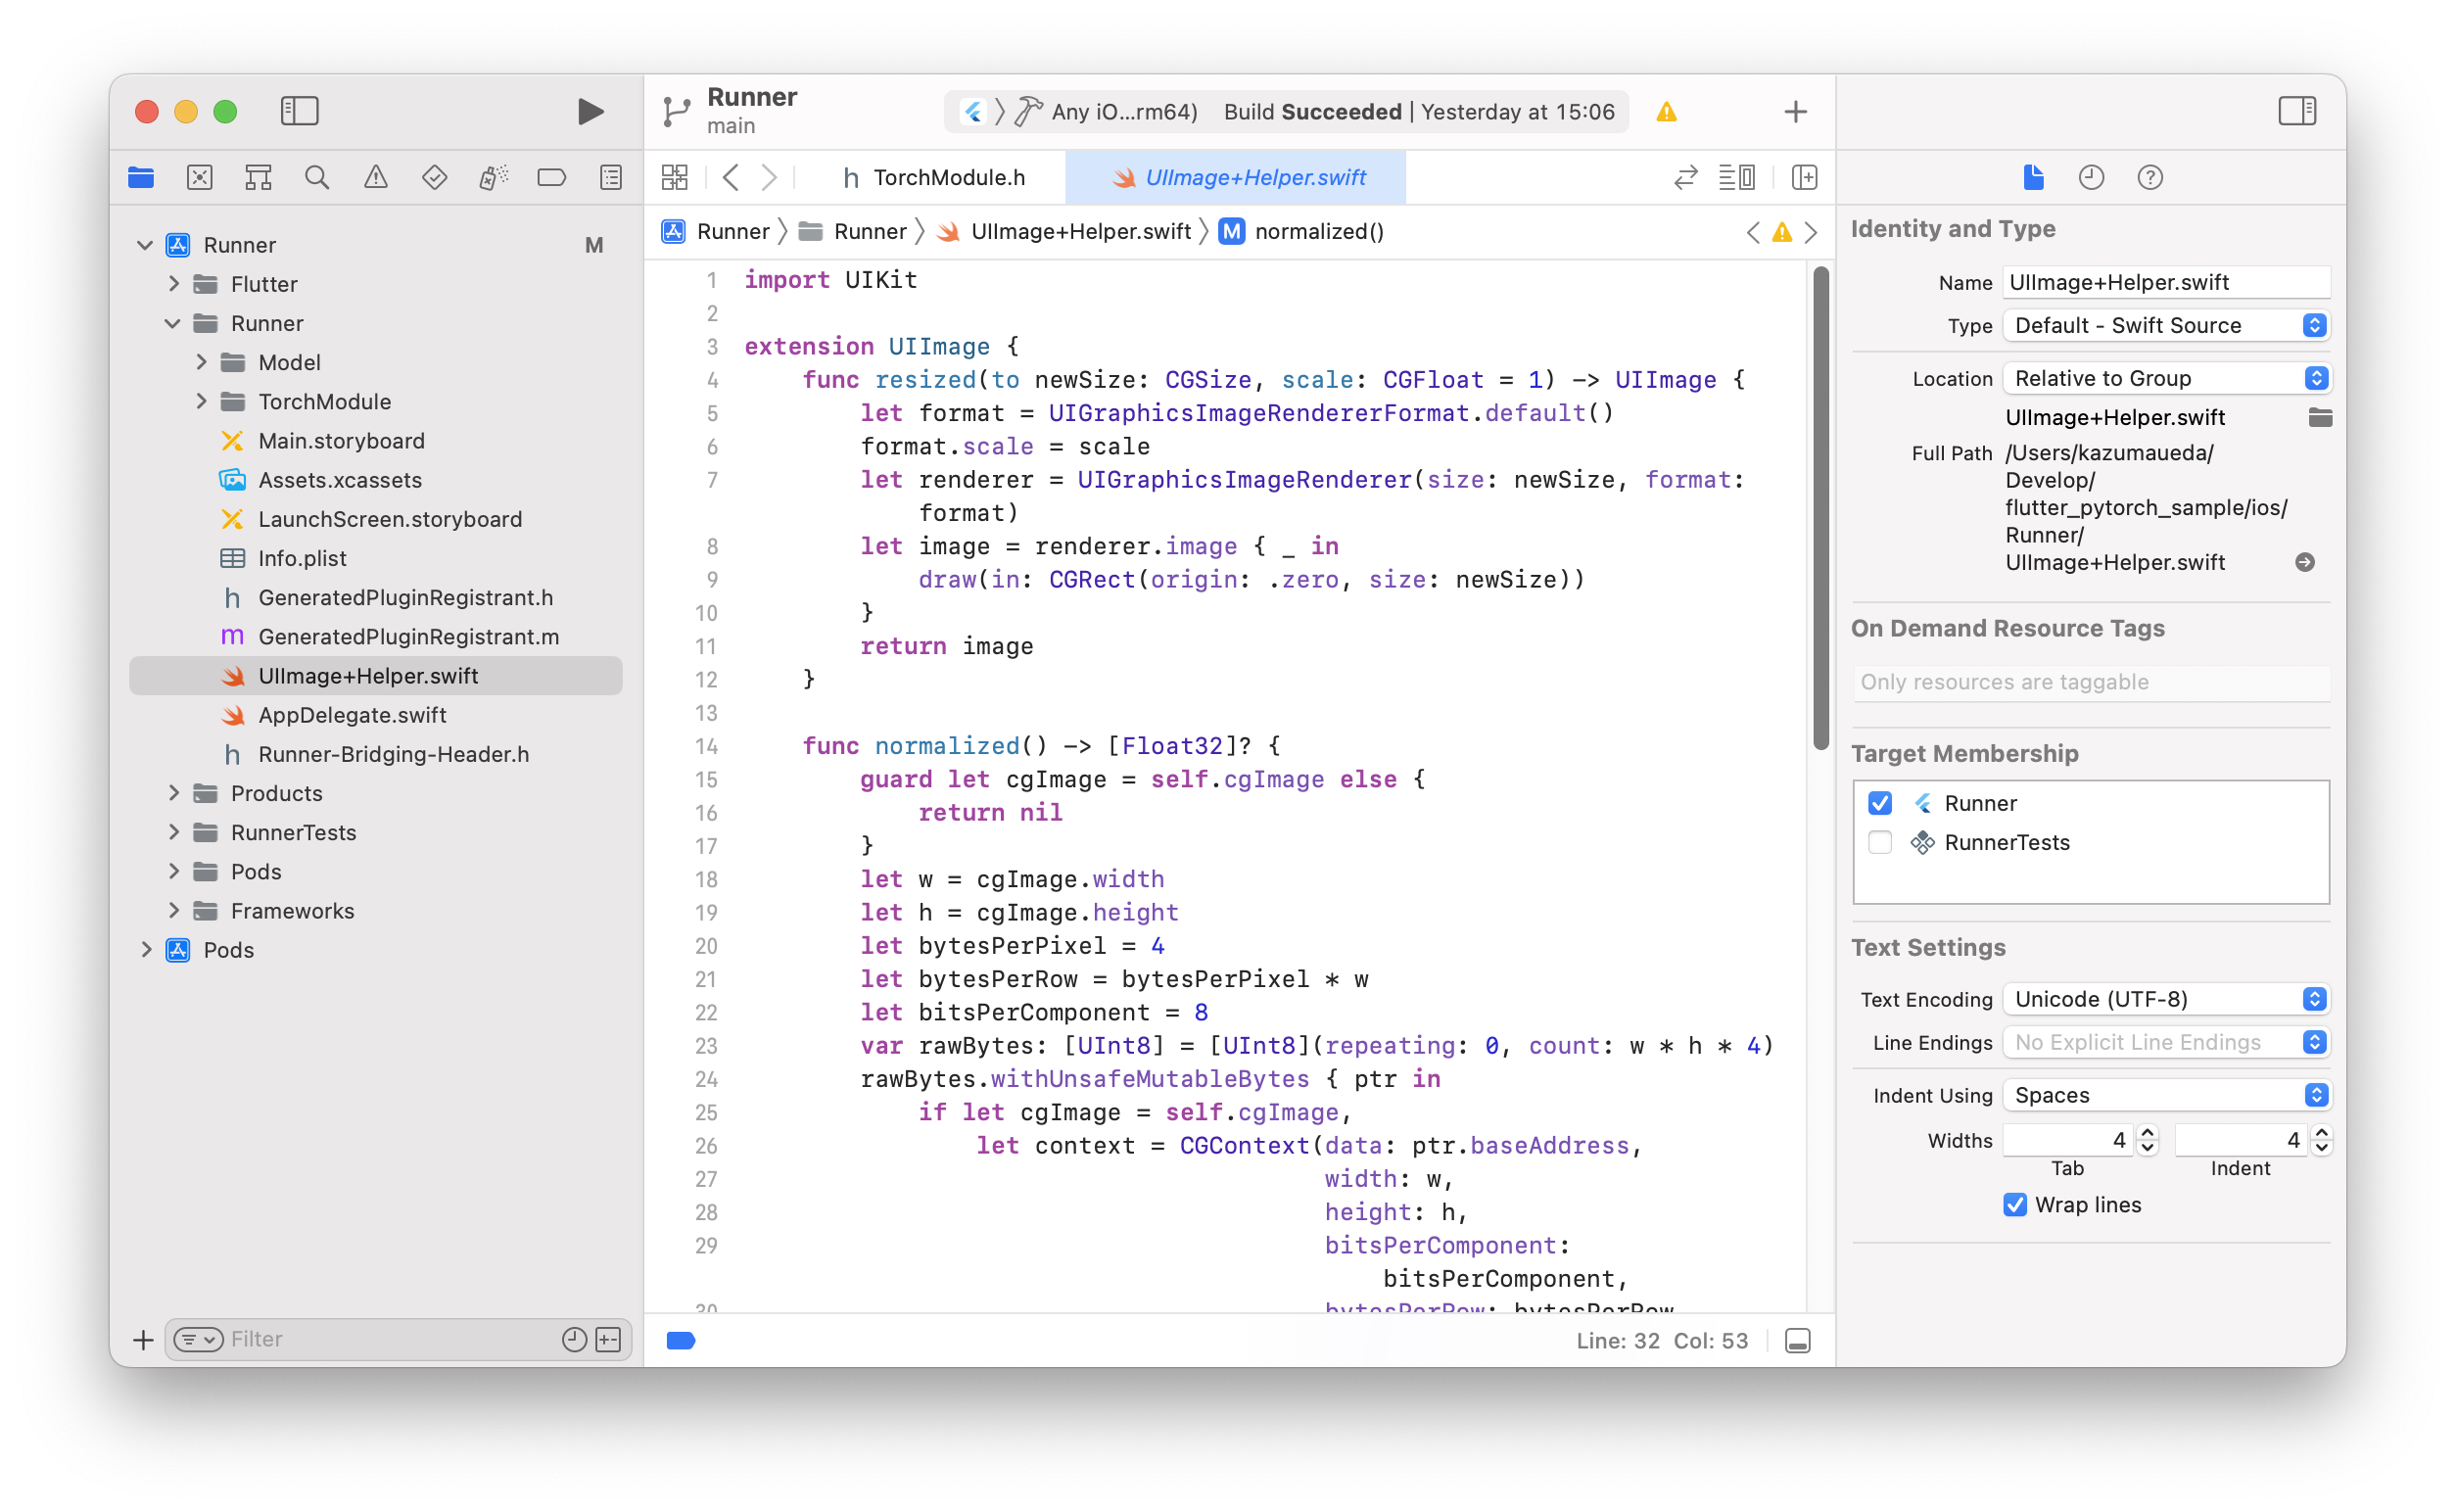
Target MembershipのRunnerにチェックを入っていることを確認してください。
3-2. FlutterMethodChannelの実装
- 以下のファイルはXcode上から編集することをオススメします
- C++で実装した推論メソッドを呼び出すSwift側のメソッドと、またそれにFlutterから呼び出せるようにするための
MethodChannelの実装をします。Runner/Runner/AppDelegate.swiftimport UIKit import Flutter @UIApplicationMain @objc class AppDelegate: FlutterAppDelegate { // クラス分類モデルのロード private lazy var module: TorchModule = { if let filePath = Bundle.main.path(forResource: "model", ofType: "pt"), let module = TorchModule(fileAtPath: filePath) { return module } else { fatalError("Can't find the model file!") } }() // クラスラベルのロード private lazy var labels: [String] = { if let filePath = Bundle.main.path(forResource: "words", ofType: "txt"), let labels = try? String(contentsOfFile: filePath) { return labels.components(separatedBy: .newlines) } else { fatalError("Can't find the text file!") } }() override func application( _ application: UIApplication, didFinishLaunchingWithOptions launchOptions: [UIApplication.LaunchOptionsKey: Any]? ) -> Bool { GeneratedPluginRegistrant.register(with: self) // Flutterメソッドチャンネル let controller: FlutterViewController = window?.rootViewController as! FlutterViewController let methodChannel = FlutterMethodChannel(name: "Channel", binaryMessenger: controller as! FlutterBinaryMessenger) methodChannel.setMethodCallHandler({ (call:FlutterMethodCall, result:FlutterResult) -> Void in let arguments = call.arguments as? [String: Any] switch call.method { case "classify" : result(Classify(arguments)) default : result(nil) } }) // 画像分類 func Classify(_ arguments: [String: Any]?) -> String { let imagePath: String? = arguments?["imagePath"] as? String if imagePath != nil { let image = UIImage(named: imagePath!)! let resizedImage = image.resized(to: CGSize(width: 224, height: 224)) guard var pixelBuffer = resizedImage.normalized() else { return "Error 3" } guard let outputs = module.predict(image: UnsafeMutableRawPointer(&pixelBuffer)) else { return "Error 2" } let zippedResults = zip(labels.indices, outputs // 上位3件を取得 let sortedResults = zippedResults.sorted { $0.1.floatValue > $1.1.floatValue }.prefix(3) // 出力テキスト var text = "" for result in sortedResults { text += "\(labels[result.0])\n" } return text } else { return "Error 1" } } return super.application(application, didFinishLaunchingWithOptions: launchOptions) } }FlutterMethodChannelはFlutterからCallを受け取り、受け取った引数を辞書としてClassify()に流しています。
Classify()は推論の結果から最も確からしいものを3件、テキストで返します。
Swiftの実装はここまでです。
4. Flutterアプリの実装
ここまで出来たら、あとはFlutterに推論メソッドを組み込んで、画像選択や結果の表示などのUIを実装したらアプリの完成です。
4-1. パッケージのインストールと準備
カメラロールからアプリへ画像を取り込むのに、image_pickerを利用します。
(カメラでを利用する実装もimage_pickerだけで簡単に実装可能ですが、ここでは割愛)
-
image_pickerのインストール-
flutter pub getfvm flutter pub add image_picker -
pubspec.yaml確認pubspec.yamldependencies: flutter: sdk: flutter cupertino_icons: ^1.0.2 image_picker: ^1.0.4 # <- 追加される
-
4-2. コントローラーの実装
画面の状態管理や各種メソッドを持つコントローラーを作成します。
(Flutterアプリでの状態管理はRiverpodを使うのが定番ですが、今回は簡単のためビューからsetState()を受け取ってコントローラー内で使う実装をしています)
-
lib/predict_page_controller.dartを作成lib/predict_page_controller.dartimport 'package:flutter/services.dart'; import 'package:image_picker/image_picker.dart'; class PredictPageController { final Function setState; // ページからsetState()を受け取る PredictPageController({required this.setState}); final picker = ImagePicker(); final channel = const MethodChannel('Channel'); XFile? xFile; // 推論する画像ファイル String? label; // 推論結果 var busy = false; // 推論中フラグ // 初期化 void clear() { if (busy) return; // 処理中ガード xFile = null; label = null; setState(); } // 画像選択 Future<void> pickImage() async { if (busy) return; // 処理中ガード busy = true; // 画像選択 final pickedFile = await picker.pickImage(source: ImageSource.gallery); // 無選択ガード if (pickedFile == null) { busy = false; return; } // 画像表示 xFile = pickedFile; setState(); // 推論 await predict(pickedFile); busy = false; } // 推論 Future<void> predict(XFile xFile) async { // Swiftで実装したメソッド呼び出し await channel.invokeMethod( 'classify', {'imagePath': xFile.path}, ).then((result) { // 推論結果表示 label = result.toString(); setState(); }); } }
4-3. UIの実装
基本的にはコントローラーが持っているメソッドを実行し、xFileやlabelを表示するだけのシンプルな実装なので、詳解は割愛します。
-
predict_page.dartを作成するlib/predict_page.dartimport 'dart:io'; import 'package:flutter/material.dart'; import 'predict_page_controller.dart'; class PredictPage extends StatefulWidget { const PredictPage({super.key}); @override State<PredictPage> createState() => _PredictPageState(); } class _PredictPageState extends State<PredictPage> { late PredictPageController pageController; @override void initState() { super.initState(); // コントローラー初期化 pageController = PredictPageController(setState: () => setState(() {})); } @override Widget build(BuildContext context) { return Scaffold( appBar: AppBar( title: const Text('Flutter PyTorch Sample'), ), body: Stack( children: [ // 画像&ラベル Column( children: [ Expanded( child: Container( alignment: Alignment.center, child: SingleChildScrollView( child: Column( children: [ // プレイスホルダー if (pageController.xFile == null) AspectRatio( aspectRatio: 1, child: Container( alignment: Alignment.center, color: Theme.of(context) .colorScheme .secondaryContainer, child: const Text('Pick an image...'), ), ), // 画像 if (pageController.xFile != null) Image.file(File(pageController.xFile!.path)), // 推論結果 if (pageController.label != null) Text(pageController.label!), ], ), ), ), ), // ボタン Container( alignment: Alignment.bottomCenter, padding: const EdgeInsets.all(12), child: SafeArea( child: Row( children: [ OutlinedButton( onPressed: pageController.clear, child: const Text('Clear'), ), const SizedBox(width: 12), Expanded( child: FilledButton( onPressed: pageController.pickImage, child: const Text('Image Classification'), ), ), ], ), ), ), ], ), // プログレス表示 if (pageController.busy) Container( alignment: Alignment.center, color: Colors.black45, child: const CircularProgressIndicator(), ) ], ), ); } }推論実行中は
CircularProgressIndicator()を表示させる実装をしていますが、今回のモデルは非常に軽量なモデルのため、ほとんど表示されません。 -
main.dartにページを実装lib/main.dartimport 'package:flutter/material.dart'; import 'predict_page.dart'; void main() { runApp(const MyApp()); } class MyApp extends StatelessWidget { const MyApp({super.key}); @override Widget build(BuildContext context) { const seedColor = Color.fromARGB(255, 255, 128, 132); return MaterialApp( title: 'Flutter PyTorch Sample', debugShowCheckedModeBanner: false, theme: ThemeData( colorScheme: ColorScheme.fromSeed(seedColor: seedColor), useMaterial3: true, ), home: const PredictPage(), ); } }お好みで
seedColorを変更して、全ての実装が完了です!
5. 実行
実機につないだら、アプリを起動してみましょう
(XcodeからSigningの設定や、実機のデベロッパモードの設定が必要な場合があります)
fvm flutter run
メインのボタンを押したらカメラロールが開いて、画像を選択したらあっという間に推論結果が表示されると思います!
(今回は2行目のcomputer keyboard, keypadが正解ですね…!)
設定ミス等によりカメラロールへのアクセスができない場合や、Swiftの実装などに間違いがあるとクラッシュすることがあります。特にios/下のファイルやグループの操作は間違いが起こりやすいので注意してください。
おわりに
今回は実装が最も簡単なクラシフィケーションを実装しましたが、こちらのセマンティック・セグメンテーションや、自前で学習したモデルでも推論が正しく行えることも確認できています。
PyTorchモバイル化できる学習済みモデルであれば、Flutter x LibTorchで広く利用できそうです。
TensorFlowも公式にFlutter対応していてサンプルアプリも公開されているのですが…
サンプルやその他のチュートリアル含めて、Flutterエンジニアの私にとって、とっつきやすさでは圧倒的にPyTorchに軍配があがるという印象でした!
質問やアドバイスなどあれば、お気軽にコメントしてください^^