この記事で取り扱うSW360のバージョンはとても古いです。以下を参照に最新のバージョンの導入をお勧めします。(2023年追記)
https://www.eclipse.org/sw360/docs/deployment/nativeinstall/
This article is written in Japanese and I am writing an English version now. If you can read English, you can check https://www.eclipse.org/sw360/docs/deployment/nativeinstall
If you have any questions in English, please send SW360 community an email.
sw360-dev@eclipse.org
OSS管理ツール SW360 - オープンソースをオープンソースで管理しよう (1.インストール編) で紹介したインストール方法がSW360のバージョンアップに伴い変更されたので,最新版のインストール方法を別記事として紹介する.ここではSW360のネイティブインストールのみを紹介するが,他のインストール方法も後日紹介する予定.
ここではsw360-4.0.1-M1|commit id (f1acf47)のインストール方法を紹介する.(2019年9月6日時点でLatest release)
(注)投稿数時間前(2019年9月11日)にsw360-5.0.0-M1 | commit id (4c2b66e) がリリースされてました(これが最新のリリース).概ねインストール方法は同じかと思いますが,変更点があれば追記していきます.
(注: 2020/01/07)commit id : ff16072 sw360-5.1.0-M1, commit id : 7326c63 #sw360-6.0.0-M1 ではインストール方法に変更がないことを確認
(注 2020/11/04) Version11 以降は以下を参照
https://qiita.com/K-Hama/items/1582b4e1bf248025eabb
追記:以下で利用方法を記したドキュメントを公開
https://docs.google.com/document/d/1wNV--UhIDiRPP10Hhk0vspiKtoLupug7v2AAu4yxEC8/edit?usp=sharing
誰でも閲覧編集できるので,ご確認ください.
事前準備
ビルドに必要なものは旧バージョンに記載したものと同じなのでそちらを参照.例えば以下のようにJavaなどをインストール&設定を行う.詳細は略.
$ sudo apt install openjdk-8-jdk
$ sudo apt install openjdk-8-jre-headless
$ sudo update-alternatives --config java
$ export JAVA_OPTS='-Dhttp.proxyHost=example.proxy -Dhttp.proxyPort=8080 -Dhttps.proxyHost=example.proxy -Dhttps.proxyPort=8080'
$ sudo apt install maven
CouchDB インストール
CouchDBのバージョンやインストール方法に大きな変更がない.
proxy環境下ではproxy設定を忘れずに
$ export http_proxy="http://proxy.example:port"
$ export https_proxy="http://proxy.example:port"
$ export no_proxy="localhost,127.0.0.1,noproxy_example"
・ CouchDB, at least 1.5(CouchDBは1.6.*, 1.7* でインストール推奨 (2.0.0以降は動作未確認))
CouchDBをソース(version 1.7)からビルド
$ sudo apt install -y libnspr4
$ sudo apt install -y libnspr4-dev libffi-dev
$ sudo apt install -y erlang-base erlang-dev erlang-eunit erlang-nox
$ sudo apt install -y g++ libicu-dev libcurl4-gnutls-dev
$ sudo apt install -y libtool
$ wget http://launchpadlibrarian.net/309343863/libmozjs185-1.0_1.8.5-1.0.0+dfsg-7_amd64.deb
$ wget http://launchpadlibrarian.net/309343864/libmozjs185-dev_1.8.5-1.0.0+dfsg-7_amd64.deb
$ sudo dpkg -i libmozjs185-1.0_1.8.5-1.0.0+dfsg-7_amd64.deb
$ sudo dpkg -i libmozjs185-dev_1.8.5-1.0.0+dfsg-7_amd64.deb
$ sudo apt install -y cpp g++
$ sudo apt install -y libicu-dev
$ wget https://archive.apache.org/dist/couchdb/source/1.7.0/apache-couchdb-1.7.0.tar.gz
$ tar -xzvf ./apache-couchdb-1.7.0.tar.gz
$ cd apache-couchdb-1.7.0
$ ./configure
$ make && sudo make install
インストール完了後,以下のようにコンソールに「リラックス」が表示されていたら成功.
You have installed Apache CouchDB, time to relax.
make[3]: Leaving directory '/home/PATH/apache-couchdb-1.7.0'
make[2]: Leaving directory '/home/PATH/apache-couchdb-1.7.0'
make[1]: Leaving directory '/home/PATH/apache-couchdb-1.7.0'
ユーザ権限を設定し,デーモンで起動できるようにする
$sudo adduser --system \
        --home /usr/local/var/lib/couchdb \
        --no-create-home \
        --shell /bin/bash \
        --group --gecos \
        "CouchDB Administrator" couchdb
$ sudo chown -R couchdb:couchdb /usr/local/etc/couchdb
$ sudo chown -R couchdb:couchdb /usr/local/var/lib/couchdb
$ sudo chown -R couchdb:couchdb /usr/local/var/log/couchdb
$ sudo chown -R couchdb:couchdb /usr/local/var/run/couchdb
$ sudo chmod 0770 /usr/local/etc/couchdb
$ sudo chmod 0770 /usr/local/var/lib/couchdb
$ sudo chmod 0770 /usr/local/var/log/couchdb
$ sudo chmod 0770 /usr/local/var/run/couchdb
$ sudo cp /usr/local/etc/init.d/couchdb /etc/init.d/
$ sudo update-rc.d couchdb defaults
$ sudo systemctl start couchdb.service
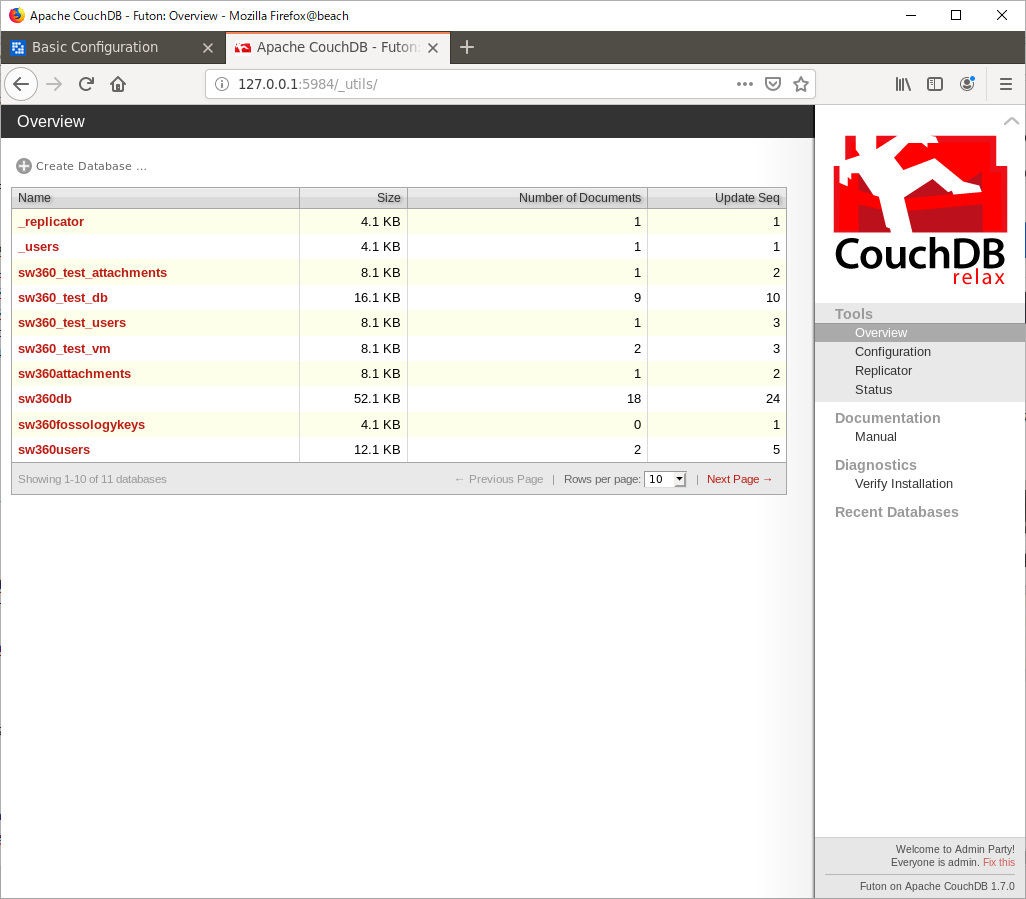
上記がうまくいけば ブラウザから http://127.0.0.1:5984/_utils
以下の画面が表示される

Couchdb-luceneをソースからビルド
$ git clone https://github.com/rnewson/couchdb-lucene.git
$ cd couchdb-lucene
$ mvn
$ cd target
成功するとzipが作成され、中に以下のようなファイルができている

Couchdb-luceneを利用するには上記をzipを展開
$ unzip couchdb-lucene-2.2.0-SNAPSHOT-dist.zip
Couchdb-luceneを起動する前に Couchdbのlocal.iniの設定する。
$ sudo vim /usr/local/etc/couchdb/local.ini
以下を追記(33行目)[httpd_global_handlers]に追記
_fti = {couch_httpd_proxy, handle_proxy_req, <<"http://127.0.0.1:5985">>}

上記の設定が完了したらCouchdbを再起動
$ sudo systemctl start couchdb.service
Couchdb-luceneを先ほど展開したzipの中にあるrunを実行させる。その後SW360を起動させる。
- マシンを再起動したときはもう一度runするか、予め自動で起動するように設定しておく
# Couchdb-lucene起動
$ cd /PATH/couchdb-lucene/target/couchdb-lucene-2.2.0-SNAPSHOT/bin
$ nohup ./run &
Couchdb-lucene をsystemctlで起動をしたいとき付属のinit.dファイルを使えばよい
$ sudo systemctl stop couchdb.service
$ cd /PATH/TO/couchdb-lucene/target/couchdb-lucene-2.2.0-SNAPSHOT/tools/etc/init.d/couchdb-lucene
$ vi couchdb-lucene
# DAEMON=/PATH/TO/couchdb-lucene/target/couchdb-lucene-2.2.0-SNAPSHOT/bin/run に書き換え
$ sudo cp couchdb-lucene /etc/init.d/
$ sudo /etc/init.d/couchdb-lucene start
$ sudo systemctl start couchdb-lucene
$ sudo systemctl start couchdb.service
Apache Thrift インストール
バージョンが上がっている.必要に応じ旧バージョンを消して,Apache Thrift 0.11.0 インストールする.SW360以外にThriftを利用する場合はconfigureオプションを適宜変更する必要がある.
$ sudo apt install -y build-essential libboost-dev libboost-test-dev libboost-program-options-dev libevent-dev automake libtool flex bison pkg-config g++ libssl-dev
$ wget http://archive.apache.org/dist/thrift/0.11.0/thrift-0.11.0.tar.gz
$ tar -xzf thrift-0.11.0.tar.gz
$ cd thrift-0.11.0
$ ./configure --without-java --without-cpp --without-qt4 --without-c_glib --without-csharp --without-erlang \
                    --without-perl --without-php --without-php_extension --without-python --without-py3 --without-ruby \
                    --without-haskell --without-go --without-d --without-haskell --without-php --without-ruby \
                    --without-python --without-erlang --without-perl --without-c_sharp --without-d --without-php \
                    --without-go --without-lua --without-nodejs --without-cl
$ make
$ sudo make install
Liferay Portal とApache Tomcat のインストール
利用するLiferayとTomcat のバージョンが上がった.
Liferay Portal 7.2.1 GA1 と Apache Tomcat 9.0.X を ここから一括でダウンロード
tarを展開,PATHの設定
$ wget https://github.com/liferay/liferay-portal/releases/download/7.2.1-ga2/liferay-ce-portal-tomcat-7.2.1-ga2-20191111141448326.tar.gz
$ tar -xzvf liferay-ce-portal-tomcat-7.2.1-ga2-20191111141448326.tar.gz
$ cd liferay-portal-7.2.1-ga2
$ export LIFERAY_PATH=/ABSOLUTE/PATH/TO/liferay-ce-portal-7.2.1-ga2
$ export LIFERAY_INSTALL=/ABSOLUTE/PATH/TO/liferay-ce-portal-7.2.1-ga2
Liferayの中身確認すると,旧バージョンのLiferayと違い元からdeployフォルダがある.
$ ls -a /liferay-portal-7.2.1-ga2
.  ..  .githash  .liferay-home  data  deploy  license  logs  osgi  readme.html  tomcat-9.0.17  tools  work
SW360をインストール
$ sudo apt install -y git
$ git clone https://github.com/eclipse/sw360.git
$ cd sw360
# 必要なバージョンに応じて以下を実行
$ # git checkout ff16072 #sw360-5.1.0-M1
$ # git checkout 7326c63 #sw360-6.0.0-M1
$ # git checkout 0eaba4b #sw360-8.2.0-M1
$ # git checkout a9edb87 #sw360-9.0.0-M1
$ # git checkout 1b93c88 #sw360-10.0.0-M1
$ mvn clean
・(参考):[Apache Maven 3.0.X インストール] (https://linuxize.com/post/how-to-install-apache-maven-on-ubuntu-18-04/)とProxyの設定
$ sudo apt install maven
$ mkdir ~/.m2
$ vi ~/.m2/settings.xml
 <settings>
  <proxies>
    <proxy>
      <id>httpproxy</id>
      <active>true</active>
      <protocol>http</protocol>
      <host>proxy.example</host>
      <port>8080</port>
     <nonProxyHosts>localhost|127.0.0.1</nonProxyHosts>
  </proxy>
    <proxy>
      <id>httpsproxy</id>
      <active>true</active>
      <protocol>https</protocol>
      <host>proxy.example</host>
      <port>8080</port>
      <nonProxyHosts>localhost|127.0.0.1</nonProxyHosts>
    </proxy>
  </proxies>
 </settings>
設定ファイルの配置
sw360/frontend/configuration のファイルを適切な場所に配置していく.
まず setenv.sh ファイルをtomcat/binにコピー
cp /PATH/TO/sw360/frontend/configuration/setenv.sh /PATH/TO/liferay-portal-7.2.1-ga2/tomcat-9.0.17/bin
コピーした後setenv.sh を適切に設定.例えばtimezoneは日本だとJSTに変更する.メモリも各自の環境に合わせて変更.
# The following settings should be adapted to your needs
JAVA_MEMORY_MIN="2g"
JAVA_MEMORY_MAX="4g"

# The following settings should not be touched unless you know what you are doing
# Misconfiguration may be lead to an unusable instance.
JAVA_OPTS="$JAVA_OPTS -Dfile.encoding=UTF8"
JAVA_OPTS="$JAVA_OPTS -Dorg.apache.catalina.loader.WebappClassLoader.ENABLE_CLEAR_REFERENCES=false"
JAVA_OPTS="$JAVA_OPTS -Duser.timezone=GMT"
JAVA_OPTS="$JAVA_OPTS -Xms${JAVA_MEMORY_MIN} -Xmx${JAVA_MEMORY_MAX}"
JAVA_OPTS="$JAVA_OPTS -XX:+UseParNewGC"
JAVA_OPTS="$JAVA_OPTS -XX:+UseConcMarkSweepGC"
JAVA_OPTS="$JAVA_OPTS -XX:+CMSParallelRemarkEnabled"
JAVA_OPTS="$JAVA_OPTS -XX:SurvivorRatio=20"

export JAVA_OPTS
次に portal-ext.properties をliferay直下に配置する
cp /PATH/TO/sw360/frontend/configuration/portal-ext.properties /PATH/TO/liferay-portal-7.2.1-ga2/
配置したportal-ext.propertiesではdefault.adminのコメントを外しておくと,最初のユーザ設定が省略できる.
ただし,いくつかの環境で以下のパスワードが正しく登録されない現象を確認している.ひとまずコメントを外さずadminユーザを手動登録することを推奨する.
# Copyright Siemens AG, 2019. Part of the SW360 Portal Project.
#
# This program and the accompanying materials are made
# available under the terms of the Eclipse Public License 2.0
# which is available at https://www.eclipse.org/legal/epl-2.0/
#
# SPDX-License-Identifier: EPL-2.0
#

# ***********************************
# Needed properties for SW360
# ***********************************

# Company (Actually the name of the site that is generated by liferay)
# (https://github.com/liferay/liferay-portal/blob/7.2.0-ga1/portal-impl/src/portal.properties#L1968)
company.default.name=SW360
company.default.web.id=sw360.org

# Needed SW360 roles
# (https://github.com/liferay/liferay-portal/blob/7.2.0-ga1/portal-impl/src/portal.properties#L2502)
# Keep this inline with sw360-portlet/**/PortalConstants#Role names
system.site.roles=Clearing Admin, Clearing Expert, ECC Admin, Security Admin, SW360 Admin


# Jump to SW360 Homepage (Dashboard) after login
# (https://github.com/liferay/liferay-portal/blob/7.2.0-ga1/portal-impl/src/portal.properties#L4333)
default.landing.page.path=/group/guest/home


# ***********************************
# Useful Liferay properties
# ***********************************

# Prevent from starting a browser at startup
# (https://github.com/liferay/liferay-portal/blob/7.2.0-ga1/portal-impl/src/portal.properties#L5581)
#browser.launcher.url=

# Set this property to true if the Setup Wizard should be displayed the
# first the portal is started.
# (https://github.com/liferay/liferay-portal/blob/7.2.0-ga1/portal-impl/src/portal.properties#L5927)
setup.wizard.enabled=true

# Disable asking for the security question
# (https://github.com/liferay/liferay-portal/blob/7.2.0-ga1/portal-impl/src/portal.properties#L2327)
#users.reminder.queries.enabled=false

# To turn off the terms and conditions
# (https://github.com/liferay/liferay-portal/blob/7.2.0-ga1/portal-impl/src/portal.properties#L2552)
#terms.of.use.required=false

# Disable user portlet CSS
# (https://github.com/liferay/liferay-portal/blob/7.2.0-ga1/portal-impl/src/portal.properties#L10960)
#portlet.css.enabled=false

# Do not track user clicks
# (https://github.com/liferay/liferay-portal/blob/7.2.0-ga1/portal-impl/src/portal.properties#L3232)
#session.tracker.memory.enabled=false


# ***********************************
# Optional properties for SW360
# ***********************************

## Default Admin
## (https://github.com/liferay/liferay-portal/blob/7.2.0-ga1/portal-impl/src/portal.properties#L4590)

# Set the default admin password.
#default.admin.password=sw360fossy
# Set the default admin screen name prefix.
#default.admin.screen.name=setup
# Set the default admin email address prefix.
#default.admin.email.address.prefix=setup
# Set the default admin first name.
#default.admin.first.name=Setup
# Set the default admin last name.
#default.admin.last.name=Administrator

# ***********************************
# Custom properties and overrides
# ***********************************
include-and-override=/etc/sw360/portal-ext.properties
ここで設定したユーザは最後設定変更(無効化)する.その他,例えば
- auto.login.hooks
- login.events.post
- servlet.service.events.pre
などの Liferayのプロパティを変更する場合は/etc/sw360というフォルダを作成し,sw360.propertiesを作成し設定を書きこめばよい.
モジュールインストール
新バージョンではDeploy-Upgrade-to-Liferay-7.2 に記載されているように下記のOSGi modulesをLiferayの中のdeployフォルダにインストールする必要がある.
$ sudo apt install curl
$ cd /PATH/TO/liferay-portal-7.2.1-ga2/deploy
$ curl -L -O https://search.maven.org/remotecontent?filepath=commons-codec/commons-codec/1.12/commons-codec-1.12.jar
$ curl -L -O https://search.maven.org/remotecontent?filepath=org/apache/commons/commons-collections4/4.1/commons-collections4-4.1.jar
$ curl -L -O https://search.maven.org/remotecontent?filepath=org/apache/commons/commons-csv/1.4/commons-csv-1.4.jar
$ curl -L -O https://search.maven.org/remotecontent?filepath=commons-io/commons-io/2.6/commons-io-2.6.jar
$ curl -L -O https://search.maven.org/remotecontent?filepath=commons-lang/commons-lang/2.4/commons-lang-2.4.jar
$ curl -L -O https://search.maven.org/remotecontent?filepath=commons-logging/commons-logging/1.2/commons-logging-1.2.jar
$ curl -L -O https://search.maven.org/remotecontent?filepath=com/google/code/gson/gson/2.8.5/gson-2.8.5.jar
$ curl -L -O https://search.maven.org/remotecontent?filepath=com/google/guava/guava/21.0/guava-21.0.jar
$ curl -L -O https://search.maven.org/remotecontent?filepath=com/fasterxml/jackson/core/jackson-annotations/2.9.8/jackson-annotations-2.9.8.jar
$ curl -L -O https://search.maven.org/remotecontent?filepath=com/fasterxml/jackson/core/jackson-core/2.9.8/jackson-core-2.9.8.jar
$ curl -L -O https://search.maven.org/remotecontent?filepath=com/fasterxml/jackson/core/jackson-databind/2.9.8/jackson-databind-2.9.8.jar
SW360パッケージ展開
$ cd /PATH/TO/sw360
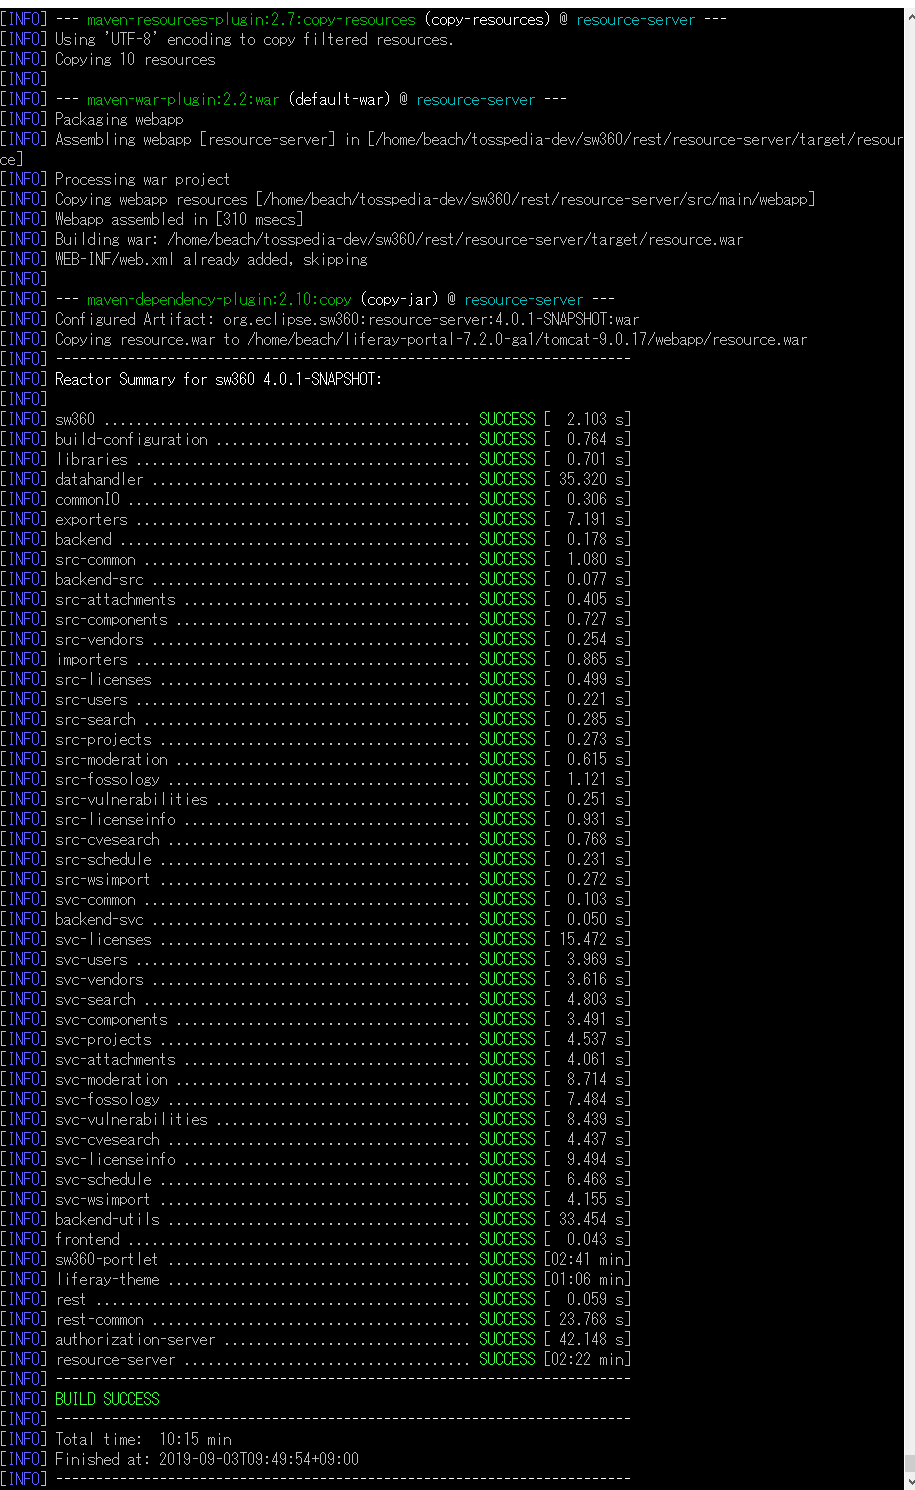
$ mvn package -P deploy -Dbase.deploy.dir=. -Dliferay.deploy.dir=${LIFERAY_INSTALL}/deploy -Dbackend.deploy.dir=${LIFERAY_INSTALL}/tomcat-9.0.17/webapps -Drest.deploy.dir=${LIFERAY_INSTALL}/tomcat-9.0.17/webapps -DskipTests -Duser.timezone=GMT
タイムゾーンのオプションは環境によっては不必要.
(テストをスキップする場合のみ -DskipTests をつける)
上記がうまくいけば以下のようになる
またインストール後はLiferay7のDeployの中に以下のものが含まれてる

すなわち,以下が配置されていることになる
org.eclipse.sw360.common-io-4.0.1-SNAPSHOT.jar
org.eclipse.sw360.datahandler-4.0.1-SNAPSHOT.jar
org.eclipse.sw360.exporters-4.0.1-SNAPSHOT.jar
org.eclipse.sw360.importers-4.0.1-SNAPSHOT.jar
org.eclipse.sw360.liferay-theme-4.0.1-SNAPSHOT.war
org.eclipse.sw360.portlet-4.0.1-SNAPSHOT.jar
このとき http://127.0.0.1:5984/_utils/
で以下のようにSW360関連のテーブルができていたらOK
(注)ただしインストール時に,-DskipTests
をオプションで付けていると,test関係のデータベースは存在しない.
インストール後 Liferay の設定方法
Liferayスタート にLiferayがユーザ情報管理に利用するPostgreSQL設定をする.(PostgreSQLを利用しない場合はスキップ)
PostgreSQLインストールと利用設定
コードからインストール (/PATH/TOは適宜置き換え)
$ #sudo apt install libreadline-dev
$ wget https://ftp.postgresql.org/pub/source/v9.6.16/postgresql-9.6.16.tar.gz
$ tar -xzvf postgresql-9.6.16.tar.gz
$ cd postgresql-9.6.16/
$ mkdir -p  /PATH/TO/sw360postgres
$ ./configure -prefix=/PATH/TO/sw360postgres
$ make
$ sudo make install
パスの設定
$ export PATH=$HOME/sw360postgres/bin:$PATH
$ export PGDATA=$HOME/sw360postgres/data
$ export LD_LIBRARY_PATH=$HOME/sw360postgres/lib
$ export PGPORT=5432
初期化&起動
$ initdb --encoding=UTF8 --no-locale
$ pg_ctl start
$ createuser postgres
PostgreSQLインストールが成功していたら psql -l コマンドで以下のように表示される.

データベースを作成しパスワードを設定する.(以下はテスト用)
$ psql postgres
postgres=# create database lportal;
postgres=# ALTER USER postgres WITH PASSWORD 'sw360fossy';
postgres=# ALTER ROLE postgres with superuser;
postgres=# \q
/data/postgresql.conf と /data/pg_hba.conf を適切に設定(以下はテスト用の例)
listen_addresses = '*' # what IP address(es) to listen on;
host all all 0.0.0.0/0 ident
PostgreSQL再起動
$ pg_ctl restart
Liferay(ユーザ管理用)起動
データベースの準備後,Liferayを起動する.
$ cd /PATH/TO/liferay-portal-7.2.1-ga2/tomcat-9.0.17/bin
$ startup.sh
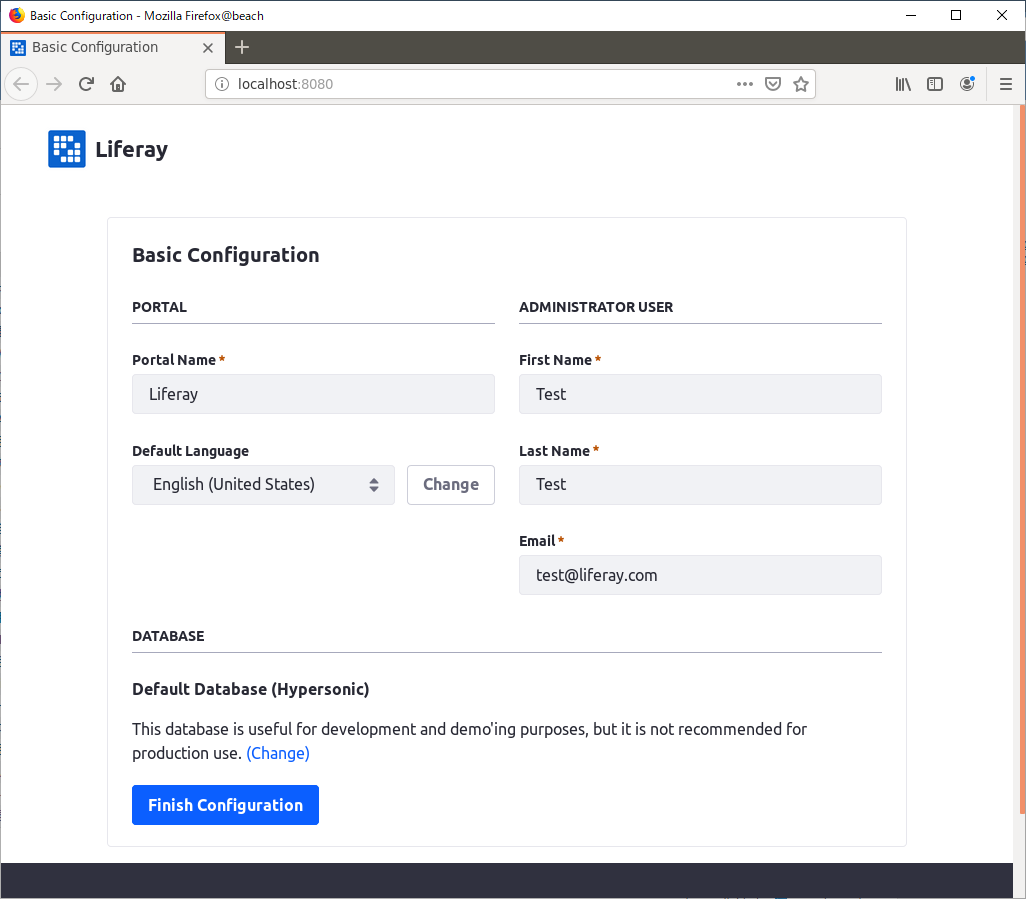
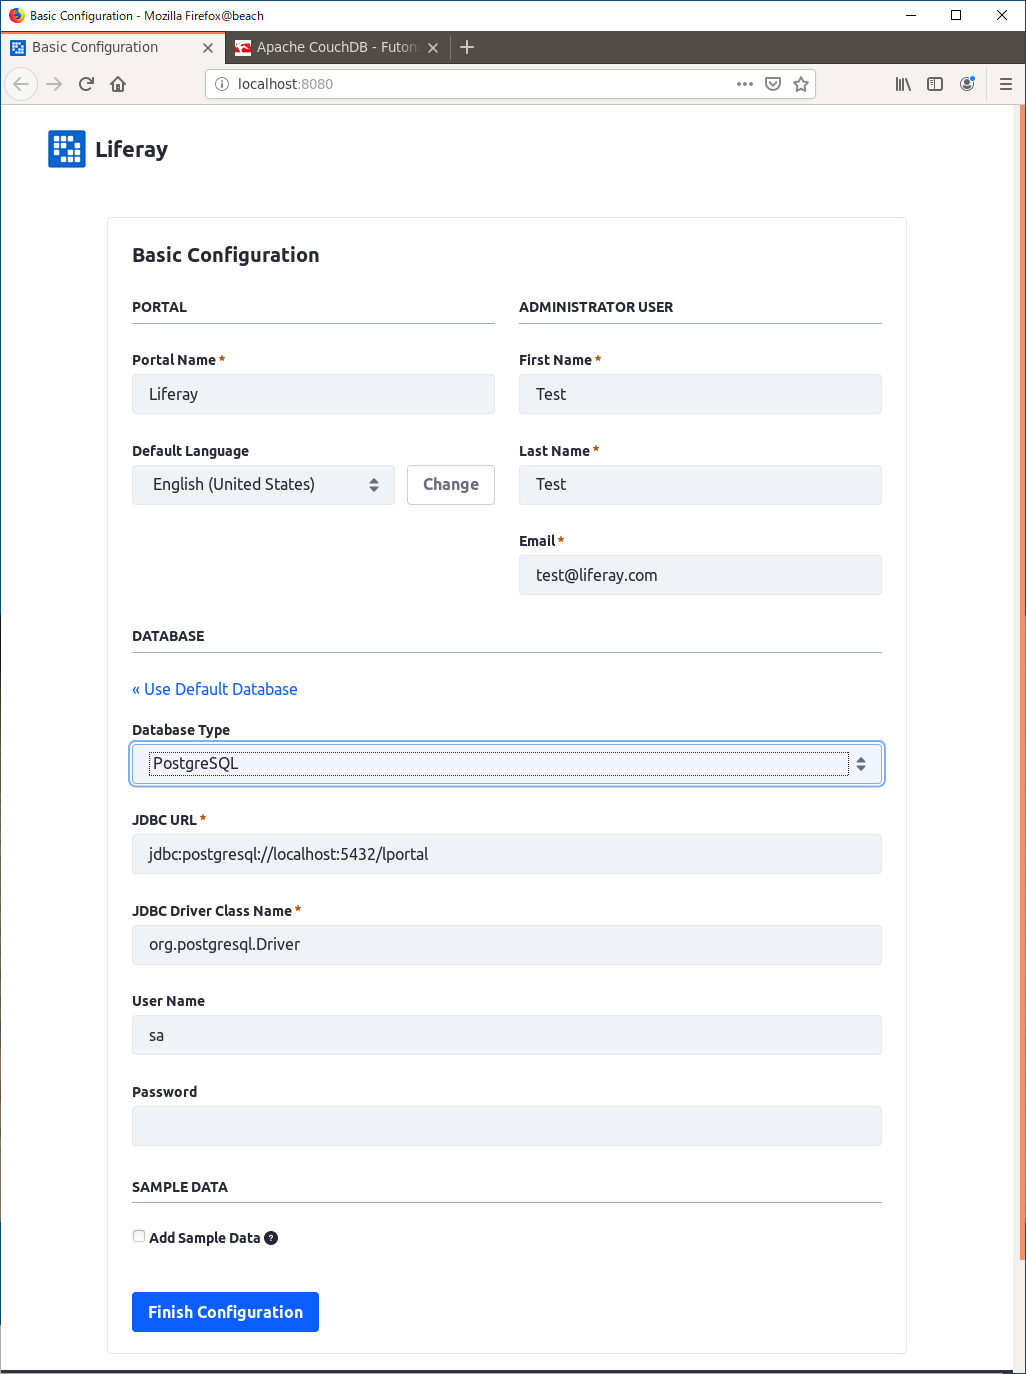
Firefoxが自動で開き,以下のLiferayの画面が表示される.
名前,サンプルデータが必要かどうか,Liferayの情報を管理するデータベースの設定を行い,[FinishCofiguration]クリック.
Liferay(ユーザ管理用)データベース選択
以降 SW360 GitHubの新バージョンインストール情報の記載箇所とLiferayについて記載されている箇所を参考に作業を進めていく.
一部はLiferay7公式の情報も参考.
Liferay が管理する情報をどのデータベースで管理するかを選択する.
(注)SW360で利用するCouchDBが管理する情報とはまた別のものであり,Liferay上のUser情報などを管理する.
デフォルトHypersonicDBはテスト用に用意されたものである.本運用時はPostgreSQL,MySQL,MariaDBから選択し,情報を記入後[Finish Configuration]を選択.
Portal Name は後で変更できる.ここではデフォルトのままLiferay にしてある.Liferayを起動するとデータベースの選択画面が出てくる.
HypersonicDB(テスト用デフォルトDB)利用の場合
画面(何も設定しないと以下の設定でLiferayが開始される)
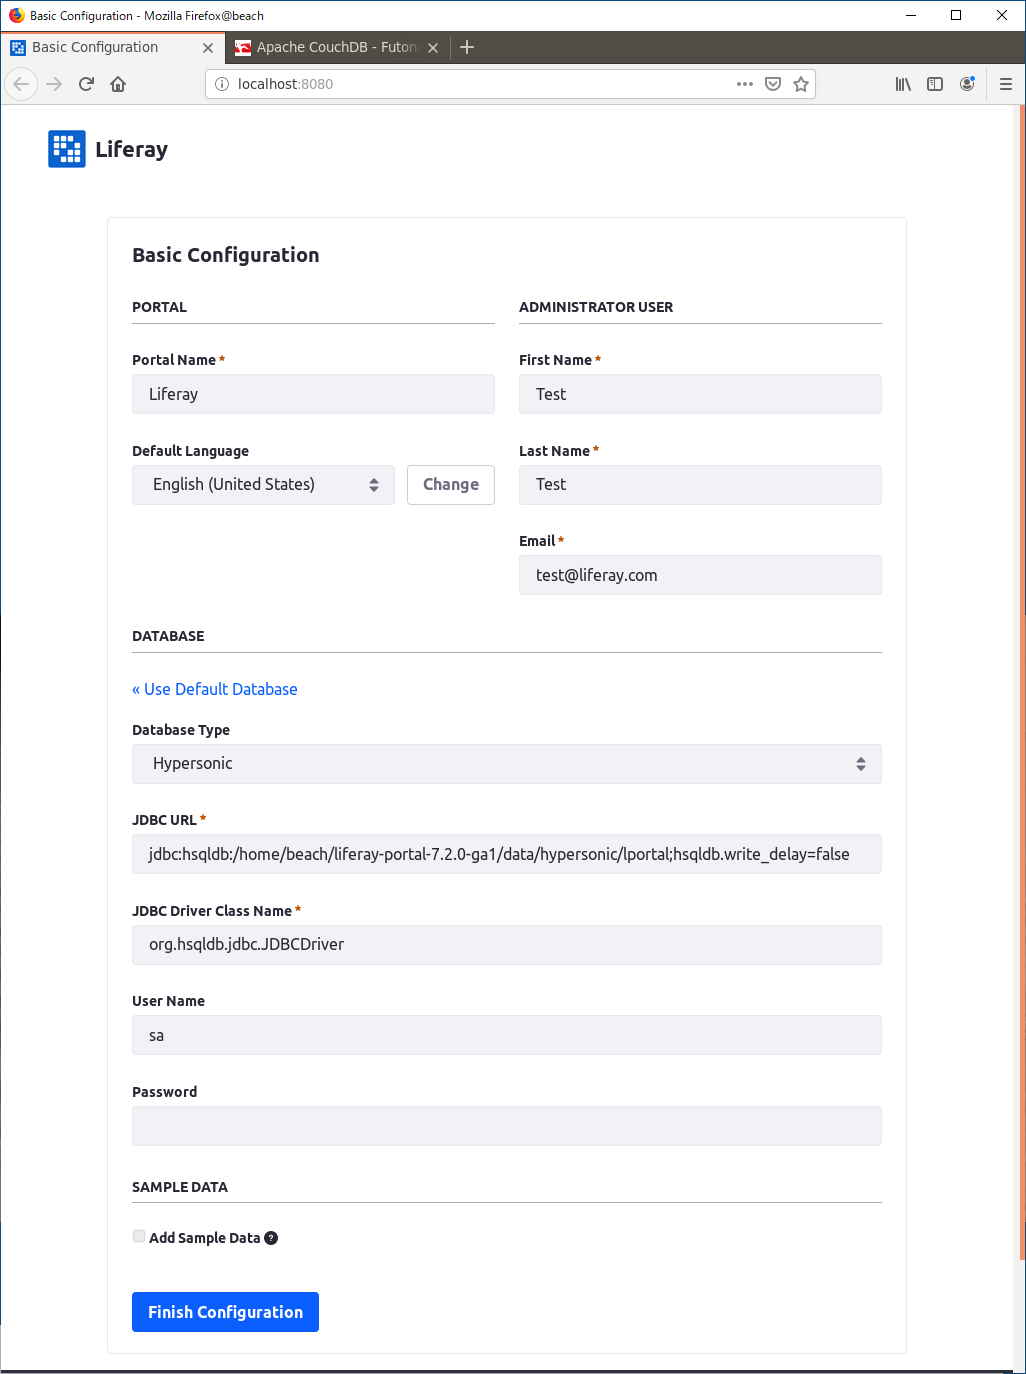
[Finish Configuration]を押すと,以下が表示されるので,[I Agree]を選択.
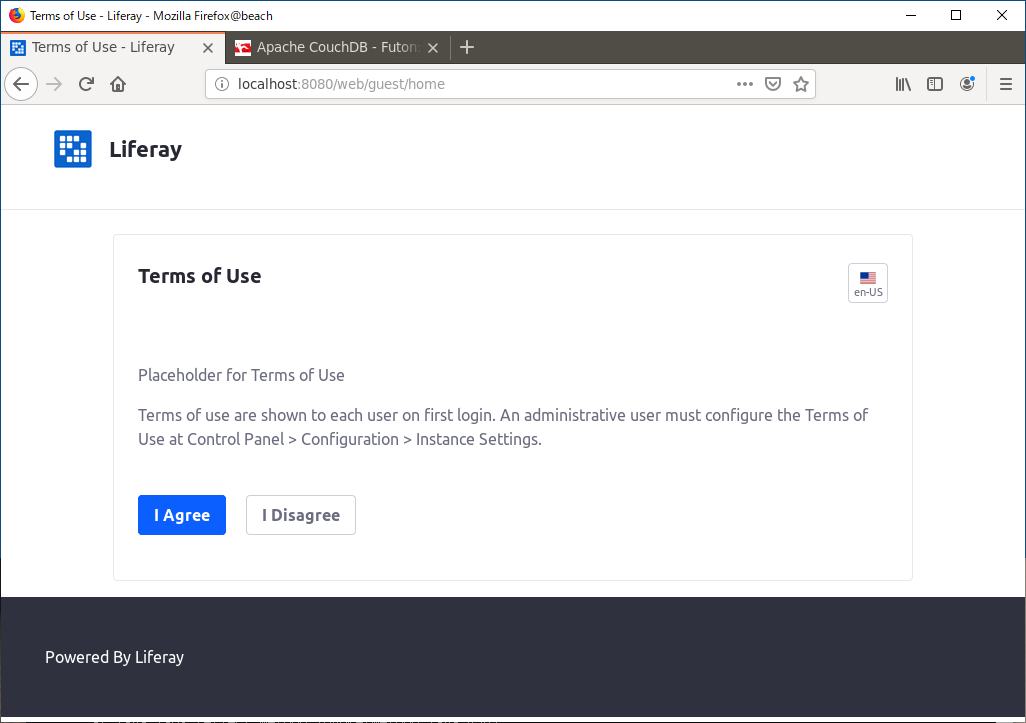
** portal-ext.properties でDefualt Adminを設定していたら略.
同様にPassWord Reminder を記入する.(図は略)
PostgreSQL利用の場合
上記画面を設定して進むと以下のようなファイルができている
/home/sw360fossy/liferay-portal-7.2.1-ga2/portal-setup-wizard.properties
admin.email.from.address=sw360@admin.com
admin.email.from.name=sw360 admin
company.default.locale=en_US
company.default.name=SW360
company.default.web.id=admin.com
default.admin.email.address.prefix=sw360
default.admin.first.name=sw360
default.admin.last.name=admin
jdbc.default.driverClassName=org.postgresql.Driver
jdbc.default.password=sw360fossy
jdbc.default.url=jdbc:postgresql://localhost:5432/lportal
jdbc.default.username=sw360fossy
liferay.home=/home/sw360fossy/liferay-portal-7.2.1-ga2
setup.wizard.enabled=false
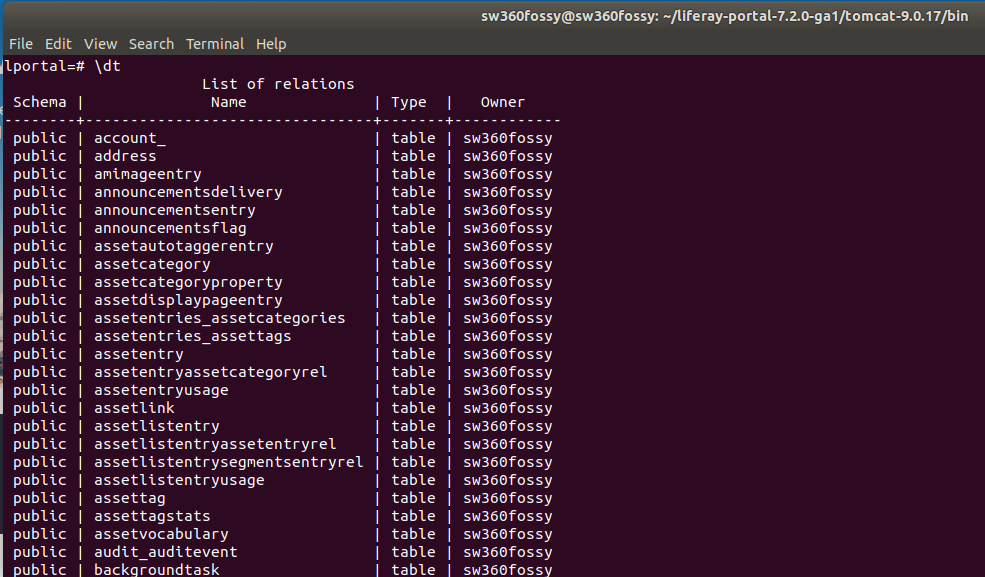
Liferayを再起動すると以下のようなDBが確認できる
$ /home/sw360fossy/liferay-portal-7.2.1-ga2/tomcat-9.0.17/bin/shutdown.sh
$ /home/sw360fossy/liferay-portal-7.2.1-ga2/tomcat-9.0.17/bin/startup.sh
$ psql -d lportal
データベース設定後の操作
portal-setup-wizard.propertiesの設定にもよるが上記例の場合
”sw360@admin.com”とpassword "test" でLiferayにログインできる.
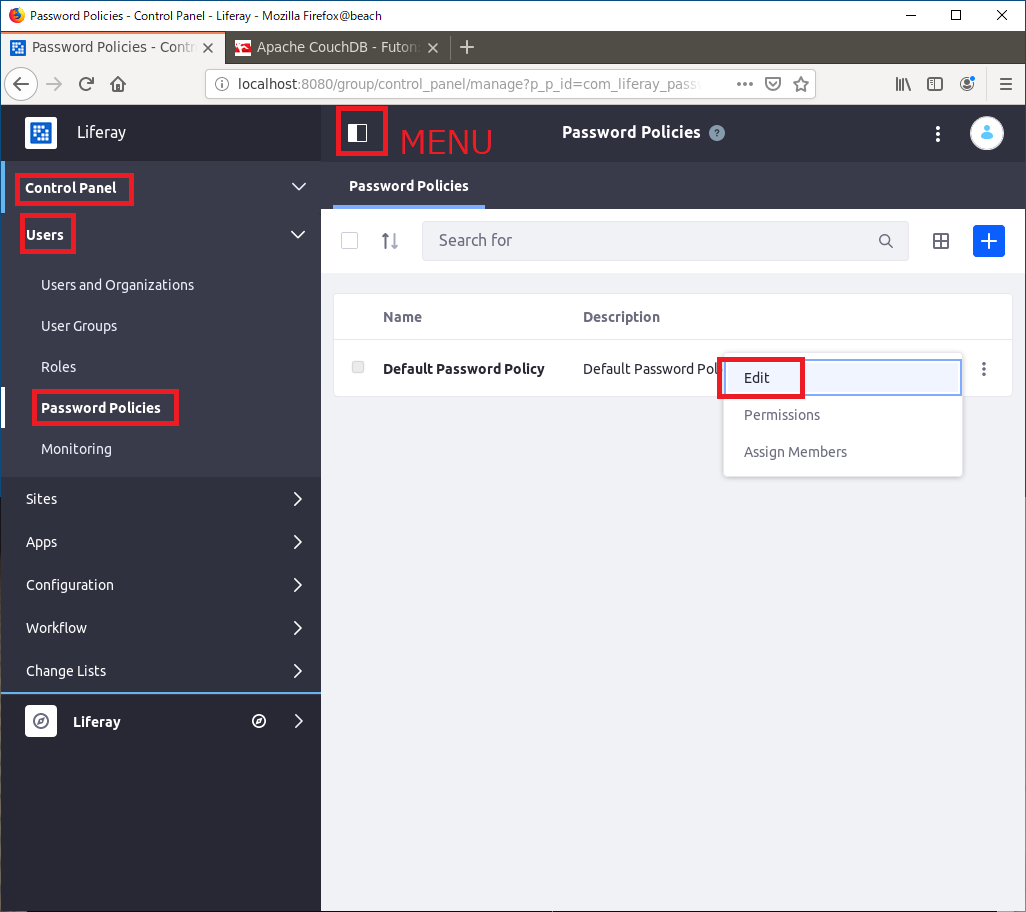
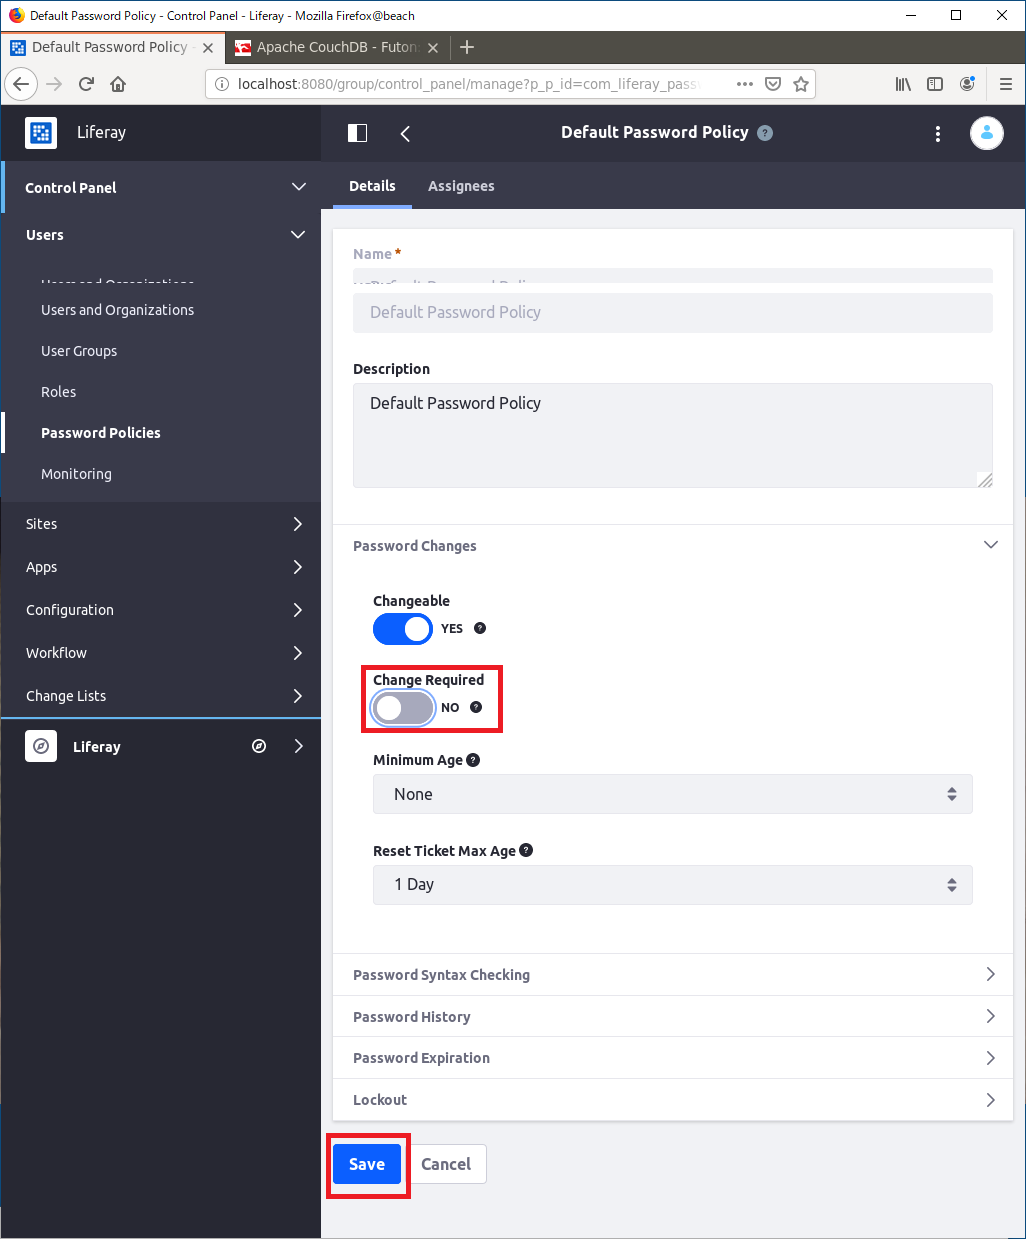
必要であれば,[Menu] -> [Control Panel] -> [Users] -> [Password Policies] -> [Edit] よりパスワードポリシー設定
Change required を No に変更し [SAVE]
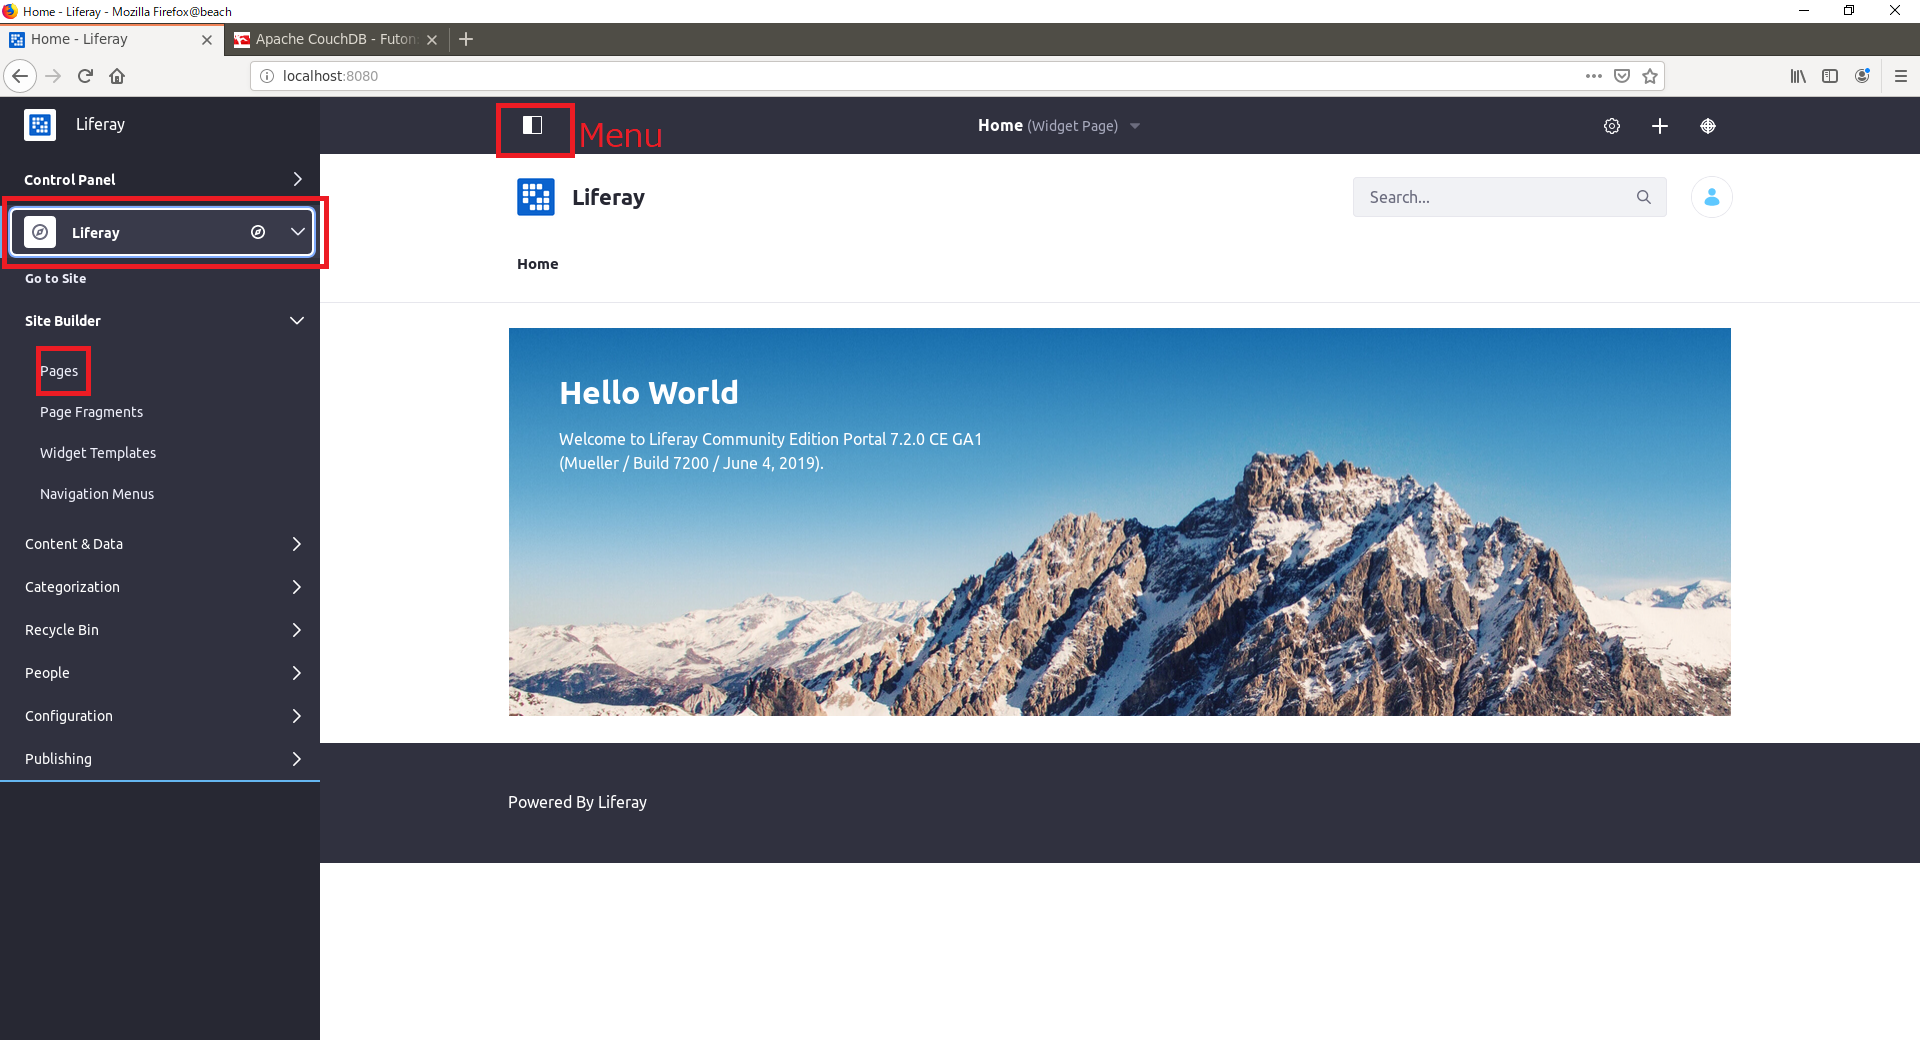
[Menu] -> [liferay] -> [Pages] の順に移動
Liferay のポータルネーム変更
初期では[Liferay]としているが,変更したい場合の作業を記す.初期設定で名前を付けていた場合や,変更の必要がない場合はこのStepをスキップする.
(portal-ext.properties)で(変更をせず)設定していると省略可
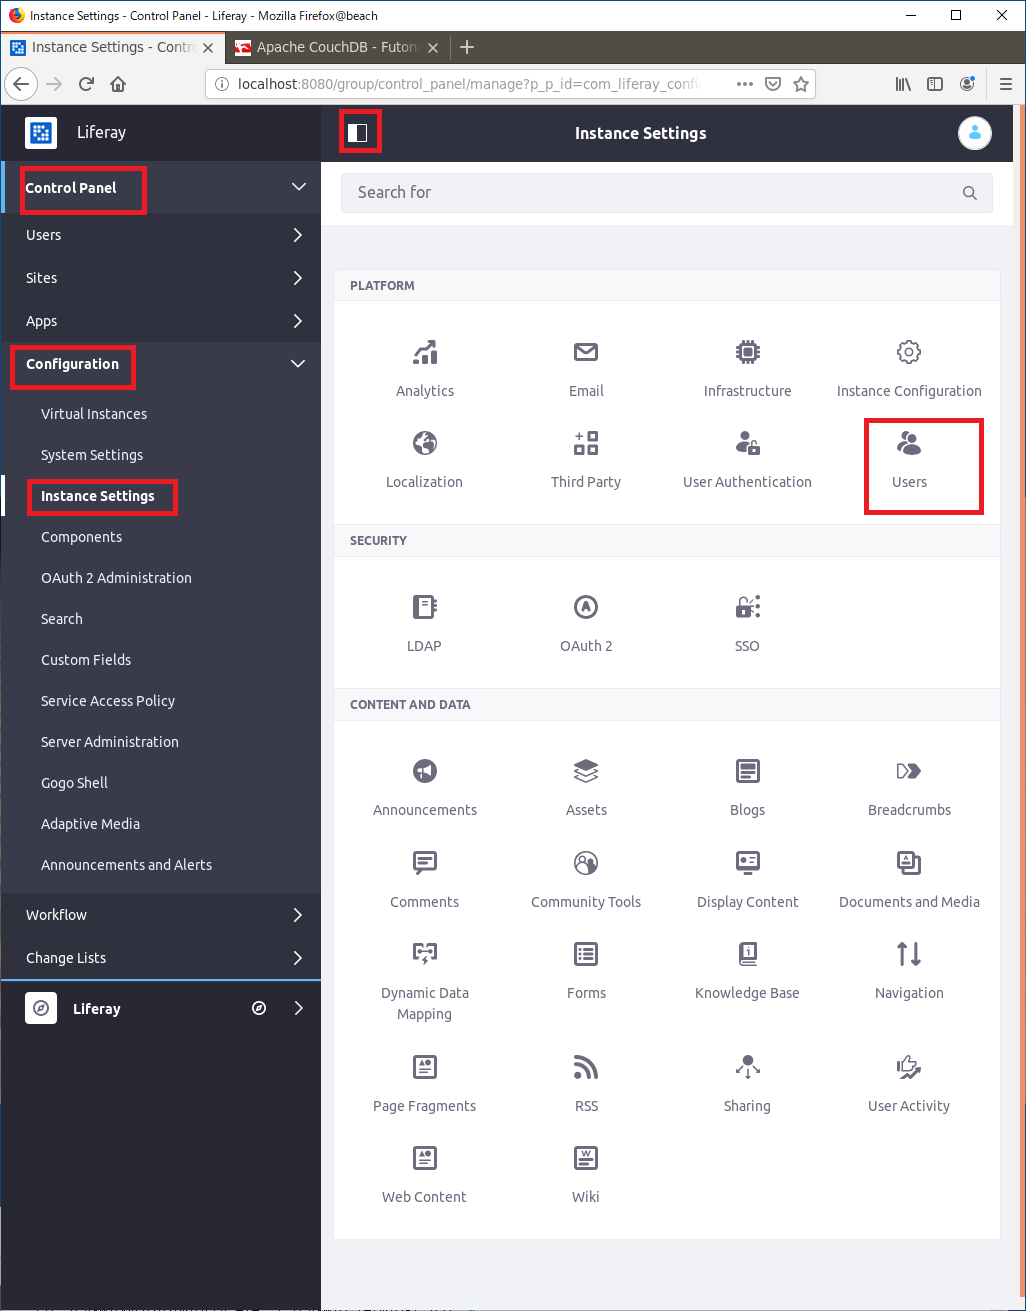
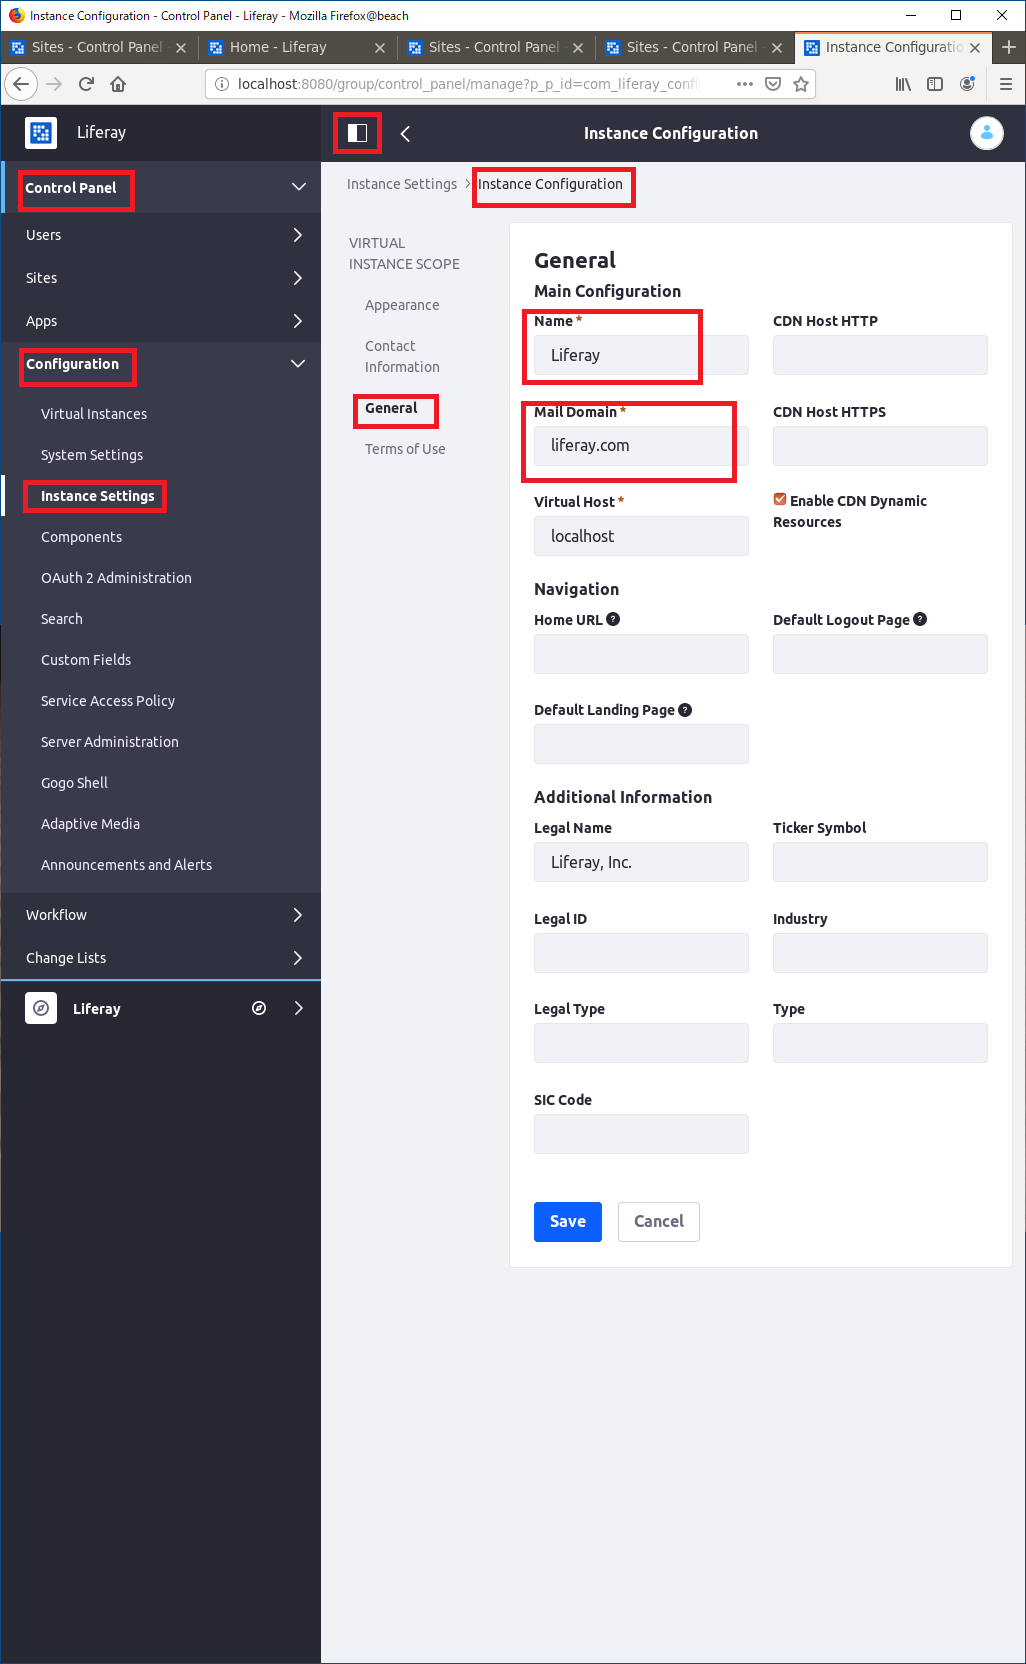
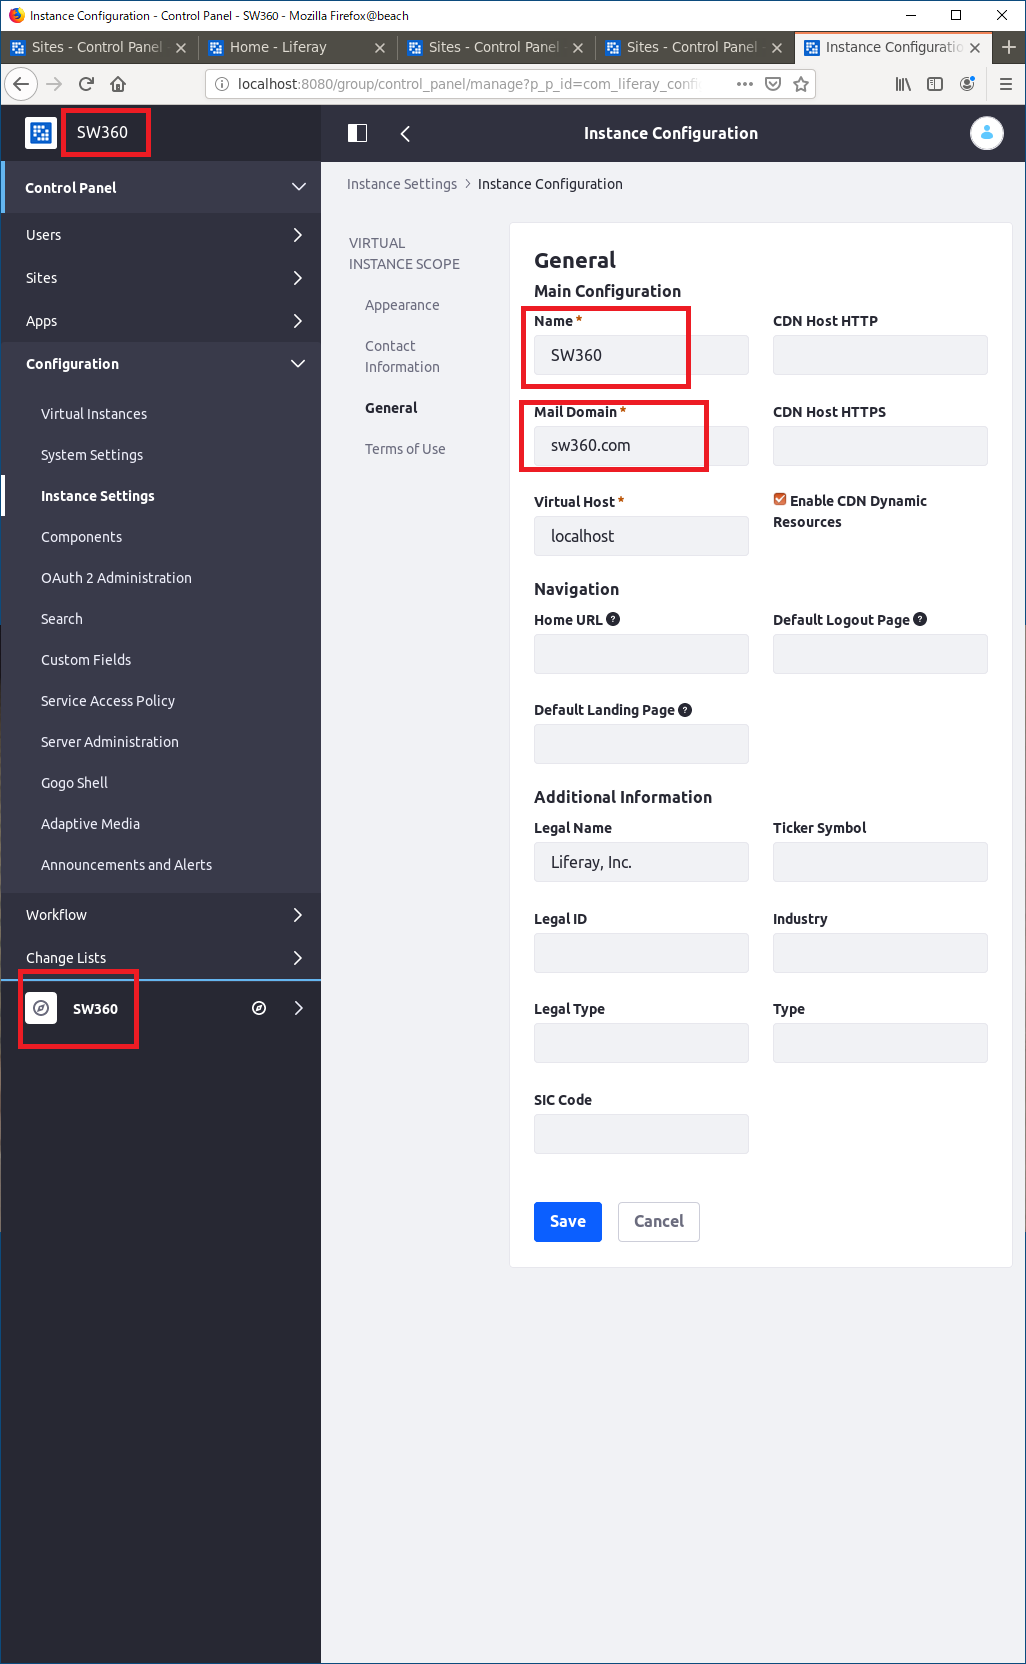
[Menu] -> [Control Panel] -> [Configuration] -> [Instance Settings]-> [Instance Configuration] -> [General] から Name や Mail Domain を必要に応じ変更.[SAVE]を押す.
以下のように名前が変更されている
LiferayにSW360サイト情報をインポート
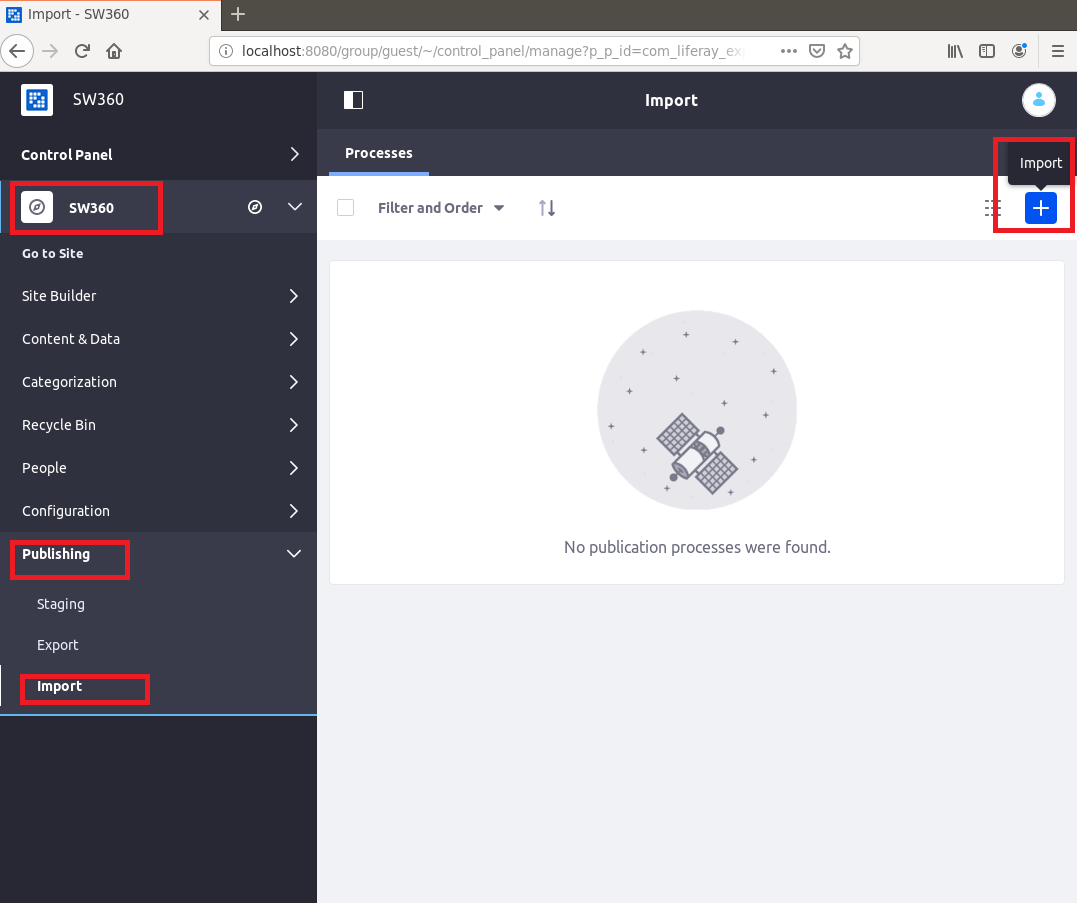
[SW360] -> [Publishing] -> [Import] と移動
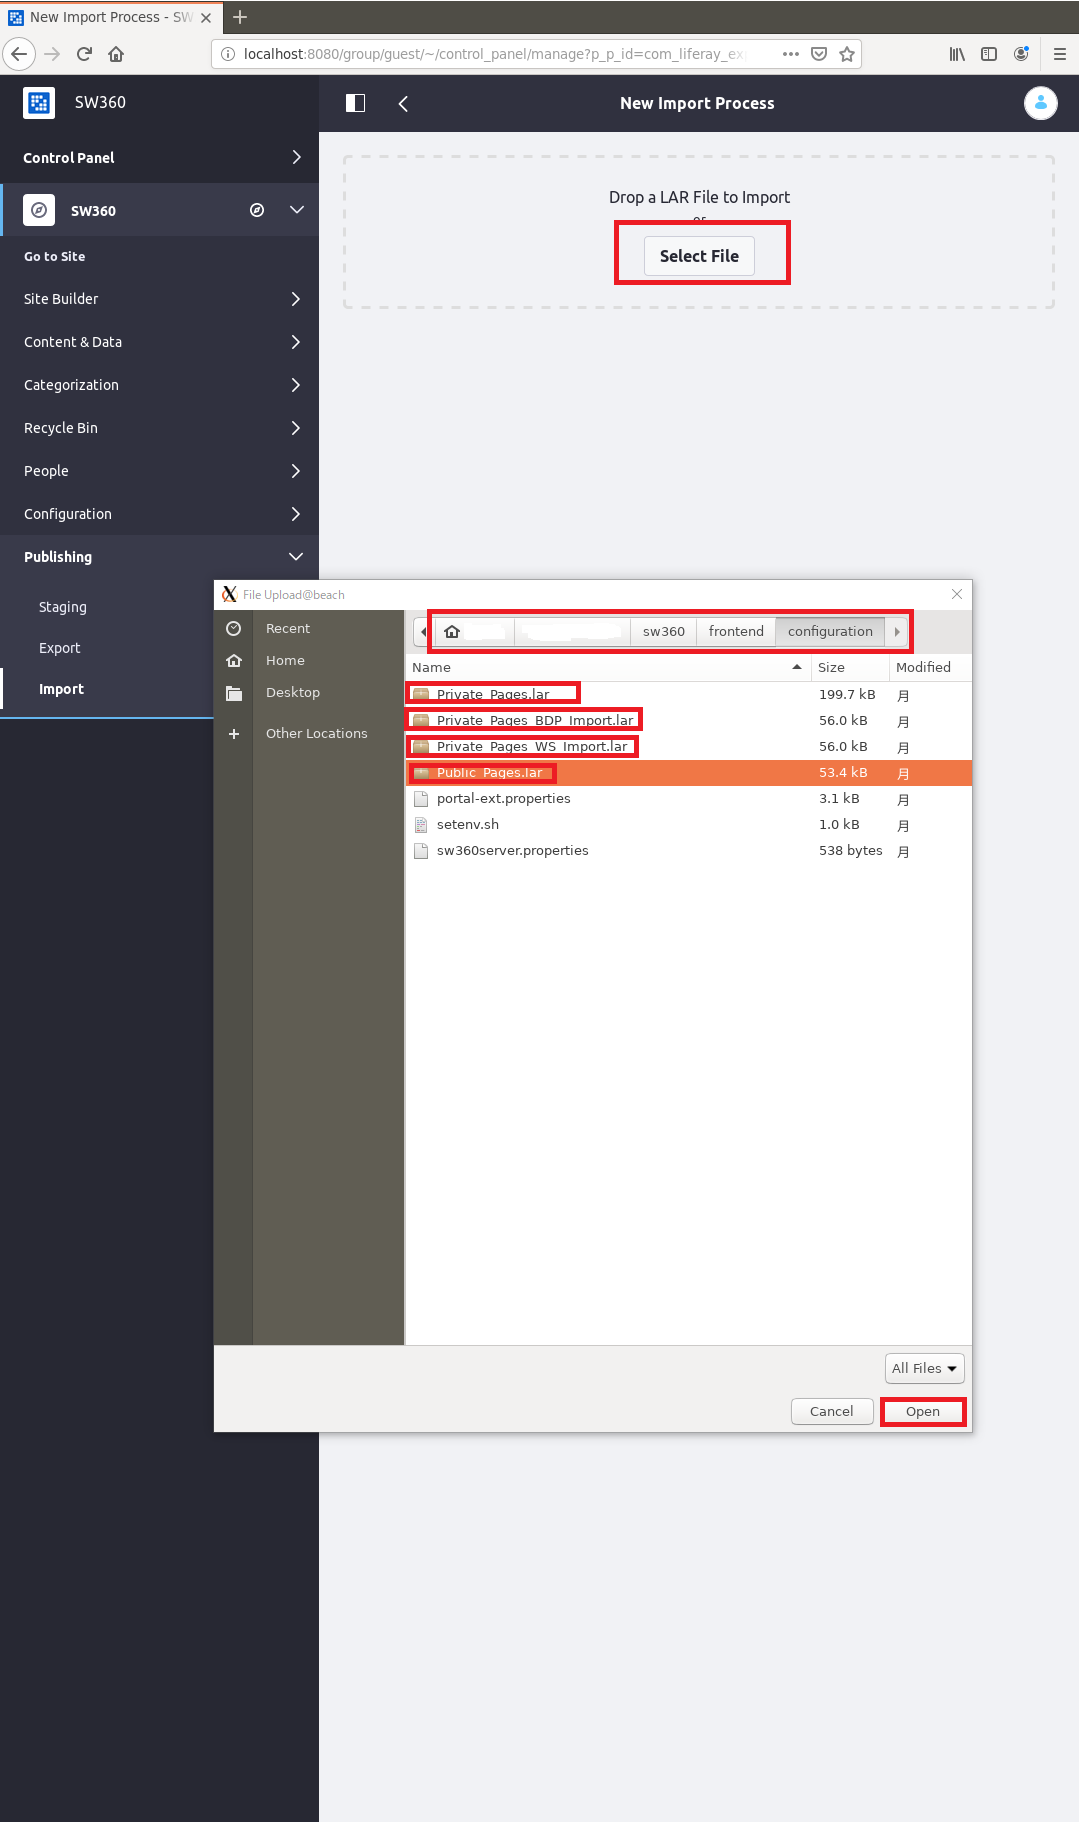
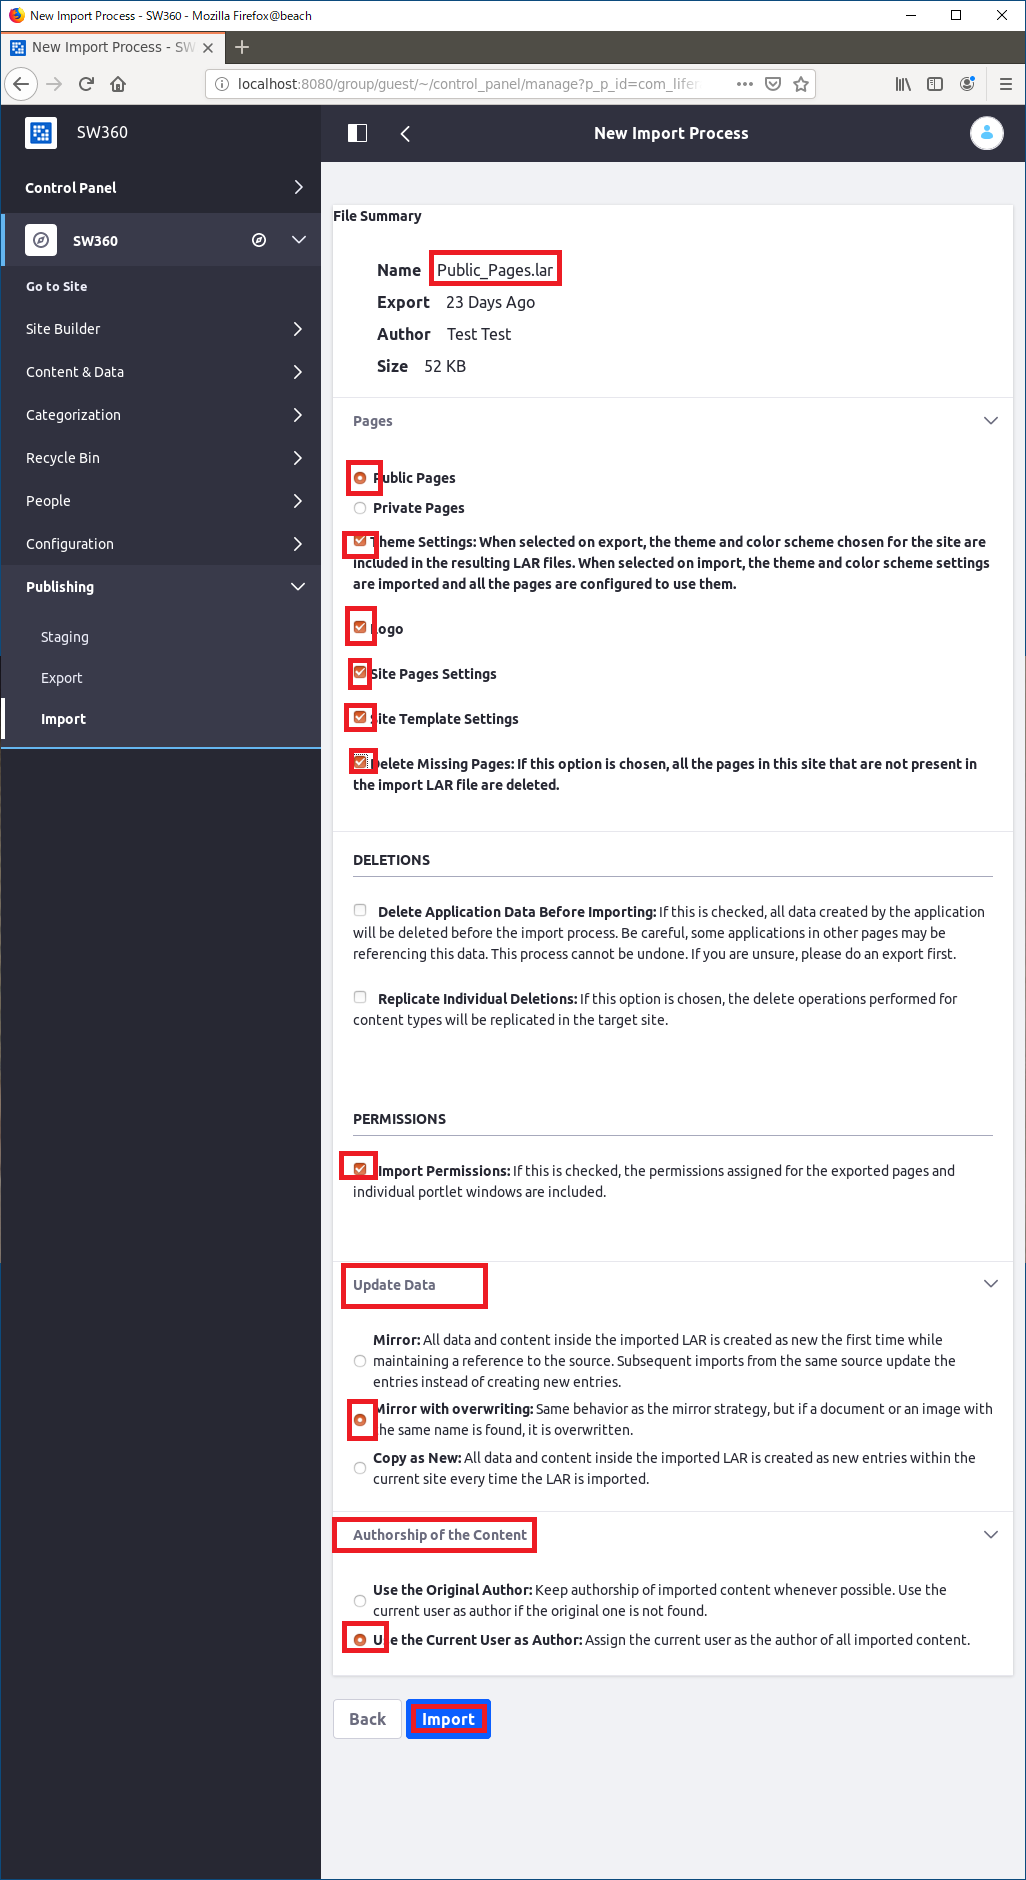
sw360/frontend/configuration...にあLarファイルを以下の順でインポートする
(BDP(Black Duck Protex)と,WS(ホワイトソース)との連携が必要な場合のみインポート)
- Public_Pages.lar
- Private_Pages.lar
- Private_Pages_BDP_Import.lar (オプション)
- Private_Pages_WS_Import.lar (オプション)
ここで 1. Public_Pages.lar 2. Private_Pages.lar については[Pages]で対応する箇所を選択,他は図のように選択
(オプション)である3, 4 はすべて[Pages]はPrivateを選んで上で,他をすべて選択しない.[Pages]以外は図と同じにする.
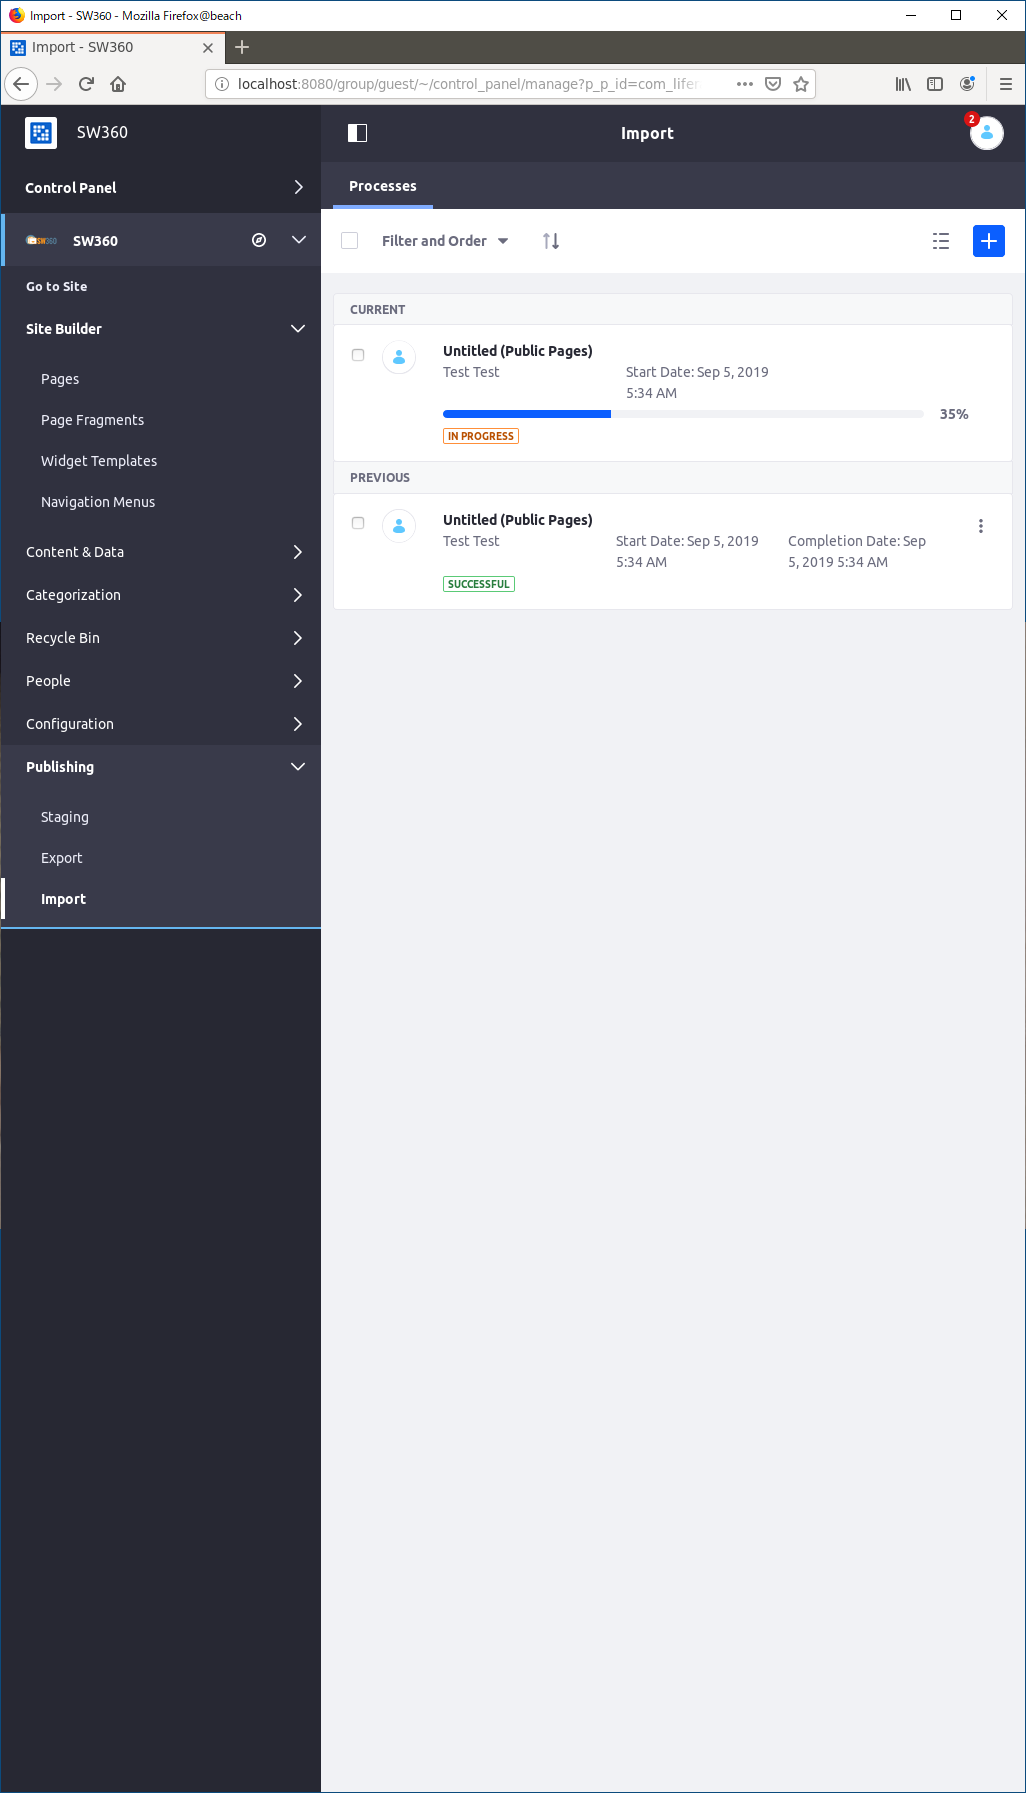
それぞれのインポートが終われば
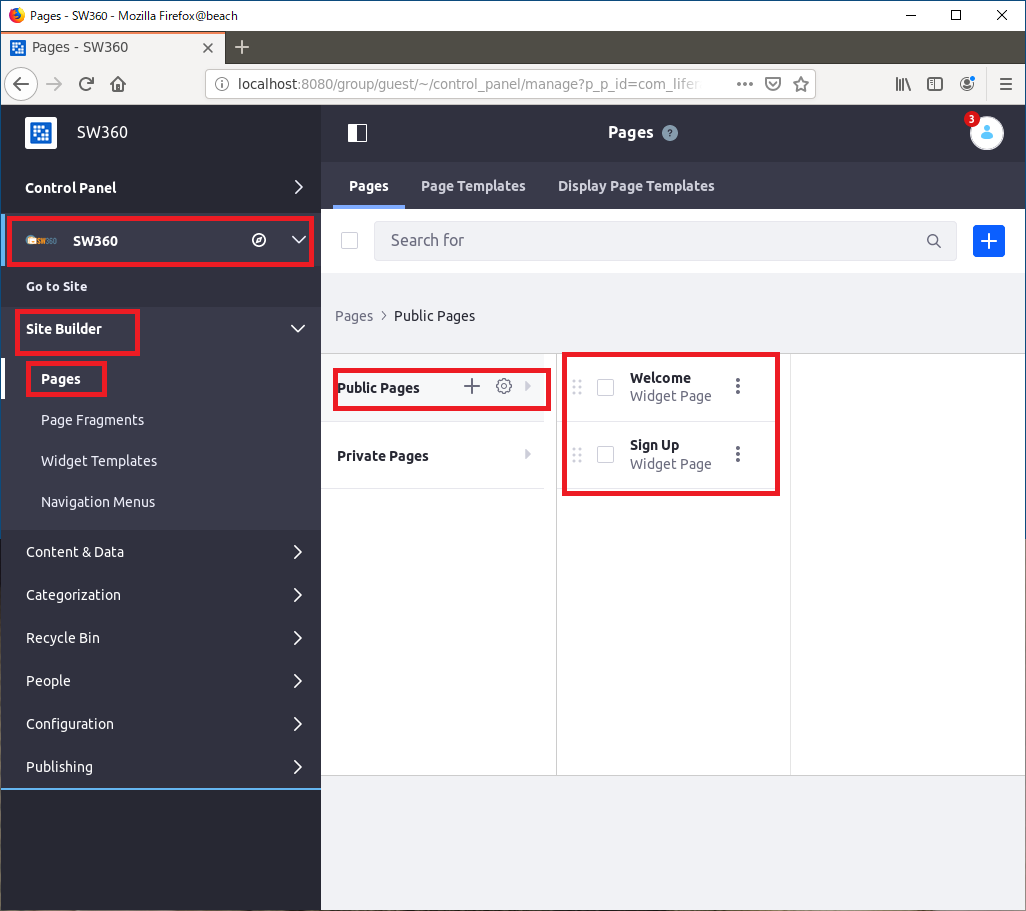
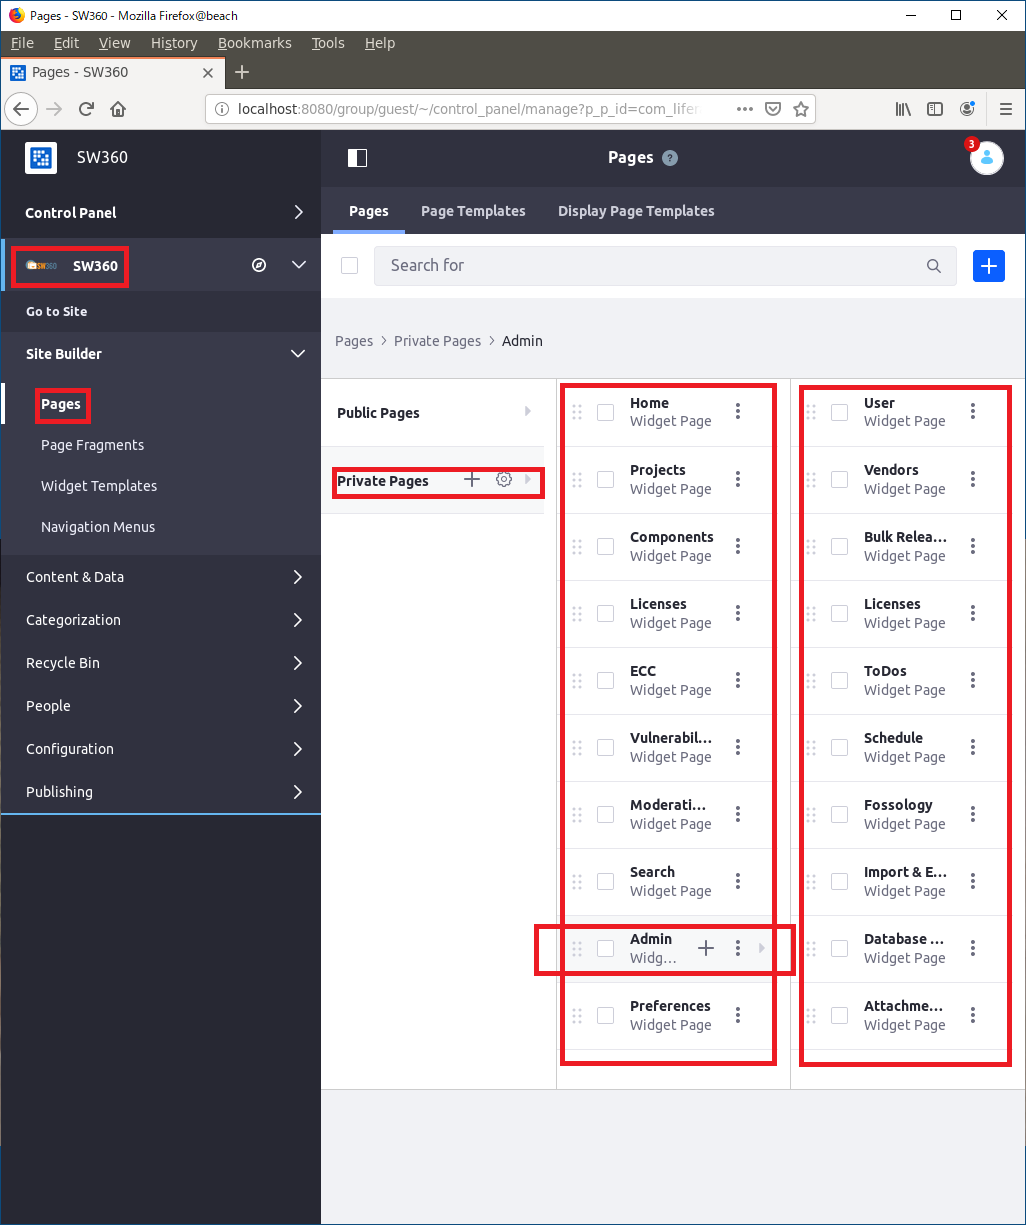
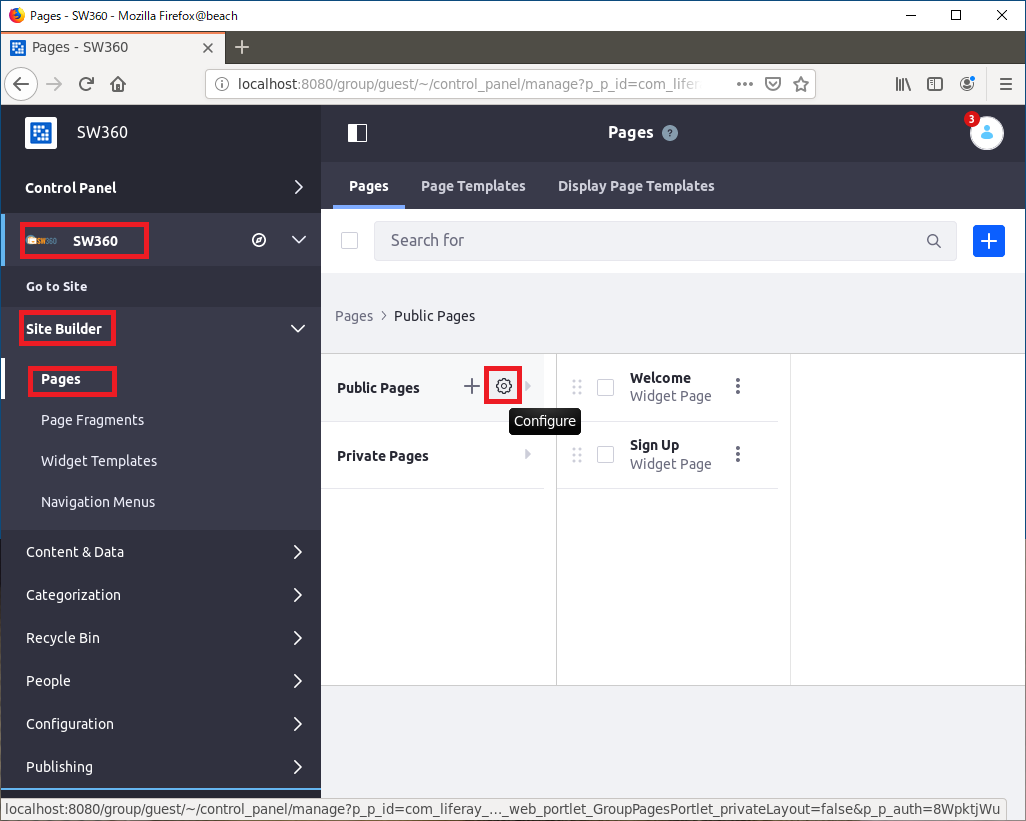
SW360 -> Site Builder -> Pages が以下のように表示されている
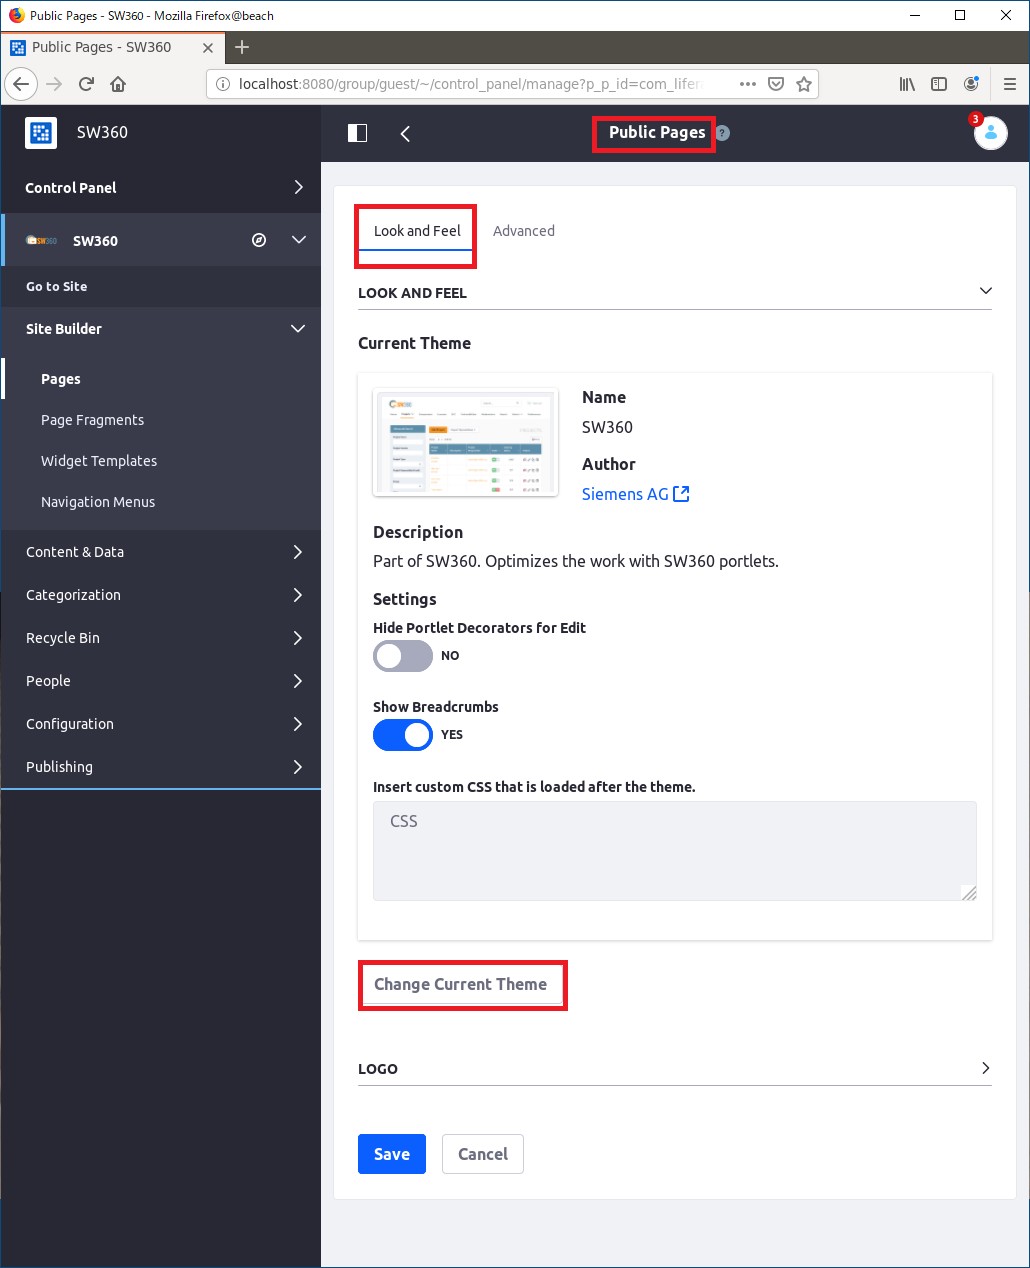
さらにここからテーマ設定を行うために,以下のように[Public Page]configure ボタンを押す
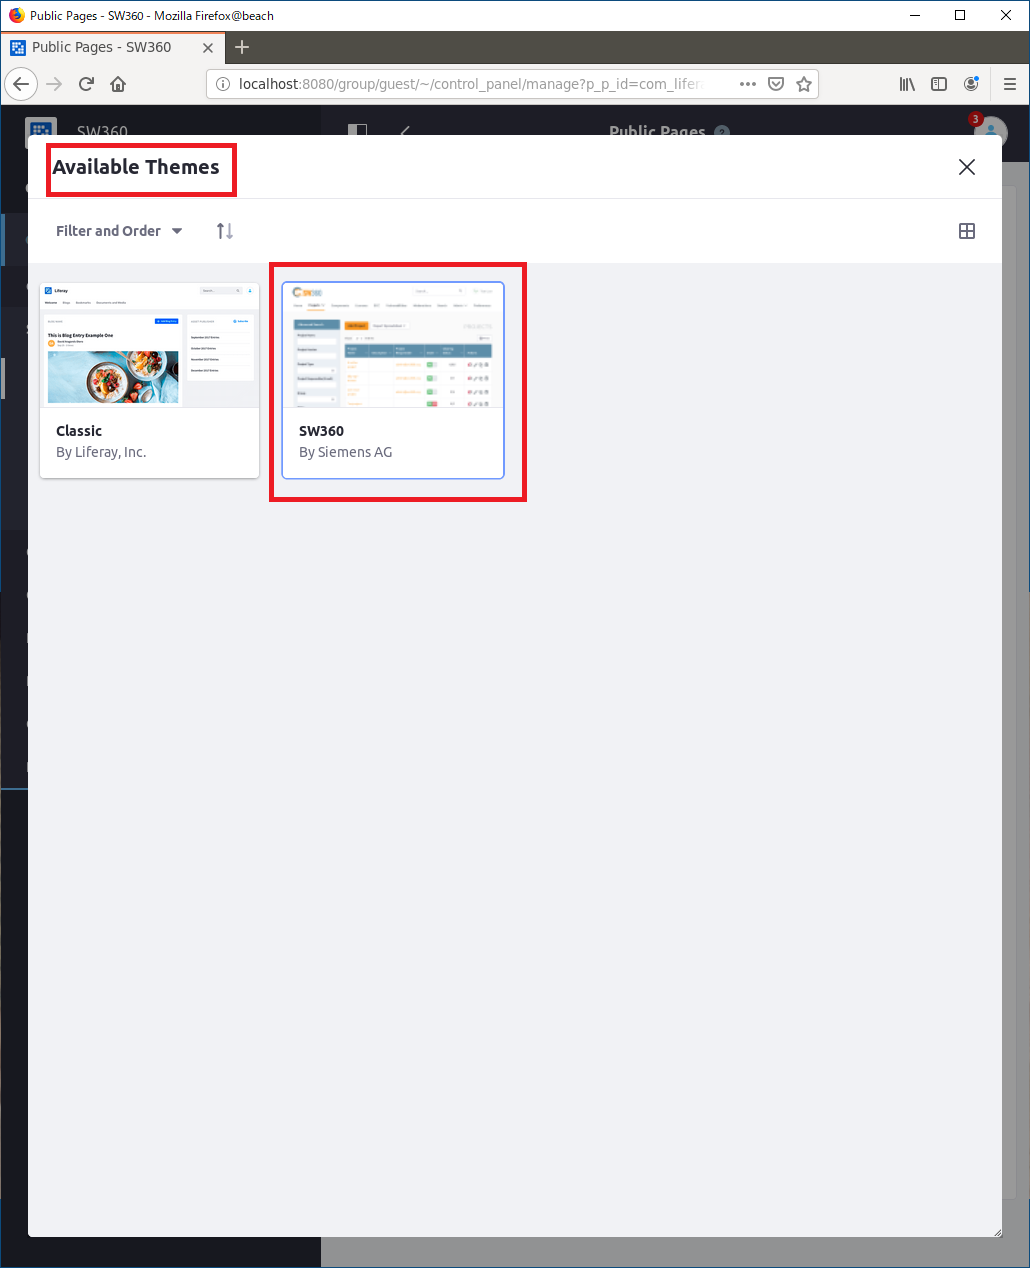
[LOOK AND FEEL] の [ Change Current Theme]からテーマをSW360に変更.
Private Page でも同じ操作を行う.
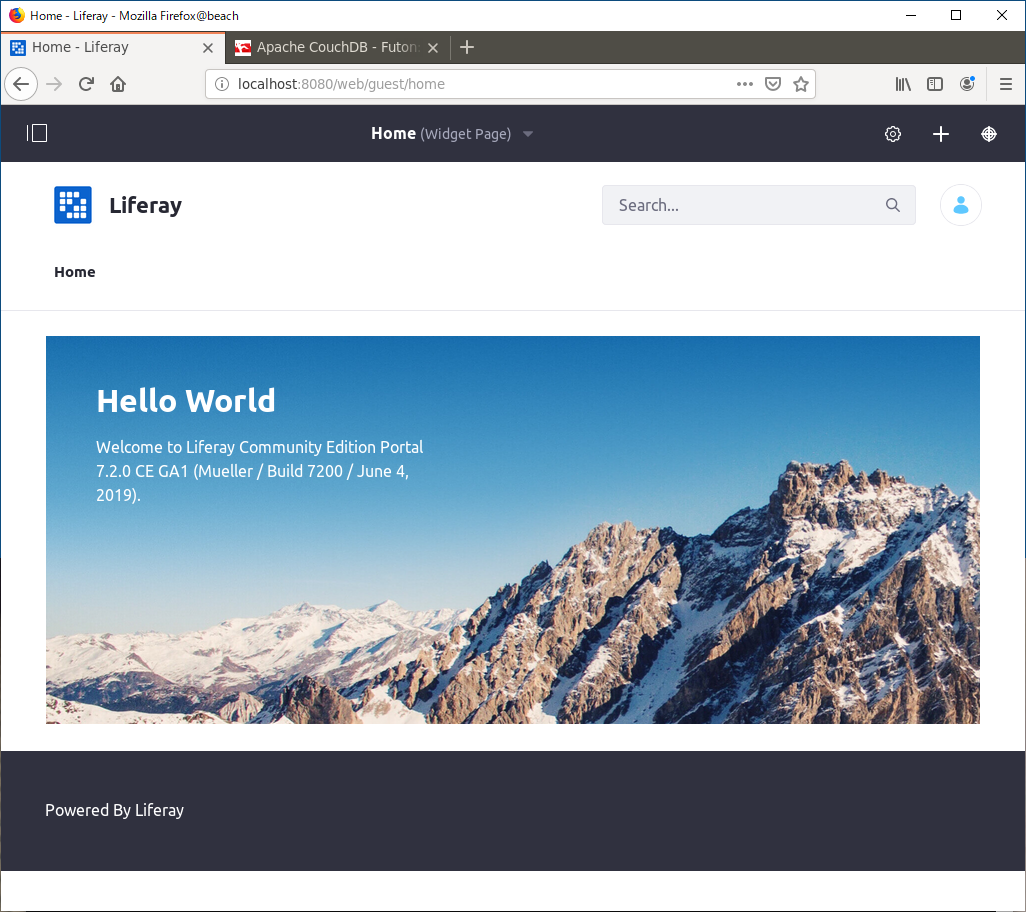
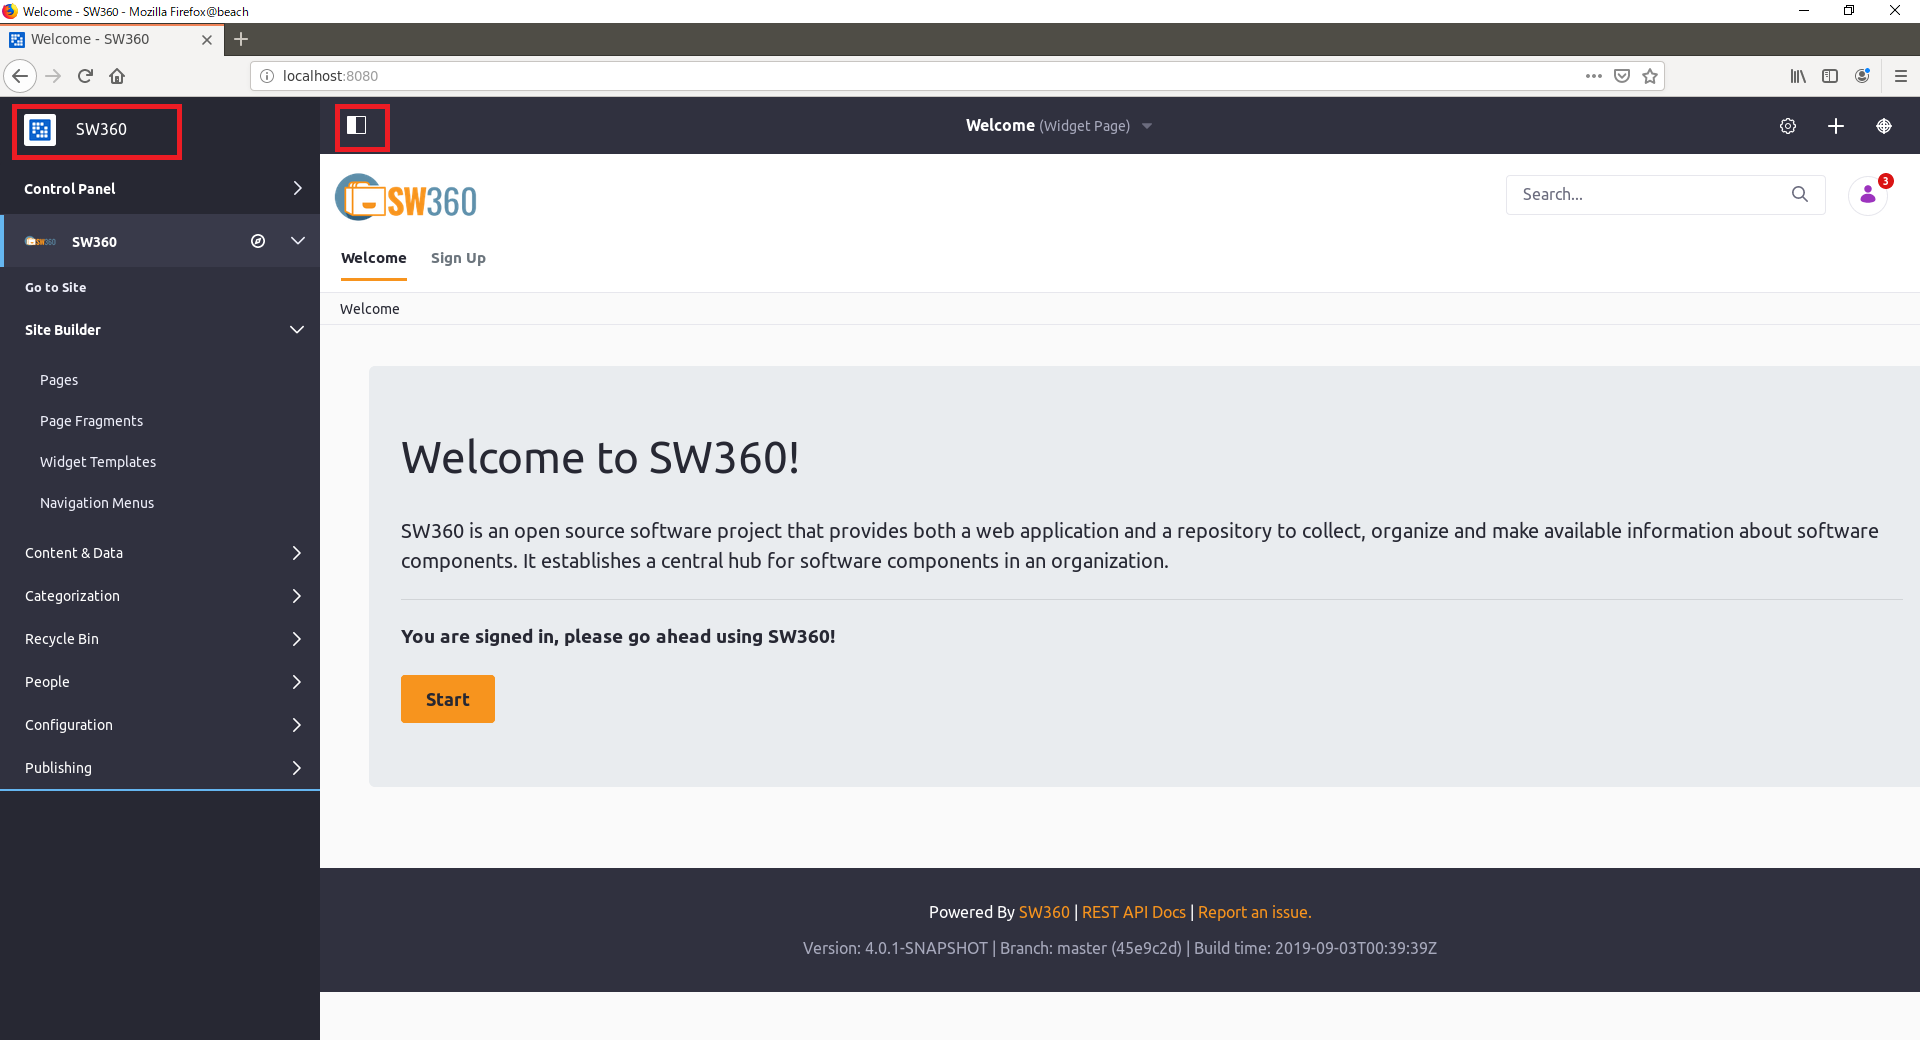
左上の SW360アイコンからSW360のWelcomeページを開くことができる.
インストールはここで完了である.引き続き,初期ユーザ設定を行う.なお,この設定を行わないとSW360が使えない.
SW360初期ユーザ設定
(注) 旧バージョンのようにGUI上でユーザ設定する方法は確認中.ここではCSVファイルをインポートする方法で登録を行う.
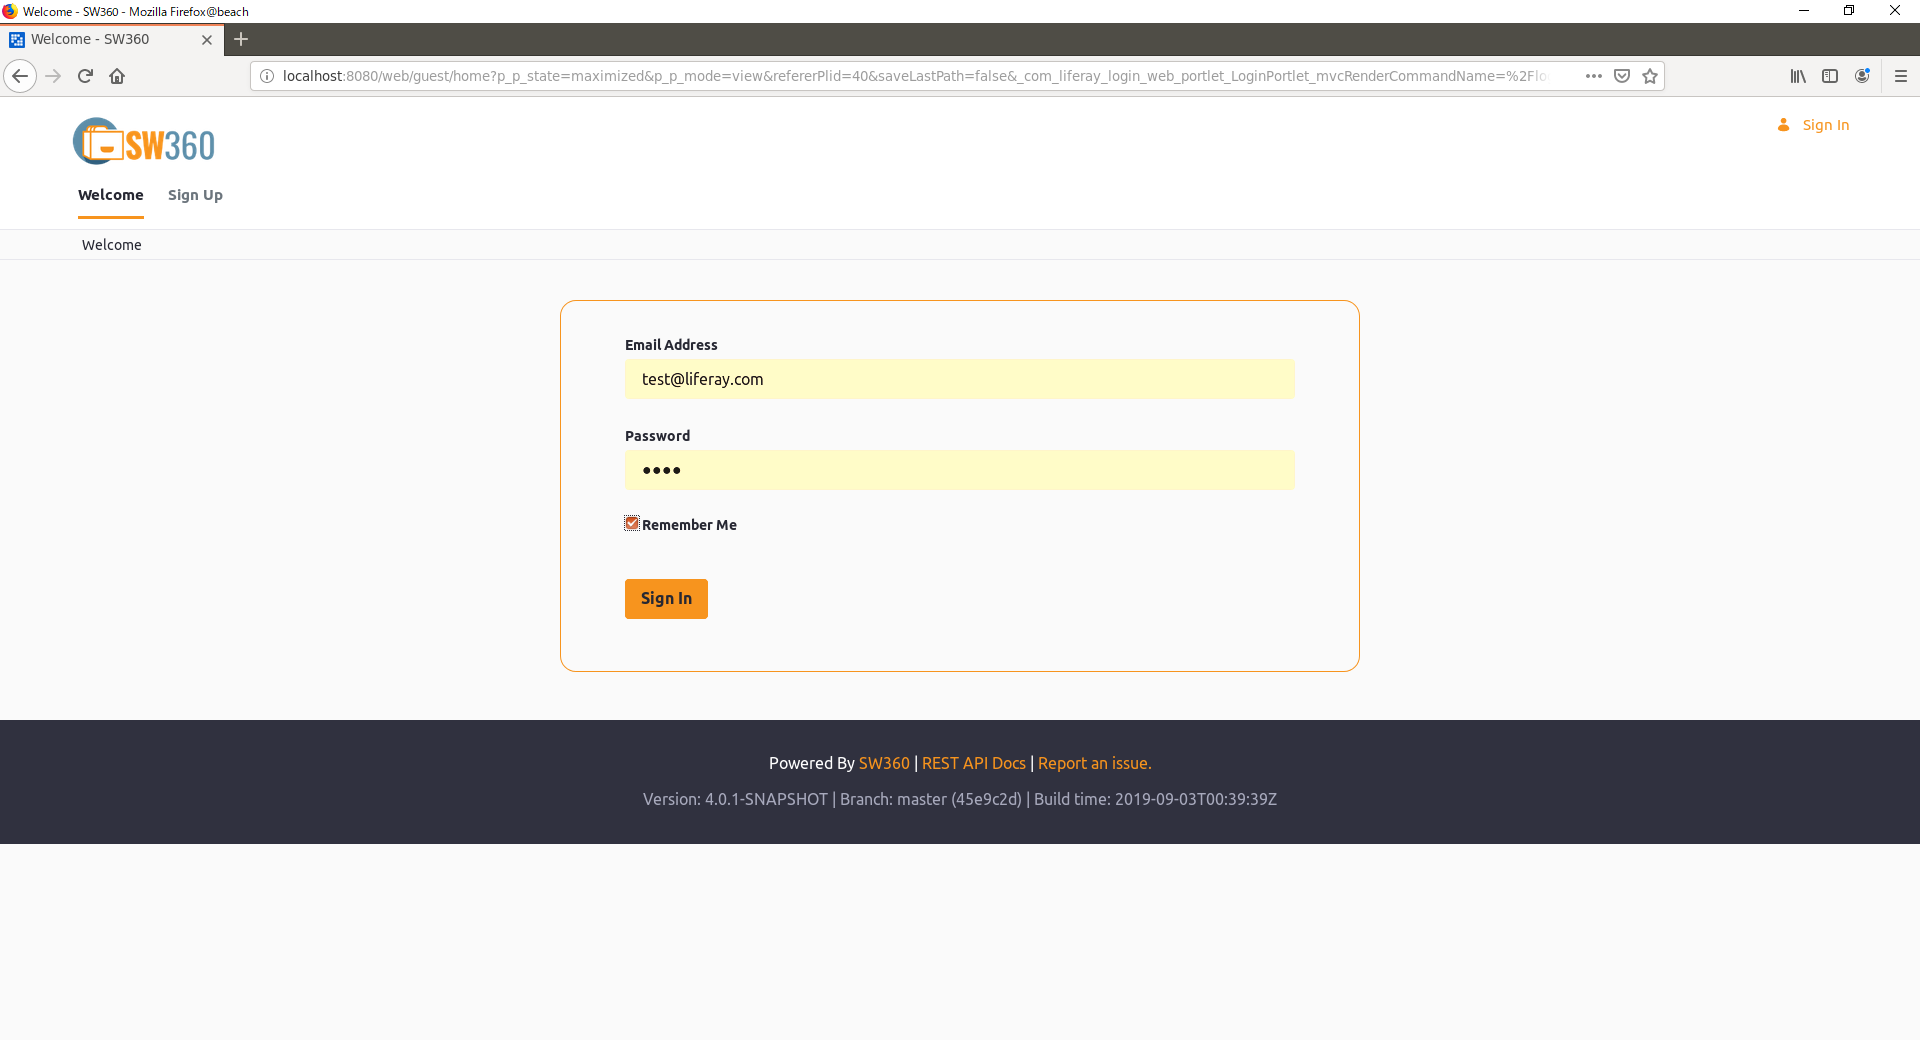
まずは,最初にliferayで作ったアカウントで[Sing in]する.
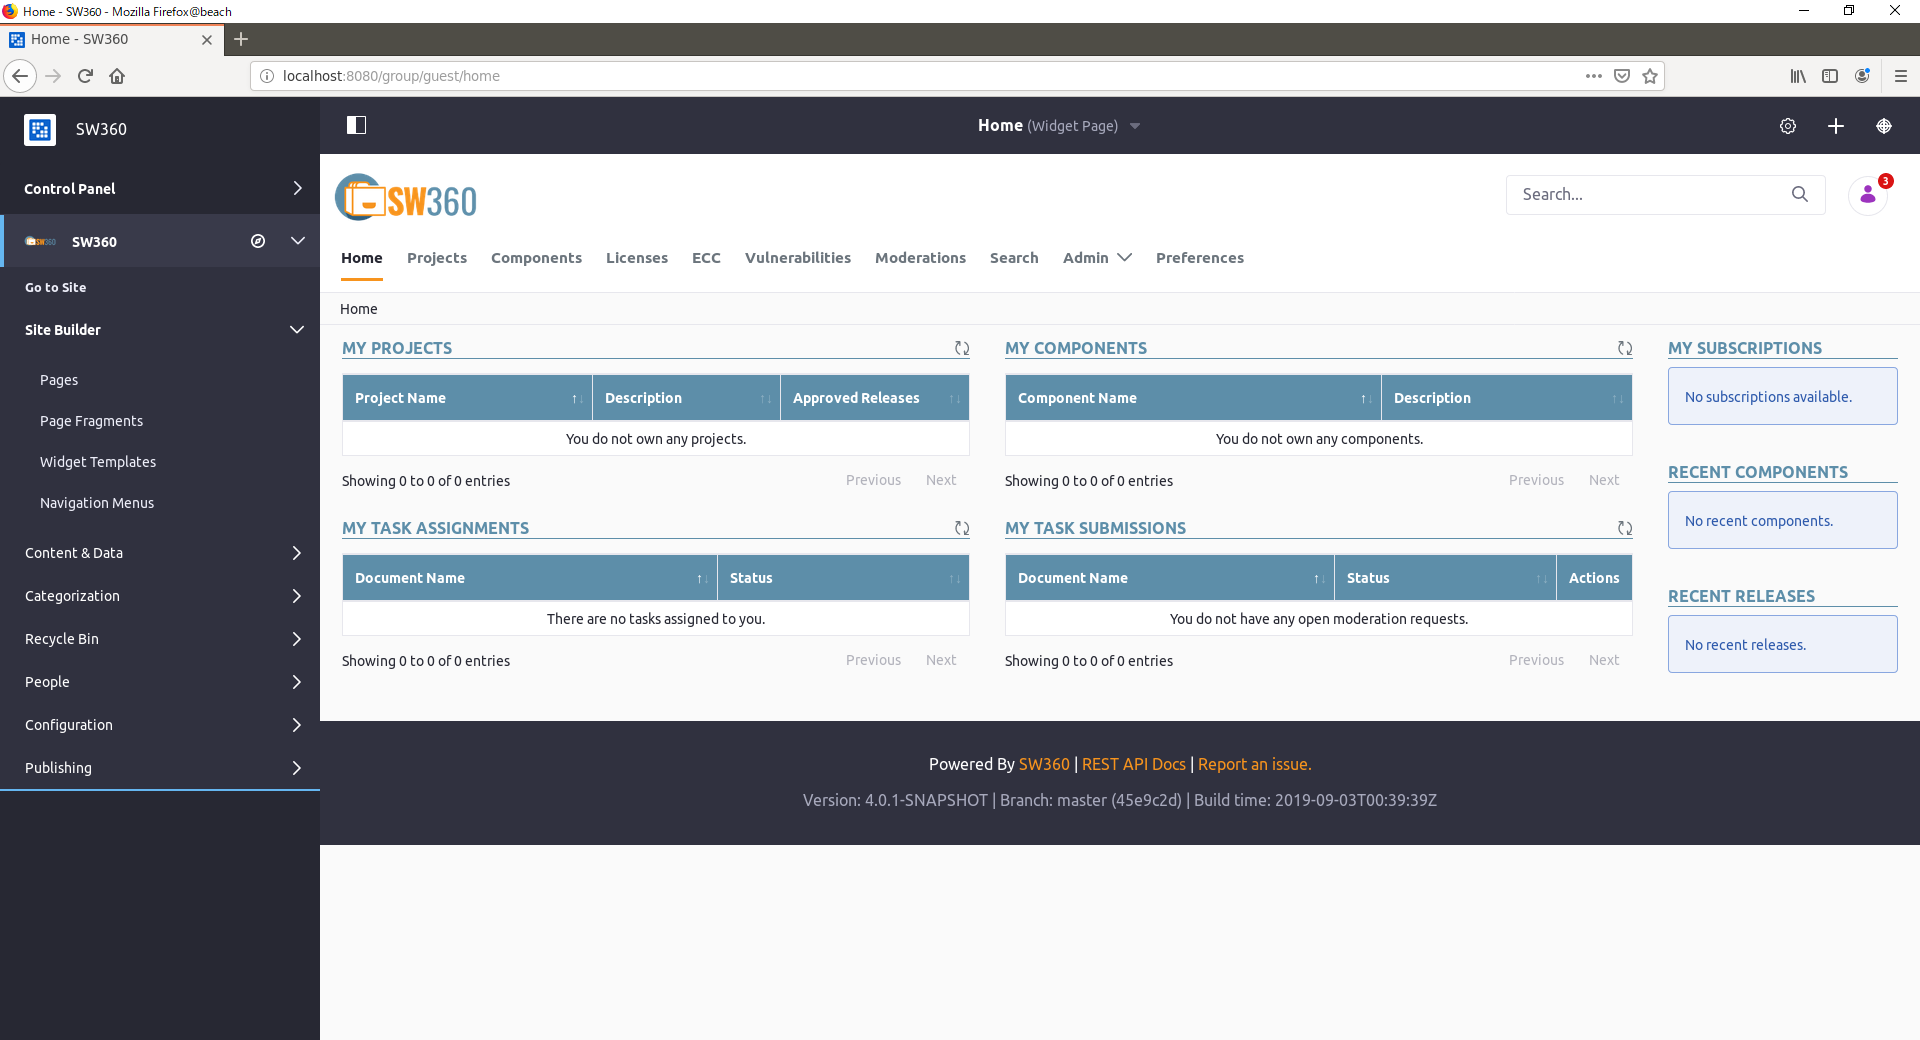
[Sing In] すると,以下の画面が開く
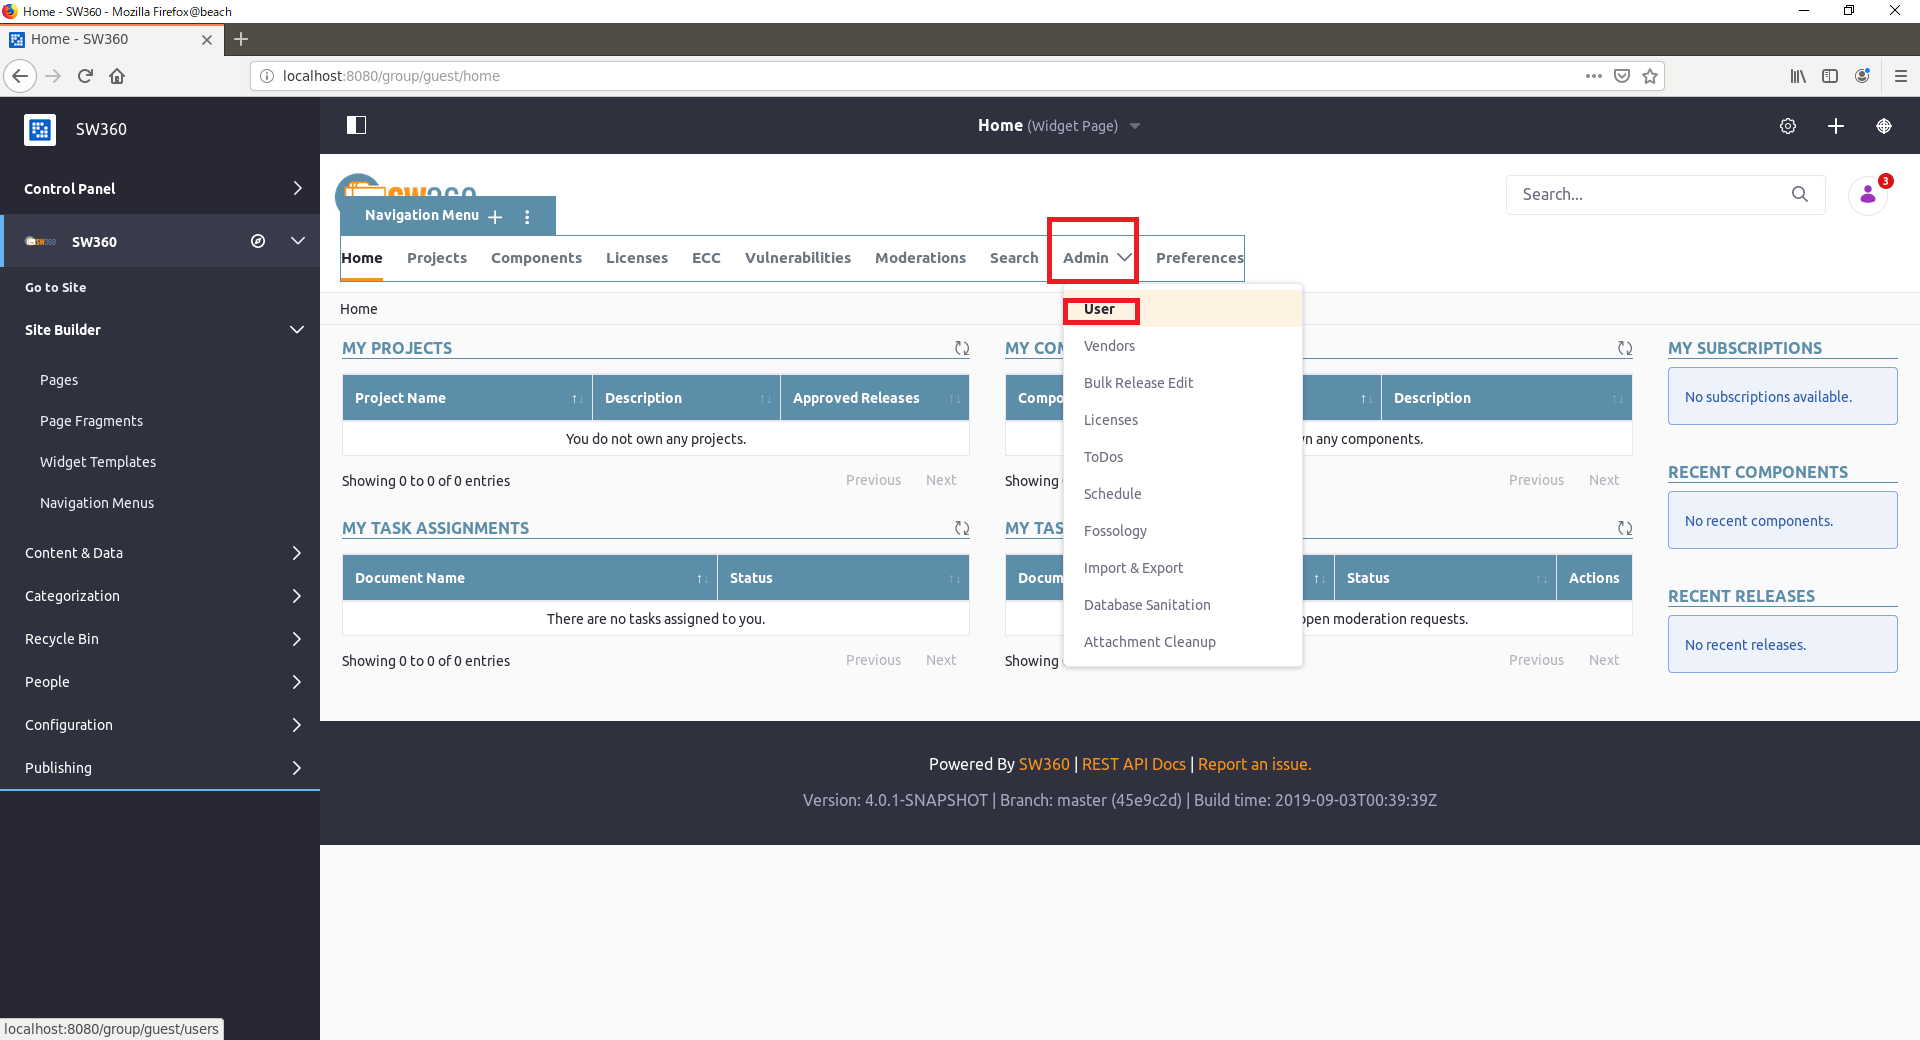
[Admin] -> [User] と移動する.
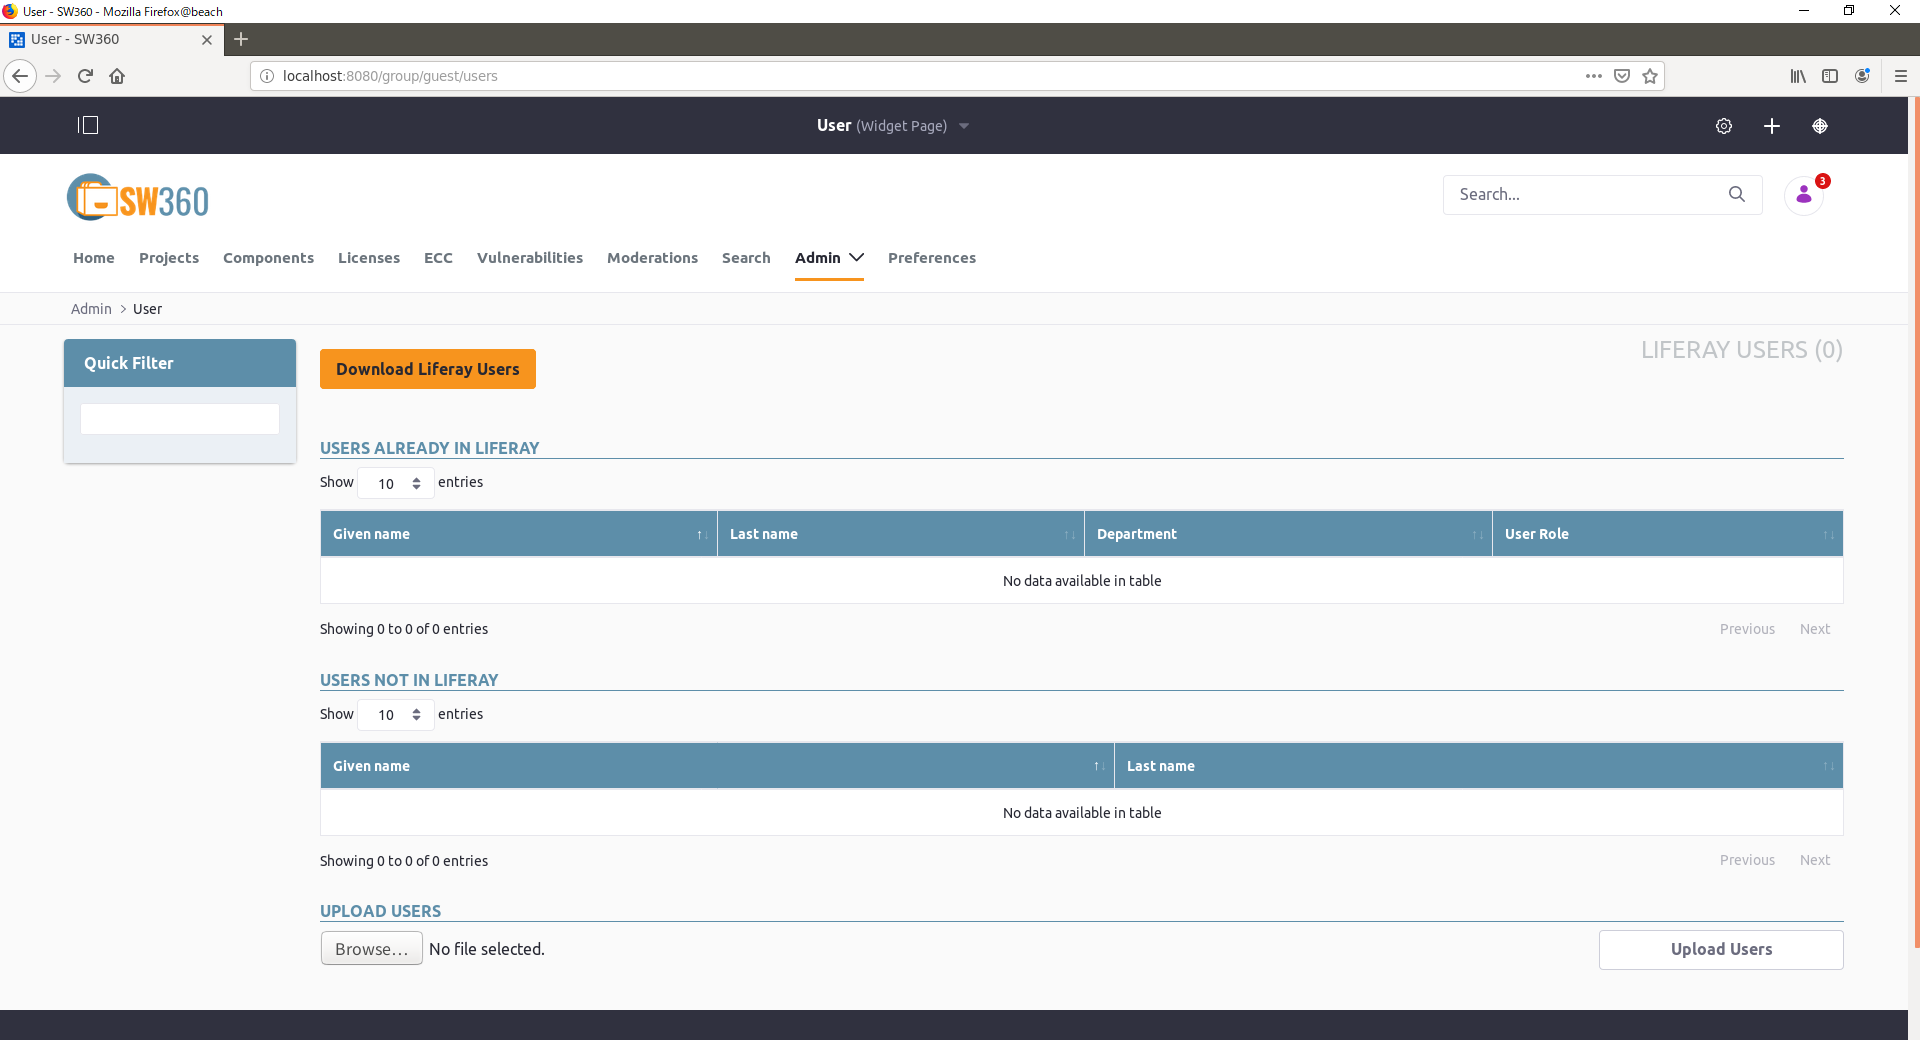
すると以下の画面が開く
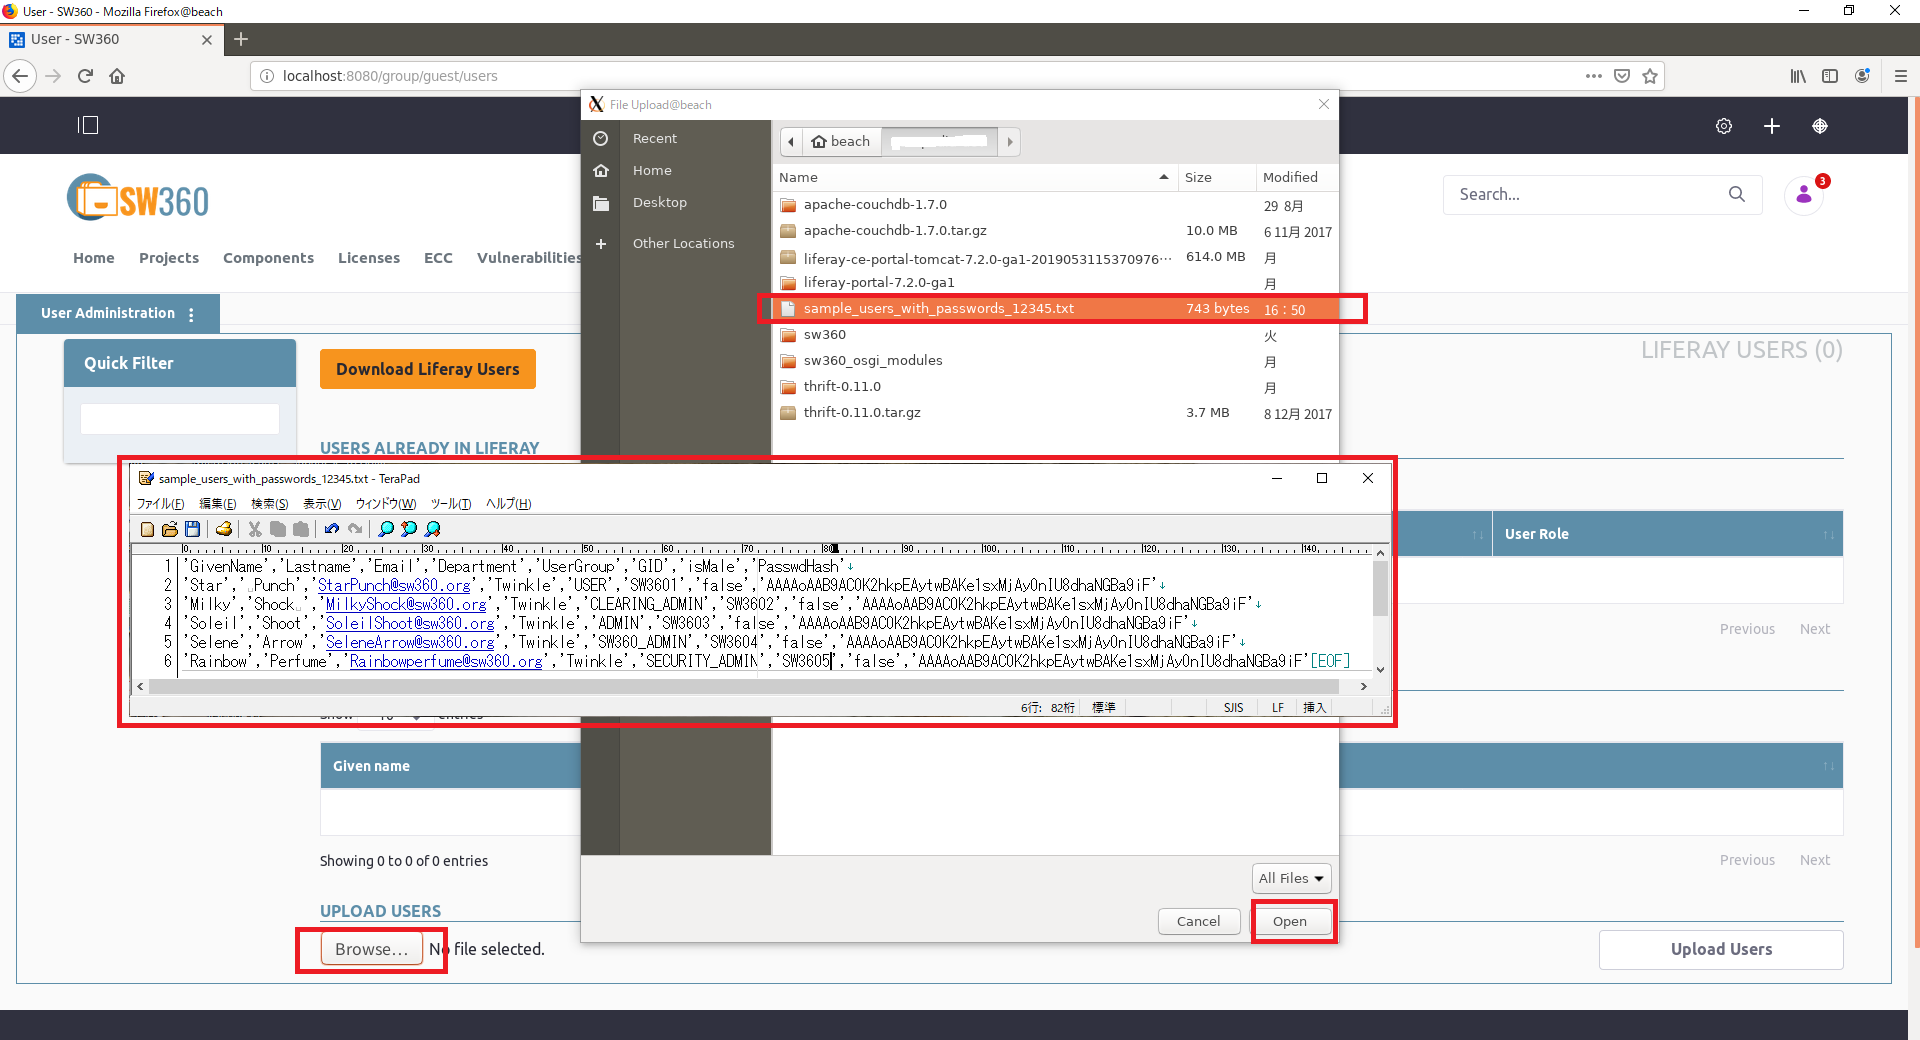
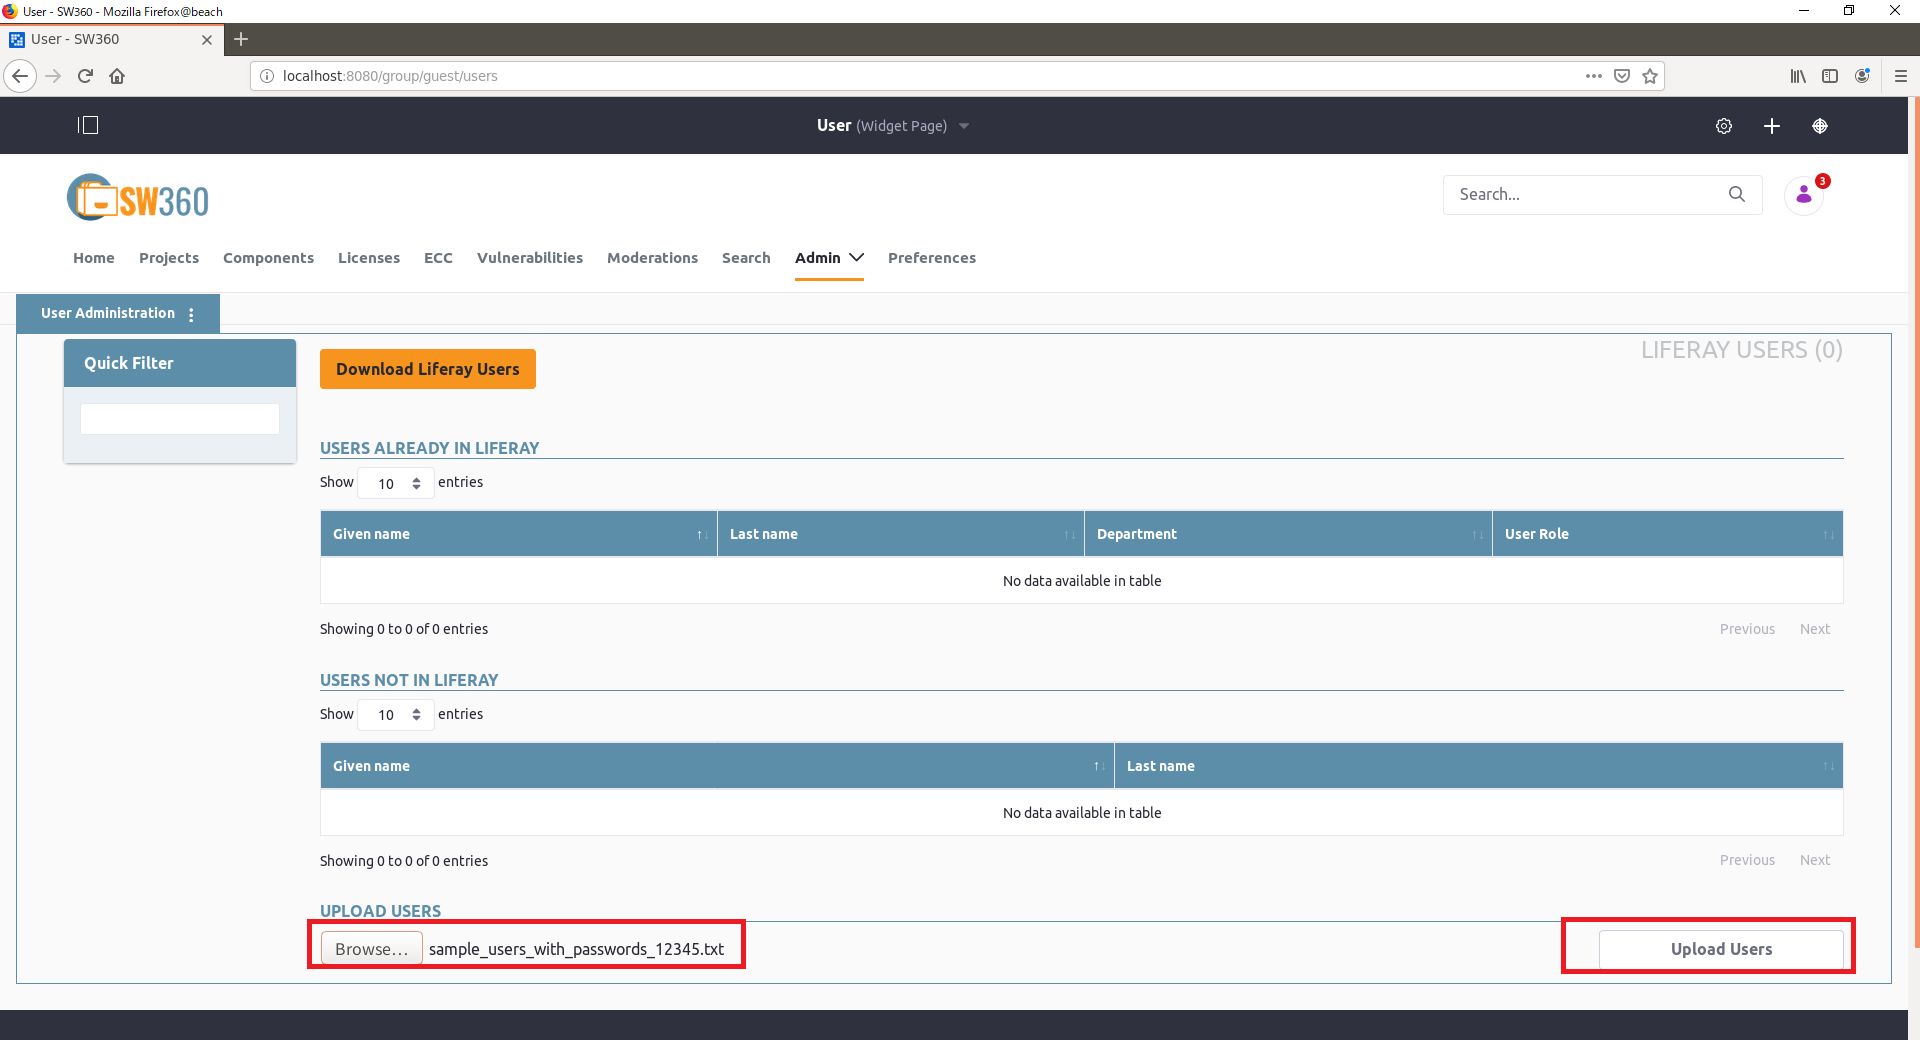
次に以下のようなユーザ情報が記載されたcsvファイルを用意する.(パスワードを含め情報は後で変更可能)
仮に以下をそのままコピーすればパスは12345となる.
'GivenName','Lastname','Email','Department','UserGroup','GID','isMale','PasswdHash'
'Test','User','user@sw360.org','DEPARTMENT','USER','SW3601','false','AAAAoAAB9AC0K2hkpEAytwBAKe1sxMjAy0nIU8dhaNGBa9iF'
'Test','Clearing','clearing_admin@sw360.org','DEPARTMENT','CLEARING_ADMIN','SW3604','true','AAAAoAAB9AC0K2hkpEAytwBAKe1sxMjAy0nIU8dhaNGBa9iF'
'Test','Admin','admin@sw360.org','DEPARTMENT','ADMIN','SW3607','false','AAAAoAAB9AC0K2hkpEAytwBAKe1sxMjAy0nIU8dhaNGBa9iF'
'Test','SW360 Admin','sw360_admin@sw360.org','DEPARTMENT','SW360_ADMIN','SW3610','false','AAAAoAAB9AC0K2hkpEAytwBAKe1sxMjAy0nIU8dhaNGBa9iF'
'Test','Security','security_admin@sw360.org','DEPARTMENT','SECURITY_ADMIN','SW3613','false','AAAAoAAB9AC0K2hkpEAytwBAKe1sxMjAy0nIU8dhaNGBa9iF'
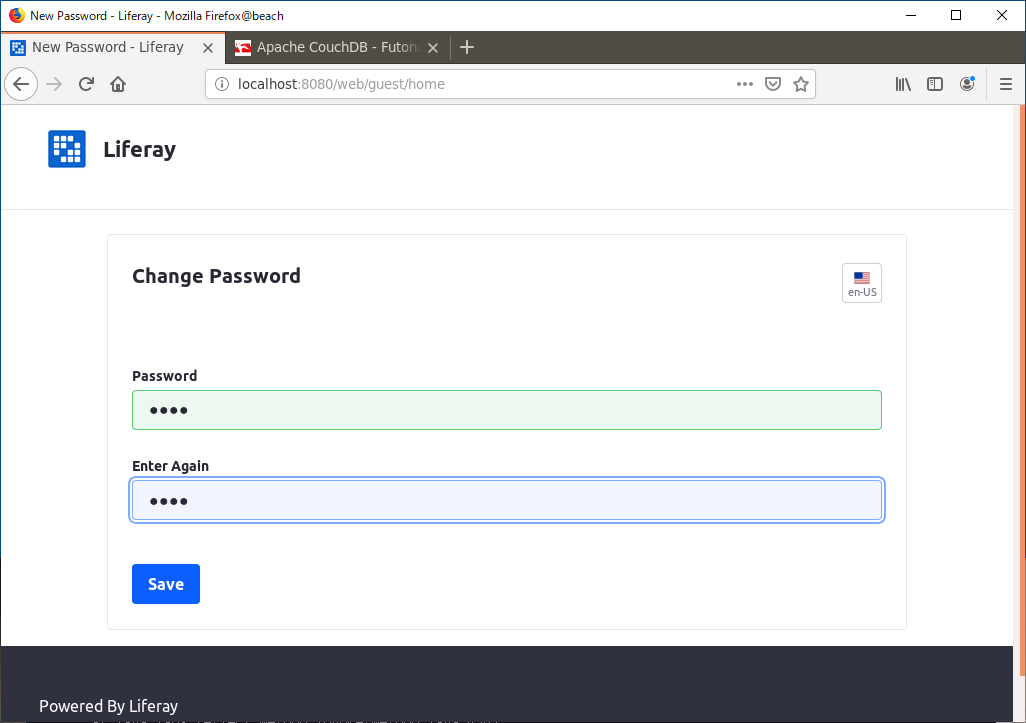
そして,今ログインしているAdminをサインアウトし,CSVで入れたAdminユーザでサインインする.(Example_SW360_user_password_12345.csv 利用の場合は Mail: admin@sw360.org,Password:12345)
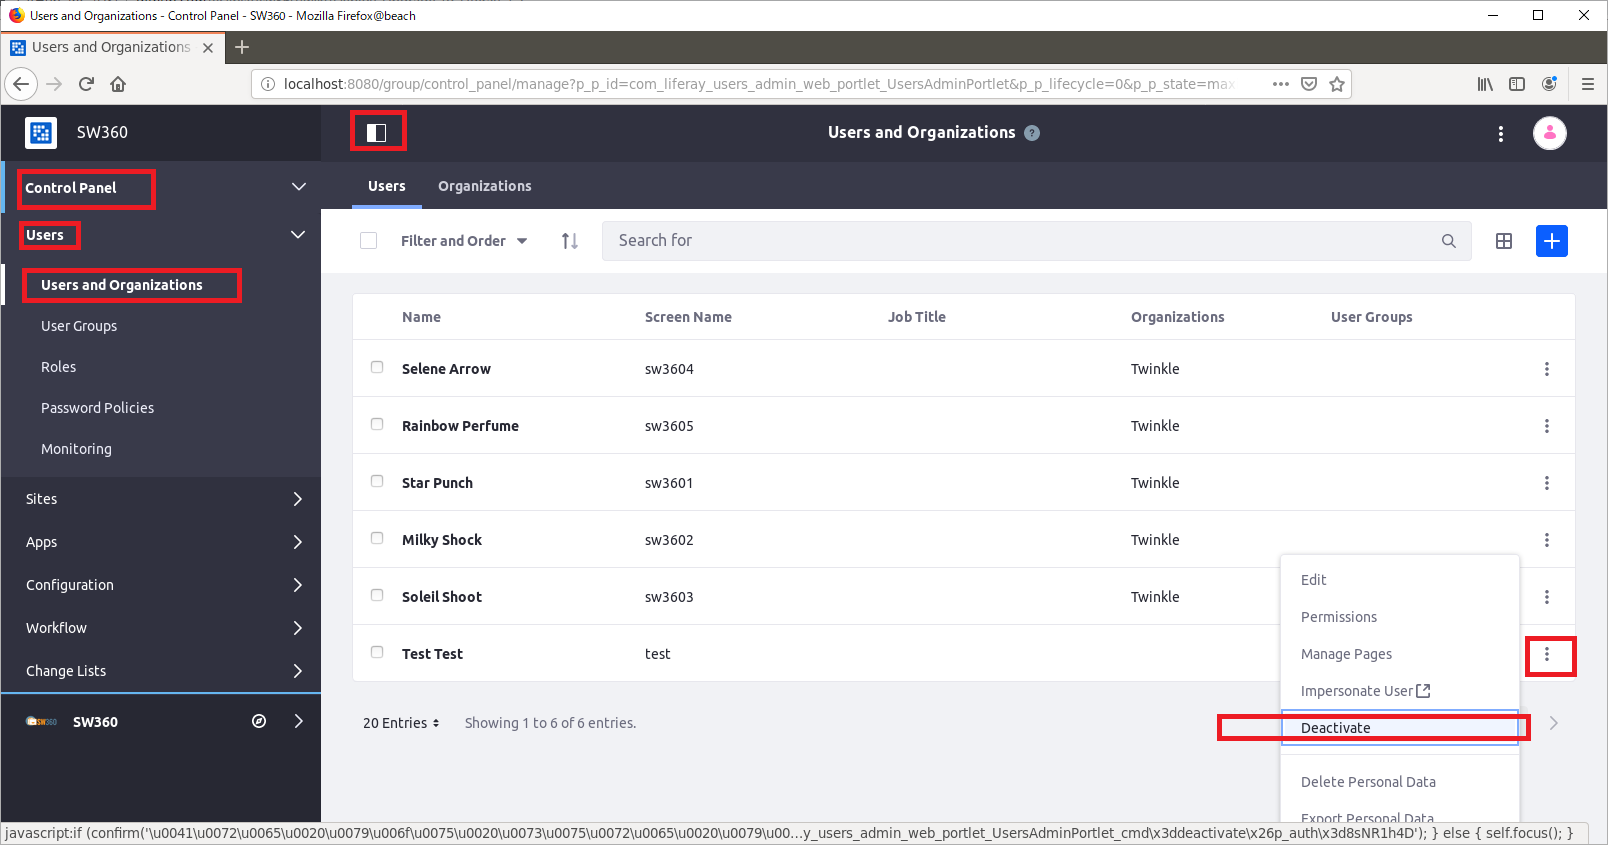
[Control Panel] -> [Users] -> [Users and Organizations]と移動し,
最初に使っていたAdmin User を Deactive(無効化)する.
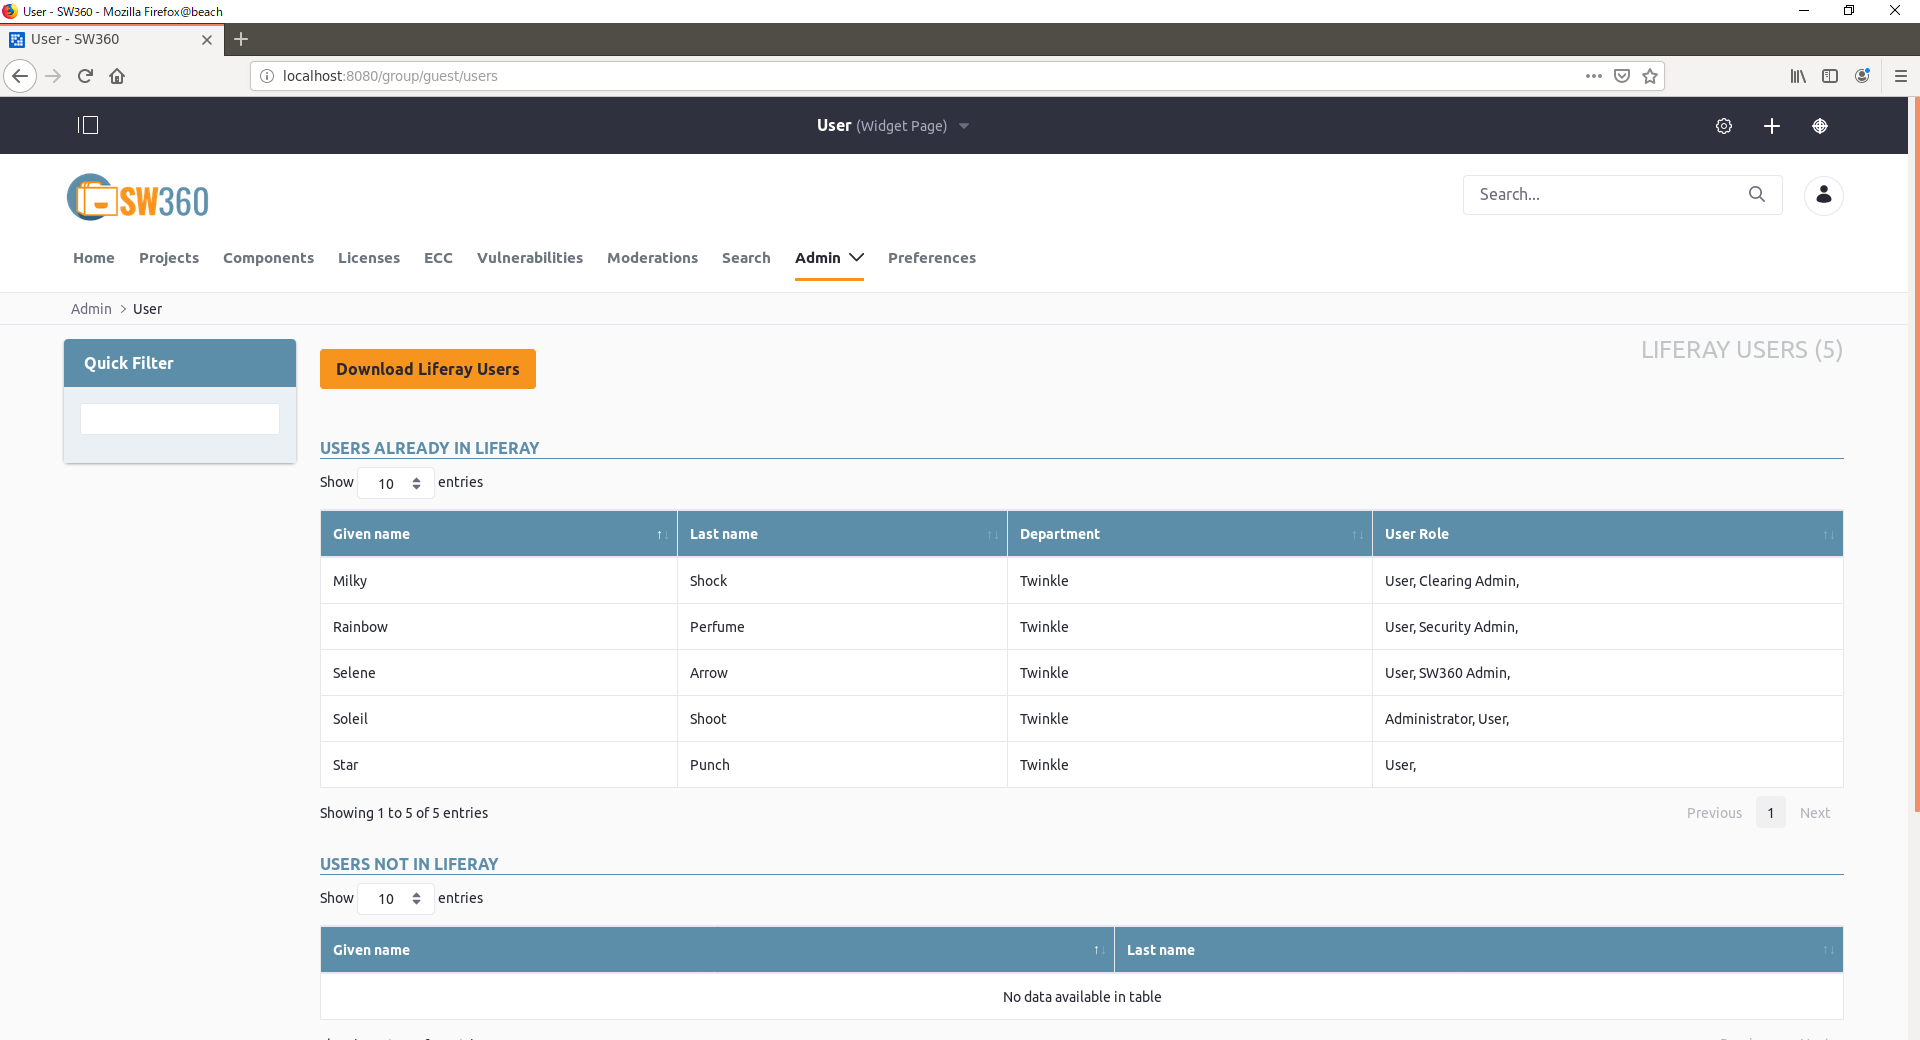
CSVにあったユーザでログインすると,ログインができて
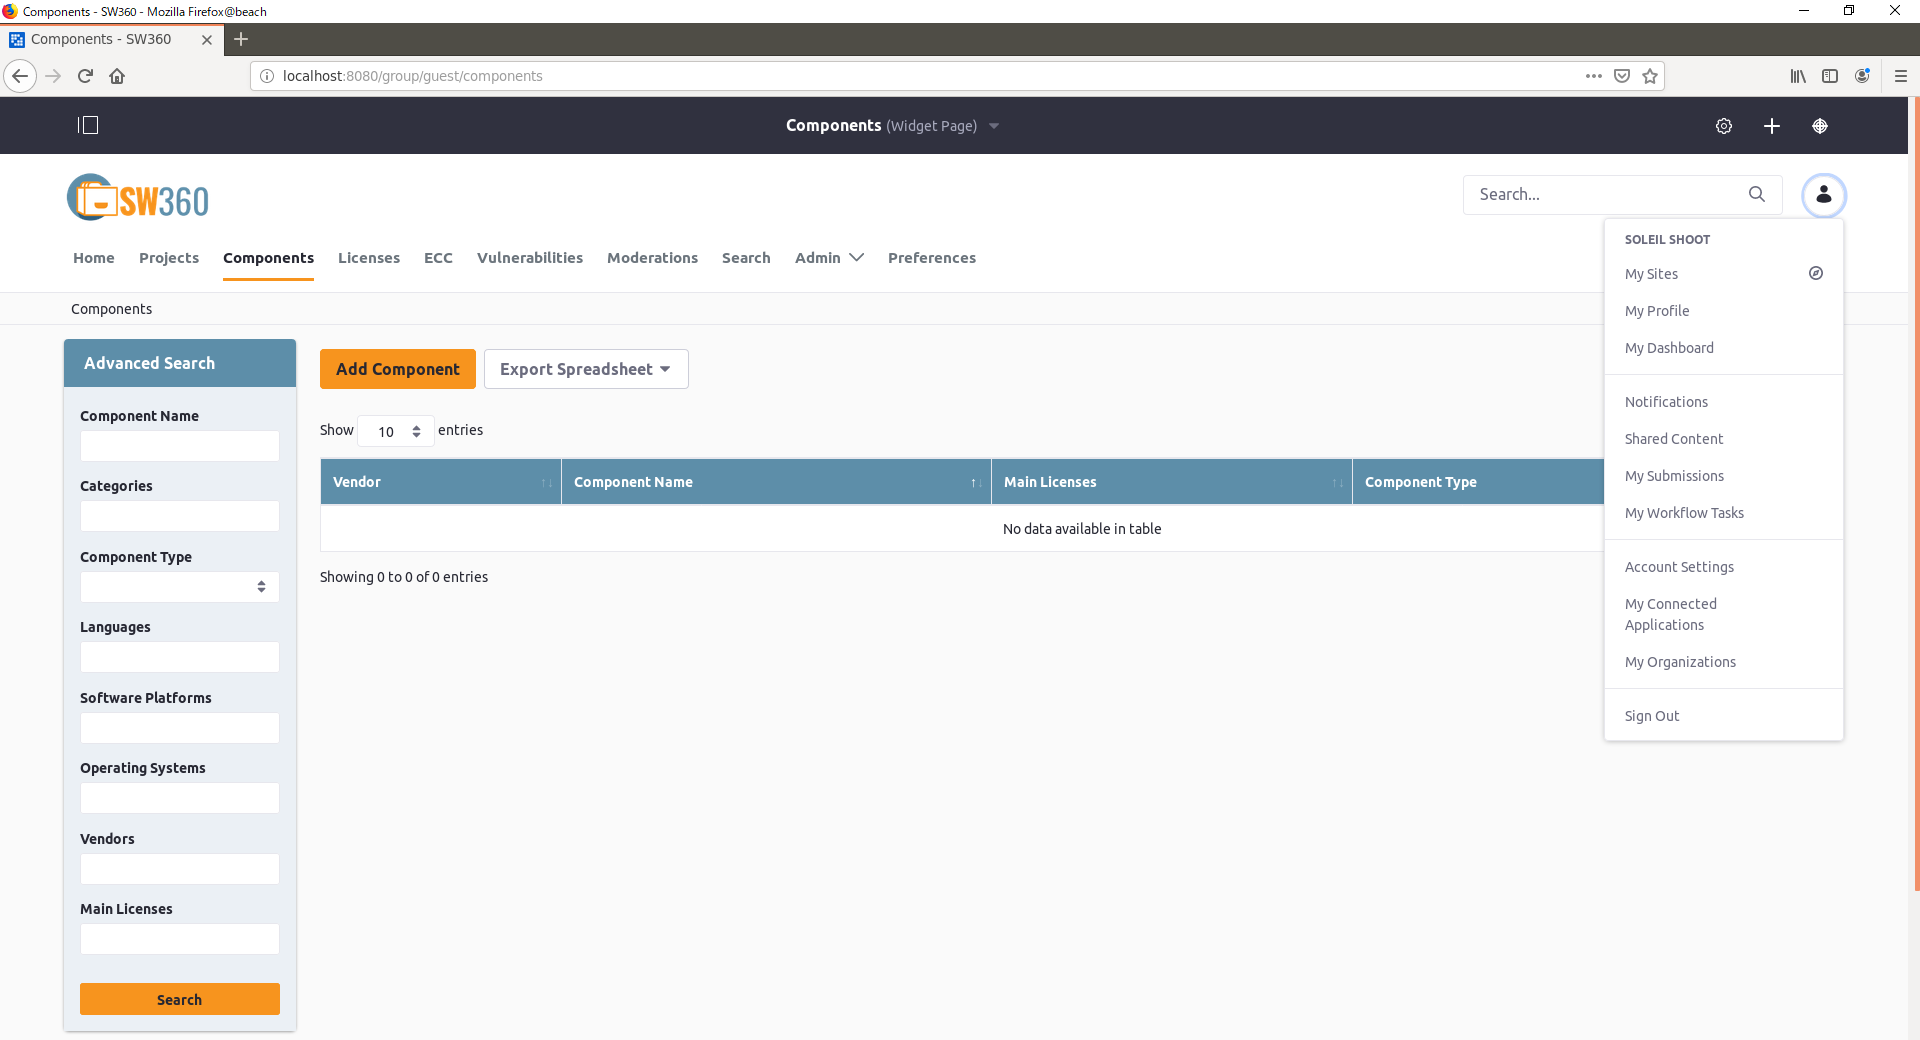
Component登録などが可能となり,すべて完了となる.
なお,初期設定ではユーザのRoleが正しく設定できない問題が確認されている.Roleに関して正しく設定するには,手動での設定が必要.
(参考) https://github.com/eclipse/sw360/issues/658
さいごに
この記事のフィードバックやコメント等はいつでもお待ちしております。気軽にお申し付けください。
